Typescriptでdiscord.js(v14)を使ってtodo-botを作るまで
はじめに
動機
- とりあえず何か作りたい
- 就活・研究・バイト…やることが多い、忘れる
- 就活のポートフォリオがほしい
- typescriptの勉強がしたい
といった理由から表題の制作を開始することに。
ただdiscord.js(v13)でpingコマンドを作ったことがあるくらいで、typescriptについてはほんとに未経験なので、いろいろ調べつつ、頼れる友人の教えに頼りつつ作ります。いい加減なことを書いていたら指摘してください。
環境構築
将来的には何らかのサービス上で常時稼働させたいが、一旦はローカルで動くようにしていく。
さしあたって、
- WSL2 (ubuntu 22.04)
- node.js v20.16.0
- discord.js v14
- dotenv v16.4.5
- mysql2 v3.11.0
- MySQL Ver 8.0.37
で行う。
node.js
node.jsのワークスペース作成は
を参考にした。
プロジェクトを作りたいディレクトリに移動し、
npm init
npm install discord.js
npm install typescript
npm install @types/node
npm install ts-node --save-dev
npx tsc --init
加えて、
npm install dotenv
npm install mysql2
も行っておく。
環境設定
ソースコードを置く場所
srcディレクトリを作成し、ここに配置する。srcディレクトリはpackage.jsonなどと同じ階層に置いている。
この中にindex.tsやcommands/utility/ping.tsなどを配置していく。また、型に関する追加ファイルを作成するときはsrc/@types/以下に加えていく。後述するclient.d.tsやenv.d.tsなどである。
.env
先ほどの記事ではconfig.jsonにトークンなどを記述していたが、環境変数は.envに入れたい。
まず、プロジェクトの一番上の階層に.envという名前でファイルを作成し、その中に以下のようにトークンを記述する。当然このファイルはgit等では無視するように設定し、流出させてはならない。
DISCCORD_BOT_TOKEN=<YOUR_TOKEN>
CLIENT_ID=<YOUR_ID>
GUILD_ID=<YOUR_ID>
また、typescriptにおいては、dotenvおよび.envを使う際には、環境変数の型を記述しておく必要があるらしい。このあたりの理解はまだあいまいなので間違っているかもしれないが、現状少なくともエラーは出ていない。
前述のsrc/@types/にenv.d.tsを作成し、中に以下の記述をすると、エラーが出なくなる。
declare module 'process' {
    global {
      namespace NodeJS {
        interface ProcessEnv {
          DISCORD_BOT_TOKEN: string;
          CLIENT_ID: string;
          GUILD_ID: string;
        }
      }
    }
  }
package.json
scriptsの項目にコマンドを追加し、楽に実行できるようにする。
"scripts": {
    "test": "echo \"Error: no test specified\" && exit 1",
    "compile": "tsc -p .",
    "start": "node build/index.js",
    "deploy": "npm run compile && node build/deploy-commands.js",
    "all": "npm run compile && npm run deploy && npm run start"
  },
tsconfig.json
コメントアウトされている中から ourDirという項目を探し、
"outDir": "./build",
に書き換える。コンパイルしたあとのjsファイルがここに入るようになる。
index.ts
ここからは実際にコードを書いてbotを作成していく。なお、時系列に沿って失敗談なども書いていくため、最善の立ち回りではないことに注意。
import
主に、ファイルパス関連、discord.js、dotenvである。
import * as fs from "node:fs";
import * as path from "node:path";
import {
	ActivityType,
    Client,
    Collection,
    Events,
    GatewayIntentBits,
} from "discord.js";
import type { CommandInteraction } from "discord.js";
import "dotenv/config";
クライアント作成
まずクライアントを作成する。clientのコンストラクタにはintentsを指定する必要がある。intentsとは、discord botに関する情報にアクセスする権限みたいなものだと解釈している。
さしあたり、以下の4つ程度あればいいだろう。必要に応じて増やせばよい。
const client: Client = new Client({intents: [
    GatewayIntentBits.Guilds,
    GatewayIntentBits.GuildMembers,
    GatewayIntentBits.GuildMessages,
    GatewayIntentBits.MessageContent,
]});
また、後述するが、typescriptでdiscord.jsを使う上で、Client型にcommandsというプロパティを追加するために型の拡張をしている。(client.d.ts)
初期化
Events.ClientReady (クライアントの準備が整った)のとき一度だけ実行される。botの動作に深いかかわりはないが、ログインが成功したことを知らせてくれる。
// clientがreadyのときに一度だけ実行
client.once(Events.ClientReady, c =>{
    console.log(`Ready! Logged in as ${c.user.tag}`);
});
また、ログイン部分は次のように書く。コードの一番下に書いているが、ほかの場所でもいいかもしれない。
dotenvを用いて環境変数のトークンを参照する。
client.login(process.env.DISCORD_BOT_TOKEN);
余談だが、botのアクティビティは次のようにして設定できる。
client.on("ready", ()=>{
	console.log("ready...");
	client.user?.setActivity("my life", { type: ActivityType.Playing });
})
スラッシュコマンド
を参考にスラッシュコマンドを作成する。なお、このガイドはたま~にtypescriptへの言及があるものの基本的にjavascriptで書かれているので、コピペしても型関連のエラーで動かないことが多い。適宜コピペして、typescript用に書き換えていくのがいいだろう。
必要なものは、
- コマンド本体のファイル
- 全コマンドをデプロイするファイル
- index.ts内に書く、コマンドが使われたときの処理
である。
コマンド本体
ここでは例として/pingというコマンドを作成する。
src/commands/utility/ping.tsを作成する。
その中に次のように記述する。
import { SlashCommandBuilder } from "discord.js";
import type { CommandInteraction } from "discord.js";

export const data = new SlashCommandBuilder()
    .setName("ping")
    .setDescription("Replies with Pong!")

export async function execute(interaction: CommandInteraction){
    await interaction.reply({content:"Pong!", ephemeral:true});
}
順に説明する。
インポート部分は、見てのとおり、コマンド作成のためのクラスや型をインポートしている。
今更だが、基本的にはrequireではなくimportを使う。javascriptではrequireで書かれているため、コピペしたときは適宜書き換えるべき。
このコードでは、dataとexecuteの二つをexportしている。どうやらこの二つがexportされているファイルをスラッシュコマンドのファイルだと認識してくれるようだ。
dataについては、nameとdescriptionが設定されているが、これ以外にもサブコマンドなど様々なものを設定できる。詳しくはドキュメントやほかの方の記事を参照。
executeはコマンドが実行されたときに呼ばれる関数である。CommandInteraction型のinteractionを引数にとる。interactionは、コマンドを使ったユーザーやサーバーに関する様々な情報が入っているものだと解釈している。
ここではpong!とリプライをしているが、リプライ以外にも、modalという入力フォームを起動したり、様々なことができるようだ。また、ephemeralというフィールドをtrueにすると、コマンドを使用したユーザーにしかリプライが見えなくなる。
deploy-commands.ts
基本的には公式のコピペだが、typescript用に一部修正している。
import { REST, Routes } from 'discord.js';
import "dotenv/config";
import * as fs from "node:fs";
import * as path from "node:path";


const commands: string[] = [];
// Grab all the command folders from the commands directory you created earlier
const foldersPath = path.join(__dirname, 'commands');
const commandFolders = fs.readdirSync(foldersPath);

for (const folder of commandFolders) {
	// Grab all the command files from the commands directory you created earlier
	const commandsPath = path.join(foldersPath, folder);
	const commandFiles = fs.readdirSync(commandsPath).filter((file) => file.endsWith('.js'));
	// Grab the SlashCommandBuilder#toJSON() output of each command's data for deployment
	for (const file of commandFiles) {
		const filePath = path.join(commandsPath, file);
		const command = require(filePath);
		if ('data' in command && 'execute' in command) {
			commands.push(command.data.toJSON());
		} else {
			console.log(`[WARNING] The command at ${filePath} is missing a required "data" or "execute" property.`);
		}
	}
}

// Construct and prepare an instance of the REST module
const rest = new REST().setToken(process.env.DISCORD_BOT_TOKEN);

// and deploy your commands!
(async () => {
	try {
		console.log(`Started refreshing ${commands.length} application (/) commands.`);

		// The put method is used to fully refresh all commands in the guild with the current set
		const data = await rest.put(
			Routes.applicationGuildCommands(process.env.CLIENT_ID, process.env.GUILD_ID),
			{ body: commands },
		);

		console.log(`Successfully reloaded ${commands.length} application (/) commands.`);
	} catch (error) {
		// And of course, make sure you catch and log any errors!
		console.error(error);
	}
})();
require -> import
いつも通り書き換える。
環境変数
typescript const { clientId, guildId, token } = require('./config.json');
config.jsonではなく.envを使うように書き換える。
インポートのところを
import "dotenv/config";
にして、環境変数を使うところを
process.env.DISCORD_BOT_TOKEN
のように書き換える。
commandsに型を
typescript const commands = [];
commandsに型を与える。
const commands: string[] = [];
dataをcommandsに
``typescript console.log(Successfully reloaded ${data.length} application (/) commands.);```
dataに型が設定されておらずlengthプロパティがないというエラーが出た。dataではなくcommandsにすれば解決する。
使い方
npm run deploy
とすれば、package.jsonで記述したようなコマンドが実行され、うまくいけばコンソールに「~個のコマンドが登録された」という旨の出力が来る。
続き。
index.tsにおけるコマンド処理
一口にコマンド処理と言っても、やることは二つある。
- 実行時に一度だけ実行される、クライアントへのコマンドの登録処理
- コマンドが実行されたときに呼ばれる、executeを呼びだす処理
コマンド登録
公式のチュートリアルでは、まずこのように書かれている。
client.commands = new Collection();
初期状態のclientにはcommandsというプロパティがないが、javascriptではこのように書くだけで新しいプロパティを作成できるらしい。羨ましいね
一方typescriptでは、型というものに厳しいので(それが良いところでもある)、Clientの型を拡張してやる必要がある。typescriptでは、型定義ファイル(.d.ts)を作成することで、新しい型を定義したり、同名の型にプロパティを追加して拡張したりすることができるらしい。本プロジェクトではそれをsrc/@typesに配置する。
というわけで、client.d.tsを作成し、以下のように記述する。
import { Client } from "discord.js";
import type { Collection } from "discord.js";

declare module "discord.js" {
    interface Client {
        commands: Collection<
            string,
            (interaction : CommandInteraction) => Promise<void>
        >;
    }
}
これにより、clientにcommandsというプロパティが追加される。commandsとは、全コマンドの情報を持つもので、コマンド本体のファイルで記述したdataとexecuteを保存できる。
このように書くことで、index.tsにおいて次のように書ける。
client.commands = new Collection<
	string,
	(interaction: CommandInteraction) => Promise<void>
>();
これで、clientに空のcommandsを追加できた。
次に、コマンドをcommandsに登録する。
公式からのコピペを一部改変したものが以下のものである。
const foldersPath = path.join(__dirname, 'commands');
const commandFolders = fs.readdirSync(foldersPath);

for(const folder of commandFolders){ // folders に関するループ
	const commandPath = path.join(foldersPath, folder);
	const commandFiles = fs.readdirSync(commandPath).filter(file => file.endsWith(".js"));
	for(const file of commandFiles){ // files に関するループ
		const filePath = path.join(commandPath, file);
		(async () => {
			const command = await import(filePath);

			// Set a new item in the Collection with the key as the command name and the value as the exported module
			// 取ってきたファイルからdataとexecuteがエクスポートされていればコレクションに追加
			if("data" in command && "execute" in command){
				client.commands.set(command.data.name, command.execute);
			}else{
				console.log(`[WARNING] The command at ${filePath} is missing a required "data" or "execute" property.`);
			}
		})();
	}
}
client.commands.set(command.data.name, command.execute);の部分で、公式ガイドでは第二引数がcommandになっているが、公式ガイドと違ってdataとexecuteを個別にエクスポートしているので、このように書く。
コマンドを実行
client.onで、Events.InteractionCreateが発火したときに実行される処理を書いていく。
基本的な処理の流れは、
- コマンド以外のイベントの時は無視
- commandsに登録されていないコマンドならエラーを返す
- コマンドを実行する(失敗したら例外処理)
という流れ。
client.on(Events.InteractionCreate, async (interaction) => {
	if (!interaction.isChatInputCommand()) {
	  return;
	}

	const command = interaction.client.commands.get(interaction.commandName);

	if (!command) {
	  console.error(`No command matching ${interaction.commandName} was found.`);
	  return;
	}

	try {
	  await command(interaction);
	} catch (error) {
	  console.error(error);

	  if (interaction.replied || interaction.deferred) {
		await interaction.followUp({
		  content: "There was an error while executing this command!",
		  ephemeral: true,
		});
	  } else {
		await interaction.reply({
		  content: "There was an error while executing this command!",
		  ephemeral: true,
		});
	  }
	}
});
ここまで書けたら、index.tsはこのようになっているはず。
index.ts
import * as fs from "node:fs";
import * as path from "node:path";
import {
	ActivityType,
    Client,
    Collection,
    Events,
    GatewayIntentBits,
} from "discord.js";
import type { CommandInteraction } from "discord.js";
import "dotenv/config";


const client: Client = new Client({intents: [
    GatewayIntentBits.Guilds,
    GatewayIntentBits.GuildMembers,
    GatewayIntentBits.GuildMessages,
    GatewayIntentBits.MessageContent,
]});

// clientがreadyのときに一度だけ実行
client.once(Events.ClientReady, c =>{
    console.log(`Ready! Logged in as ${c.user.tag}`);
});


client.commands = new Collection<
	string,
	(interaction: CommandInteraction) => Promise<void>
>();

const foldersPath = path.join(__dirname, 'commands');
const commandFolders = fs.readdirSync(foldersPath);

for(const folder of commandFolders){ // folders に関するループ
	const commandPath = path.join(foldersPath, folder);
	const commandFiles = fs.readdirSync(commandPath).filter(file => file.endsWith(".js"));
	for(const file of commandFiles){ // files に関するループ
		const filePath = path.join(commandPath, file);
		(async () => {
			const command = await import(filePath);

			// Set a new item in the Collection with the key as the command name and the value as the exported module
			// 取ってきたファイルからdataとexecuteがエクスポートされていればコレクションに追加
			if("data" in command && "execute" in command){
				client.commands.set(command.data.name, command.execute);
			}else{
				console.log(`[WARNING] The command at ${filePath} is missing a required "data" or "execute" property.`);
			}
		})();
	}
}


client.on(Events.InteractionCreate, async (interaction) => {
	if (!interaction.isChatInputCommand()) {
	  return;
	}

	const command = interaction.client.commands.get(interaction.commandName);

	if (!command) {
	  console.error(`No command matching ${interaction.commandName} was found.`);
	  return;
	}

	try {
	  await command(interaction);
	} catch (error) {
	  console.error(error);

	  if (interaction.replied || interaction.deferred) {
		await interaction.followUp({
		  content: "There was an error while executing this command!",
		  ephemeral: true,
		});
	  } else {
		await interaction.reply({
		  content: "There was an error while executing this command!",
		  ephemeral: true,
		});
	  }
	}
});

client.on("ready", ()=>{
	console.log("ready...");
	client.user?.setActivity("my life", { type: ActivityType.Playing });
})

client.login(process.env.DISCORD_BOT_TOKEN);
さあ、pingだ
ここまでで、おそらく/pingを実行するための準備は整ったはず。(書き忘れがあったら申し訳ない。)
書いたプログラムをコンパイルする。
npm run compile
コマンドをデプロイする
npm run deploy
プログラムを実行する
npm run start
これで、標準出力に
ready...
や、ログインに成功した、という旨の表示が出れば成功。
botを招待したサーバー内で、
/ping
と実行すれば、
Pong!
と返ってくるはず。
ここまでで、基本的なBotのセットアップは終了。
ここからは、MySQLなどを利用して、todoをデータベースに登録したり、リマインドしたりする機能を実装してみたい。
MySQLのインストール、ユーザー、パスワード設定回り
詳細はあとで。
参考
表に必要な項目
- ユーザー名(仮に、text(20))
- イベント名(text(200))
- 締め切り(datetime)
あとは何が必要だろうか
- メンションするためにクライアントID?
- (将来的に)どのチャンネルで通知するかのチャンネルID
- カテゴリ名
一旦、
- id
- display name(discord上で表示されている名前、返信用に使用?)
- event title
- deadline
にした。
あとから思ったことは、開発のために表を見返すときに、通し番号や登録された日時を登録しておくタイムスタンプの項があったほうがわかりやすいと感じた。
/event (イベントを表に登録するコマンド)を実装
作成したファイル
- src/command/todo/event.ts
- src/db/db_utility.ts
event.tsでは/eventコマンドが使用されたときのdiscord.jsでの処理を書き、実際のSQL操作はdb_utility.ts内に記述した関数を呼び出す形にした。
event.ts
ここでは、pingコマンドの実装で行ったようなコマンドのdataとexecuteの定義を行っている。dataについてはこれまでと同じなので省略する。
executeでは、
- テキスト入力の受付
- SQL処理関数の呼び出し
を行った。
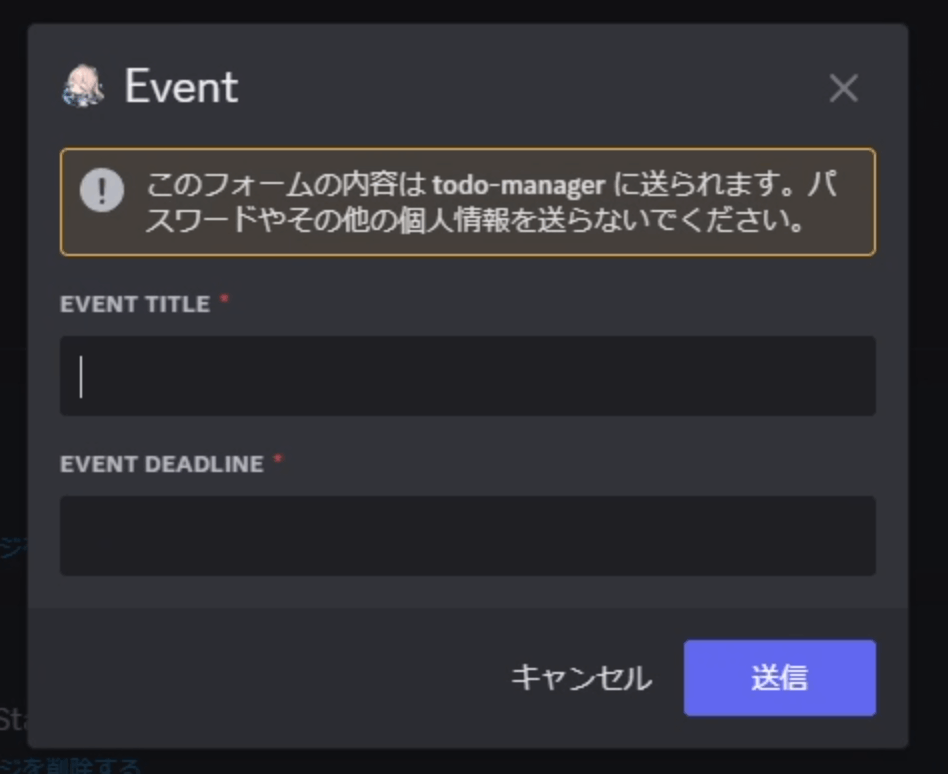
テキスト入力には、discord.jsのModalを用いた。
簡単に説明すると、テキストの入力を受け付ける枠組みを用意してくれる仕組みである。これにより、入力をコマンドの一部にオプションとして埋め込む必要がなくなる。
モーダルによる入力フォームは、Modal()で土台みたいなものを作り、ActionRowを乗せていくという方法で作成する。具体的な使用方法はドキュメントを参照していただきたい。typescriptで記述する際、一部関数で型を指定する必要があるが、それについてもドキュメントで言及されている。
これを用いて、手始めにevent titleとdeadlineを受け付けてみた。
この入力は、
modalSubmitInteraction.fields.getTextInputValue("eventTitleInput")
のようにすれば取得できる。つまり、他の関数で値を取得したければ、値を一つずつ渡してもいいが、interactionのインスタンスを渡すのが手っ取り早い。あとで紹介する表にinsertする関数でもそうしている。
なお、event.tsのexecuteの全体は以下。
追記: あとで確認したら、modalの入力を受け付けるawaitModalSubmitのところがドキュメントとちょっと違った。下のコードでも今のところちゃんと動きます。
export async function execute(commandInteraction: CommandInteraction){
    const modal = new ModalBuilder()
        .setTitle("Event")
        .setCustomId("event")

    const eventTitleInput = new TextInputBuilder()
        .setCustomId("eventTitleInput")
        .setLabel("Event title")
        .setRequired(true)
        .setStyle(TextInputStyle.Short)

    const eventDeadlineInput = new TextInputBuilder()
        .setCustomId("eventDeadlineInput")
        .setLabel("Event deadline")
        .setRequired(true)
        .setStyle(TextInputStyle.Short)

    const eventTitleActionRow = new ActionRowBuilder<ModalActionRowComponentBuilder>().addComponents(eventTitleInput);
    const eventDeadlineActionRow = new ActionRowBuilder<ModalActionRowComponentBuilder>().addComponents(eventDeadlineInput);

    modal.addComponents(eventTitleActionRow, eventDeadlineActionRow);

    await commandInteraction.showModal(modal);

    commandInteraction.awaitModalSubmit({time: 60_000})
        .then(modalSubmitInteraction => {
            registerEvents(commandInteraction, modalSubmitInteraction);
            modalSubmitInteraction.reply({
            content: `Event title: ${modalSubmitInteraction.fields.getTextInputValue("eventTitleInput")}, Event deadline: ${modalSubmitInteraction.fields.getTextInputValue("eventDeadlineInput")}`,
            ephemeral:true
            });
        })
        .catch(err => console.log('No modal submit interaction was collected'));

}