Cloud Functions for Firebaseで関数を役割毎に美しく分割する方法
目次
- はじめに
- 作成予定の関数
- 環境構築
- 実装
- シミュレータ実行
- フロントサイドからの呼び出し方
- 最後に
はじめに
今回は Cloud Functions for Firebase の分割方法について記載します。
Cloud Functions for Firebase の説明は以下。
よくあるヤバいパターンとして、Cloud Functions for Firebase の環境構築をした後、index.ts に全ての関数を記載しているプロジェクトをよく見かけます。
index.ts が 500 行ぐらいになり、コードの保守もかなり厳しくなった時にこの記事の方法を試してもらえるとコードをかなり分割することが出来、役割も分けることができるので、かなり保守しやすいコードになります。
それでは、手を動かしていきましょう!
作成予定の関数
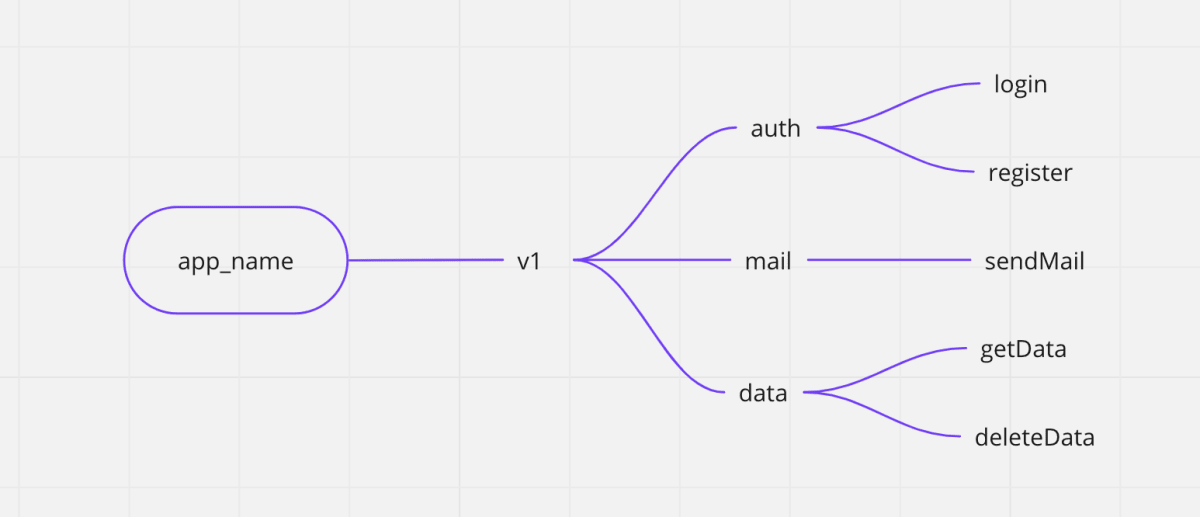
以下のような構成を Cloud Functions for Firebase で実装します。

ルート階層に app_name(ご自由に名前をつけてあげてください。)
第一階層に API のバージョンを(どんどん改変しても大丈夫なように。)
第二階層は機能毎にディレクトリを切り分け(これは私の好みです。プロジェクトに合った切り分けをお願いします。)
第三階層にロジックを実装します。(ここも単一の機能のみになるよう関数の切り分けを意識)
環境構築
では、実際に実装していきましょう。
まずは github にリポジトリを作成します。
今回の実装は以下にまとめております。
リポジトリをローカルに落として実装を始めます。
git clone https://github.com/SatakeYusuke19920527/cloud_functions_sample_composition.git
リポジトリの中に移動
cd cloud_functions_sample_composition
これから Firebase Cloud Functions for Firebase の環境構築をしていきます。
公式サイトは以下なので、一応掲載しておきます。
まずは以下二つのコマンドを実行してください。
npm install firebase-functions@latest firebase-admin@latest --save
npm install -g firebase-tools
次に Node.js で実装するので、初期化を実行
npm init -y
以下のような表示がでれば OK です。
➜  cloud_functions_sample_composition git:(main) npm init -y
Wrote to /Users/s.y/prj/03.tech/01.code/cloud_functions_sample_composition/package.json:

{
  "name": "cloud_functions_sample_composition",
  "version": "1.0.0",
  "description": "",
  "main": "index.js",
  "scripts": {
    "test": "echo \"Error: no test specified\" && exit 1"
  },
  "repository": {
    "type": "git",
    "url": "git+https://github.com/SatakeYusuke19920527/cloud_functions_sample_composition.git"
  },
  "keywords": [],
  "author": "",
  "license": "ISC",
  "bugs": {
    "url": "https://github.com/SatakeYusuke19920527/cloud_functions_sample_composition/issues"
  },
  "homepage": "https://github.com/SatakeYusuke19920527/cloud_functions_sample_composition#readme"
}
Firebase でプロジェクトを作成します。

今回は Firebase のプロジェクトを functions-sample としました。

hosting はなしの設定で、進めていくと以下の画面のようになり、Firebase プロジェクトの作成を教えてくれます。

Cloud Functions for Firebase を使用するので、プランを重量課金制に変更しておきましょう。

Firebase のプロジェクトを作成したら、ローカルで以下のコマンドより Firebase Cloud Functions を初期化
firebase init functions
色々聞かれます。
こちらは Use an existing project を選択
? Please select an option: (Use arrow keys)
❯ Use an existing project
  Create a new project
  Add Firebase to an existing Google Cloud Platform project
  Don't set up a default project
そして先ほど選択したプロジェクトを選択
=== Project Setup

First, let's associate this project directory with a Firebase project.
You can create multiple project aliases by running firebase use --add,
but for now we'll just set up a default project.

? Please select an option: Use an existing project
? Select a default Firebase project for this directory:
❯ functions-sample-5edef (functions-sample)
(Move up and down to reveal more choices)
その後は TypeScript を選択してください。
=== Functions Setup
Let's create a new codebase for your functions.
A directory corresponding to the codebase will be created in your project
with sample code pre-configured.

See https://firebase.google.com/docs/functions/organize-functions for
more information on organizing your functions using codebases.

Functions can be deployed with firebase deploy.

? What language would you like to use to write Cloud Functions?
  JavaScript
❯ TypeScript
  Python
ESLlint の設定や依存関係のインストール等、色々質問されるので、以下のように回答
? Do you want to use ESLint to catch probable bugs and enforce style? No
✔  Wrote functions/package.json
✔  Wrote functions/tsconfig.json
✔  Wrote functions/src/index.ts
✔  Wrote functions/.gitignore
? Do you want to install dependencies with npm now? Yes
以下のような感じになれば OK です!
added 517 packages, and audited 518 packages in 50s

47 packages are looking for funding
  run `npm fund` for details

25 moderate severity vulnerabilities

To address issues that do not require attention, run:
  npm audit fix

To address all issues (including breaking changes), run:
  npm audit fix --force

Run `npm audit` for details.

i  Writing configuration info to firebase.json...
i  Writing project information to .firebaserc...

✔  Firebase initialization complete!
VSCode を開くと以下のような実装になっていれば OK です。

実装
では、実装していきます。
再掲ですが、以下の構成を作成します。

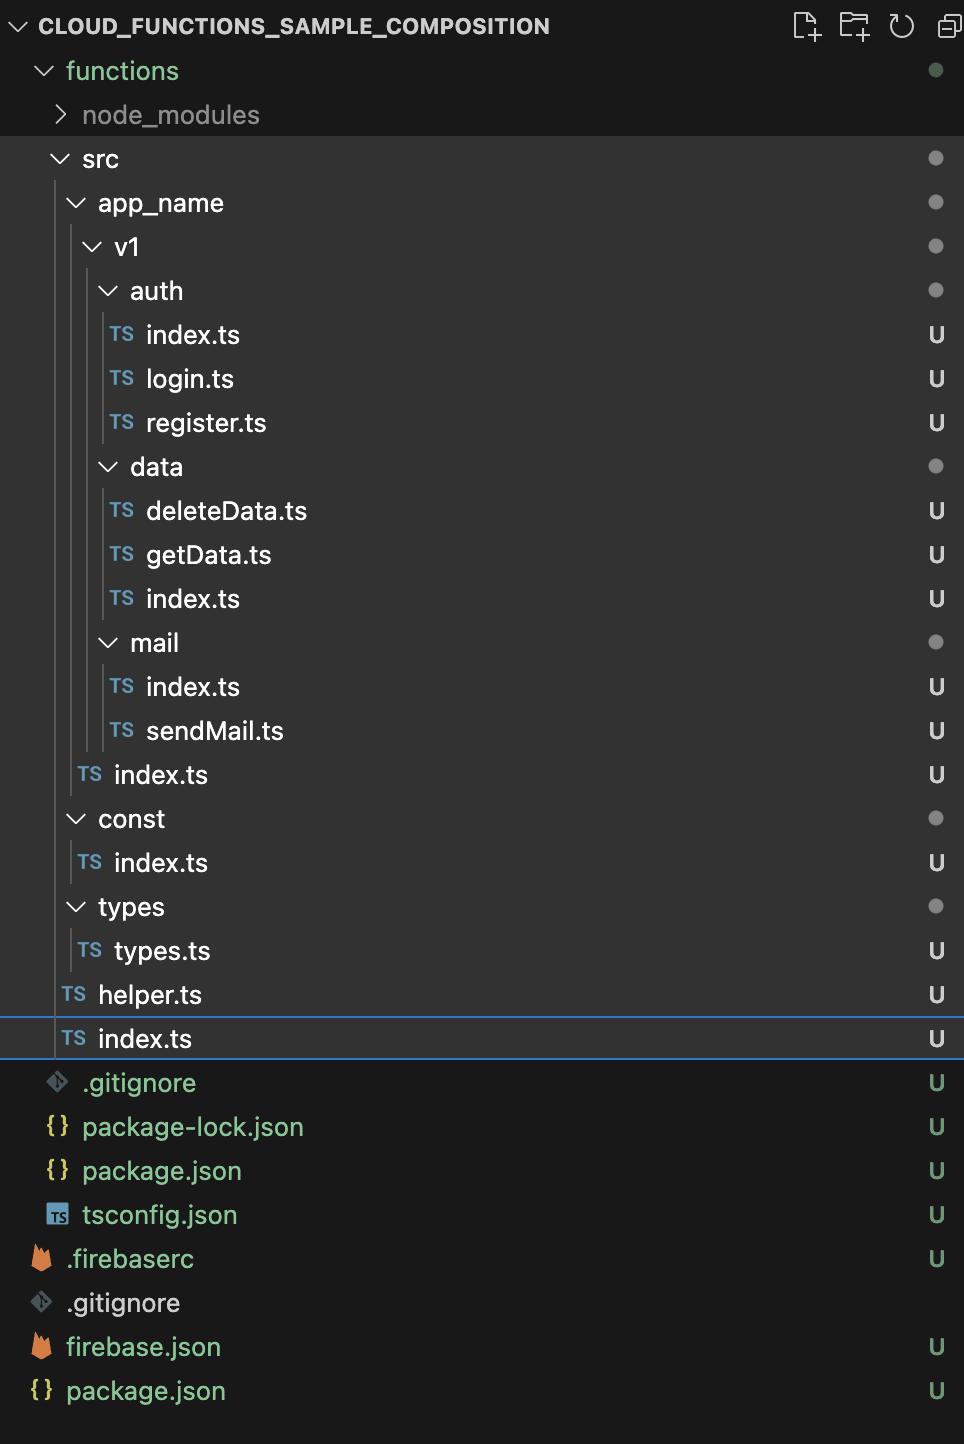
以下のようなディレクトリ構成を準備してください。

src は以下の箇所を真似て作成していただければ OK です。
完全版は以下の github に掲載しているので、こちらはかいつまんで紹介します。
では、それぞれ実装を見ていきます。
- ルート階層の実装
主にアプリの名前や、共通して使用するリージョンの指定、admin の定義などを実装します。
src/index.ts
import * as admin from 'firebase-admin';
import * as app_name from './app_name';

// initialize
admin.initializeApp();
export const db = admin.firestore();

export { app_name };
src/helper.ts
import * as functions from 'firebase-functions';

export const regionFunctions = functions.region('asia-northeast1');
// constans
export const main_app_name = 'app_name';
- app_name 配下の実装
メインロジックを記載する箇所になります。v1,v2 とディレクトリを切り分けることで、仕様変更によるバージョン更新にも対応します。
src/app_name/index.ts
import * as auth from './v1/auth';
import * as data from './v1/data';
import * as mail from './v1/mail';

export const v1 = {
  auth: { ...auth },
  mail: { ...mail },
  data: { ...data },
};
src/app_name/v1/auth/index.ts
export { login } from './login';
export { register } from './register';
src/app_name/v1/auth/login.ts
import { regionFunctions } from '../../../helper';

/**
 * ログイン処理
 */
export const login = regionFunctions.https.onCall(async (data, context) => {
  try {
    // ログインの処理を記載してください。
  } catch (error) {
    // errorの処理を記載してください。
    console.log('🚀 ~ file: login.ts:24 ~ error:', error);
  }
});
src/app_name/v1/auth/register.ts
import { regionFunctions } from '../../../helper';

/**
 * ユーザ登録処理
 */
export const register = regionFunctions.https.onCall(async (data, context) => {
  try {
    // ユーザ登録の処理を記載してください。
  } catch (error) {
    // errorの処理を記載してください。
    console.log('🚀 ~ file: register.ts:10 ~ register ~ error:', error);
  }
});
シミュレータ実行
では、上記の実装が完了したら、シミュレータを実行してみましょう。
package.json の中身が以下のようになっているか確認してみてください。
{
  "name": "functions",
  "scripts": {
    "build": "tsc",
    "build:watch": "tsc --watch",
    "serve": "npm run build && firebase emulators:start --only functions",
    "shell": "npm run build && firebase functions:shell",
    "start": "npm run shell",
    "deploy": "firebase deploy --only functions",
    "logs": "firebase functions:log"
  },
  "engines": {
    "node": "18"
  },
  "main": "lib/index.js",
  "dependencies": {
    "firebase-admin": "^11.8.0",
    "firebase-functions": "^4.3.1"
  },
  "devDependencies": {
    "typescript": "^4.9.0",
    "firebase-functions-test": "^3.1.0"
  },
  "private": true
}
terminal を3つ開き、それぞれのターミナルで以下のコマンドを順番に実行していきます。
フォルダを監視して随時 build
npm run build:watch
Firebase のシミュレーターを実行
npm run serve
Cloud Functions の shell を起動
firebase functions:shell
shell を起動して、app_name と入力してエンターをすると、以下のように実行できる関数が一覧で表示されるようになります。
➜  functions git:(main) firebase functions:shell

firebase > app_name
{
  v1: {
    auth: { login: [Function: bound ], register: [Function: bound ] },
    mail: { sendMail: [Function: bound ] },
    data: { deleteData: [Function: bound ], getData: [Function: bound ] }
  }
}
以下のようなコマンドで呼び出すことができます。
app_name.v1.auth.login({})
フロントサイドからの呼び出し方
React や Vue から呼び出す時の方法は、以下のように呼び出せます。
お好きに使ってあげてください。
  /**
   * ログイン
   * @returns
   */
  async login() {
    return new Promise(async (resolve, reject) => {
      try {
        const func = await httpsCallable(
          functions,
          'app_name-v1-auth-login'
        );
        await func({ stuid, amount, transfer_group }).then((res: any) => {
          resolve(res.data);
        });
      } catch (error) {
        reject(error);
      }
    });
  }
最後に
どうだったでしょうか。
不明点、疑問点は積極的にコメントしていただければと存じます。
また、玄人の方はより良い方法などあれば、ご提案いただけますと幸いです。
Happy Hacking.
Discussion
ありがとうございます🙌
Firebaseを使って開発している方の効率を更に向上させるため、フルスタックサーバーレスフレームワークを開発しました!
もしよろしければお試しいただけたら嬉しいです!
今後ともよろしくお願いいたします!