PlayCanvas便利スクリプト
非同期でのシーン移動
  async loadScene(sceneName) {
    const oldHierarchy = this.app.root.findByName("Root");
    const scene = this.app.scenes.find(sceneName);
    return new Promise((resolve, reject) => {
      this.app.scenes.loadSceneHierarchy(scene.url, (err, parent) => {
        if (!err) {
          resolve(oldHierarchy);
        } else {
          reject();
        }
      });
    });
  }
}
使用例
 async changeVrScene(sceneName) {
    this.app.root.findByName("CameraParent").setPosition(0, 1.5, 0);
    const old = await this.loadScene(sceneName);
    old.destroy();
  }
円を書く
var CircleEntityCreator = pc.createScript('circleEntityCreator');
CircleEntityCreator.attributes.add("createEntity", { type: "entity" });
CircleEntityCreator.attributes.add("itemCount", { type: "number", default: 40 });
CircleEntityCreator.attributes.add("radius", { type: "number", default: 5 });
CircleEntityCreator.attributes.add("repeat", { type: "number", default: 2 });

CircleEntityCreator.prototype.initialize = function () {
    const oneCycle = 2.0 * Math.PI;

    for (let i = 0; i < this.itemCount; i++) {

        const point = (i / this.itemCount) * oneCycle;
        const repeatPoint = point * this.repeat;

        const x = Math.cos(repeatPoint) * this.radius;
        const y = Math.sin(repeatPoint) * this.radius;

        const position = new pc.Vec3(x, y);

        const entity = new pc.Entity();
        entity.addComponent("render", {
            type: "box"
        });
        entity.setLocalPosition(position);
        this.entity.addChild(entity);
    }
};
参考にさせていただいたページ
円状にオブジェクトを生成する
全ての日本語を表示する方法
こちらの日本語の一覧を元にフォントアセットにて「Process Font」をクリック
https://gist.github.com/kgsi/ed2f1c5696a2211c1fd1e1e198c96ee4
多くの日本語フォント(Googleフォント)を追加したプロジェクト
Render To Texture
PlayCanvas Editor用スクリプト
var TextureScript = pc.createScript('textureScript');

// script attributes for material
TextureScript.attributes.add('material', {
    type: 'asset',
    assetType: 'material'
});

TextureScript.prototype.initialize = function() {
    var app = this.app;

    // create texture and render target for rendering into
    const texture = new pc.Texture(app.graphicsDevice, {
        width: 512,
        height: 512,
        format: pc.PIXELFORMAT_RGB8,
        mipmaps: true,
        minFilter: pc.FILTER_LINEAR,
        magFilter: pc.FILTER_LINEAR,
        addressU: pc.ADDRESS_CLAMP_TO_EDGE,
        addressV: pc.ADDRESS_CLAMP_TO_EDGE,
    });

    const renderTarget = new pc.RenderTarget({
        name: `camera-to-texture`,
        colorBuffer: texture,
        depth: true,
        flipY: true,
        samples: 2,
    });

    // set renderTarget to the camera component
    this.entity.camera.renderTarget = renderTarget;
    this.material.resource.emissiveMap = texture;
    this.material.resource.diffuseMap = texture;
    this.material.resource.update();
    // get world and skybox layers
    const worldLayer = app.scene.layers.getLayerByName("World");
    const skyboxLayer = app.scene.layers.getLayerByName("Skybox");

    // set layers of this camera
    this.entity.camera.layers = [worldLayer.id, skyboxLayer.id];
};

// call this function when material attribute changes
TextureScript.prototype.onAttributeChanged = function(name, oldValue, newValue) {
    if(name === 'material' && newValue) {
        var materialAsset = this.app.assets.get(newValue);
        if (materialAsset) {
            // change material of render component
            this.entity.render.material = materialAsset.resource;
        }
    }
};
PlayCanvas用にモーフ(シェイプキー)をBlenderから全て書き出すためのPythonスクリプト
- シェイプキーのあるオブジェクト(Body / Faceなど)を選択
- BlenderのScriptを実行するとGLB形式ですべてアニメーション付きのGLBがBlenderから出力されます。
import bpy

# オブジェクトを選択します。
obj = bpy.context.object

# シェイプキーのリストを取得します。
shape_keys = obj.data.shape_keys.key_blocks

# ループの回数を制限します。
loop_count = min(5, len(shape_keys) - 1)

# 各シェイプキーに対してアニメーションを作成し、GLBとしてエクスポートします。
for key in shape_keys[1:1+loop_count]:  # Basisはスキップし、ループを5回までに制限します。

    # 新しいアクションを作成してアサイン
    action_name = f"Action_{key.name}"
    action = bpy.data.actions.new(action_name)
    obj.data.shape_keys.animation_data_create()
    obj.data.shape_keys.animation_data.action = action

    # シェイプキーの値をすべて0にリセット
    for k in shape_keys[1:]:
        k.value = 0.0
        k.keyframe_insert(data_path="value", index=-1, frame=0)

    # ターゲットとなるシェイプキーのアニメーションを設定
    key.value = 1.0
    key.keyframe_insert(data_path="value", index=-1, frame=24)

    # GLBとしてエクスポート
    export_path = f"your_directory_path/{key.name}.glb"  # 保存先のパスを設定してください
    bpy.ops.export_scene.gltf(filepath=export_path, export_format='GLB')

    # 作成したアクションを削除
    bpy.data.actions.remove(action)
- PlayCanvasのAnim State Graphで設定します。
シーンのデータを元に360度動画の撮影をする
PlayCanvasのカメラを使って360度動画を撮影する方法を紹介します。
プロジェクトの元になるのは、以下のPublicプロジェクトです。
https://playcanvas.com/project/1203128
実行URLはこちらです。
https://playcanv.as/p/wrwiuEbZ/
360度動画撮影の仕組み
プロジェクト内のコードは、正距円筒図法(Equirectangular projection)でカメラを描画をすることで作成ができました。実装は、PlayCanvasのReflection Cubemapのデモを元に実装をしたコードがこちらです。
const EquirectangularCamera = pc.createScript('equirectangular-camera');

EquirectangularCamera.attributes.add("srcSphere", { type: "entity" });

EquirectangularCamera.prototype.postInitialize = function () {
    this.textureEqui = this.createReprojectionTexture(pc.TEXTUREPROJECTION_EQUIRECT, 2048);
};

EquirectangularCamera.prototype.postUpdate = function () {
    pc.reprojectTexture(this.srcSphere.script.cubemapRenderer.cubeMap, this.textureEqui, { numSamples: 1 });
    this.app.drawTexture(0, 0, 2, 2, this.textureEqui);
}

EquirectangularCamera.prototype.createReprojectionTexture = function (projection, size) {
    return new pc.Texture(this.app.graphicsDevice, {
        width: size,
        height: size,
        format: pc.PIXELFORMAT_RGB8,
        mipmaps: false,
        minFilter: pc.FILTER_LINEAR,
        magFilter: pc.FILTER_LINEAR,
        addressU: pc.ADDRESS_CLAMP_TO_EDGE,
        addressV: pc.ADDRESS_CLAMP_TO_EDGE,
        projection: projection
    });
};
このプロジェクトをフォークするか、一部を使用することで360度動画を撮影することができます。
プロジェクトを移植する際の設定
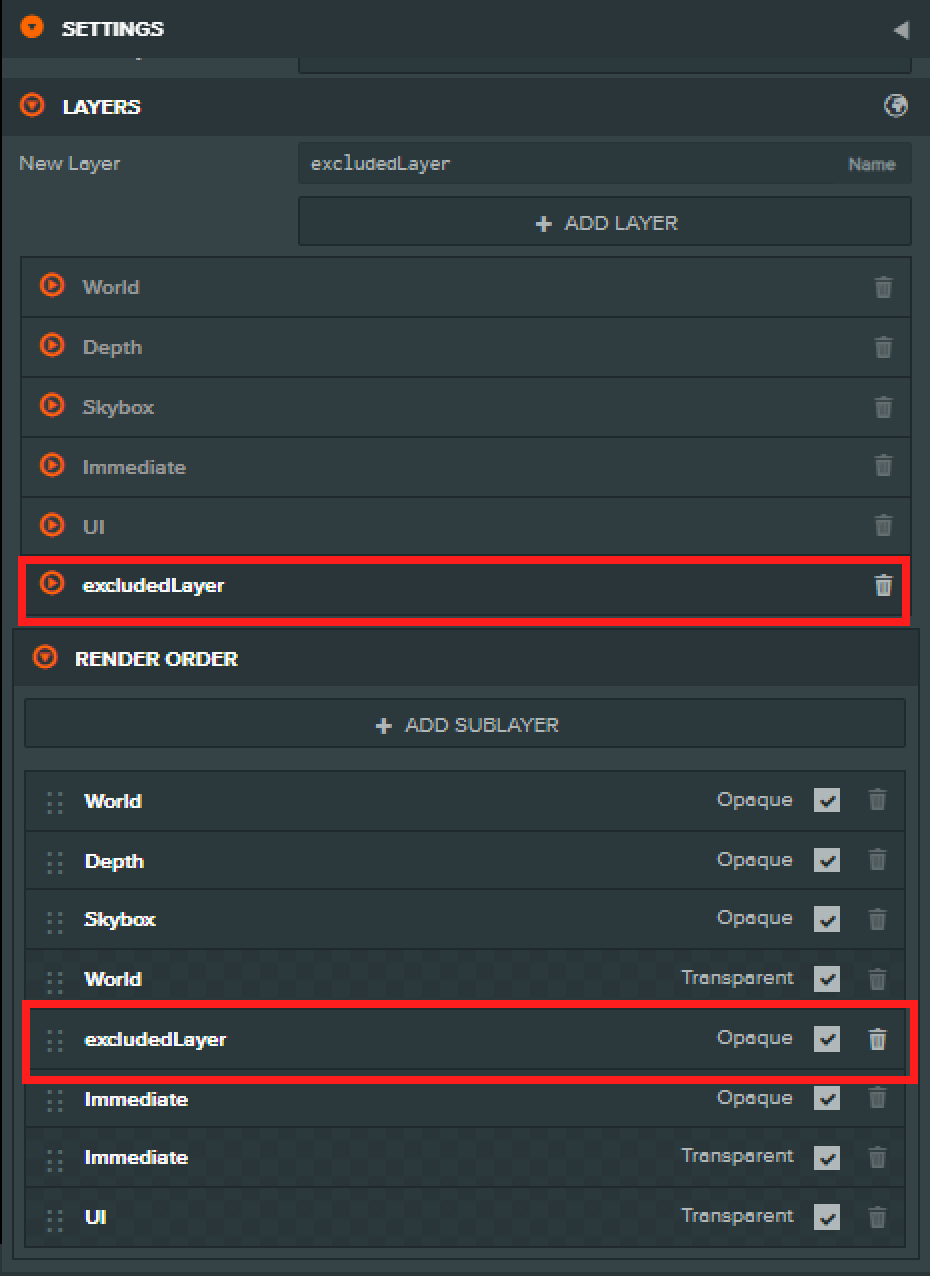
1. レイヤーの設定
- 新規にレイヤー(
excludedLayer)を作成します。 - レイヤーを適切に設定します。
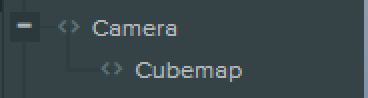
2. ヒエラルキーの設定
- カメラに
equirectangular-camera.jsを設定します。 - カメラの子エンティティ(Sphere)を追加し、
cubemap-renderer.jsを設定します。
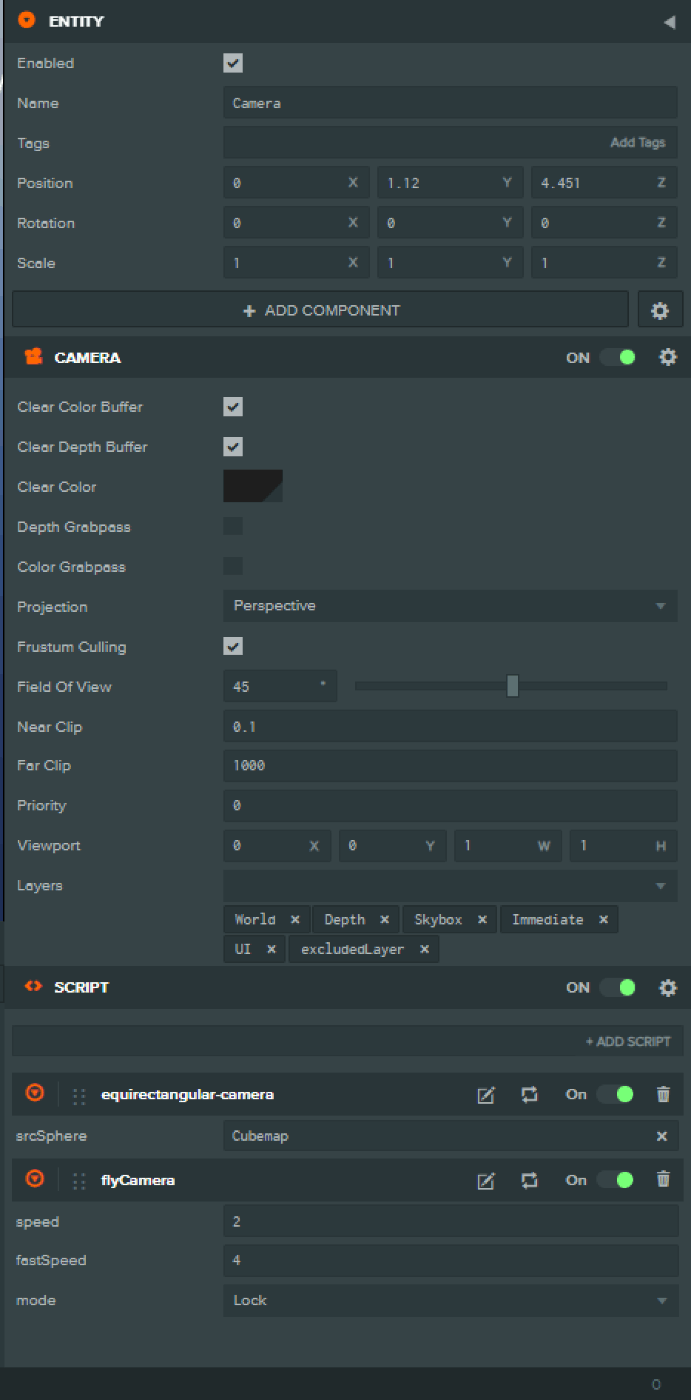
それぞれカメラのエンティティとカメラの子エンティティの設定はこちらです。
カメラの設定
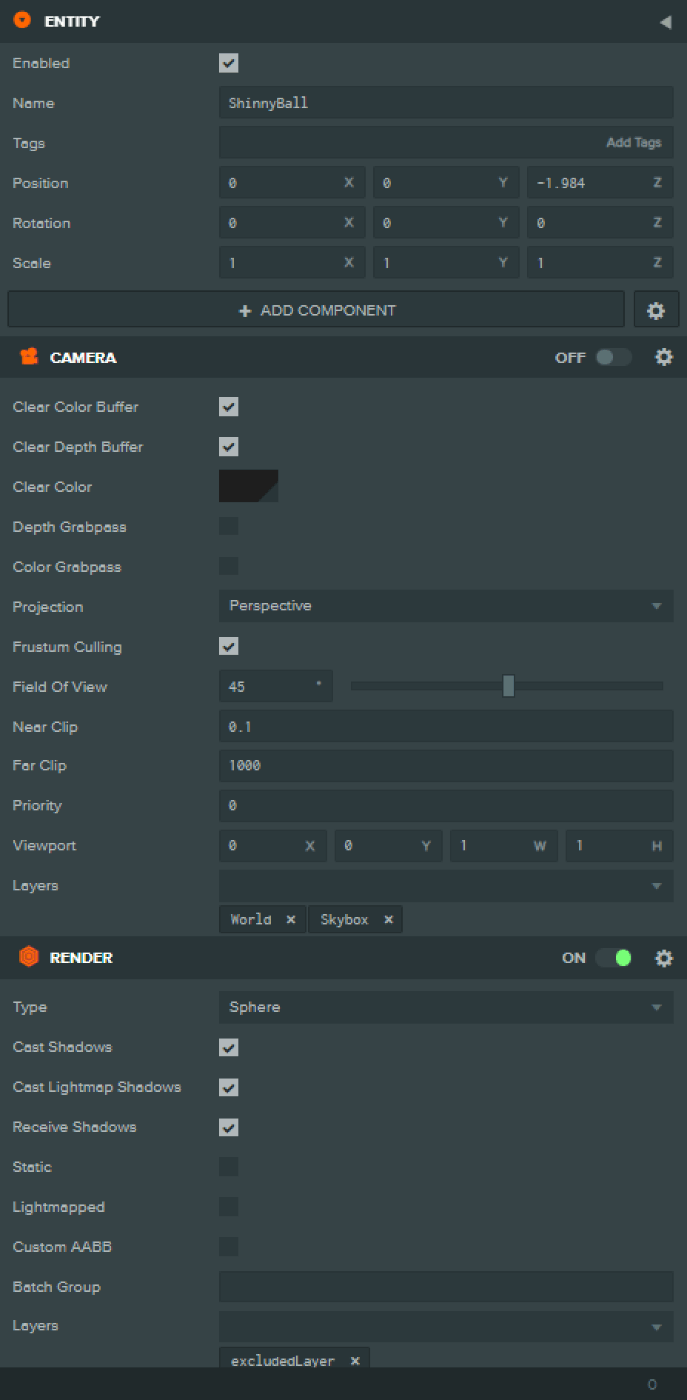
カメラの子エンティティの設定
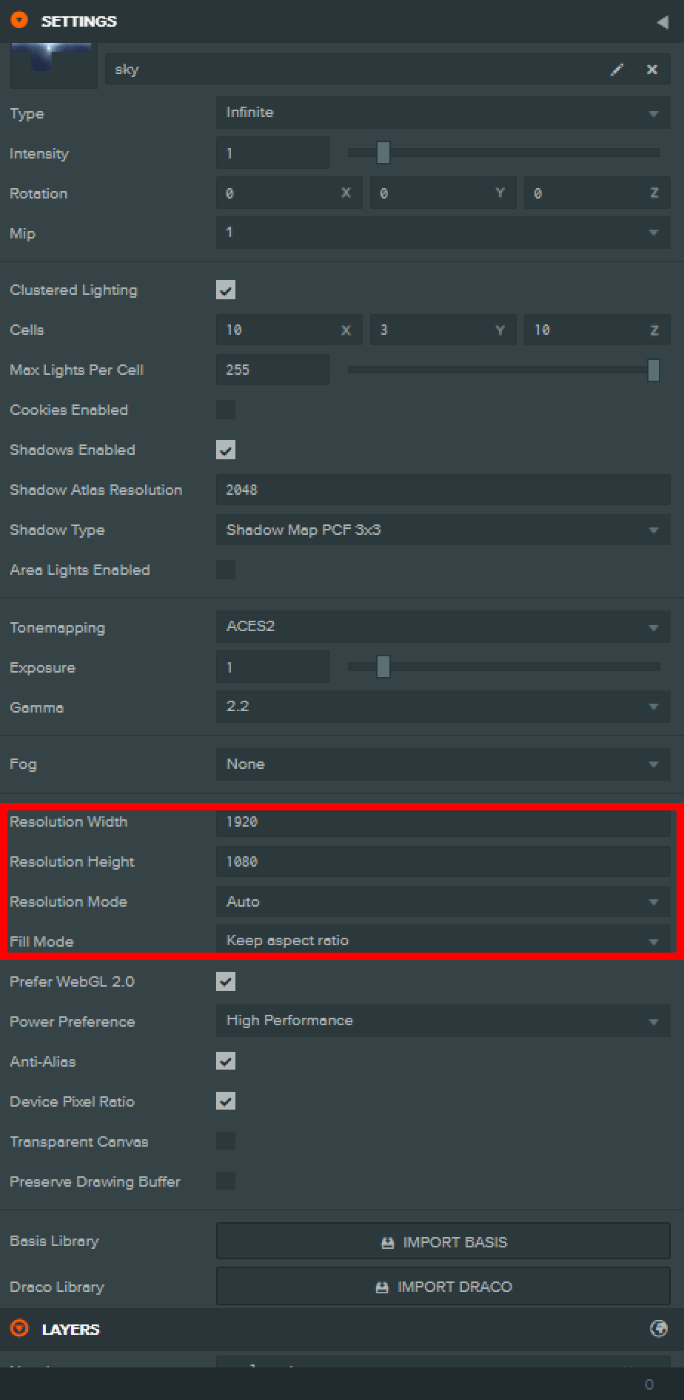
3. 解像度の設定
PlayCanvasの設定から、解像度とFill Modeを設定します。
これにより、起動時にウィンドウのサイズに関わらずアスペクト比を固定することができます。
YouTubeにアップロードをする
設定が完了したら、F11キーを押してシーンを全画面表示にし、録画を行います。
YouTubeにアップロードする場合は、撮影した動画(mp4 / mov形式)に対して「Spatial Media Metadata Injector」を使ってメタデータを付与することで、360度動画としてアップロードできます。
特定のタグのアセットをロード、アンロードを動的に行う方法。
ヒエラルキーにあるRenderコンポーネントを使ったエンティティで使用しているアセットをUnloadをするには、Texture / Render / Containerにそれぞれの共通のタグを付けることでリソースの開放ができます。
コード 1 アセットのロード / アンロード
var AssetManager = pc.createScript('assetManager');

AssetManager.prototype.initialize = function() {
    // アセットロードイベントのリスナーを設定
    this.app.on('loadAsset', this.loadAssetWithTag, this);

    // アセットアンロードイベントのリスナーを設定
    this.app.on('unloadAsset', this.unloadAssetWithTag, this);
};

// タグに基づいてアセットをロードする関数
AssetManager.prototype.loadAssetWithTag = function(tag) {
    var assets = this.app.assets.findByTag(tag);
    assets.forEach((asset) => {
        asset.ready(() => {
            console.log('Asset loaded: ' + asset.name);
        });
        this.app.assets.load(asset);
    });
};

// タグに基づいてアセットをアンロードする関数
AssetManager.prototype.unloadAssetWithTag = function(tag) {
    var assets = this.app.assets.findByTag(tag);
    assets.forEach((asset) => {
        asset.unload();
        console.log('Asset unloaded: ' + asset.name);
    });
};
コード 2 アセットのロード / アンロードを順次行う
var AssetManager = pc.createScript('assetManager');

// タグリストと現在のタグインデックス、そして一度にロード/アンロードするアセットの数を定義
AssetManager.attributes.add('tagList', { type: 'string', array: true });
AssetManager.attributes.add('loadUnloadCount', { type: 'number', default: 1 });

AssetManager.prototype.initialize = function () {
    this.currentTagIndex = 0;
    this.app.on('loadNext', this.handleLoadNext, this);
    setInterval(() => {
        this.app.fire("loadNext");
    }, 1000)
};

// 次のアセットをロードするための関数
AssetManager.prototype.handleLoadNext = function () {
    var totalTags = this.tagList.length;
    var unloadIndex = this.currentTagIndex;

    // 現在のタグのアセットをアンロード
    for (let j = 0; j < this.loadUnloadCount; j++) {
        var currentUnloadTag = this.tagList[unloadIndex % totalTags];
        this.unloadAssetsWithTag(currentUnloadTag);
        unloadIndex++;
    }

    // インデックスを更新
    this.currentTagIndex = (this.currentTagIndex + this.loadUnloadCount) % totalTags;

    // 次のタグのアセットをロード
    var loadIndex = this.currentTagIndex;
    for (let i = 0; i < this.loadUnloadCount; i++) {
        var currentLoadTag = this.tagList[loadIndex % totalTags];
        this.loadAssetsWithTag(currentLoadTag);
        loadIndex++;
    }
};

// 特定のタグのアセットをロードする関数
AssetManager.prototype.loadAssetsWithTag = function (tag) {
    var assets = this.app.assets.findByTag(tag);
    assets.forEach((asset) => {
        asset.ready(() => {
            console.log('Asset loaded: ' + asset.name);
        });
        this.app.assets.load(asset);
    });
};

// 特定のタグのアセットをアンロードする関数
AssetManager.prototype.unloadAssetsWithTag = function (tag) {
    var assets = this.app.assets.findByTag(tag);
    assets.forEach((asset) => {
        asset.unload();
        console.log('Asset unloaded: ' + asset.name);
    });
};
(パフォーマンス確認用)シーン上のrenderコンポーネントのアセットをテーブルで表示
// PlayCanvasのパフォーマンス・チューニング用のコードです。
const renders = pc.app.root.findComponents("render");
const assetCount = {};
let totalSceneMB = 0;
const containerAssetSizes = {};

// アセットの出現回数と頂点数の合計をカウント
renders.forEach(render => {
    if (render.entity.enabled) {
        const asset = pc.app.assets.getAssetById(render.asset);
        if (!asset || !asset.resource) return;
        const meshes = asset.resource.meshes;
        let totalVertices = 0;

        if (meshes.length) {
            meshes.forEach((mesh) => {
                totalVertices += mesh.vertexBuffer.numVertices;
            });
        }

        if (asset) {
            if (!assetCount[asset.id]) {
                assetCount[asset.id] = { name: asset.name, count: 0, id: asset.id, vertices: 0, verticesPerRender: 0, entities: [], batchGroups: new Set(), preload: asset.preload, relatedAssets: new Set() };
            }
            assetCount[asset.id].count++;
            assetCount[asset.id].vertices += totalVertices;
            assetCount[asset.id].verticesPerRender = assetCount[asset.id].vertices / assetCount[asset.id].count;
            assetCount[asset.id].entities.push(render.entity.name);
            if (render.batchGroupId !== undefined) {
                assetCount[asset.id].batchGroups.add(render.batchGroupId);
            }
            if (asset.data.containerAsset) {
                const containerAssetId = asset.data.containerAsset;
                if (!containerAssetSizes[containerAssetId]) {
                    const relatedAsset = pc.app.assets.getAssetById(containerAssetId);
                    if (relatedAsset) {
                        const sizeInBytes = relatedAsset.file.size;
                        let sizeFormatted;
                        if (sizeInBytes < 1024) {
                            sizeFormatted = `${sizeInBytes} B`;
                        } else if (sizeInBytes < 1024 * 1024) {
                            sizeFormatted = `${(sizeInBytes / 1024).toFixed(2)} KB`;
                        } else if (sizeInBytes < 1024 * 1024 * 1024) {
                            sizeFormatted = `${(sizeInBytes / (1024 * 1024)).toFixed(2)} MB`;
                            totalSceneMB += sizeInBytes / (1024 * 1024);
                        } else {
                            sizeFormatted = `${(sizeInBytes / (1024 * 1024 * 1024)).toFixed(2)} GB`;
                        }
                        containerAssetSizes[containerAssetId] = `${relatedAsset.name} (${sizeFormatted})`;
                    }
                }
                assetCount[asset.id].relatedAssets.add(containerAssetSizes[containerAssetId]);
            }
        }
    }
});

// 出現回数でソート
const sortedAssetCount = Object.entries(assetCount).sort((a, b) => b[1].count - a[1].count);

// シーン全体の頂点数を計算
let totalSceneVertices = 0;
sortedAssetCount.forEach(([id, { count, vertices }]) => {
    totalSceneVertices += count * vertices;
});

// 頂点数でソート
const sortedByVertices = sortedAssetCount.sort((a, b) => b[1].vertices - a[1].vertices);

// 新しいタブでテーブル形式で表示
const newWindow = window.open("", "_blank");
newWindow.document.write("<html><head><title>Asset Count</title></head><body>");
newWindow.document.write("<table border='1'><tr><th>Index</th><th>Asset ID</th><th>Asset Name</th><th>Count</th><th>Vertices</th><th>Total Vertices</th><th>Entities</th><th>Batch Groups</th><th>Preload</th><th>Related Assets</th></tr>");
newWindow.document.write(`<tr><td colspan="6">Total Scene Vertices</td><td>${totalSceneVertices}</td></tr>`);
newWindow.document.write(`<tr><td colspan="6">Total Scene MB</td><td>${totalSceneMB.toFixed(2)} MB</td></tr>`);

sortedByVertices.forEach(([id, { name, count, vertices, verticesPerRender, entities, batchGroups, preload, relatedAssets }], index) => {
    newWindow.document.write(`<tr><td>${index + 1}</td><td>${id}</td><td>${name}</td><td>${count}</td><td>${verticesPerRender}</td><td>${vertices}</td><td>${entities.join(', ')}</td><td>${Array.from(batchGroups).join(', ')}</td><td>${preload}</td><td>${Array.from(relatedAssets).join(', ')}</td></tr>`);
});

newWindow.document.write("</table></body></html>");
マテリアルの利用状態を確認する
// PlayCanvasのパフォーマンス・チューニング用のコードです。
const renders = pc.app.root.findComponents("render");
const materialCount = {};

// マテリアルの出現回数と使用しているエンティティをカウント
renders.forEach(render => {
    if (render.entity.enabled) {
        const meshInstances = render.meshInstances;
        if (meshInstances.length) {
            meshInstances.forEach((meshInstance) => {
                const material = meshInstance.material;
                if (material) {
                    if (!materialCount[material.name]) {
                        materialCount[material.name] = { count: 0, id: material.id, entities: [] };
                    }
                    materialCount[material.name].count++;
                    materialCount[material.name].entities.push(render.entity.name);
                }
            });
        }
    }
});

// 出現回数でソート
const sortedMaterialCount = Object.entries(materialCount).sort((a, b) => b[1].count - a[1].count);

// 新しいタブでテーブル形式で表示
const newWindow = window.open("", "_blank");
newWindow.document.write("<html><head><title>Material Count</title></head><body>");
newWindow.document.write("<table border='1'><tr><th>Index</th><th>Material ID</th><th>Material Name</th><th>Count</th><th>Entities</th></tr>");

sortedMaterialCount.forEach(([name, { count, id, entities }], index) => {
    newWindow.document.write(`<tr><td>${index + 1}</td><td>${id}</td><td>${name}</td><td>${count}</td><td>${entities.join(', ')}</td></tr>`);
});

newWindow.document.write("</table></body></html>");
正距円筒図法の画像(テクスチャ)をSkyboxに設定
var FuncChangeSkybox = pc.createScript('funcChangeSkybox');

// Attributes
FuncChangeSkybox.attributes.add('skyboxType', {
    type: "string",
    default: "dome",
    enum: [
        { "infinite": "infinite" },
        { "dome": "dome" },
        { "box": "box" }
    ]
});
FuncChangeSkybox.attributes.add('skyboxScale', { type: 'vec3', default: [1, 1, 1] });
FuncChangeSkybox.attributes.add('skyboxPosition', { type: 'vec3', default: [0, 0, 0] });
FuncChangeSkybox.attributes.add('skyboxTripodY', { type: 'number', default: 0 });
FuncChangeSkybox.attributes.add('skyboxRotation', { type: 'number', default: 0 });
FuncChangeSkybox.attributes.add('skyboxTexture', { type: 'asset', assetType: 'texture' });

// initialize code called once per entity
FuncChangeSkybox.prototype.initialize = function () {
    this.entity.button.on('click', this.onButtonClick, this);
};

FuncChangeSkybox.prototype.onButtonClick = function () {

    // 1枚のテクスチャからSkyboxを設定
    const texture = this.skyboxTexture.resource;
    const skybox = pc.EnvLighting.generateSkyboxCubemap(texture);
    this.app.scene.skybox = skybox;

    const lighting = pc.EnvLighting.generateLightingSource(texture);
    const envAtlas = pc.EnvLighting.generateAtlas(lighting);
    lighting.destroy();
    this.app.scene.envAtlas = envAtlas;

    // Dome / Infinity / Boxの設定
    this.app.scene.sky.type = this.skyboxType;
    this.app.scene.sky.node.setLocalScale(this.skyboxScale);
    this.app.scene.sky.node.setLocalPosition(this.skyboxPosition);
    this.app.scene.sky.center = new pc.Vec3(0, this.skyboxTripodY, 0);
    this.app.scene.skyboxRotation = new pc.Quat().setFromEulerAngles(0, this.skyboxRotation, 0);
}
DXT 1 / DXT 5のテクスチャフォーマットをそのままエクスポート
VRChat ( UdonSharp ) で読める形式でエクスポートをする。
テクスチャの圧縮オプションをPlayCanvasエディターからLegacyにチェックを入れてDXTにチェックを入れる。
AlphaのチェックなしだとDXT1
AlphaにチェックをいれるとDXT5
に変換をされる。
このgltfエクスポーターを使うことで、このプログラムと組み合わせて、動的に.glbのロードができる。