話題のInstant NeRFs使いたい
本家リポジトリ
GUIが絡んでていて環境構築がめんどくさそうだから一旦Windowsに直接入れる
本当はあんまりローカル環境汚したくないからWSL+Dockerとかでやりたい
その場合こちらが参考になりそう
WSLをGUI化させるならこちらが簡単そう
WSLのイメージを新規で作ってとりあえずそこに環境構築してみる
WSLのイメージファイルの複製、取り込みの仕方は以前やった方法
ちょうど素のUbuntu-20.04のイメージを保存しているのでそれを使う
上記記事のubuntuにXRDPをインストールからあとを実行すればGUI起動問題なくできた!

次はNeRFに必要そうなものを入れていく
書き忘れていたけど、WSLのカーネル バージョン: 5.10.102.1
GCC/G++
$ sudo apt install build-essential
$ gcc --version
gcc (Ubuntu 9.4.0-1ubuntu1~20.04.1) 9.4.0
追記:
GCC含む本家リポジトリにまとめて必要なものインストールするコマンド書いてた
If you are using Debian based Linux distribution, install the following packages
って書いてた
もう実行しちゃったのでとりあえずこれでおかしなことが起きなければそれでヨシとする。。
sudo apt-get install build-essential git python3-dev python3-pip libopenexr-dev libxi-dev \
                     libglfw3-dev libglew-dev libomp-dev libxinerama-dev libxcursor-dev
CMake
$ sudo apt-get install cmake
$ cmake --version
cmake version 3.16.3
CUDA on WSL2
WSLにCUDA Tool kit入れるためのコマンドは公式が用意してくれている
色々設定していたらxrdpでのリモートデスクトップの画面が真っ暗になって何も映らなくなっていた
リモートデスクトップをつなぎなおしても復帰しないが、xrdpを再起動してから接続しなおせば治った
Optix on WSL
公式が非対応でリリースまで数か月かかるって言ってる(2022/07/12)

OptixはOptionalになってるし一旦このままWSLで試しに動かすとこまでやってみる
cmakeのバージョンが古くてビルドが通らない
確かにv3.21以上って書いてあるが、upgradeしても最新って言われて更新されない
$ sudo apt-get upgrade cmake
Reading package lists... Done
Building dependency tree
Reading state information... Done
cmake is already the newest version (3.16.3-1ubuntu1).
Calculating upgrade... Done
The following package was automatically installed and is no longer required:
  libfwupdplugin1
Use 'sudo apt autoremove' to remove it.
0 upgraded, 0 newly installed, 0 to remove and 0 not upgraded.
Ubuntu 20.04でaptでcmakeをインストールすると3.16が最新バージョンになってしまうっぽいので、直接インストールする
apt-getで入れた方はremoveで一旦アンインストール
sudo apt-get remove cmake
以下のSet up CMake from Source on Ubuntu 20.04を参考にソースからインストール
インストール完了後にWSL再起動したら任意のバージョンのインストールが確認できた
(本当は最新のリリースを指定すればいいのだが、コピペで全部やってしまった)
$ cmake --version
cmake version 3.22.3
以下のビルド通った!
ワーニングかなり出たけど
instant-ngp$ cmake . -B build
instant-ngp$ cmake --build build --config RelWithDebInfo -j
Pythonのライブラリインストール
instant-ngp$ python3 -m pip install -r requirements.txt
順番が前後したけど、とりあえず最初のサンプルは動いた!
instant-ngp$ ./build/testbed --scene data/nerf/fox

新規で画像追加してやるパターン試してみる
こちらの生成編を参考にする
公式のドキュメントはこちら
COLMAPという3次元復元?ツールのインストールが必要な様子
Linuxだとビルド済バイナリが配布されてないのでソースからビルドする
COLMAPやCeresSolverのビルドでメモリ不足で失敗したけどリトライしたら成功した
メモリ32GBじゃ足りないのか。。
instant-nerfにもどって、生成用の画像を用意
画像群に関する情報が記載されたtransforms.jsonを生成するため以下のコマンドを実行
$ python scripts/colmap2nerf.py –colmap_matcher exhaustive –run_colmap –aabb_scale 16 –images <image/path>
しかし16枚の画像を用意したけど、以下のエラーが表示されて、2枚分しか認識してもらえなかった
Single camera specified, but images have different dimensions.
何か画像にも条件がある?
スマホで撮った画像だが、2枚とそれ以外で画像が90度回転している
コマンドオプションで--aabb-scaleを渡しているので、おそらく4:3とか16:9とか3:4とかが統一されている必要がある?
The aabb_scale parameter is the most important instant-ngp specific parameter. It specifies the extent of the scene, defaulting to 1; that is, the scene is scaled such that the camera positions are at an average distance of 1 unit from the origin. For small synthetic scenes such as the original NeRF dataset, the default aabb_scale of 1 is ideal and leads to fastest training. The NeRF model makes the assumption that the training images can entirely be explained by a scene contained within this bounding box. However, for natural scenes where there is a background that extends beyond this bounding box, the NeRF model will struggle and may hallucinate "floaters" at the boundaries of the box. By setting aabb_scale to a larger power of 2 (up to a maximum of 16), the NeRF model will extend rays to a much larger bounding box. Note that this can impact training speed slightly. If in doubt, for natural scenes, start with an aabb_scale of 128, and subsequently reduce it if possible. The value can be directly edited in the transforms.json output file, without re-running the scripts/colmap2nerf.py script.
aabb-scaleは違った
認識されていた画像を90度回転させたらそれも認識してもらえなくなったので、一旦全部さらに90度回転してみたら認識してもらえてなかった画像も認識してもらえるようになったのか、上記のエラーは出なくなった
しかし今度は以下のエラーが出て、中断されてしまう
Killed
FATAL: command failed
またメモリが足りていない???
タスクマネージャーで見たところメモリは80%程度まで上がるけど、それ以上上がる前に処理が中断されてしまってる
CPUは一気に100%に張り付く
よくよく見たらそれっぽいワーニングがでてた
WARNING: Your current options use the maximum number of threads on the machine to extract features. Exracting SIFT features on the CPU can consume a lot of RAM per thread for large images. Consider reducing the maximum image size and/or the first octave or manually limit the number of extraction threads. Ignore this warning, if your machine has sufficient memory for the current settings.
タスクマネージャー的にもCPUがぱつぱつで死んでそうだったので、colmapを実行している以下の部分に--SiftExtraction.num_threads 8のオプションを追加した
自分の実行環境は物理コア12 論理コア20で論理コアが物理コアのきれいに2倍になってないのが内部処理の前提と食い違ってるとかを予想して12スレッドを指定したけどそれでも失敗したので、さらに8まで減らした
これで、死んでいたところは通過して、一気に処理が進んだ
しかし次は以下のようなエラーが出てきた
==============================================================================
Finding good initial image pair
==============================================================================

  => No good initial image pair found.

Elapsed time: 2.169 [minutes]
ERROR: failed to create sparse model
FATAL: command failed
画像が少ないからかわからないけど、データがモデル生成に適切でないっぽい
動画から生成する方法もあるみたいなので、そちらに方針を変更
The colmap2nerf.py script assumes that the training images are all pointing approximately at a shared point of interest, which it places at the origin.
学習用の画像はどうやって用意すればいいんだ???
動画でできた!!!
以下のコマンドで、学習データの動画が指定できる
デフォルトでは2fpsごとに画像を抽出してくれるみたいで、事前にffmpegを入れている必要がありそう
python3 scripts/colmap2nerf.py --colmap_matcher exhaustive --run_colmap --aabb_scale 16 --video_in output.mp4
この際、切り抜いた画像は指定した動画ファイルと同一ディレクトリにimagesディレクトリを作ってその下に保存するらしい
後々学習にも使うので、以下のコマンドのように--outオプションでtransform.jsonの出力先も同じ場所に指定するとちょうどいいと思われる
python3 scripts/colmap2nerf.py --colmap_matcher exhaustive --run_colmap --aabb_scale 16 --video_in data/nerf/sample/room.mp4 --out data/nerf/sample/transform.json
ただし出力されたtransform.json内部では参照する画像ファイルのパスが実行場所からのパスで格納されるが、学習時に使う時にはtransform.jsonからの相対パス?(build/testbedで指定したフォルダからの相対パスかもしれない)が期待値なようなので、置換してあげる必要がある
そこまで準備が出来たら、以下のコマンドで学習が始まるはず
./build/testbed --scene data/nerf/sample
見た感じ生成はうまくいっていたけどMesh it!を押すとSegmentation faultが起きてしまう
Vulkan SDKを入れていないからかもしれない
いかに従って入れてみる
Vulkanいれてみたけどこんな警告が出ていて、Mesh out時やはりセグフォ
04:32:06 WARNING  Vulkan: loader_scanned_icd_add: Driver /usr/lib/x86_64-linux-gnu/libvulkan_radeon.so supports Vulkan 1.2, but only supports loader interface version 4. Interface version 5 or newer required to support this version of Vulkan (Policy #LDP_DRIVER_7)
04:32:06 WARNING  Vulkan: loader_scanned_icd_add: Driver /usr/lib/x86_64-linux-gnu/libvulkan_lvp.so supports Vulkan 1.1, but only supports loader interface version 4. Interface version 5 or newer required to support this version of Vulkan (Policy #LDP_DRIVER_7)
04:32:06 WARNING  Vulkan: loader_scanned_icd_add: Driver /usr/lib/x86_64-linux-gnu/libvulkan_intel.so supports Vulkan 1.2, but only supports loader interface version 4. Interface version 5 or newer required to support this version of Vulkan (Policy #LDP_DRIVER_7)
04:32:06 WARNING  Could not initialize Vulkan and NGX. DLSS not supported. (Failed to find Vulkan device corresponding to CUDA device.)
今更だけど、Windowsで直で実行した方が幸せになれそう
最初Anacondaじゃないとダメ説があって、Windowsに入れたくなかったのもあったけど、別にPython動けばpoetryでもなんでもよさそう
あとはWindowsの場合Visual Studio2019がいるぐらいかな
Mesh it!で落ちる問題について
メッシュ生成はGUIからじゃなくてPythonバインディング使った方がいいかもよって書いてる
Pythonバインディングでやったらあっさりできた!!!!
実行コマンド
$ python3 scripts/run.py --mode nerf --scene data/nerf/guitar --save_mesh <outputfile>
さっそくBlenderに取り込んでみた、、、って全然できてなー-------い!!!!

メッシュの解像度がデフォルトの256だと全然足りないみたい
思い切って4096を指定したらメモリエラー。そりゃそうかー
python3 scripts/run.py --mode nerf --scene data/nerf/guitar --save_mesh guitar.obj --marching_cubes_res 4096
RuntimeError: /home/yusenran/workspace/program/external/instant-ngp/dependencies/tiny-cuda-nn/include/tiny-cuda-nn/gpu_memory.h:567 cuMemCreate(&m_handles.back(), n_bytes_to_allocate, &prop, 0) failed with error CUDA_ERROR_OUT_OF_MEMORY
Could not free memory: /home/yusenran/workspace/program/external/instant-ngp/dependencies/tiny-cuda-nn/include/tiny-cuda-nn/gpu_memory.h:142 cudaFree(rawptr) failed with error an illegal memory access was encountered
1024まで落としたら
Could not free memory: /home/yusenran/workspace/program/external/instant-ngp/dependencies/tiny-cuda-nn/include/tiny-cuda-nn/gpu_memory.h:142 cudaFree(rawptr) failed with error an illegal memory access was encountered
は消えたけど
RuntimeError: /home/yusenran/workspace/program/external/instant-ngp/dependencies/tiny-cuda-nn/include/tiny-cuda-nn/gpu_memory.h:574 cuMemMap(m_base_address + m_size, n_bytes_to_allocate, 0, m_handles.back(), 0) failed with error CUDA_ERROR_INVALID_VALUE
こっちが消えない
512まで下げたらなんとか出力できた
Blenderに取り込んだ結果が以下のような感じ
見にくいけど、中央にギターらしきシルエットと、その後ろにはしごが見えるはず

実はこのギターとその周辺の一角が動画で撮ったもので、実際に撮った一角のスペースの数10倍くらいの空間に床などを突き抜けて無駄なメッシュが発生している
必要な部分だけについてのメッシュが出力できれば、もっと有用な3Dデータが取れそうなんだけど、、、
あんまりはっきり映したくないから遠目からの画像だけ貼るけど、GUIで学習してるときはこんな感じ
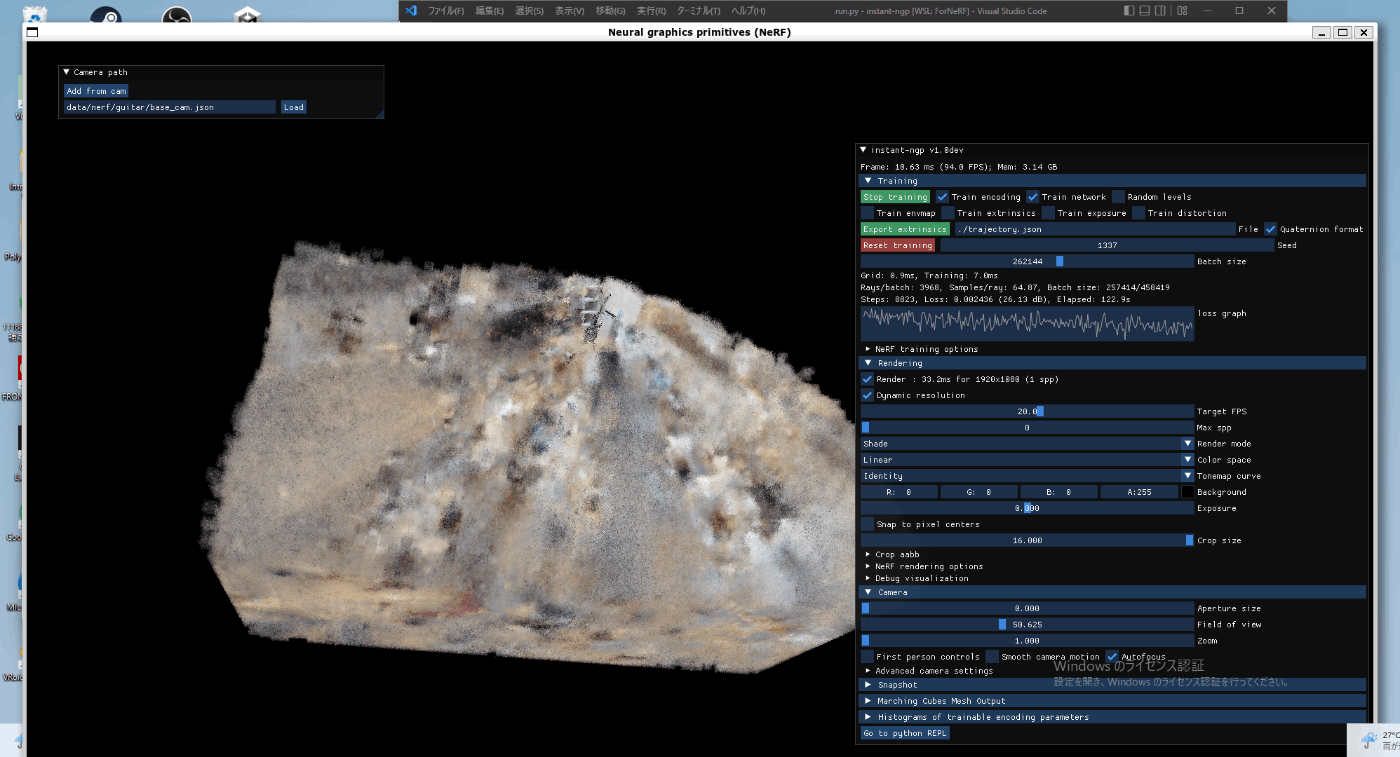
GUI上で
Crop aabb -> Size x,y,zの調整で見た目上は必要な部分の切り取りが出来た

あとはこれをPythonバインディングにパラメーターとして渡せればOKそう
いや、最大サイズが16だし、colmap2nerf.py実行時に渡してるオプションのaabb_scaleがこれか
colmap2nerf.pyの手順から、aabb_scaleオプションを16から2に変えてやり直した結果!
かなりそれっぽくなった!

テクスチャー込みの3Dデータはどうやってエクスポートするんだ?
For the color you can use MeshLab software
ってあるけどどういうことだろう
試しにMeshLabをインストールして生成したOBJファイルを開いてみたら色がついてる!!!!!
OBJファイルというものの理解が足りていなさそうだ
No: the mesh export currently only gives you per-face texturing / vertex colors. But you can import the mesh in third party software and unwrap it there. Cheers!
NeRFから出力された3DモデルにはVertex colorのみが与えられていて、Mesh colorは与えられていない
おそらく、MeshLabを使えば、Vertex colorからMesh Colorへ変換ができる?
Blenderでもできてよさそうだけど
Blenderでカラーを頂点カラーに変更しても色がつかないんだが。。
どういうこと???
PLY形式なら頂点カラー表示で色ついた!!!!

終わり!!!!

これ参考にすれば、実用的なモデル作成もできるかも