【Next.js × Newt】ヘッドレスCMSを使ってコーポレートサイトのニュース記事を公開する
1. はじめに
今回コーポレートサイトの制作において、ヘッドレス CMS の Newt を使いました。Newt を使うことで、簡単にニュース記事の一覧表示、記事内容の表示ができたのでご紹介します!
使用技術
- Next.js (13.4.1)
- Tailwind CSS (3.3.2)
- Newt
2. コンテンツの作成
Newt で記事を作成し API で取得できるようにするため、まずはコンテンツの準備から始めていきます。
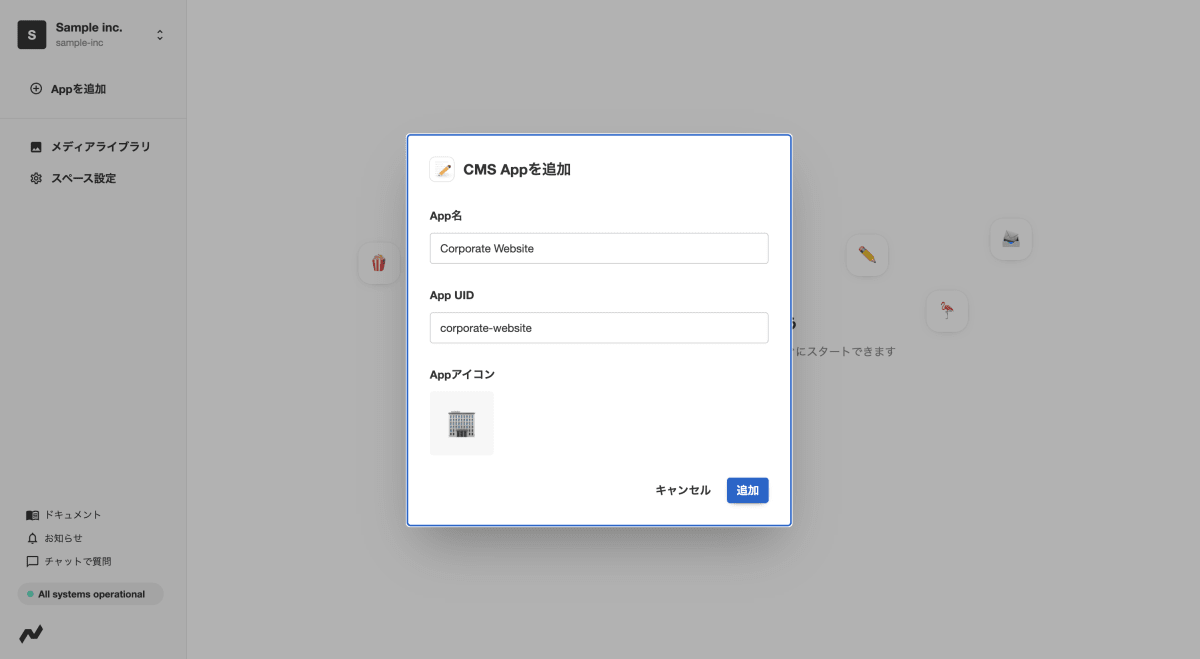
App の作成
こちらから Newt のアカウント登録をし、新規スペースを作成後、App を作成します。
今回、コーポレートサイトのみで管理したいコンテンツがいくつかあったので、「App を追加」→「タイプを選択して追加」→「CMS App」を選択し、App 名は「Corporate Website」としました。
App UID のcorporate-websiteは後で記事を取得する際に必要になるので、控えておきます。
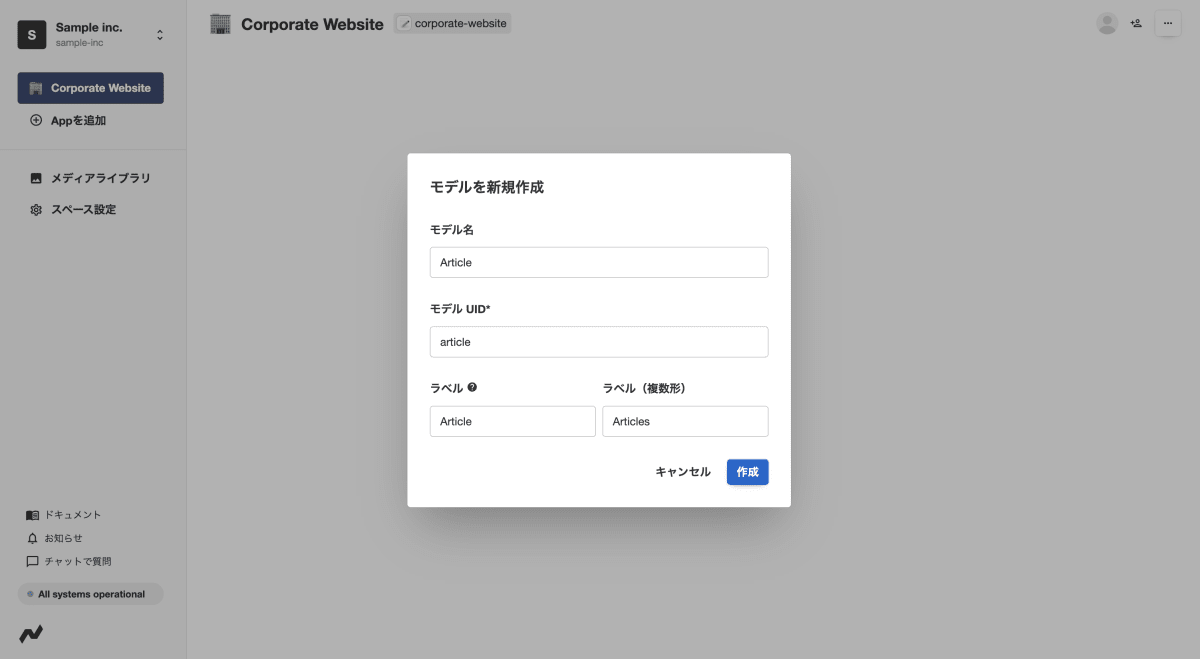
モデルの作成
次にモデルを作成します。わかりやすいようにモデル名は「Article」としました。
モデル UID のarticleは後で記事を取得する際に必要になるので、控えておきます。
続いて、App 設定の画面内で、ニュース記事に合わせてフィールドを作成していきます。
今回は 4 つのフィールドを作成します。
-
Title (記事のタイトル)
「テキスト」を選択し、情報を入力後、フィールドを追加します。 -
Slug (記事のスラッグ)
「テキスト」を選択し、情報を入力後、フィールドを追加します。 -
Meta (メタ情報)
まず、カスタムフィールドタイプを作成します。
フィールド選択の一番下にあるカスタムフィールドタイプから、「フィールドタイプ」を作成を押します。フィールドタイプ名・ID を入力し、以下 3 つのフィールドを追加します。それぞれフィールド名・ID を入力し、保存をします。
- Title: テキスト
- Description: テキスト
- OG Image: 画像
これで以下のカスタムフィールドタイプが作成できました。
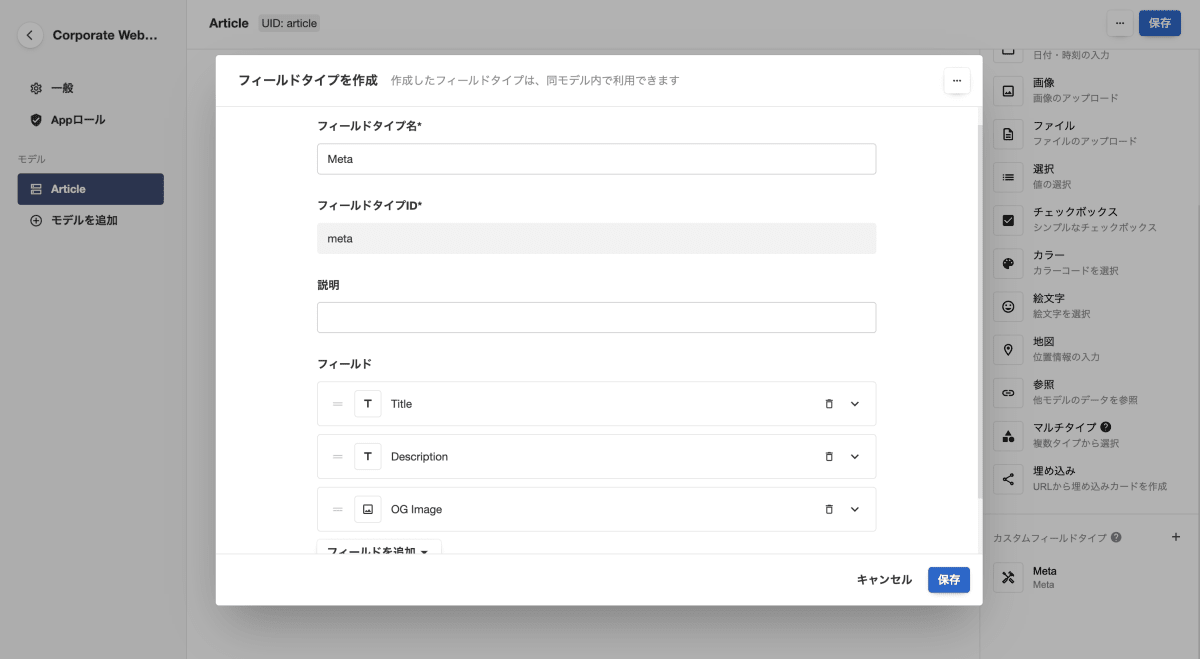
最後に、作成したカスタムフィールドタイプを選択し、情報を入力してモデルにフィールドを追加します。
-
Body (記事の本文)
「マークダウン」を選択し、情報を入力後、フィールドを追加します。
ビューの作成
App のトップ画面に戻ると、Articleというビューが作成されていることが確認できます。
ビューとは、ユーザーがコンテンツ管理作業を行うときに、ユーザーが実際に触れることになる管理画面 UI を指します。(参考)
記事の作成
「Article の追加」から、情報を入力し、ニュース記事を追加します。
これでコンテンツの準備ができました。
3. API エンドポイントの確認
API でデータを取得するために、API のエンドポイントを確認します。
Newt のエンドポイントは、以下のような形式になっています。ここで控えておいた App UID とモデル UID を使います。※ スペース UID は「スペース設定」から確認できます。
https://{spaceUid}.cdn.newt.so/v1/{appUid}/{modelUid}
続いて、API リクエストに必要なトークを発行します。手順は公式のドキュメントをご確認ください。
これで基本的な Newt のセットアップは全て完了しました。
4. 記事の一覧ページの作成
先にリクエストの準備をしておきます。こちらを参考に、環境変数の設定と SDK のインストールを行います。
記事の型を定義する
まずは、記事の型をtypes/article.tsに定義します。
export type Article = {
  _id: string;
  _sys: {
    createdAt: string;
    updatedAt: string;
    raw: {
      createdAt: string;
      updatedAt: string;
      firstPublishedAt: string;
      publishedAt: string;
    };
  };
  title: string;
  slug: string;
  meta:{
    title: string;
    description: string;
    ogImage: {
      _id: string;
      src: string;
      fileType: string;
      fileSize: number;
      fileName: string;
      width: number;
      height: number;
    };
  body: string;
};
記事の一覧を取得する
次に、lib/newt.tsファイルを作成し、記事の一覧を取得するメソッドを記述します。
import { createClient } from 'newt-client-js';
import type { Article } from '@/types/article'; // 今回はインポートエイリアスに @ を指定しています

// CDN APIを利用するためのクライアントを作成
const client = createClient({
  spaceUid: process.env.NEWT_SPACE_UID + '',
  token: process.env.NEWT_CDN_API_TOKEN + '',
  apiType: 'cdn',
});

export const getArticles = async () => {
  const { items } = await client.getContents<Article>({
    appUid: 'corporate-website',
    modelUid: 'article',
    query: {
      select: ['_id', '_sys', 'title', 'slug', 'meta', 'body'],
    },
  });
  return items;
};
記事の一覧を表示する
今回は Next.js の Pages Router を採用しています。
/newsというパスで記事の一覧を表示したいので、pages/news/index.tsxファイルを以下の通り作成します。
import { getArticles } from '@/libs/newt';
import type { Article } from '@/types/article';

export default function News({ articles }: { articles: Article[] }) {
  return (
    <div>
      <h1 className="text-3xl md:text-6xl mb-4 md:mb-6">NEWS</h1>
      <div className="mb-10 md:mb-20">
        <ul>
          {articles.map((article) => {
            return (
              <li
                key={article._id}
                className="flex flex-col lg:flex-row gap-2 lg:gap-10 mb-10 lg:mb-2"
              >
                <p>{article._sys.raw.firstPublishedAt}</p>
                <p className="font-bold hover:text-gray-600">
                  {article.title}
                </p>
              </li>
            );
          })}
        </ul>
      </div>
    </div>
  );
}

export const getStaticProps = async () => {
  const articles = await getArticles();
  return {
    props: {
      articles,
    },
  };
};
続いて、記事の公開日をYYYY.MM.DDで表示したいので、utils/formatDate.tsを作成し、pages/news/index.tsxの公開日表示部分を以下の通り変更します。
export const getFormattedDate = (isoDate: string) => {
  const dateObj = new Date(isoDate);

  const year = dateObj.getUTCFullYear();
  const month = dateObj.getUTCMonth() + 1;
  const day = dateObj.getUTCDate();

  // YYYY.MM.DD 形式の文字列に変換
  const formattedDate = `${year}.${month.toString().padStart(2, '0')}.${day
    .toString()
    .padStart(2, '0')}`;

  return formattedDate;
};
import { getArticles } from '@/libs/newt';
+ import { getFormattedDate } from '@/utils/formatDate';
import type { Article } from '@/types/article';

export default function News({ articles }: { articles: Article[] }) {
  return (
    <div>
      <h1 className="text-3xl md:text-6xl mb-4 md:mb-6">NEWS</h1>
      <div className="mb-10 md:mb-20">
        <ul>
          {articles.map((article) => {
            return (
              <li
                key={article._id}
                className="flex flex-col lg:flex-row gap-2 lg:gap-10 mb-10 lg:mb-2"
              >
-                  <p>{article._sys.raw.firstPublishedAt}</p>
+                  <p>{getFormattedDate(article._sys.raw.firstPublishedAt)}</p>
                <p className="font-bold hover:text-gray-600">
                  {article.title}
                </p>
              </li>
            );
          })}
        </ul>
      </div>
    </div>
  );
}

// 以下省略
これで/newsに記事の一覧を表示することができました。
5. 記事の詳細ページの作成
記事の詳細を取得する
記事の詳細を取得するために、lib/newt.tsにgetArticleBySlugメソッドを追加します。
import { createClient } from 'newt-client-js';
import type { Article } from '@/types/article'; // 今回はインポートエイリアスに @ を指定しています

// CDN APIを利用するためのクライアントを作成
const client = createClient({
  spaceUid: process.env.NEWT_SPACE_UID + '',
  token: process.env.NEWT_CDN_API_TOKEN + '',
  apiType: 'cdn',
});

export const getArticles = async () => {
  const { items } = await client.getContents<Article>({
    appUid: 'corporate-website',
    modelUid: 'article',
    query: {
      select: ['_id', '_sys', 'title', 'slug', 'meta', 'body'],
    },
  });
  return items;
};

+ export const getArticleBySlug = async (slug: string) => {
+   const article = await client.getFirstContent<Article>({
+     appUid: 'corporate-website',
+     modelUid: 'article',
+     query: {
+       slug,
+       select: ['_id', '_sys', 'title', 'slug', 'meta', 'body'],
+     },
+   });
+   return article;
+ };
動的に詳細ページを作成する
/news/:slugというパスで記事の詳細を表示したいので、pages/news/[slug].tsxファイルを作成します。
import Head from 'next/head';
import { getArticles, getArticleBySlug } from '@/libs/newt';
import { getFormattedDate } from '@/utils/formatDate';
import type { Article } from '@/types/article';

type Props = { article: Article; slug: string };

export default function Article({ article, slug }: Props) {
  return (
    <>
      <Head>
        <title>{article.meta.title}</title>
        <meta name="description" content={article.meta.description} />
        <meta property="og:title" content={article.meta.title} />
        <meta
          property="og:description"
          content={article.meta.description}
        />
        <meta property="og:image" content={article.meta.ogImage.src} />
        <meta property="og:url" content={`https://xxxxx/news/${slug}`} /> // 実際のURLに変更してください
        <meta property="og:type" content="article" />
      </Head>

      <main>
        <div>
          <p>
            {getFormattedDate(article._sys.raw.firstPublishedAt)}
          </p>
          <h1>{article.title}</h1>
          <div dangerouslySetInnerHTML={{ __html: article.body }} />
        </div>
      </main>
    </>
  );
}

export const getStaticPaths = async () => {
  const articles = await getArticles();
  return {
    paths: articles.map((article) => ({
      params: {
        slug: article.slug,
      },
    })),
    fallback: false,
  };
};

export const getStaticProps = async ({
  params,
}: {
  params: { slug: string };
}) => {
  const { slug } = params;
  const article = await getArticleBySlug(slug);
  return {
    props: {
      article,
      slug,
    },
  };
};
一覧ページで記事タイトルをクリックした際に詳細ページに遷移するようにしたいので、pages/news/index.tsxを以下の通り変更します。
+ import Link from 'next/link';
import { getArticles } from '@/libs/newt';
import { getFormattedDate } from '@/utils/formatDate';
import type { Article } from '@/types/article';

export default function News({ articles }: { articles: Article[] }) {
  return (
    <div>
      <h1 className="text-3xl md:text-6xl mb-4 md:mb-6">NEWS</h1>
      <div className="mb-10 md:mb-20">
        <ul>
          {articles.map((article) => {
            return (
              <li
                key={article._id}
                className="flex flex-col lg:flex-row gap-2 lg:gap-10 mb-10 lg:mb-2"
              >
                <p>{getFormattedDate(article._sys.raw.firstPublishedAt)}</p>
+                <Link href={`news/${article.slug}`}>
                  <p className="font-bold hover:text-gray-600">
                    {article.title}
                  </p>
+                </Link>
              </li>
            );
          })}
        </ul>
      </div>
    </div>
  );
}

// 以下省略
記事にスタイルを適用する
styles/globals.cssで主要な要素のスタイルを定義し、pages/news/[slug].tsxでスタイルを適用させます。
@tailwind base;
@tailwind components;
@tailwind utilities;

@layer components {
  .article-container {
    @apply mx-auto max-w-4xl px-6 py-10 md:py-20 lg:items-center lg:gap-x-10 lg:px-8 text-justify;
  }

  .article-published-at {
    @apply text-base;
  }

  .article-title {
    @apply font-bold text-xl md:text-3xl py-4;
  }

  .article h1 {
    @apply font-bold text-xl md:text-3xl text-left py-2;
  }

  .article h2 {
    @apply text-lg md:text-2xl text-left py-2 pl-4 border-l-8 border-orange-600;
  }

  .article h3 {
    @apply text-base md:text-xl text-left py-2 pb-2 mb-2 border-b-2 border-orange-600;
  }

  .article p {
    @apply text-sm md:text-base whitespace-pre-wrap text-justify py-2;
  }

  .article img {
    @apply mx-auto my-4;
  }

  .article ul {
    @apply list-disc ml-8 py-2;
  }

  .article ol {
    @apply list-decimal ml-8 py-2;
  }
}
import Head from 'next/head';
import { getArticles, getArticleBySlug } from '@/libs/newt';
import { getFormattedDate } from '@/utils/formatDate';
import type { Article } from '@/types/article';

type Props = { article: Article; slug: string };

export default function Article({ article, slug }: Props) {
  return (
    <>
      <Head>
        <title>{article.meta.title}</title>
        <meta name="description" content={article.meta.description} />
        <meta property="og:title" content={article.meta.title} />
        <meta
          property="og:description"
          content={article.meta.description}
        />
        <meta property="og:image" content={article.meta.ogImage.src} />
        <meta property="og:url" content={`https://xxxxx/news/${slug}`} /> // 実際のURLに変更してください
        <meta property="og:type" content="article" />
      </Head>

      <main>
-        <div>
-          <p>
-            {getFormattedDate(article._sys.raw.firstPublishedAt)}
-          </p>
-          <h1>{article.title}</h1>
-          <div dangerouslySetInnerHTML={{ __html: article.body }} />
-        </div>
+        <div className="article-container">
+          <p className="article-published-at">
+            {getFormattedDate(article._sys.raw.firstPublishedAt)}
+          </p>
+          <h1 className="article-title">{article.title}</h1>
+          <div dangerouslySetInnerHTML={{ __html: article.body }} className="article" />
+        </div>
      </main>
    </>
  );
}

// 以下省略
以上で、記事の詳細ページも作成することができました!
6. 最後に
今後、誰でも簡単にコンテンツを更新できるようにしたいという理由から、Newt を選定しました。
結果的に、コンテンツの更新はもちろんのこと、導入自体も、公式のドキュメントがとてもわかりやすいので私のような初学者でもつまずくことなく、簡単にすることができました。
Newt が提供しているフォーム機能「Form App」についても、今後記事化したいと思います!
Discussion