eas.jsonを設定して、EASビルドする方法
はじめに
eas.jsonを設定したので、developmentでビルドできるか検証しました。
eas.jsonとは?
こちらに詳しく書いたので、ご覧ください。
eas.jsonを設定
eas.jsonに下記の内容を記載
{
  "cli": {
    "version": ">= 10.2.4",
    "appVersionSource": "remote"
  },
  "build": {
    "development": {
      "developmentClient": true,
      "distribution": "internal"
    },
    "preview": {
      "distribution": "internal"
    },
    "production": {
      "autoIncrement": true
    }
  },
  "submit": {
    "production": {}
  }
}
ビルド準備
easがインストールされているか確認
$ eas login
されていなかったらインストール
$ npm install -g eas-cli
ビルドします。
$ eas build:configure
上記のコマンドを打つと、下記の質問が出てきます。
✔ Would you like to automatically create an EAS project for @mii/mobile? … yes
✔ Which platforms would you like to configure for EAS Build? › All
🎉 Your project is ready to build.と書かれたら完了です!
developmentでビルド
preview,productionもあるのですが、今回はdevelopmentのビルドを行なっていきます。
下記のコマンドを実行
$ eas build --profile development --platform all
コマンド実行後、質問が出てきますので、答えていく。
✔ Do you want EAS CLI to install expo-dev-client for you? … yes
✔ What would you like your Android application id to be? … com.mii.app
✔ Generate a new Android Keystore? … yes
yes or no
初めてのビルドでまだKeystoreを持っていない場合は、y(Yes)を選択。
Expoが新しいAndroid Keystore(署名に必要な証明書ファイル)を自動生成します。
KeystoreはExpoのサーバーに安全に保存されます。
既存のアプリを更新する場合は、n(No)を選択。
確認が必要: すでにGoogle Playに公開されているアプリの更新ビルドである場合、以前のKeystoreで署名する必要があります。
新しいKeystoreを生成してしまうと、Google Playは署名が異なると判断し、アプリの更新を拒否します。
✔ What would you like your iOS bundle identifier to be? … com.mii.app
? Do you want to log in to your Apple account? › (Y/n)
Apple IDを入れます。

? Generate a new Apple Distribution Certificate? › (Y/n)

yes or no
初めてのビルドの場合は、Yを選択。
新しい証明書を生成してください。
まだApple Distribution Certificateを持っていない場合、Expoが自動で生成し、必要な設定を処理します。
すでに証明書を持っている場合は、nを選択。
Expoに既存の証明書を使用させることができます。
? You don't have any registered devices yet. Would you like to register them now? › (Y/n)
yes or no
開発用ビルドを作成してテストしたい場合は、Y(Yes)を選択。
まだ登録されていないデバイス(iPhone、iPad)を Apple Developer アカウントに追加し、ビルドに使用できるようにします。
登録したデバイスでのみテスト用アプリをインストールして実行できます。
App Store への配布ビルドを作成する場合は、N(No)を選択。
App Store で公開するビルドには、特定のデバイス登録は必要ありません。
Expo CLI の質問をスキップしてそのまま進めてください。
デバイス登録を手動で行いたい場合は、N(No)を選択。
手動でデバイスを Apple Developer Portal に登録します。
? How would you like to register your devices? › - Use arrow-keys. Return to submit.

select
-
Website(おすすめ)
デバイスを登録するための専用URLを生成し、登録したいiOSデバイスでそのURLを開きます。
デバイスのUDIDが自動的に取得され、Apple Developer Portalに登録されます。
簡単で、複数のデバイスを素早く登録可能。 -
Developer Portal
すでにApple Developer Portalに登録済みのデバイスをインポートします。
Apple Developer Portalでデバイスを登録済みの場合に適しています。
既存デバイスの登録情報を再利用でき、手間が省ける。 -
Input
手動でUDIDを入力してデバイスを登録します。
高度なオプションで、特定のデバイスだけを直接登録したい場合に使用。
UDIDを正確に把握している場合、無駄なく登録可能。 -
Current Machine
現在使用中のApple Silicon Macをデバイスとして登録します。
macOSアプリの開発で、Macを直接テストデバイスとして使いたい場合に便利。
macOSデバイスでのみ必要になる特殊なケース。 -
Exit
デバイス登録を中断し、操作を終了します。
デバイス登録を今は行いたくない場合、または登録方法を再検討したい場合に使用。
Websiteを選択すると、これが出ます。

デバイス登録方法
QRコードを登録したいデバイスで読み取る

デバイスにこちらの画面が出ます。ダウンロードプロファイルを押下します。

ダウンロード済みのプロファイルを押下して

インストールを押下します。

こちらの画面になれば完了です!

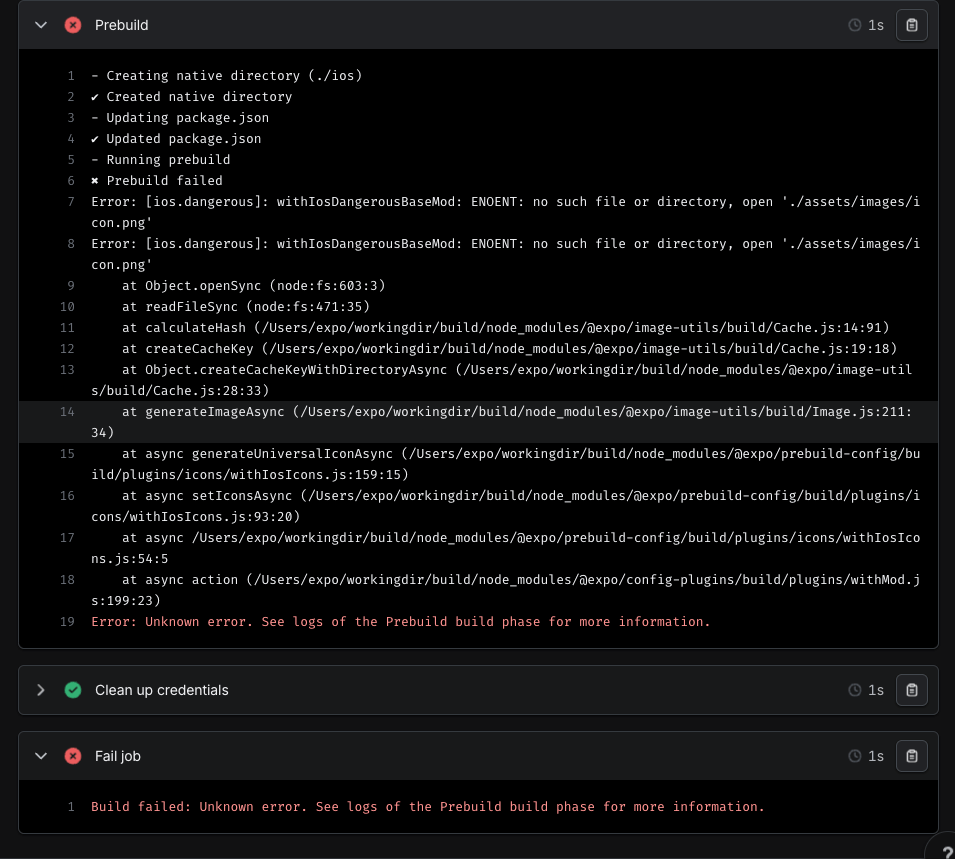
登録してビルドしていたらエラーがでたので対応
エラーが発生

ビルドログを確認
リンクから失敗したビルドの詳細ログを確認します:
Android ビルドログ:
Android build details
iOS ビルドログ:
iOS build details
- Creating native directory (./android)
✔ Created native directory
- Updating package.json
✔ Updated package.json
- Running prebuild
✖ Prebuild failed
Error: [android.dangerous]: withAndroidDangerousBaseMod: ENOENT: no such file or directory, open './assets/images/adaptive-icon.png'
Error: [android.dangerous]: withAndroidDangerousBaseMod: ENOENT: no such file or directory, open './assets/images/adaptive-icon.png'
    at Object.openSync (node:fs:603:3)
    at readFileSync (node:fs:471:35)
    at calculateHash (/home/expo/workingdir/build/node_modules/@expo/image-utils/build/Cache.js:14:91)
    at createCacheKey (/home/expo/workingdir/build/node_modules/@expo/image-utils/build/Cache.js:19:18)
    at Object.createCacheKeyWithDirectoryAsync (/home/expo/workingdir/build/node_modules/@expo/image-utils/build/Cache.js:28:33)
    at generateImageAsync (/home/expo/workingdir/build/node_modules/@expo/image-utils/build/Image.js:211:34)
    at async generateIconAsync (/home/expo/workingdir/build/node_modules/@expo/prebuild-config/build/plugins/icons/withAndroidIcons.js:352:11)
    at async /home/expo/workingdir/build/node_modules/@expo/prebuild-config/build/plugins/icons/withAndroidIcons.js:276:21
    at async Promise.all (index 0)
    at async generateMultiLayerImageAsync (/home/expo/workingdir/build/node_modules/@expo/prebuild-config/build/plugins/icons/withAndroidIcons.js:272:3)
Error: Unknown error. See logs of the Prebuild build phase for more information.
Build failed: Unknown error. See logs of the Prebuild build phase for more information.
実際のExpo画面

Error: [android.dangerous]: withAndroidDangerousBaseMod: ENOENT: no such file or directory, open './assets/images/adaptive-icon.png'
このエラーは、必要なアイコンファイルが存在しなかったため発生しています。
サンプルからassets/images配下の画像を全部コピペして持ってきました。
これでビルドができました🎉
デバイスで見れるか確認
ビルドができたら、下記のQEコードが出てきます。

iOSのリンクを押下

installを押下

この画面が出てきます。

このQRコードを読み込むと、このモーダルが出るので、インストールを押下します。

これでアプリがインストールされました🎉

アプリを開こうとしたら、ディベロッパーモードにする必要があったので、設定します。

ディベロッパーモードの設定
ディベロッパーモードをオンにします。

再起動します。

再起動し終わったら、オンにします。

アプリを開くとこの画面になります!

アプリを立ち上げる
ターミナルで下記コマンドで立ち上げて読み込みます。
npm run dev
このQRコードをデバイスで読み込みます。


許可を押下します。

自分の作ったアプリが開けました🎉これで完了です!

おまけ
Androidのエミュレータも開くかどうか聞かれるので、それもやりました。
✔ Install and run the Android build on an emulator? … yes

Androidエミュレータが立ち上がりました!

今回は記載しませんが、下記のコマンドも今後やっていきます。
previewのコマンド
eas build --profile preview --platform all
productionのコマンド
eas build --profile production --platform all
まとめ
eas.jsonを設定して、developmentでビルドする方法を記載しました。
Discussion