A-Frameでgltfモデルにclickイベントを付与する方法


はじめに
A-Frameでは、gltfモデルに直接クリックイベントを登録できないため、少し遠回りな方法で実現する必要があります。
結論
- gltfモデルを直接クリックすることは現時点ではおそらく不可能
- 透明な当たり判定オブジェクトを埋め込むことで疑似的にクリック可能にする
当たり判定用のオブジェクトを重ねる。
A-Frameにデフォルトで用意されているcylinder(円柱)やbox(箱)などのオブジェクトには、クリックイベントを登録できます。これを3Dモデルと重ねて当たり判定オブジェクトにしていきます。
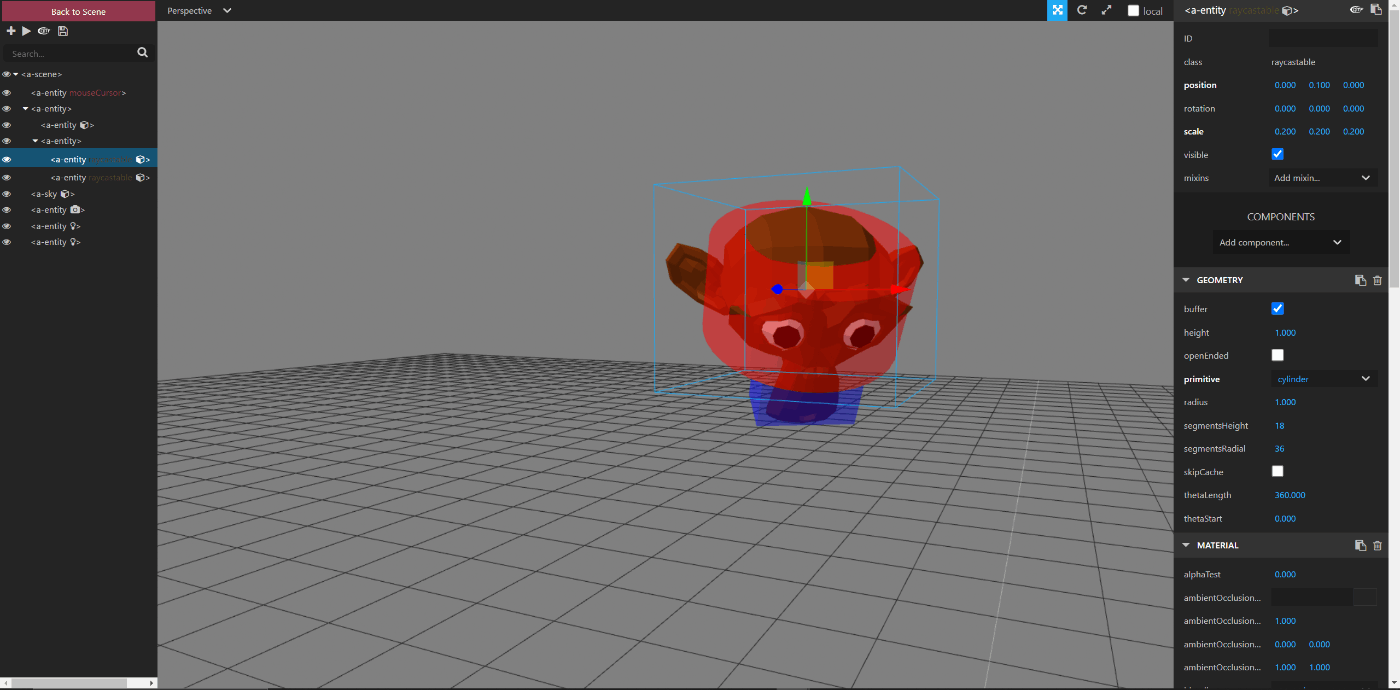
イメージはこんな感じです。赤色のcylinderオブジェクトと青色のboxオブジェクトにクリックイベントを登録します。
<!DOCTYPE html>
<html>
    <head>
        <meta charset="UTF-8" />
        <title>hit-box test</title>
        <script src="https://aframe.io/releases/1.3.0/aframe.min.js"></script>
        <script>
            AFRAME.registerComponent('hit-box', {
                init:function(){
                    this.el.addEventListener('click', ()=>{
                        alert('clicked!');
                    });
                }
            });
        </script>
    </head>
    <body>
        <a-scene>
            <a-assets>
                <a-asset-item id="monkeyModel" src="/assets/models/free/monkey.glb"></a-asset-item>
            </a-assets>

            <!-- マウスカーソル -->
            <a-entity id="mouseCursor" cursor="rayOrigin: mouse" raycaster="objects: .raycastable"></a-entity>

            <!-- クリックしたいentityグループ -->
            <a-entity position="0 1.6 -1">
                <!-- 3Dモデル -->
                <a-entity gltf-model="#monkeyModel" scale="0.2 0.2 0.2"></a-entity>

                <!-- 当たり判定オブジェクト -->
                <a-entity position="0 -0.05 0" hit-box>
                    <a-entity class="raycastable" geometry="primitive:cylinder" material="color:red; opacity: 0.5" scale="0.2 0.2 0.2" position="0 0.1 0" visible="true"></a-entity>
                    <a-entity class="raycastable" geometry="primitive:box" material="color:blue; opacity: 0.5" scale="0.2 0.25 0.1" position="0 0 0.1" visible="true"></a-entity>
                </a-entity>
            </a-entity>

            <a-sky color="gray"></a-sky>
        </a-scene>
    </body>
</html>
ここから「当たり判定オブジェクト」のscale, positionなどを調整し、理想の当たり判定に近づけていきます。opacity (透明度)を設定しておくと調整時に見やすいです。ブラウザでa-sceneを開いているとき、Ctrl + Alt + I で編集モードを開けるので、これで良い感じの座標に調整します。
当たり判定オブジェクトを見えなくする。
納得いくまで当たり判定の座標を調整したら「当たり判定オブジェクト」の a-entity に visible="false" の属性を設定します。
                <!-- 当たり判定オブジェクト -->
                <a-entity position="0 -0.05 0" hit-box visible="false">
                    <a-entity class="raycastable" geometry="primitive:cylinder" material="color:red; opacity: 0.5" scale="0.2 0.2 0.2" position="0 0.1 0" visible="true"></a-entity>
                    <a-entity class="raycastable" geometry="primitive:box" material="color:blue; opacity: 0.5" scale="0.2 0.25 0.1" position="0 0 0.1" visible="true"></a-entity>
                </a-entity>
当たり判定オブジェクトが見えなくなりました。3Dモデルの外側をクリックしても当たり判定内であれば反応しますが、厳密なゲーム等で無い限りそこまで気にならないと思います。
以上の処理で、ユーザから見ると3Dモデルをクリックしたときにイベントが起きたように見えます。
アニメーション対応
当たり判定ごとアニメーションさせたいときは親のa-entity要素にアニメーション設定します。これで子要素の3Dモデル、当たり判定全体がアニメーションします。
            <!-- クリックしたいentityグループ -->
            <a-entity
                position="-0.3 1.6 -1"
                rotation="0 0 0"
                animation="property: position; to:0.3, 1.6 -1; loop: true; dur: 2000"
                animation__2="property: rotation; to: 360 360 0; loop: true; dur: 2000"
            >
                <!-- 3Dモデル -->
                <a-entity gltf-model="#monkeyModel" scale="0.2 0.2 0.2"></a-entity>

                <!-- 当たり判定オブジェクト -->
                <a-entity position="0 -0.05 0" hit-box visible="true">
                    <a-entity class="raycastable" geometry="primitive:cylinder" material="color:red; opacity: 0.5" scale="0.2 0.2 0.2" position="0 0.1 0"></a-entity>
                    <a-entity class="raycastable" geometry="primitive:box" material="color:blue; opacity: 0.5" scale="0.2 0.25 0.1" position="0 0 0.1"></a-entity>
                </a-entity>

            </a-entity>
最後に
読んでいただきありがとうございました。
学びたての頃は3Dモデルを直接クリックしようとして、cursorオブジェクトやraycasterの調整などいろいろ試行錯誤したり海外の記事を漁ったりしていました。それでも3Dモデルを直接クリックすることはできなかったため、直接のクリックは諦めてこのような方法でクリック判定を作りました。同じ事象で悩んでいる方の参考になれば幸いです。
Discussion