【AKS】Azure Kubernetes Service で Azure App Configuration を使用する をやってみた


先日まで、AKSで App Configuration プロバイダーを使用するのがPreviewだったと思うんですが、GAされたようなので、これを機にクイックスタートをやってみました。
実行環境
ローカル Azure Cloud Shell[1]
【事前準備】Azure リソースの作成
こちらはすでに作成していたらskipして大丈夫です。
リソースグループの作成
名前はご自由に。
$ RGNAME=aks-app-configuration-quickstart
$ az group create --location japaneast --name $RGNAME
App Configuration ストア の作成
App Configuration ストアを作成する を元に作成します。
ストア名はグローバルに一意である必要があるので各自変更してください。
$ az appconfig create --location japaneast --name app-configuration-quickstart-1986 --resource-group $RGNAME --sku Free
Azure Container Registry の作成
- レジストリの作成
Azure Container Registry を作成する を元に作成します。
レジストリ名はAzure 内で一意にする必要があるので各自変更してください。
$ ACRNAME=aksappconfigurationquickstartacrh58lsi
$ az acr create --resource-group $RGNAME --name $ACRNAME --sku Basic --admin-enabled
- (--admin-enabled をつけ忘れた場合)管理者ユーザの有効
Portal から コンテナレジストリの画面の、アクセスキーから管理者ユーザのチェックボックスにチェックを入れて、管理者ユーザを有効化します。作成時にオプション付けないとこれが必要です。

AKS クラスターを作成する
Kubernetes クラスターを作成する を元に作成します。
$ AKSNAME=aks-app-configuration-cluster
$ az aks create --resource-group $RGNAME --name $AKSNAME --node-count 2 --generate-ssh-keys --attach-acr $ACRNAME
AKS で実行されているアプリケーションを作成する
アプリケーションの作成
- .NET7アプリケーションを作成します。
今回は作業用のディレクトリを作ってから、その中にアプリケーションを作成しています。
$ dotnet new webapp --output MyWebApp --framework net7.0

Welcome to .NET 7.0!
---------------------
SDK Version: 7.0.403

Telemetry
---------
The .NET tools collect usage data in order to help us improve your experience. It is collected by Microsoft and shared with the community. You can opt-out of telemetry by setting the DOTNET_CLI_TELEMETRY_OPTOUT environment variable to '1' or 'true' using your favorite shell.

Read more about .NET CLI Tools telemetry: https://aka.ms/dotnet-cli-telemetry

----------------
Installed an ASP.NET Core HTTPS development certificate.
To trust the certificate run 'dotnet dev-certs https --trust' (Windows and macOS only).
Learn about HTTPS: https://aka.ms/dotnet-https
----------------
Write your first app: https://aka.ms/dotnet-hello-world
Find out what's new: https://aka.ms/dotnet-whats-new
Explore documentation: https://aka.ms/dotnet-docs
Report issues and find source on GitHub: https://github.com/dotnet/core
Use 'dotnet --help' to see available commands or visit: https://aka.ms/dotnet-cli
--------------------------------------------------------------------------------------
The template "ASP.NET Core Web App" was created successfully.
This template contains technologies from parties other than Microsoft, see https://aka.ms/aspnetcore/7.0-third-party-notices for details.

Processing post-creation actions...
Restoring /usr/cloudshell/MyWebApp/MyWebApp.csproj:
  Determining projects to restore...
  Restored /usr/cloudshell/MyWebApp/MyWebApp.csproj (in 52 ms).
Restore succeeded.
dotnetバージョンについて
公式は6.0 でしたが、2023/11/24 時点 6.0で作成しようとすると7.0 で作りなさいというエラーになりました。Azure Cloud Shell でのSDKのバージョンが7系になったからのようです。
$ dotnet new webapp --output MyWebApp --framework net6.0

Welcome to .NET 7.0!
---------------------
SDK Version: 7.0.403

Telemetry
---------
The .NET tools collect usage data in order to help us improve your experience. It is collected by Microsoft and shared with the community. You can opt-out of telemetry by setting the DOTNET_CLI_TELEMETRY_OPTOUT environment variable to '1' or 'true' using your favorite shell.

Read more about .NET CLI Tools telemetry: https://aka.ms/dotnet-cli-telemetry

----------------
Installed an ASP.NET Core HTTPS development certificate.
To trust the certificate run 'dotnet dev-certs https --trust' (Windows and macOS only).
Learn about HTTPS: https://aka.ms/dotnet-https
----------------
Write your first app: https://aka.ms/dotnet-hello-world
Find out what's new: https://aka.ms/dotnet-whats-new
Explore documentation: https://aka.ms/dotnet-docs
Report issues and find source on GitHub: https://github.com/dotnet/core
Use 'dotnet --help' to see available commands or visit: https://aka.ms/dotnet-cli
--------------------------------------------------------------------------------------
Error: Invalid option(s):
--framework net6.0
   'net6.0' is not a valid value for --framework. The possible values are:
      net7.0   - Target net7.0

For more information, run:
   dotnet new webapp -h

For details on the exit code, refer to https://aka.ms/templating-exit-codes#127
- Pages/Index.cshtml のコードを以下に置き換えます。
$ cd MyWebApp
$ vi Pages/Index.cshtml
@page
@model IndexModel
@using Microsoft.Extensions.Configuration
@inject IConfiguration Configuration
@{
    ViewData["Title"] = "Home page";
}

<style>
    h1 {
        color: @Configuration["Settings:FontColor"];
    }
</style>

<div class="text-center">
    <h1>@Configuration["Settings:Message"]</h1>
</div>
- プロジェクト ディレクトリのルートに mysettings.json という名前 のファイルを作成し、次の内容を入力します。
# touch mysettings.json
# vi mysettings.json
{
  "Settings": {
    "FontColor": "Black",
    "Message": "Message from the local configuration"
  }
}
- Program.cs を変更してJSONファイルを読み込むようにします。
$ vi Program.cs
var builder = WebApplication.CreateBuilder(args);

// Add services to the container.
builder.Services.AddRazorPages();

+ // Add a JSON configuration source
+ builder.Configuration.AddJsonFile("mysettings.json");

var app = builder.Build();
アプリケーションのコンテナー格納
- アプリをビルドしてアセットファイルを作成します。
$ dotnet publish -c Release -o published
MSBuild version 17.7.3+4fca21998 for .NET
  Determining projects to restore...
  All projects are up-to-date for restore.
  MyWebApp -> /usr/cloudshell/MyWebApp/bin/Release/net7.0/MyWebApp.dll
  MyWebApp -> /usr/cloudshell/MyWebApp/published/
- プロジェクト ディレクトリのルートに Dockerfile を作成します。Dockerfileの中身は以下のようにします。
$ touch Dockerfile
$ vi Dockerfile
FROM mcr.microsoft.com/dotnet/aspnet:7.0 AS runtime
WORKDIR /app
COPY published/ ./
ENTRYPOINT ["dotnet", "MyWebApp.dll"]
- aspnetapp という名前のコンテナー イメージをビルドします。
$ docker build --tag aspnetapp .
[+] Building 5.1s (8/8) FINISHED
 => [internal] load .dockerignore                                                                                  0.1s
 => => transferring context: 2B                                                                                    0.0s
 => [internal] load build definition from Dockerfile                                                               0.1s
 => => transferring dockerfile: 159B                                                                               0.0s
 => [internal] load metadata for mcr.microsoft.com/dotnet/aspnet:7.0                                               0.5s
 => [1/3] FROM mcr.microsoft.com/dotnet/aspnet:7.0@sha256:567be43cf97d21523845af3cadf576517bc541cbf18d4a5d11b3687  4.0s
 => => resolve mcr.microsoft.com/dotnet/aspnet:7.0@sha256:567be43cf97d21523845af3cadf576517bc541cbf18d4a5d11b3687  0.0s
 => => sha256:567be43cf97d21523845af3cadf576517bc541cbf18d4a5d11b36873d2b025c4 1.79kB / 1.79kB                     0.0s
 => => sha256:f60c55ee78a09d0047fad6ac7638ad83368fe660e95e2f73848ff2f051b6f4d8 1.37kB / 1.37kB                     0.0s
 => => sha256:c4ee1b0c8d5d61209773fde896aad6dc5335320d5d60355208dfffb1b3c710b7 2.36kB / 2.36kB                     0.0s
 => => sha256:b7f91549542cca4b35a34cdee5364339f17468971ea730bb072864d3e78c8b94 31.42MB / 31.42MB                   1.6s
 => => sha256:a976ebe67a5a13f3b88541bec8be0171b680df446365c3d24140a2892b92eb34 14.97MB / 14.97MB                   0.5s
 => => sha256:01f22fa85c0ae740e3132b4e518b3dcf1ca9fe8bf540c5cd072d5047295742bf 32.46MB / 32.46MB                   1.3s
 => => sha256:ef7250e794662a50cc3b6a01908c0f71cd794bbcff7f85f1b8857513ecad2888 155B / 155B                         0.6s
 => => sha256:f16f1898acfe5c94c7831885068d3371c10b2df2e3dc3774f8ab04ae03413eeb 10.12MB / 10.12MB                   1.1s
 => => extracting sha256:b7f91549542cca4b35a34cdee5364339f17468971ea730bb072864d3e78c8b94                          1.2s
 => => extracting sha256:a976ebe67a5a13f3b88541bec8be0171b680df446365c3d24140a2892b92eb34                          0.2s
 => => extracting sha256:01f22fa85c0ae740e3132b4e518b3dcf1ca9fe8bf540c5cd072d5047295742bf                          0.4s
 => => extracting sha256:ef7250e794662a50cc3b6a01908c0f71cd794bbcff7f85f1b8857513ecad2888                          0.0s
 => => extracting sha256:f16f1898acfe5c94c7831885068d3371c10b2df2e3dc3774f8ab04ae03413eeb                          0.1s
 => [internal] load build context                                                                                  0.1s
 => => transferring context: 8.40MB                                                                                0.0s
 => [2/3] WORKDIR /app                                                                                             0.2s
 => [3/3] COPY published/ ./                                                                                       0.1s
 => exporting to image                                                                                             0.1s
 => => exporting layers                                                                                            0.1s
 => => writing image sha256:a4e49d52258c9473ef2a5a2c3fddc3a5edb84ac4c6cd95cbcaf5d20195f7ba37                       0.0s
 => => naming to docker.io/library/aspnetapp:latest                                                                0.0s
Azure Container Registry にイメージをプッシュする
- az acr login でレジストリにログインします。
$ az acr login --name $ACRNAME
Login Succeeded
- イメージ用のタグを作成します
$ docker tag aspnetapp $ACRNAME.azurecr.io/aspnetapp:v1
- イメージをコンテナー レジストリにアップロードします。
$ docker push $ACRNAME.azurecr.io/aspnetapp:v1
The push refers to repository [aksappconfigurationquickstartacrh58lsi.azurecr.io/aspnetapp]
3c9e99900b64: Pushed
12613b9b3d18: Pushed
ee7107da446b: Pushed
9165c11d69c3: Pushed
db3084a64bb8: Pushed
d3a323cd3227: Pushed
1b6fd3ad4ce6: Pushed
v1: digest: sha256:dc020484dfd734052ba76bd726625d8befc5a4ad790c8299fa0fcdb99faae0b0 size: 1789
アプリケーションのデプロイ
- Deployment ディレクトリを作成します。
$ mkdir Deployment
- deployment.yaml ファイルを追加します。ファイルの内容は以下のようにします。
$ cd Deployment
$ touch deployment.yaml
$ vi deployment.yaml
apiVersion: apps/v1
kind: Deployment
metadata:
  name: aspnetapp-demo
  labels:
    app: aspnetapp-demo
spec:
  replicas: 1
  selector:
    matchLabels:
      app: aspnetapp-demo
  template:
    metadata:
      labels:
        app: aspnetapp-demo
    spec:
      containers:
      - name: aspnetapp
        image: aksappconfigurationquickstartacrh58lsi.azurecr.io/aspnetapp:v1 # 自分のACR名に変更する
        ports:
        - containerPort: 80
- service.yaml ファイルを Deployment ディレクトリに追加します。LoadBalancerの設定を記述します。
$ touch service.yaml
$ vi service.yaml
apiVersion: v1
kind: Service
metadata:
  name: aspnetapp-demo-service
spec:
  type: LoadBalancer
  ports:
  - port: 80
  selector:
    app: aspnetapp-demo
- アプリケーションを AKS クラスターにデプロイします。
$ cd ../
[ /usr/cloudshell/MyWebApp ]# kubectl create namespace appconfig-demo
namespace/appconfig-demo created
[ /usr/cloudshell/MyWebApp ]# kubectl apply -f ./Deployment -n appconfig-demo
deployment.apps/aspnetapp-demo created
service/aspnetapp-demo-service created
- LoadBalancer によって公開される外部 IP アドレスを取得します。
$ kubectl get service aspnetapp-demo-service -n appconfig-demo
NAME                     TYPE           CLUSTER-IP    EXTERNAL-IP   PORT(S)        AGE
aspnetapp-demo-service   LoadBalancer   10.0.168.44   4.241.27.99   80:30783/TCP   67s
- ブラウザで EXTERNAL-IP にアクセスします。

表示されました~!
App Configuration Kubernetes プロバイダー を使用する
Azure App Configuration ストアのセットアップ
KeyとValueをストアに追加します。
| Key | Value |
|---|---|
| Settings:FontColor | green |
| Settings:Message | "Hello from Azure App Configuration" |
※ダブルクォートはなくてもいいみたいです。

App Configuration Secret マニュフェストの作成
公式docsだとワークロードID を使ったやり方で接続させるみたいなんですが、うまくいかなかったので、おとなしく App Configuration の接続文字列を使ったやり方をします。
接続文字列の使用
そのために、接続文字列を保持するsecretを作成します。
なんだか本末転倒感もありますが、背に腹は代えられぬ。
まずは、Deployment ディレクトリの下に appConfigurationSecret.yaml を作成します。
apiVersion: v1
kind: Secret
metadata:
  name: app-configuration-secret
type: Opaque
data:
  azure_app_configuration_connection_string: <接続文字列をbase64エンコードした文字列>
接続文字列は App Configuration の [アクセスキー] から、読み取り専用キーの接続文字列をコピーします。その値を丸ごと base64 エンコードしてください。
App Configuration Kubernetes プロバイダーをセットアップする
- AKS クラスターのアクセス資格情報を取得します。
$ az aks get-credentials --resource-group $RGNAME --name $AKSNAME
- helm を使用して、Azure App Configuration Kubernetes プロバイダーを AKS クラスターにインストールします。
$ helm install azureappconfiguration.kubernetesprovider \
     oci://mcr.microsoft.com/azure-app-configuration/helmchart/kubernetes-provider \
     --namespace azappconfig-system \
     --create-namespace
Pulled: mcr.microsoft.com/azure-app-configuration/helmchart/kubernetes-provider:1.0.0
Digest: sha256:e4634b18d6a151bf81a92114c397549cd2b14a03ead50b3ea7a06b038fe6ad89
NAME: azureappconfiguration.kubernetesprovider
LAST DEPLOYED: Mon Nov 27 01:21:56 2023
NAMESPACE: azappconfig-system
STATUS: deployed
REVISION: 1
TEST SUITE: None
- appConfigurationProvider.yaml ファイルを Deployment ディレクトリに追加して、AzureAppConfigurationProvider リソースを作成します。定義は以下の通り。
apiVersion: azconfig.io/v1
kind: AzureAppConfigurationProvider
metadata:
  name: appconfigurationprovider-sample
spec:
  connectionStringReference: app-configuration-secret # secret の名前
  target:
    configMapName: configmap-created-by-appconfig-provider
    configMapData:
      type: json
      key: mysettings.json
- Deployment ディレクトリ内の deployment.yaml ファイルを更新します。ConfigMap configmap-created-by-appconfig-provider をマウントされたデータ ボリュームとして使用します。
apiVersion: apps/v1
kind: Deployment
metadata:
  name: aspnetapp-demo
  labels:
    app: aspnetapp-demo
spec:
  replicas: 1
  selector:
    matchLabels:
      app: aspnetapp-demo
  template:
    metadata:
      labels:
        app: aspnetapp-demo
    spec:
      containers:
      - name: aspnetapp
        image: aksappconfigurationquickstartacrh58lsi.azurecr.io/aspnetapp:v1
        ports:
        - containerPort: 80
+        volumeMounts:
+        - name: config-volume
+          mountPath: /app/mysettings.json # Dockerfile の WORKDIR のパス + mysettings.json
+          subPath: mysettings.json
+      volumes:
+      - name: config-volume
+        configMap:
+          name: configmap-created-by-appconfig-provider
+          items:
+          - key: mysettings.json
+            path: mysettings.json
- 変更をデプロイします。
$ kubectl apply -f ./Deployment -n appconfig-demo
文字が変わりました!!!

おわりに
なんか簡単そうにできそうだなーと軽い気持ちでやってみたら、色々ハマりました。。
ワークロードIDでの接続はまた気合入れてできるようにしないと。
それでは。
おまけ
せっかく書いたけど、今回は使えなかったワークロードID の有効化も悔しいので記述しておきます。なんでconfigMapが読めなかったのかは、また検証しよう。。
ユーザマネージドIDを作成し、AKSでワークロードIDを有効にする
AzureAppConfiguration と AKS を接続するために、ワークロード ID を使う を元に作成、有効にしていきます。
- Azure Kubernetes Service (AKS) クラスターでワークロード ID を有効にします。
既存の AKS クラスターを更新する
$ az aks update -g $RGNAME -n $AKSNAME --enable-oidc-issuer --enable-workload-identity
- AKS クラスターの OIDC 発行者 URL のを取得します。
OIDC 発行者 URL を取得する
$ export AKS_OIDC_ISSUER="$(az aks show -n $AKSNAME -g $RGNAME --query "oidcIssuerProfile.issuerUrl" -otsv)"
$ echo $AKS_OIDC_ISSUER
https://eastus.oic.prod-aks.azure.com/00000000-0000-0000-0000-000000000000/00000000-0000-0000-0000-000000000000/ # この形式のURLが表示されればよい
- ユーザー割り当てマネージド ID を作成し、作成後にそのクライアント ID をメモします。
ユーザー割り当てマネージド ID を作成する
マネージドIDの追加画面から、こんな感じで入力して作成します。
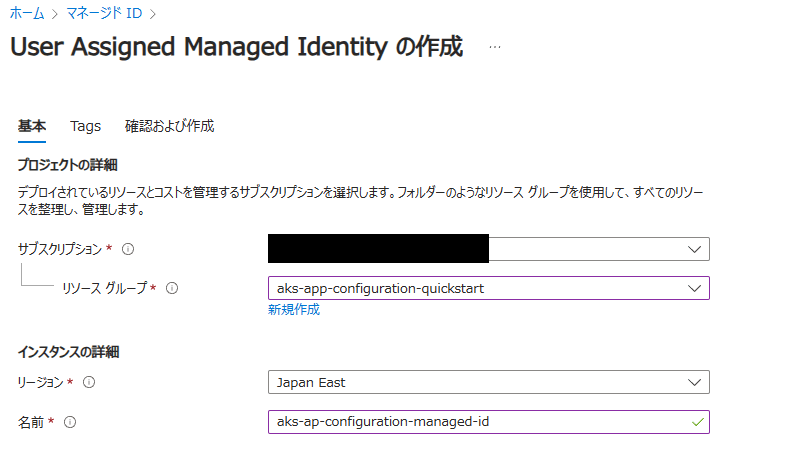
作成されたら、マネージドIDの概要ページに遷移して、クライアントIDをコピーしておきます。
- マネージド ID、OIDC 発行者、サブジェクト間のフェデレーション ID 資格情報を作成します。言っていることが難しい。
name に指定するのはなんでもよいと思います。
identity-name は作成したユーザマネージドIDの名前です。
issuerは上記で取得したAKS_OIDC_ISSUERです。
$ az identity federated-credential create --name aksAppConfigAccessCredential --identity-name aks-ap-configuration-managed-id --resource-group $RGNAME --issuer $AKS_OIDC_ISSUER --subject system:serviceaccount:azappconfig-system:az-appconfig-k8s-provider --audience api://AzureADTokenExchange
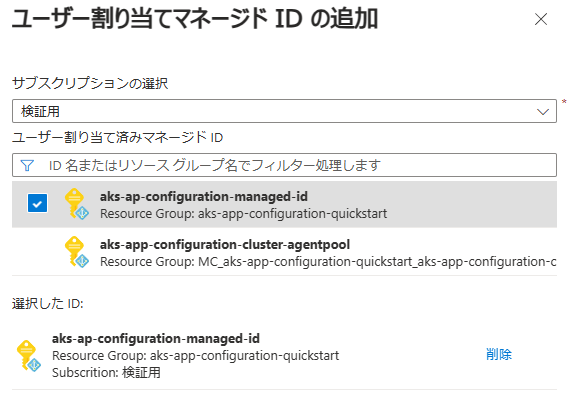
- App Configuration にユーザ割り当てマネージドIDを付与し、App Configuration データ閲覧者ロールを付与します。
AppConfigurationの画面に遷移し、[設定] -> [ID] の順で表示します。
ユーザ割り当て済みのタブを選択します。

ユーザ割り当てマネージドIDの追加 から、先ほど作成したマネージドIDを選択して、追加します。
- ユーザ割り当てマネージドIDの画面に戻り、[Azure ロールの割り当て] を選択します。

[+ロールの割り当ての追加] を選択し、リソースグループをAKSがあるリソースグループにし、『App Configuration データ閲覧者』の役割にして保存します。

※今回はAKSとAppConfigurationは同じリソースグループにしたので、これで大丈夫だと思いますが、別のリソースグループの場合だと、サブスクリプションレベルにしないといけないかもしれません。
-
途中でdockerコマンドを使うので、ローカル環境じゃないとできません。途中で詰みました。WSLでAzure Cloud Shell dockerを使うのが便利です。https://level69.net/archives/31099 ↩︎
Discussion