【GR00T N1 × LeRobot】独自の学習データでファインチューニングと推論を実践する方法
はじめに
NVIDIAが発表した人型ロボットの基盤モデル「Project GR00T」は、AIとロボットの世界に大きな変革をもたらす可能性を秘めています。このGR00T N1モデルは、シミュレーションだけでなく実世界のデータでファインチューニングすることで、特定のタスクに特化した動作生成が可能です。
本記事では、シングルアーム「SO-ARM101」で収集した独自の学習データセットを使い、GR00T N1モデルのファインチューニングから、実機での推論、そして学習済みモデルの評価までの一連のプロセスを、具体的な手順と詳細なトラブルシューティングを交えながら網羅的に解説します。
この記事を読めば、独自タスクを実行するロボットモデルを構築する第一歩を踏み出せるはずです。
本記事で解説する内容
- データ選定編:学習データセットの概要と、データ収集時の設定について解説します。
- ファインチューニング編:GR00T N1モデルを独自データでファインチューニングします。
- 推論編:ファインチューニング済みモデルを使い、実機ロボットを制御します。
- 評価編:学習済みモデルの性能を定量的に評価します。
参考資料
本記事は、以下の公式ドキュメントやブログを参考に、特定のバージョンで動作確認を行っています。
- 公式ブログ: Fine-tuning GR00T N1 with LeRobot on a custom dataset
- GitHub: NVIDIA/Isaac-GR00T / huggingface/lerobot
NOTE: リポジトリの更新が速いため、同様の環境を再現する際はご注意ください。
データ選定編
ファインチューニングには、質の高い学習データが不可欠です。本記事では、データ収集プロセスは完了している前提で進めますが、どのようなデータセットを使い、どのように収集したかを説明します。
タスクの選定
今回は、以下の3つのタスクの中から最もシンプルな「テープを1つ掴んで箱に入れる」タスクを選択しました。複雑なタスクは成功率が下がりやすいため、まずは簡単なタスクから始めることをお勧めします。
作成したデータセットはLeRobot Dataset Visualizerで可視化できます。
-
複雑なタスク:
pen-cleanup -
簡単なタスク:
tapes-cleanup -
最も簡単なタスク:
onetape-cleanup(今回使用)
データ収集時の設定
以下に、今回使用したデータセット(50エピソード)の収集設定を示します。
特に重要なのがcamerasの設定です。ここで定義したカメラ名(例: tip, front)は、後のファインチューニング工程で参照されるため、正確に覚えておく必要があります。GR00Tのデフォルト設定に合わせてwristという名前を使うと、後の設定変更の手間が省けるため推奨します。
dataset:
  repo_id: "yuk6ra/so101-onetape-cleanup"  # Hugging Face のリポジトリID
  single_task: "Grab the tape and place it in the box."  # タスクの説明
  num_episodes: 50  # 記録するエピソード数
  fps: 30  # フレームレート
  episode_time_s: 15  # 1エピソードあたりの最大時間(秒)
  reset_time_s: 15  # エピソード記録後のリセット時間(秒)

# フォロワーアーム
robot:
  type: "so101_follower"
  port: "/dev/ttyACM0"  # シリアルポート
  id: "white"  # フォロワーのID

  # カメラ設定 (ここで定義した名前を後で使います)
  cameras:
    tip: # 'wrist' にしておくと後工程がスムーズ
      type: "opencv"
      index_or_path: 0
      fps: 30
      width: 640
      height: 480
    front:
      type: "opencv"
      index_or_path: 2
      fps: 30
      width: 640
      height: 480

# リーダーアーム
teleop:
  type: "so101_leader"
  port: "/dev/ttyACM1"  # シリアルポート
  id: "black"  # リーダーのID

# 追加オプション
options:
  display_data: false  # カメラ映像を表示するか
  push_to_hub: true # Hugging Face Hub に自動アップロードするか
ファインチューニング編
収集したデータを使って、GR00T N1モデルをファインチューニングします。
実行環境の準備
ファインチューニングには高いスペックのマシンが必要です。今回は以下のクラウド環境で実行しました。
| コンポーネント | スペック |
|---|---|
| GPU | NVIDIA H100 SXM (VRAM 80GB) |
| Disk | 300GB以上 (5000ステップで約100GB消費) |
| RAM | 128GB以上 |
| OS | Ubuntu 24.04 |
| ネット速度 | 4Gbps (アップロード/ダウンロード) |
NOTE: ネット速度が遅いとモデルのアップロードにかなりの時間を要します。
SSHでリモートサーバーに接続後、各種コマンドでスペックを確認しておきましょう。
ssh -p 30454 root@xxx.xxx.xxx.xx -L 8080:localhost:8080
# GPUの確認
$ nvidia-smi
Sun Jul 13 06:57:05 2025
+-----------------------------------------------------------------------------------------+
| NVIDIA-SMI 560.35.03              Driver Version: 560.35.03      CUDA Version: 12.6     |
|-----------------------------------------+------------------------+----------------------+
| GPU  Name                 Persistence-M | Bus-Id          Disp.A | Volatile Uncorr. ECC |
| Fan  Temp   Perf          Pwr:Usage/Cap |           Memory-Usage | GPU-Util  Compute M. |
|                                         |                        |               MIG M. |
|=========================================+========================+======================|
|   0  NVIDIA H100 80GB HBM3          On  |   00000000:E4:00.0 Off |                    0 |
| N/A   47C    P0             73W /  700W |       1MiB /  81559MiB |      0%      Default |
|                                         |                        |             Disabled |
+-----------------------------------------+------------------------+----------------------+

+-----------------------------------------------------------------------------------------+
| Processes:                                                                              |
|  GPU   GI   CI        PID   Type   Process name                              GPU Memory |
|        ID   ID                                                               Usage      |
|=========================================================================================|
|  No running processes found                                                             |
+-----------------------------------------------------------------------------------------+
$ df /home -h
Filesystem      Size  Used Avail Use% Mounted on
overlay         300G   90M  300G   1% /
$ free -h
               total        used        free      shared  buff/cache   available
Mem:           503Gi        34Gi       372Gi        47Mi       101Gi       469Gi
Swap:          8.0Gi       186Mi       7.8Gi
$ lsb_release -d
No LSB modules are available.
Description:    Ubuntu 24.04.2 LTS
次に、公式の指示に従い、Condaで仮想環境を構築します。
# リポジトリをクローン
git clone https://github.com/NVIDIA/Isaac-GR00T
cd Isaac-GR00T

# Conda環境を作成して有効化
conda create -n gr00t python=3.10
conda activate gr00t

# 必要なパッケージをインストール
pip install --upgrade setuptools
pip install -e .[base]
pip install --no-build-isolation flash-attn==2.7.1.post4
最後に、Hugging FaceとWeights & Biases (Wandb) にログインします。
- Hugging Face Token: huggingface.co/settings/tokens
- Wandb API Key: wandb.ai/authorize
huggingface-cli login
wandb login
学習データの準備
Hugging Face Hubから任意のデータセットをダウンロードします。
huggingface-cli download \
       --repo-type dataset yuk6ra/so101-onetape-cleanup \
       --local-dir ./demo_data/so101-onetape-cleanup
GR00Tがデータ形式を正しく認識できるように、modality.jsonという設定ファイルが必要です。サンプルをコピーし、内容を自分の環境に合わせて修正します。
# サンプルファイルをコピー
cp getting_started/examples/so100_dualcam__modality.json ./demo_data/so101-onetape-cleanup/meta/modality.json
データ収集時に設定したカメラ名(tip)に合わせて、wristの記述をtipに変更します。
# 設定ファイルを編集
vim ./demo_data/so101-onetape-cleanup/meta/modality.json
 {
    ...
        "video": {
            "front": {
                "original_key": "observation.images.front"
            },
-           "wrist": {
-               "original_key": "observation.images.wrist"
+           "tip": {
+               "original_key": "observation.images.tip"
            }
        },
    ...
データが正しく読み込めるか、以下のスクリプトで確認します。
python scripts/load_dataset.py \
    --dataset-path ./demo_data/so101-onetape-cleanup \
    --plot-state-action \
    --video-backend torchvision_av
成功すると、データセットの構造情報やフレーム情報が出力されます。
====================================================================================================
========================================= Humanoid Dataset =========================================
====================================================================================================
{'action.gripper': 'np scalar: 1.1111111640930176 [1, 1] float64',
 'action.single_arm': 'np: [1, 5] float64',
 'annotation.human.task_description': ['Grab the tape and place it in the '
                                       'box.'],
 'state.gripper': 'np scalar: 2.410423517227173 [1, 1] float64',
 'state.single_arm': 'np: [1, 5] float64',
 'video.front': 'np: [1, 480, 640, 3] uint8',
 'video.tip': 'np: [1, 480, 640, 3] uint8'}
dict_keys(['video.front', 'video.tip', 'state.single_arm', 'state.gripper', 'action.single_arm', 'action.gripper', 'annotation.human.task_description'])
==================================================
video.front: (1, 480, 640, 3)
video.tip: (1, 480, 640, 3)
state.single_arm: (1, 5)
state.gripper: (1, 1)
action.single_arm: (1, 5)
action.gripper: (1, 1)
annotation.human.task_description: ['Grab the tape and place it in the box.']
Image 0, prompt: ['Grab the tape and place it in the box.']
Image 10, prompt: ['Grab the tape and place it in the box.']
Image 20, prompt: ['Grab the tape and place it in the box.']
Image 30, prompt: ['Grab the tape and place it in the box.']
Image 40, prompt: ['Grab the tape and place it in the box.']
Image 50, prompt: ['Grab the tape and place it in the box.']
Image 60, prompt: ['Grab the tape and place it in the box.']
Image 70, prompt: ['Grab the tape and place it in the box.']
Image 80, prompt: ['Grab the tape and place it in the box.']
Image 90, prompt: ['Grab the tape and place it in the box.']
Image 100, prompt: ['Grab the tape and place it in the box.']
Image 110, prompt: ['Grab the tape and place it in the box.']
Image 120, prompt: ['Grab the tape and place it in the box.']
Image 130, prompt: ['Grab the tape and place it in the box.']
Image 140, prompt: ['Grab the tape and place it in the box.']
Image 150, prompt: ['Grab the tape and place it in the box.']
Image 160, prompt: ['Grab the tape and place it in the box.']
Image 170, prompt: ['Grab the tape and place it in the box.']
Image 180, prompt: ['Grab the tape and place it in the box.']
Image 190, prompt: ['Grab the tape and place it in the box.']
Warning: Skipping left_arm as it's not found in both state and action dictionaries
Warning: Skipping right_arm as it's not found in both state and action dictionaries
Warning: Skipping left_hand as it's not found in both state and action dictionaries
Warning: Skipping right_hand as it's not found in both state and action dictionaries
Plotted state and action space
学習の実行
準備が整ったら、ファインチューニングを開始します。H100 GPUで約30分かかり、5000ステップの学習で約100GBのディスク容量を消費しました。
python scripts/gr00t_finetune.py \
      --dataset-path ./demo_data/so101-onetape-cleanup/ \
      --num-gpus 1 \
      --output-dir ./so101-checkpoints  \
      --max-steps 5000 \
      --data-config so100_dualcam \
      --video-backend torchvision_av
もしメモリなどスペックが足りない場合は、--dataloader-num-workersや--batch-sizeを小さくして試してみましょう。
python scripts/gr00t_finetune.py \
     --dataset-path ./demo_data/so101-onetape-cleanup/ \
     --num-gpus 1 \
     --output-dir ./so101-checkpoints  \
     --max-steps 5000 \
     --data-config so100_dualcam \
     --batch-size 8 \
     --video-backend torchvision_av \
     --dataloader-num-workers 0
トラブルシューティング
エラー1: ValueError: Video key wrist not found
このエラーは、学習スクリプトがデフォルトのカメラ名wristを探しに行き、データセット内のtipを見つけられないために発生します。
解決策: gr00t/experiment/data_config.pyを直接編集し、カメラ名を修正します。
# 225行目あたり
class So100DualCamDataConfig(So100DataConfig):
-   video_keys = ["video.front", "video.wrist"]
+   video_keys = ["video.front", "video.tip"]
エラー2: av.error.MemoryError: [Errno 12] Cannot allocate memory
ビデオデータのデコード中にメモリ不足が発生した場合のエラーです。
  0%|                                                                                                                            | 0/5000 [00:00<?, ?it/s]Traceback (most recent call last):
  File "/workspace/Isaac-GR00T/scripts/gr00t_finetune.py", line 315, in <module>
    main(config)
  File "/workspace/Isaac-GR00T/scripts/gr00t_finetune.py", line 287, in main
    experiment.train()
  File "/workspace/Isaac-GR00T/gr00t/experiment/runner.py", line 173, in train
    self.trainer.train(resume_from_checkpoint=self.resume_from_checkpoint)
  File "/workspace/Isaac-GR00T/gr00t/experiment/trainer.py", line 153, in train
    return super().train(resume_from_checkpoint, trial, ignore_keys_for_eval, **kwargs)
  File "/venv/gr00t/lib/python3.10/site-packages/transformers/trainer.py", line 2245, in train
    return inner_training_loop(
  File "/venv/gr00t/lib/python3.10/site-packages/transformers/trainer.py", line 2514, in _inner_training_loop
    batch_samples, num_items_in_batch = self.get_batch_samples(epoch_iterator, num_batches, args.device)
  File "/venv/gr00t/lib/python3.10/site-packages/transformers/trainer.py", line 5243, in get_batch_samples
    batch_samples.append(next(epoch_iterator))
  File "/venv/gr00t/lib/python3.10/site-packages/accelerate/data_loader.py", line 552, in __iter__
    current_batch = next(dataloader_iter)
  File "/venv/gr00t/lib/python3.10/site-packages/torch/utils/data/dataloader.py", line 701, in __next__
    data = self._next_data()
  File "/venv/gr00t/lib/python3.10/site-packages/torch/utils/data/dataloader.py", line 1465, in _next_data
    return self._process_data(data)
  File "/venv/gr00t/lib/python3.10/site-packages/torch/utils/data/dataloader.py", line 1491, in _process_data
    data.reraise()
  File "/venv/gr00t/lib/python3.10/site-packages/torch/_utils.py", line 714, in reraise
    raise RuntimeError(msg) from None
RuntimeError: Caught MemoryError in DataLoader worker process 0.
Original Traceback (most recent call last):
  File "/venv/gr00t/lib/python3.10/site-packages/torch/utils/data/_utils/worker.py", line 351, in _worker_loop
    data = fetcher.fetch(index)  # type: ignore[possibly-undefined]
  File "/venv/gr00t/lib/python3.10/site-packages/torch/utils/data/_utils/fetch.py", line 52, in fetch
    data = [self.dataset[idx] for idx in possibly_batched_index]
  File "/venv/gr00t/lib/python3.10/site-packages/torch/utils/data/_utils/fetch.py", line 52, in <listcomp>
    data = [self.dataset[idx] for idx in possibly_batched_index]
  File "/workspace/Isaac-GR00T/gr00t/data/dataset.py", line 508, in __getitem__
    return self.transforms(self.get_step_data(trajectory_id, base_index))
  File "/workspace/Isaac-GR00T/gr00t/data/dataset.py", line 542, in get_step_data
    data[key] = self.get_data_by_modality(trajectory_id, modality, key, base_index)
  File "/workspace/Isaac-GR00T/gr00t/data/dataset.py", line 802, in get_data_by_modality
    return self.get_video(trajectory_id, key, base_index)
  File "/workspace/Isaac-GR00T/gr00t/data/dataset.py", line 672, in get_video
    return get_frames_by_timestamps(
  File "/workspace/Isaac-GR00T/gr00t/utils/video.py", line 112, in get_frames_by_timestamps
    for frame in reader:
  File "/venv/gr00t/lib/python3.10/site-packages/torchvision/io/video_reader.py", line 200, in __next__
    frame = next(self._c)
  File "av/container/input.pyx", line 208, in decode
  File "av/packet.pyx", line 80, in av.packet.Packet.decode
  File "av/video/stream.pyx", line 41, in av.video.stream.VideoStream.decode
  File "av/video/stream.pyx", line 50, in av.video.stream.VideoStream.decode
  File "av/codec/context.pyx", line 462, in av.codec.context.CodecContext.decode
  File "av/codec/context.pyx", line 238, in av.codec.context.CodecContext.open
  File "av/error.pyx", line 326, in av.error.err_check
av.error.MemoryError: [Errno 12] Cannot allocate memory
解決策: PyAVライブラリを最新版にアップデートすることで解決する場合があります。
pip install -U av
学習済みモデルのアップロード
学習が完了したら、生成されたチェックポイントをHugging Face Hubにアップロードします。
cd so101-checkpoints/checkpoint-5000/

# 不要なファイルを削除 (任意)
# rm -rf scheduler.pt optimizer.pt

# Hugging Face Hubにアップロード
huggingface-cli upload \
      --repo-type model yuk6ra/so101-onetape-cleanup . \
      --commit-message="Finetuned model with 5000 steps"
NOTE:クラウドサーバーを利用した場合、アップロードが完了したらインスタンスの削除を忘れないようにしましょう。
推論編
ファインチューニングしたモデルを使い、実機ロボットを動かします。推論は、モデルをホストする推論サーバーと、ロボットを制御するクライアントノードの2つで構成されます。
推論サーバーのセットアップと実行
推論サーバーは、ローカルまたはクラウドのGPUマシンで実行します。今回は以下のローカル環境を使用しました。
- GPU: NVIDIA GeForce RTX 4070 Ti (12GB)
- RAM: 128GB
- OS: Ubuntu 22.04
クラウドで実行する場合は、推論サーバー用のポート(例: 5555)を開けておく必要があります。
まず、ファインチューニング時と同様にGR00Tの環境を構築します。次に、Hugging Face Hubからモデルをダウンロードし、サーバーを起動します。
# GR00T環境のセットアップ (ファインチューニング編を参照)
git clone https://github.com/NVIDIA/Isaac-GR00T
cd Isaac-GR00T
conda create -n gr00t python=3.10
conda activate gr00t
pip install --upgrade setuptools
pip install -e .[base]
pip install --no-build-isolation flash-attn==2.7.1.post4

# モデルのダウンロード
huggingface-cli download \
     --repo-type model yuk6ra/so101-onetape-cleanup \
     --local-dir ./model/so101-onetape-cleanup

# 推論サーバーの起動
python scripts/inference_service.py \
    --model_path ./model/so101-onetape-cleanup \
    --embodiment_tag new_embodiment \
    --data_config so100_dualcam \
    --server \
    --port 5555
Server is ready and listening on tcp://0.0.0.0:5555 と表示されれば起動成功です。
NOTE: ここでもdata_config.pyのカメラ名をtipに修正する必要があります。
トラブルシューティング
エラー1: OSError: CUDA_HOME environment variable is not set
flash-attnのインストール時にCUDAのパスが見つからない場合に発生します。
Collecting flash-attn==2.7.1.post4
  Using cached flash_attn-2.7.1.post4.tar.gz (2.7 MB)
  Preparing metadata (setup.py) ... error
  error: subprocess-exited-with-error

  × python setup.py egg_info did not run successfully.
  │ exit code: 1
  ╰─> [20 lines of output]
      ...
      OSError: CUDA_HOME environment variable is not set. Please set it to your CUDA install root.
      ...
  [end of output]
解決策: condaでCUDA Toolkitをインストールします。
conda install -c nvidia cuda-toolkit=12.4
エラー2: ModuleNotFoundError: No module named 'flash_attn'
解決策: conda activate gr00t が正しく実行されているか確認してください。意図せずbaseやlerobotの環境になっている可能性があります。
クライアントノードのセットアップと実行
クライアントは、データ収集時に使用したlerobotの環境で実行します。もし環境がない場合は、以下の手順で作成します。
# LeRobotリポジトリをクローン
git clone https://github.com/huggingface/lerobot.git
cd lerobot

# Conda環境を作成して有効化
conda create -y -n lerobot python=3.10
conda activate lerobot

# 必要なパッケージをインストール
conda install ffmpeg -c conda-forge
pip install -e .
pip install -e ".[feetech]"
conda activate lerobot
lerobotのConda環境を有効化したら、その他に必要になるパッケージをインストールします。
pip install matplotlib
Isaac-GR00Tディレクトリに移動します。
cd ~/Documents/Isaac-GR00T/ # or your path to Isaac-GR00T
まず、lerobot.find_cameras を使って、システムに接続されているカメラのIDを確認します。このIDは後ほどクライアント起動コマンドの引数で使用します。
$ python -m lerobot.find_cameras opencv
# ... (実行結果から tip と front に対応するカメラIDを確認)
# 例: tipが2、frontが0
次に、getting_started/examples/eval_lerobot.pyをGR00Tの推論機能と連携させるために修正します。
- from lerobot.common.cameras.opencv.configuration_opencv import (
+ from lerobot.cameras.opencv.configuration_opencv import (
    OpenCVCameraConfig,
)
- from lerobot.common.robots import (
+ from lerobot.robots import (
    Robot,
    RobotConfig,
    koch_follower,
    make_robot_from_config,
    so100_follower,
    so101_follower,
)
- from lerobot.common.utils.utils import (
+ from lerobot.utils.utils import (
    init_logging,
    log_say,
)

# NOTE:
# Sometimes we would like to abstract different env, or run this on a separate machine
# User can just move this single python class method gr00t/eval/service.py
# to their code or do the following line below
- # sys.path.append(os.path.expanduser("~/Isaac-GR00T/gr00t/eval/"))
+ import os
+ import sys
+ sys.path.append(os.path.expanduser("./gr00t/eval/")) # パスの修正
from service import ExternalRobotInferenceClient
以下のコマンドでクライアントを起動し、ロボットに指示を出します。
python getting_started/examples/eval_lerobot.py \
    --robot.type=so101_follower \
    --robot.port=/dev/ttyACM1 \
    --robot.id=white \
    --robot.cameras="{
        tip: {type: opencv, index_or_path: 2, width: 640, height: 480, fps: 30},
        front: {type: opencv, index_or_path: 0, width: 640, height: 480, fps: 30}
    }" \
    --lang_instruction="Grab the tape and place it in the box."
推論サーバーでクラウドを利用している場合は、--policy_hostと--policy_portを任意に設定してください。
python getting_started/examples/eval_lerobot.py \
    --robot.type=so101_follower \
    --robot.port=/dev/ttyACM0 \
    --robot.id=white \
    --robot.cameras="{
        tip: {type: opencv, index_or_path: 2, width: 640, height: 480, fps: 30},
        front: {type: opencv, index_or_path: 0, width: 640, height: 480, fps: 30}
    }" \
    --policy_host xxx.xx.xx.xx \
    --policy_port xxxxx \
    --lang_instruction="Grab tapes and place into pen holder."
実行の結果
GR00T N1の実行結果です。比較として、ACTモデルの成功と失敗の例も示しておきます。
GR00T N1(成功)
ACT(成功)
GR00T N1(失敗)
ACT(失敗)
トラブルシューティング
エラー: 推論結果がNanになっていたり、カクカク動く。
モデルは正しくできている可能性がありますが、ロボット側の入力が正しくない可能性があります。
解決策: camerasの設定を確認したり、環境構築を再度作り直してみてください。
モデル評価編
最後に、学習済みモデルがデータセット内のタスクをどの程度再現できるかを評価します。
評価の準備
gr00t環境で作業します。評価用のデータセットとモデルをダウンロードし、modality.jsonを準備します。この手順はファインチューニング時と同様です。
conda activate gr00t

# データセットのダウンロード
huggingface-cli download \
       --repo-type dataset yuk6ra/so101-onetape-cleanup \
       --local-dir ./demo_data/so101-onetape-cleanup

# モデルのダウンロード (特定のステップを評価する場合 --revision を使用)
huggingface-cli download \
    --repo-type model  yuk6ra/so101-onetape-cleanup \
    --local-dir ./model/so101-onetape-cleanup
    # --revision checkpoint-2000

# modality.jsonの準備
cp getting_started/examples/so100_dualcam__modality.json ./demo_data/so101-onetape-cleanup/meta/modality.json
# vimでカメラ名を 'tip' に修正
評価の実行
準備ができたら評価スクリプトを実行します。
python scripts/eval_policy.py \
    --plot \
    --embodiment_tag new_embodiment \
    --model_path ./model/so101-onetape-cleanup/ \
    --data_config so100_dualcam \
    --dataset_path ./demo_data/so101-onetape-cleanup/ \
    --video_backend torchvision_av \
    --modality_keys single_arm gripper \
    --denoising_steps 4
NOTE: ここでもdata_config.pyのカメラ名をtipに修正する必要があります。
トラブルシューティング
エラー: ModuleNotFoundError: No module named 'tyro'
解決策: 仮想環境がgr00tになっているか、再確認してください。
評価結果
実行が完了すると、モデルの予測(Prediction: 緑線)と実際の動作(Ground truth: オレンジ線)を比較したグラフが出力されます。このグラフにより、モデルがどの程度正確にタスクを学習できたかを視覚的に確認できます。

比較検討
評価スクリプトを活用し、学習の進捗やタスクの難易度がモデルの性能にどう影響するかを比較検討します。評価結果のプロット図は、モデルの予測(Prediction: 緑線)と実際の動作(Ground truth: オレンジ線)のズレを可視化したもので、両者の曲線が近いほど、モデルがタスクを正確に再現できていることを示します。
※本記事では説明を単純化するため、学習の進み具合を学習ステップ数(steps)で比較しています。データセットのサイズが異なる場合、同じステップ数でも対応するエポック数(データ全体を学習した回数)は異なるため、厳密な比較を行う場合はエポック数換算が必要です。
学習ステップ数による性能比較
同じタスク(onetape-cleanup)に対して、学習ステップ数が2000回と5000回の場合で性能を比較します。
2000ステップ時点での評価

考察: 2000ステップの時点では、予測(緑線)が正解データ(オレンジ線)を大まかには追従しているものの、全体的にズレや振動が見られます。特にアームの動作(single_arm)の次元によっては、動きが滑らかでなく、タスクを完全には再現できていないことがわかります。
5000ステップ時点での評価
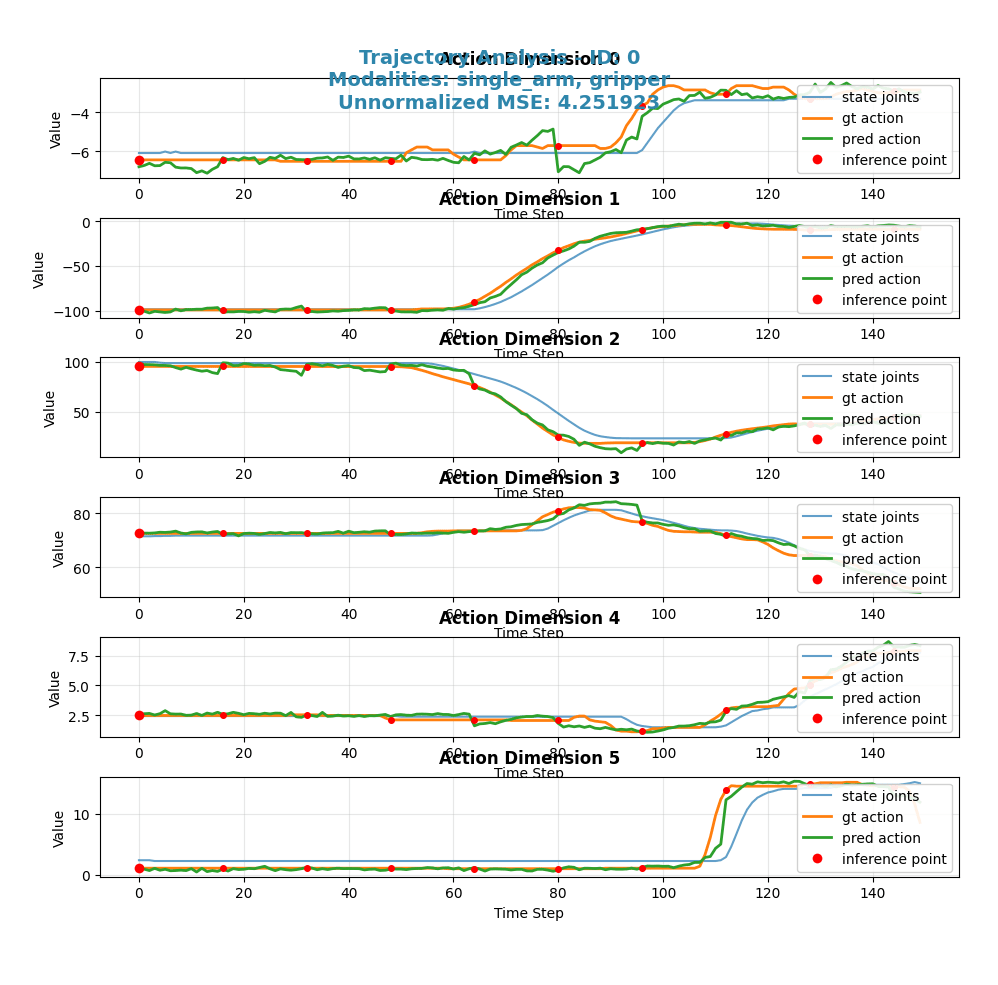
考察: 5000ステップまで学習を進めると、予測(緑線)と正解データ(オレンジ線)の曲線がほぼ一致し、非常に滑らかに動作を再現できていることが確認できます。これにより、追加の学習がモデルの性能を向上させたことがわかります。
タスクの複雑さによる性能比較
次に、同じ5000ステップの学習済みモデルを使い、タスクの複雑さが性能に与える影響を比較します。
最も簡単なタスク: onetape-cleanup
考察: 前述の通り、最も簡単なタスクではモデルはほぼ完璧に動作を再現できています。
簡単なタスク: tapes-cleanup

考察: テープが複数になるだけで、予測(緑線)のズレが少し大きくなります。
複雑なタスク: pen-cleanup

考察: 公式ブログに載っているペンを片付けるという、より複雑なタスクになると、予測(緑線)と正解データ(オレンジ線)の乖離が顕著になります。特定の関節の動き(single_arm_4など)で大きなズレが生じており、5000ステップの学習ではこの複雑なタスクを遂行するには不十分であることが示唆されます。
さらなる学習の効果(7000ステップ)
複雑なpen-cleanupタスクに対して、さらに学習を進めた7000ステップ時点での評価も見てみましょう。

考察: 5000ステップと比較して、7000ステップまで学習を進めても、依然として予測(緑線)と正解データ(オレンジ線)の間には大きな乖離が残り、むしろMSEは高くなっていますので、予測が正解から遠ざかりました。これは、単純に学習ステップを増やすだけでは解決できない問題がある可能性を示唆しています。例えば、データセットの多様性や量が不足している、あるいはモデルのアーキテクチャ自体がこのタスクの複雑さに対応しきれていない、といった可能性も考えられます。
これらの比較からは、改めてタスクの複雑さに応じた十分な学習ステップ数と、質の高い多様なデータセットが必要であることがわかります。
まとめ
本記事では、LeRobotで収集した独自データを用いてNVIDIA GR00T N1モデルをファインチューニングし、実機で推論・評価を行うまでの一連の流れを、詳細なコマンドやログと共に解説しました。
重要なポイントは以下の通りです。
- データの一貫性: データ収集時(LeRobot)と学習・推論時(GR00T)で、カメラ名などの各種設定を一致させることが極めて重要です。
-
環境構築:
condaによる仮想環境の分離と、ライブラリの適切なインストールが成功の鍵となります。 - トラブルシューティング: エラーログをよく読み、設定ファイルの直接編集など、独自の学習データに応じたエラーの対応力が必要となります。
本記事が、GR00Tを使って独自のロボットアプリケーションを開発する際の一助となれば幸いです。今後は、より複雑なタスクに挑戦したり、学習ステップ数を変えてモデルの性能を比較したりといった発展的な取り組みも考えられるでしょう。
何かお気づきの点や間違いなどがありましたら、お気軽にご連絡ください。みなさんで一緒に盛り上げていきましょう。
Discussion