Raspberry Pi Zero 2WでMQTT送信
1.概要
Raspberry Piに接続したロードセルとHX711の値を読み取ってMQTTで送る。
ロードセルは体重計をばらしたものを使用し、前2個と後ろ2個を別々にHX711に接続する。
最初はRaspberry Pi Zero 2 Wをアクセスポイント化しようとしたが、負荷が重いのかうまく送信できなかったので別のルーターを使用した。
いろんなサイトにお世話になったので、そのメモ。
2. 使用機材
ハードウェア
- Raspberry Pi Zero 2 W
- タニタ 体重計 ホワイト HD-661-WH A4
- HX711モジュール
Raspberry Pi
- Raspberry Pi OS Lite(64bit)
- Python 3.11.2
3. Raspberry Pi OSの書き込み
Raspberry Piの設定
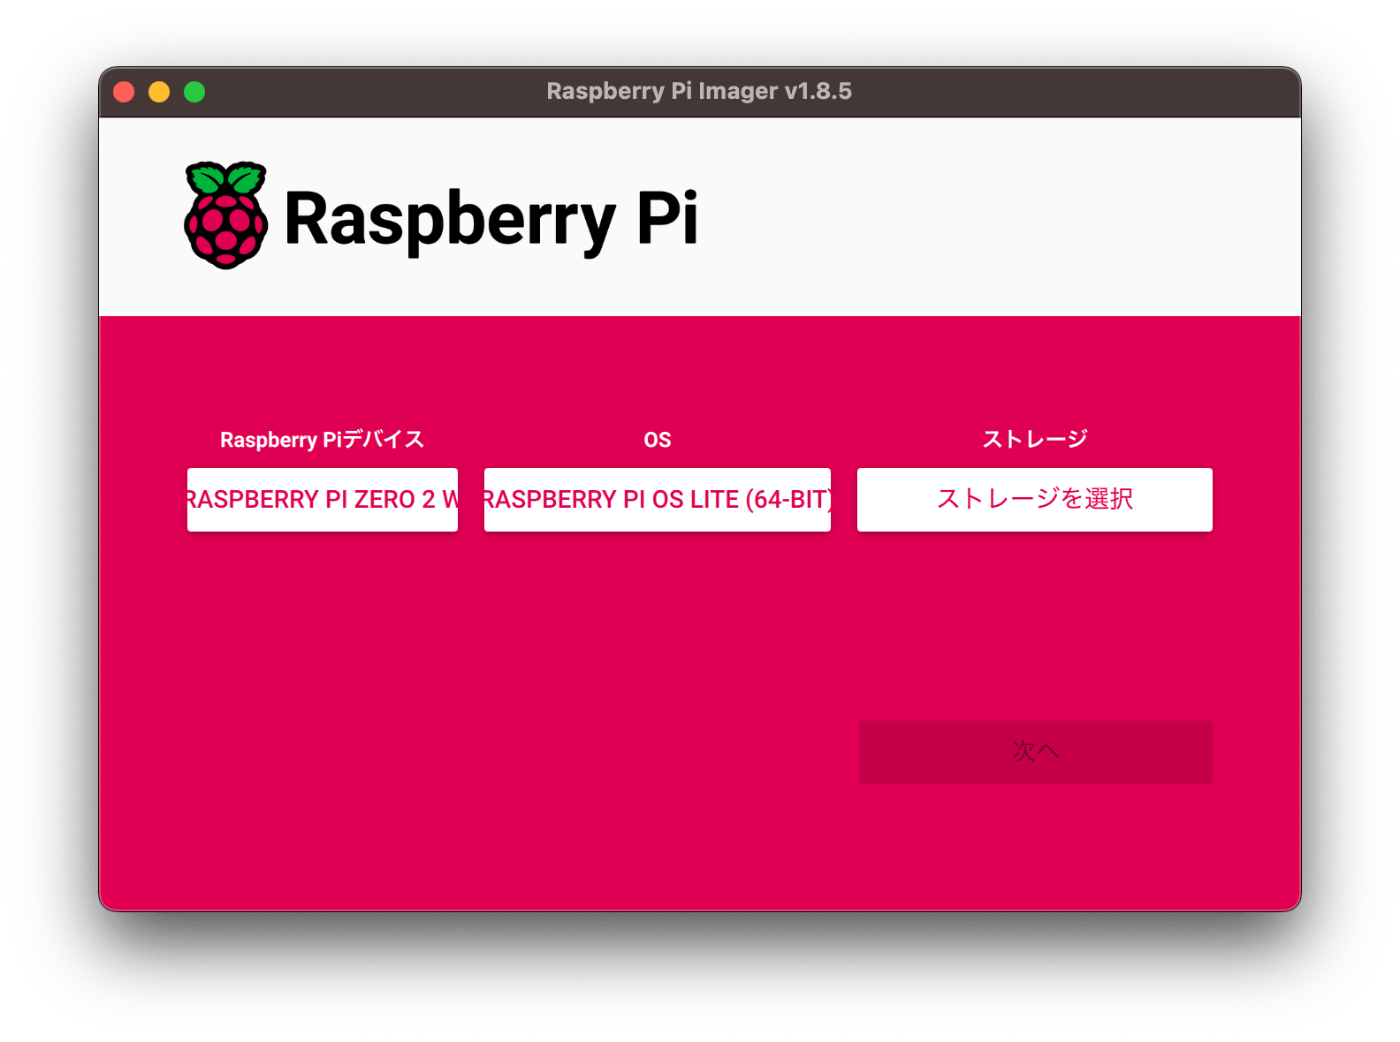
macOSにRaspberry Pi Imagerをインストール
デバイスとOSとストレージを選択し書き込む。
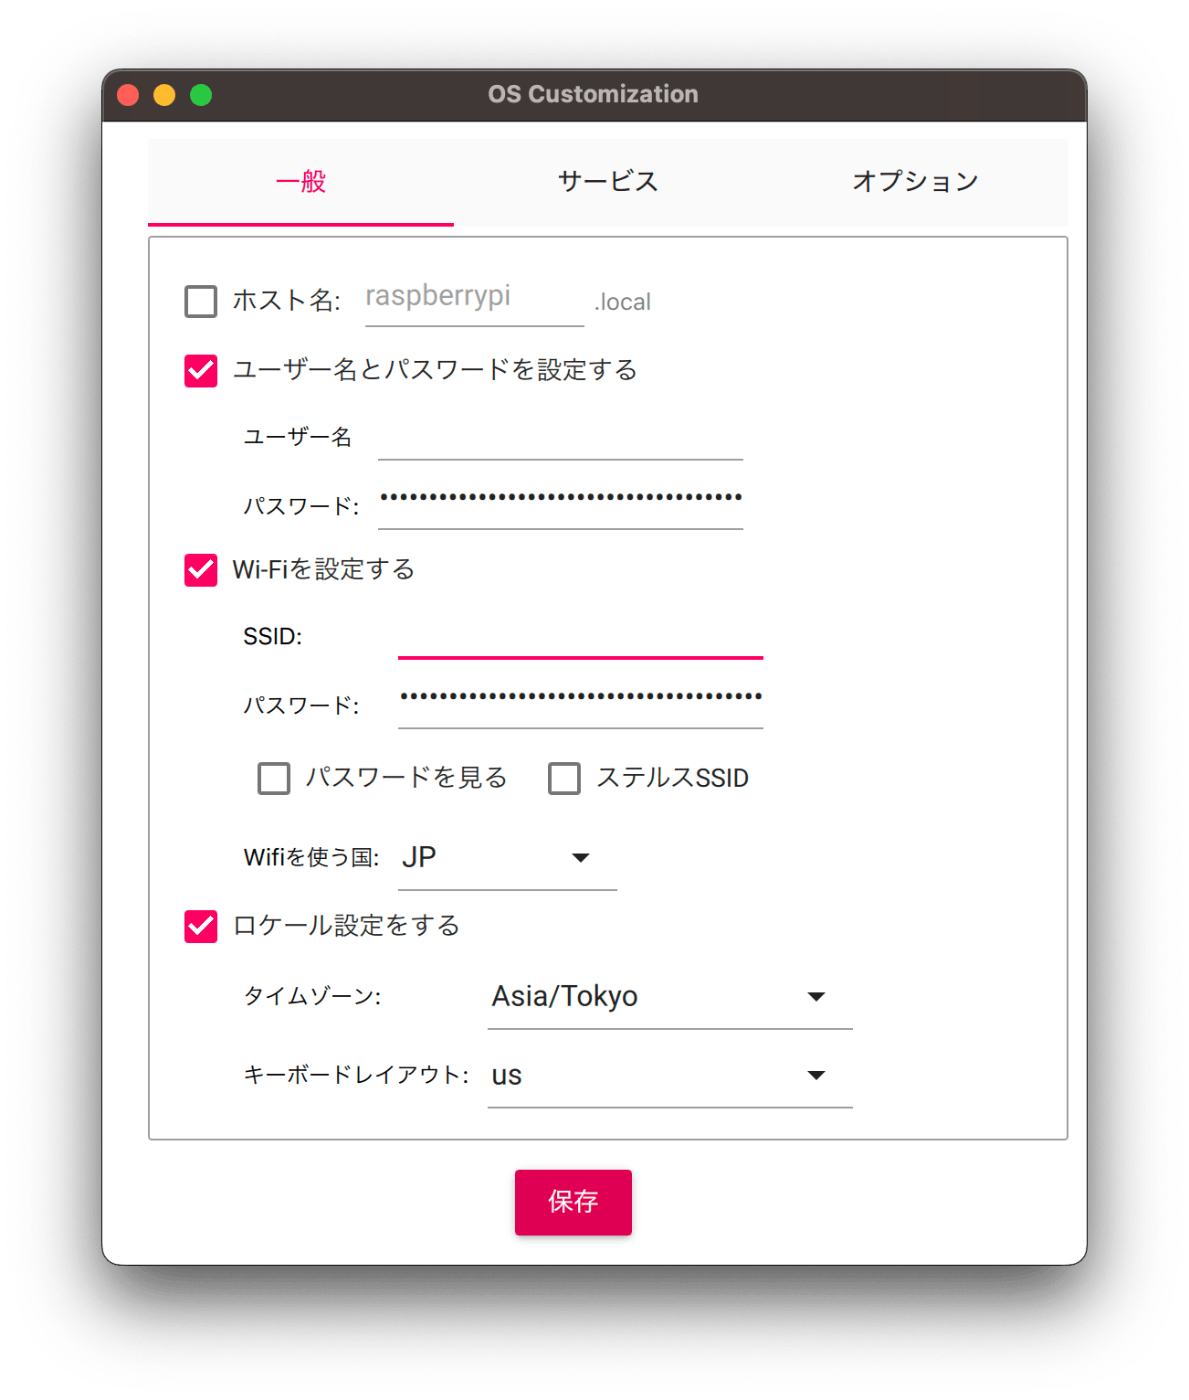
Zero2なのでGUIなしのLiteを選択。Wifiやログイン情報もここで設定。

ssh接続
同じネットワークにいれば
ssh <username>@raspberrypi.local
で接続できる。
今回同じネットワークに2台Raspberry Piがあったのでその場合の手順。
こちらを参考に、arp-scanをインストール
brew install arp-scan
次のコマンドで実行
sudo arp-scan -l --interface en0
参考にしたサイトにはRaspberry Piと表示されたが、ZeroではMACアドレスが 2c:cf:から始まる2つが該当した。
172.25.128.49	2c:cf:xx:xx:xx:xx	(Unknown)
172.25.128.106	2c:cf:xx:xx:xx:xx	(Unknown)
下のアドレスのRaspberry piに接続したい場合は
ssh <username>@172.25.128.106 -p 22
とする。
git cloneできるようにする
以下のサイトを参照した。
Wifi設定
公式を見るとwpa_supplicant.confを使わずnmcliを使うっぽい。
実際のやり方などは以下のサイトを参考にした。
$ sudo raspi-config
nmcli device wifi con <SSID> password <password>
接続したことのあるwifiに接続する
nmcli connection up <SSID>
Power ManagementをOFFにして常時接続をONにする
以下のサイトを参考にした。
$ sudo iwconfig wlan0 power off
$ wconfig wlan0
/etc/rc.localを編集してraspi-configのNetwork at Bootで設定する方法が書かれているサイトもあったが、Network at Bootの項目がなくなっており、そういうのはsystemctlでやるらしいので以下のサイトを参考にしてサービスを作成した。
固定IP化はルーターで行う
以下のサイトを見るとルータ側で指定するとのことでしたので、ルータ側の管理画面でMACアドレスと固定したいIPを入力して固定した。
4. ロードセルの値を読み取る
配線
タニタの体重計を選んだのはこちらの記事で使われていたから。
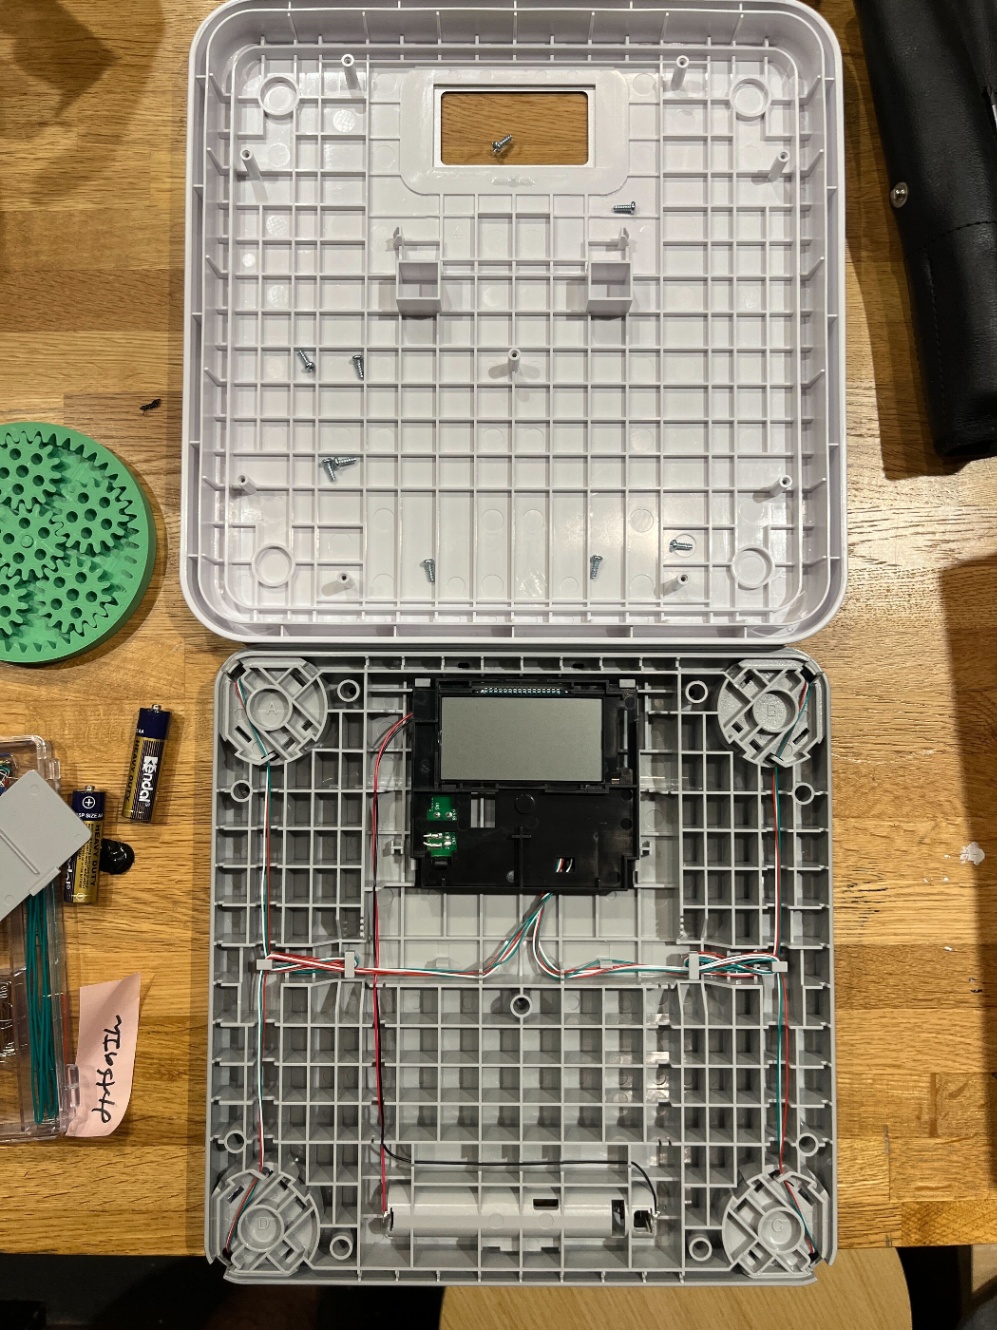
体重計を開けるとA〜Dの4つのロードセルが見える。ロードセルは3線式になっている。
前後の荷重を別々に取りたいので、AとB、CとDを分ける。
3線式のロードセル2つを1つのHX711に接続する配線方法を調べるのに時間がかかった。
以下のサイトが参考になった。ホイートストンブリッジっていう言葉を聞いたのは電気回路の授業以来かもしれない。
| HX711 | センサーA | センサーB |
|---|---|---|
| E+ | A赤 | B白 |
| E- | A白 | B赤 |
| A- | B緑 | |
| A+ | A緑 |
| HX711 | センサーC | センサーD |
|---|---|---|
| E+ | C赤 | D白 |
| E- | C白 | D赤 |
| A- | D緑 | |
| A+ | C緑 |
HX711の値の読み取り
以下のリポジトリを利用する。
$ git clone https://github.com/tatobari/hx711py
サンプリング速度を10Hz→80Hzにする
HX711のサンプリング速度が10Hzらしく、データは1秒に1回送られてくる。
これをもっと早くしたい。
HX711にチップ抵抗を追加して80Hzにする方法を試している人がいた。
同様の基板だったので0Ωの抵抗を外し、80Hz側にチップ抵抗を入れてみたところプログラムはそのままでもサンプリング速度が上がった。
更にサンプリング速度を上げるには
- 中央値を取る数が現状5になっているものを減らす。
- sleap時間を調整する。
とかかなと思う。
センサ2つの値をとる
これは簡単で、サンプルのhxをhx1とhx2にすればできた。
配線は5、6と7、8に接続した。
hx1 = HX711(5, 6)
hx2 = HX711(7, 8)
別の階層にあるライブラリのインポート方法
python初心者のため、hx711pyとは別の場所にプログラムを置いた場合にライブラリを参照する方法が分からずハマった。
sys.path.append('/home/pi/hx711py')
from hx711 import HX711
5.MQTTで送信する
paho-mqttのインストール
仮想環境じゃないとダメみたい
仮想環境のセットアップ。ホームディレクトリで以下のコマンドを実行する。
$ python3 -m venv default
$ ./default/bin/pip3 install paho-mqtt
RPiがないと怒られるので以下もインストール
$ ./default/bin/pip3 install RPI.GPIO
以下のエラーが出る。
Looking in indexes: https://pypi.org/simple, https://www.piwheels.org/simple
Collecting RPI.GPIO
  Using cached RPi.GPIO-0.7.1.tar.gz (29 kB)
  Preparing metadata (setup.py) ... done
Installing collected packages: RPI.GPIO
  DEPRECATION: RPI.GPIO is being installed using the legacy 'setup.py install' method, because it does not have a 'pyproject.toml' and the 'wheel' package is not installed. pip 23.1 will enforce this behaviour change. A possible replacement is to enable the '--use-pep517' option. Discussion can be found at https://github.com/pypa/pip/issues/8559
  Running setup.py install for RPI.GPIO ... error
  error: subprocess-exited-with-error

  × Running setup.py install for RPI.GPIO did not run successfully.
  │ exit code: 1
  ╰─> [29 lines of output]
      running install
      /home/pola/default/lib/python3.11/site-packages/setuptools/command/install.py:34: SetuptoolsDeprecationWarning: setup.py install is deprecated. Use build and pip and other standards-based tools.
        warnings.warn(
      running build
      running build_py
      creating build
      creating build/lib.linux-aarch64-cpython-311
      creating build/lib.linux-aarch64-cpython-311/RPi
      copying RPi/__init__.py -> build/lib.linux-aarch64-cpython-311/RPi
      creating build/lib.linux-aarch64-cpython-311/RPi/GPIO
      copying RPi/GPIO/__init__.py -> build/lib.linux-aarch64-cpython-311/RPi/GPIO
      running build_ext
      building 'RPi._GPIO' extension
      creating build/temp.linux-aarch64-cpython-311
      creating build/temp.linux-aarch64-cpython-311/source
      aarch64-linux-gnu-gcc -Wsign-compare -DNDEBUG -g -fwrapv -O2 -Wall -g -fstack-protector-strong -Wformat -Werror=format-security -g -fwrapv -O2 -fPIC -I/home/pola/default/include -I/usr/include/python3.11 -c source/c_gpio.c -o build/temp.linux-aarch64-cpython-311/source/c_gpio.o
      source/c_gpio.c: In function ‘setup’:
      source/c_gpio.c:170:9: warning: cast from pointer to integer of different size [-Wpointer-to-int-cast]
        170 |     if ((uint32_t)gpio_mem % PAGE_SIZE)
            |         ^
      source/c_gpio.c:171:34: warning: cast from pointer to integer of different size [-Wpointer-to-int-cast]
        171 |         gpio_mem += PAGE_SIZE - ((uint32_t)gpio_mem % PAGE_SIZE);
            |                                  ^
      aarch64-linux-gnu-gcc -Wsign-compare -DNDEBUG -g -fwrapv -O2 -Wall -g -fstack-protector-strong -Wformat -Werror=format-security -g -fwrapv -O2 -fPIC -I/home/pola/default/include -I/usr/include/python3.11 -c source/common.c -o build/temp.linux-aarch64-cpython-311/source/common.o
      source/common.c:23:10: fatal error: Python.h: No such file or directory
         23 | #include "Python.h"
            |          ^~~~~~~~~~
      compilation terminated.
      error: command '/usr/bin/aarch64-linux-gnu-gcc' failed with exit code 1
      [end of output]

  note: This error originates from a subprocess, and is likely not a problem with pip.
error: legacy-install-failure

× Encountered error while trying to install package.
╰─> RPI.GPIO

note: This is an issue with the package mentioned above, not pip.
hint: See above for output from the failure.
以下のサイトに従ってみる
$ source env/bin/activate
この状態で仮想環境に入ってpip install RPI.GPIOしてみたがだめだった。
以下のサイトに従って、一度仮想環境から出てsudo apt-get install pipをしてみた。
その後、
$ source env/bin/activate
(default)$ pip install RPI.GPIO
でうまく行った。理由は分からない。
ファイルの実行はこうなる
~/default/bin/python3 test.py
値は取れてそう
Mosquitto
インストール
こちらを参考にした。
$sudo apt install mosquitto
$sudo apt install mosquitto-clients
Mosquittoのブローカー立ち上げ
sudo systemctl start mosquitto
画面上は特に何も起こらない。
状況を確認するには
sudo systemctl status mosquitto
Mosquittoのブローカーを自動起動する
これでRapsberry Piが起動したときに自動的にブローカーが立ち上がる。
sudo sytemctl enable mosquitto
同じRaspberry Pi内でMQTTを受信してみる
以下のコマンドを入力するとtopicをweight/frontの値が確認できる。
mosquitto_sub -h localhost -t weight/front
6.Unityで受信する
別PCで受け取れるようMosquittoの設定を変更する
この設定を忘れて、ローカルだとMQTT送信できてるのに別PCだと受け取れないと小一時間悩んだ。
以下のサイトを参考にして設定する。
sudo vi /etc/mosquitto/mosuquitto.conf
以下の2行をファイル末尾に記入
listener 1883
allow_anonymous true
再起動
sudo systemctl restart mosquitto
MQTT.netを使う
MQTT.netを使う
スクリプトは以下を参考にした。
サービスを作成し自動起動する
$HOMEや~/などを使うとエラーが出るのでフルパスで記入する。
pythonのスクリプトを実行するshを作成
#!/bin/bash

sleep 5
/home/pi/default/bin/python3 /home/pi/test.py
[Unit]
Description=start program for sending loadcell value through mqtt

[Service]
ExecStart=/home/pi/services/test.sh

[Install]
WantedBy=multi-user.target
シェルに権限追加
chmod +x test.sh
/etc/systemd/system/にコピー
sudo cp test.service /etc/systemd/system/
サービスを有効にする
sudo systemctl enable testS.service
これでRaspberry Pi起動時にMQTTを送信するスクリプトも実行される。
Discussion