Flutter + BLEシリアル通信の開発
前置き
いままでFlutter経験ない、BLE関連開発経験がない。
この記事は、実践で得た経験を記録する。
作ったものについて
デバイスをBLEでコントロールするアプリを開発するFlutterプロジェクトで、自分が主にBLE通信部分の開発を担当した。
BLEの大体の知識
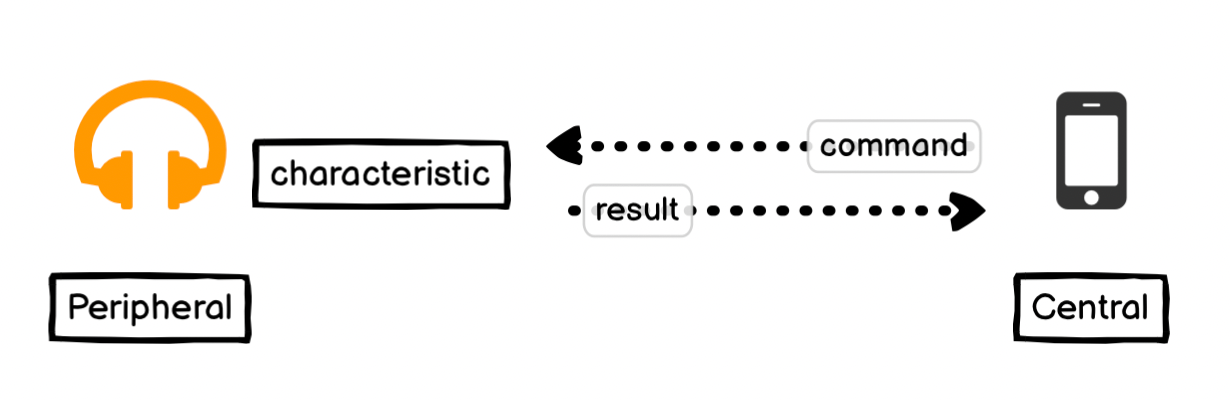
登場人物
- ペリフェラル(peripheral):Bluetoothデバイスのこと
- セントラル(central):スマホのこと
例:スマホを使ってbluetoothヘッドホンに接続する場合、スマホがセントラルで、ヘッドホンはペリフェラル

Characteristic
Characteristicの役割
BLE通信で一番重要なのがCharacteristic。アプリから送信されたコマンドの受付みたいな役割。
Characteristicには属性がある、どういう種類の操作受付しているのか示している。
属性の種類がREAD, WRITE, NOTIFY, INDICATEなどなどある。
一つのCharacteristicが複数属性持つことができる。
Web ServerのAPIで例えると、Characteristicはendpointみたいなもので、属性はPOST, PUTとかみたいな概念かも。
CharacteristicとService
一つのBluetoothデバイスに複数のCharacteristicがあるのがよくある。
そして、それらはServiceに格納されいる、Serviceはフォルダーみたいなもの。
Serviceも複数存在することがある。
イメージとして
ServiceとCharacteristicどれもUUIDで識別する。
イメージとして一つのbluetoothデバイスのserviceとcharacteristicの定義は↓の感じ。
Service: ABCD0001-xxxx-xxxx-xxxx-xxxx
| Characteristic | Property | Feature(機能の例) |
|---|---|---|
| ABCD0002-xxxx-xxxx-xxxx-xxxx | READ | このcharacteristicから〇〇情報をREADできる |
| ABCD0003-xxxx-xxxx-xxxx-xxxx | READ, WRITE | このcharacteristicから〇〇情報をREADまたはWRITE(更新)できる |
| ABCD0004-xxxx-xxxx-xxxx-xxxx | WRITE | このcharacteristicで〇〇情報をWRITEできる |
Service: EFGH0001-xxxx-xxxx-xxxx-xxxx
| Characteristic | Property | Feature(機能の例) |
|---|---|---|
| EFGH0002-xxxx-xxxx-xxxx-xxxx | READ | - |
| EFGH0003-xxxx-xxxx-xxxx-xxxx | NOTIFY | characteristicの値変化が通知される |
BLE関連の知識、GATTとか他の概念もあると思うが、自分の開発で使ってなかった+そこまで詳しくないので省く。
ようやくシリアル通信の開発の話
flutter_blue_plus
開発にはpackage: flutter_blue_plusを利用した。
このpackageを使うことで、BLEの基本的な処理ができる。
例えば接続切断、characteristicリストを取得や、characteristicに対してREAD、WRITEするなど。
開発のゴール: コマンドをqueueする
packageがあるなら、他に何か開発する必要がある?という質問が出るかもしれないが…
プロジェクトで扱ったbluetoothデバイスは、↓の制限と要件があった。
- 制限
- bluetoothデバイス同時に一つのコマンドしか処理できない
- 要件
- ユーザー操作によってリアルタイムでデバイスをコントロールできる
- 常に繰り返しにデバイス状態をbluetoothデバイスから取得必要がある
bluetoothデバイスとの通信、もちろん非同期処理である(APIと一緒)。
制限について誤解しやすいところ:
| ❌ | ⭕️ |
|---|---|
| 同時に一つのコマンドしか送れない | bluetoohデバイスが一つのコマンド受付してから返信完了まで、他のコマンド受付できない |
例えば、ユーザー操作のコマンド送信した時に、bluetoohデバイスの方が別のコマンド処理中だと、ユーザー操作のコマンドの実行結果がエラーになる。体験的に微妙なので、避けたい。
なので、アプリの方は、前のコマンドのレスポンス取得できてから次のコマンドを送るように設計する必要がある → 要するに、アプリの方がコマンドをqueueする必要がある!!
Queueの実装
BleServiceCommand
一つのqueueにはいろんな種類のコマンドを扱うため、コマンドの抽象クラスをまず定義。
parameters()は送信データを定義するメソッド。
execute()は、コマンド実行するメソッド。
Tはレスポンスから取得する実行結果の型。
abstract class BleServiceCommand<T> {
  List<int> parameters();
  Future<T> execute();
}
BleServiceCommandのimplementationの例
characteristicはflutter_blue_plusにあるdiscoverServices()メソッド使って取得したBluetoothCharacteristicオブジェクトを渡す。
この例がやっていることは、characteristicに対して、WRITEコマンドを実行し、パラメタは0x01。
characteristic.writeに結果が返ってきた時、bluetoothデバイス側が処理完了した後。
class TestCommand extends BleServiceCommand<bool> {
TestCommand(this.characteristic);
final BluetoothCharacteristic characteristic;
Future<void> execute() => characteristic.write(parameters());
List<int> parameters() => [0x01];
}
BleServiceCommandQueue
ここRxDartのBehaviorSubjectを使用している。
class BleServiceCommandQueue {
  // commandを格納するqueue
  final List<BleServiceCommand> _queue = [];

  // 次実行するcommandを通知する用のSubjectとStream
  final BehaviorSubject<BleServiceCommand?> _nextCommandSubject =
      BehaviorSubject<BleServiceCommand?>();

  Stream<BleServiceCommand?> get _nextCommand =>
      _nextCommandSubject.stream.distinct();

  // 次に実行してほしいcommandを指定
  // queueの一つ目のcommandが実行中の可能性があるため、2番目にinsertする
  // 例えばユーザー操作のコマンドはこちらを使用
  Future<T> executeNext<T>(BleServiceCommand<T> command) {
    _insertNext(command);
    return _execute(command);
  }

  // 急ぎではなくどっかで実行してほしいcommandを追加
  // 例えばデバイス状態取得ためのコマンド、ユーザー操作のコマンドより優先度低いので、こちらを使用
  Future<T> executeInTurn<T>(BleServiceCommand<T> command) {
    _add(command);
    return _execute(command);
  }

  // 順番になったらcommandのexecute()メソッドを実行。
  // 実行完了後、次のcommandに進む。
  Future<T> _execute<T>(BleServiceCommand<T> command) {
    return _nextCommand.firstWhere((element) => element == command).then((_) {
      return command.execute().whenComplete(_proceedNext);
    });
  }

  void _insertNext(BleServiceCommand command) {
    if (_queue.isEmpty) {
      _queue.add(command);
    } else {
      _queue.insert(1, command);
    }
    _nextCommandSubject.add(_queue.first);
  }

  void _add(BleServiceCommand command) {
    _queue.add(command);
    _nextCommandSubject.add(_queue.first);
  }

  void _proceedNext() {
    if (_queue.isNotEmpty) {
      _queue.removeAt(0);
    }
    if (_queue.isEmpty) {
      _nextCommandSubject.add(null);
    } else {
      _nextCommandSubject.add(_queue.first);
    }
  }

  void clearQueue() {
    _nextCommandSubject.add(null);
    _queue.clear();
  }
}
BleServiceCommandQueueの使い方
final BleServiceCommandQueue commandQueue = BleServiceCommandQueue();
//...
Future<void> executeTestCommand(BluetoothCharacteristic characteristic) {
   final command = TestCommand(characteristic)
   return commandQueue.executeNext(command)
}
書いてないところ
そのほかに、コマンド実行のエラーハンドリングやtimeoutを正しくハンドリングする必要がある。ここでは省いている。
Queueの効果
bluetoothデバイスの状態を無限に繰り返し取得できるようになった〜
ユーザー操作もあんまり遅延なく、bluetoothデバイスに送信できた。
体験的に良い結果になった。
おまけ:BLE通信開発の動作確認関連の知見
- nRFアプリが便利
- アプリ上でcharacteristicに対してWRITEやREADができ、bluetoothデバイスの挙動を確認するのが便利
- Android端末のbluetooth不安定
- bluetoothデバイスになかなか接続できない時は:bluetooth設定ON/OFF、wifi ON/OFF、ペアリング削除、端末再起動・・・
Discussion