KV260アプリケーションの開発方法(2)


1.はじめに
KV260用のオリジナルのアプリを開発方法について、前回はハードウエア側のフローについて確認しました。
今回はプラットフォームやオーバーレイ機能のファームウエアをPetaLinuxに統合する手順について見ていきます。
2.PetaLinuxの構築
ハードウエア側の開発フローをVitis2021.1で進めたので、PetaLinuxは2021.1のバージョンをインストールします。続いてKV260のBSPであるxilinx-k26-starterkit-v2021.1-final.bspを以下からダウンロードします。
PetaLinuxツールの環境を更新し、設定を読み込みます。
$ cd <path-to-installed-PetaLinux>
$ petalinux-upgrade -u 'http://petalinux.xilinx.com/sswreleases/rel-v2021/sdkupdate/2021.1_update1/' -p 'aarch64'
$ source settings.sh
3.PataLinuxプロジェクトの生成
任意のディレクトリでPetaLinuxプロジェクトを生成します。
$ petalinux-create -t project -s xilinx-k26-starterkit-v2021.1-final.bsp
PetaLinuxの設定を変更します。
$ cd <Petalinux-project-root>
$ petalinux-config
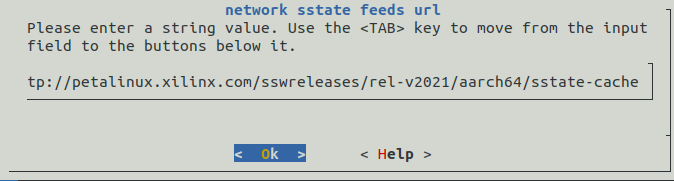
設定画面が起動したら[Yocto Settings] -> [Network sstate feeds URL]を選択して
http://petalinux.xilinx.com/sswreleases/rel-v2021/aarch64/sstate-cache/
を設定します。
4.DeviceTreeの作成
以下のGithubからDTG(Device Tree Generator)を入手します。
$ git clone https://github.com/Xilinx/device-tree-xlnx
$ cd device-tree-xlnx
$ git checkout xlnx_rel_v2021.1_update1
XSAファイルをdevice-tree-xlnxディレクトリにコピーします。
$ cd device-tree-xlnx
$ cp <kv260-vitis>/platforms/vivado/kv260_ispMipiRx_vcu_DP/project/kv260_ispMipiRx_vcu_DP.xsa ./user.xsa
XSCTシェルを開き、以下のコマンドを実行します。
$ source /tools/Xilinx/Vitis/2021.1/settings64.sh
$ xsct
xsct% hsi::open_hw_design test.xsa
xsct% hsi::set_repo_path <path to device-tree-xlnx repository>
xsct% hsi::create_sw_design device-tree -os device_tree -proc psu_cortexa53_0
xsct% hsi::set_property CONFIG.dt_overlay true [hsi::get_os]
xsct% hsi::generate_target -dir build
xsct% hsi::close_hw_design [current_hw_design]
xsct% exit
buildディレクトリが作成され、その中に以下のデバイスツリーファイルが生成されます。
$ ls build
device-tree.mss  pcw.dtsi  system.dts      zynqmp-clk-ccf.dtsi
include          pl.dtsi   system-top.dts  zynqmp.dtsi
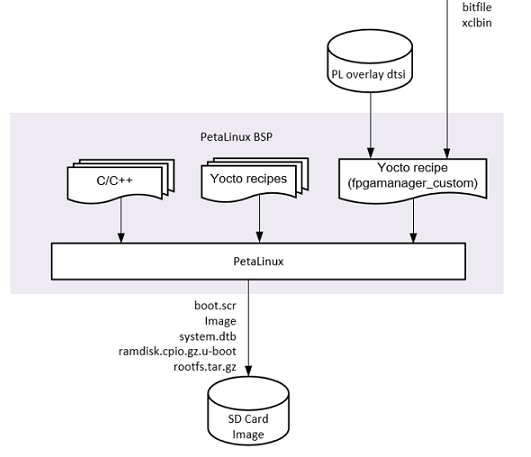
5.FPGAファームウエアの追加
次に、アプリケーションをFPGAマネージャーに登録します。
FPGAマネージャーはオーバーレイをFPGAにコンフィギュレーションするためのLinux用のインターフェイスになります。
FPGA マネージャーに登録すると、関連するファームウエアをPetaLinuxの/lib/firmware/xilinxに配置してくれます。
まず始めに、プラットフォームファイルとオーバーレイをPetaLinuxのプロジェクトディレクトリにコピーしてきます。
$ cd <Petalinux-project-root>
$ cp <kv260-vitis>/platforms/vivado/kv260_ispMipiRx_vcu_DP/project/kv260_ispMipiRx_vcu_DP.xsa user.xsa
$ cp <kv260-vitis>/overlays/examples/smartcam/binary_container_1/dpu.xclbin user.xclbin
$ cp <kv260-vitis>/overlays/examples/smartcam/binary_container_1/link/int/system.bit user.bit
$ cp <device-tree-xlnx>/build/pl.dtsi user.dtsi
xmutilによるファームウエアをロードするための設定ファイルshell.jsonを作成します。※2021.1バージョンではXRT_FLATのみのサポートの様です。
以下の内容を書いて保存します。
{
    "shell_type" : "XRT_FLAT",
    "num_slots" : "1"
}
user.dtsiファイルを編集します。
firmware-name = "user-firmware.bit.bin";と書いて保存します。
/dts-v1/;
/plugin/;
/ {
	fragment@0 {
		target = <&fpga_full>;
		overlay0: __overlay__ {
			#address-cells = <2>;
			#size-cells = <2>;
			firmware-name = "user-firmware.bit.bin";
			resets = <&zynqmp_reset 116>, <&zynqmp_reset 117>, <&zynqmp_reset 118>, <&zynqmp_reset 119>;
		};
	};
petalinux-create コマンドを使用して、PetaLinuxプロジェクトにファイルを追加します。
$ petalinux-create -t apps --template fpgamanager -n user-firmware --enable --srcuri "user.bit user.dtsi user.xclbin shell.json"
INFO: Create apps: user-firmware
INFO: Copying source urls into the project directory
INFO: Creating fpgamanager/fpgamanager_dtg template apps required FPGA Manager to be enabled in petalinux-config
INFO: New apps successfully created in <Petalinux-project-root>/project-spec/meta-user/recipes-apps/user-firmware
INFO: Enabling created component...
INFO: Sourcing build environment
INFO: Silentconfig rootfs
INFO: user-firmware has been enabled
以下のパスにレシピファイルが追加されます。
<Petalinux-project-root>/project-spec/meta-user/recipes-apps/user-firmware/
├── files
│   ├── shell.json
│   ├── user.bit
│   ├── user.xclbin
│   └── user.dtsi
├── README
└── user-firmware.bb
次にPetaLinuxのMenuConfigの設定を確認します。以下のコマンドを実行し
$ petalinux-config -c rootfs
[apps] -> [user-firmware]が選択されているか確認します。

最後にPetaLinuxをビルドします。
$ petalinux-build
6.SDカードの作成と動作
アプリケーションを追加したPetaLinuxのSDカードイメージを作成します。
アプリケーションを追加したPetaLinuxをパッケージングし、GZIPで圧縮ファイルを生成します。
$ petalinux-package --wic --bootfiles "ramdisk.cpio.gz.u-boot boot.scr Image system.dtb"
$ gzip images/linux/petalinux-sdimage.wic
生成したファイルをEtcherでSDカードに書き込みます。
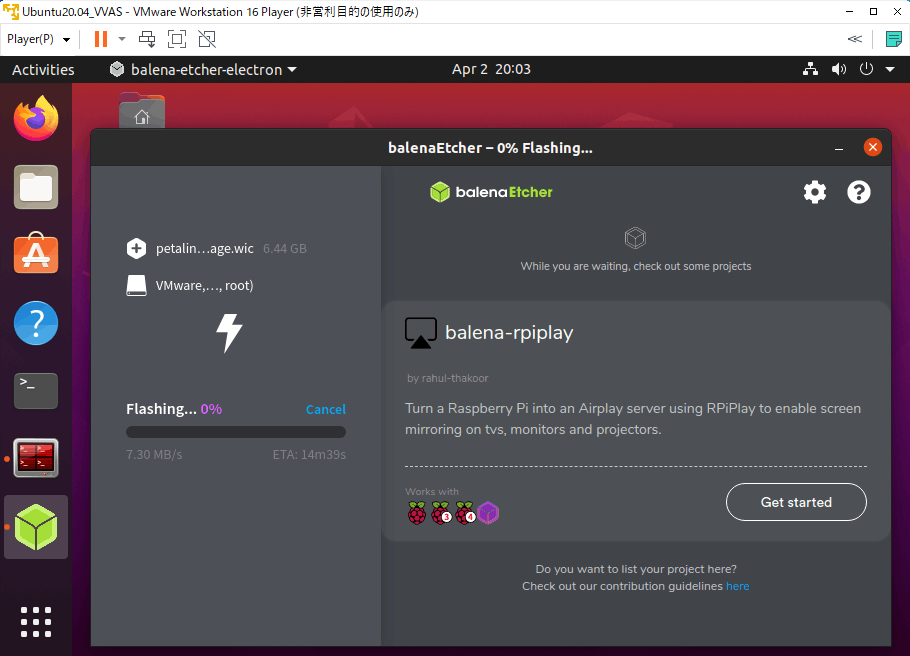
SDカードへの書き込みが完了したらKV260にSDカードを挿し込み、電源を入れます。
ターミナルのプロンプトからPetaLinuxにログインします。
xilinx-k26-starterkit-2021_1 login: petalinux
You are required to change your password immediately (administrator enforced)
New password:
Retype new password:
xilinx-k26-starterkit-2021_1:~$
PetaLinuxに/lib/firmware/xilinx/user-firmwareディレクトリがあることが確認できます。その中のファイル構成は以下のようになります。
$ ls /lib/firmware/xilinx/user-firmware
shell.json  user-firmware.bit.bin  user-firmware.dtbo  user-firmware.xclbin
追加したファームウエアの動作確認をしてみます。
リストに登録されていることを確認します。
$ sudo xmutil listapps
                     Accelerator                            Base           Type    #slots         Active_slot

                   user-firmware                   user-firmware       XRT_FLAT         0                  -1
                        kv260-dp                        kv260-dp       XRT_FLAT         0                  0,
Socket 9 closed by client
ファームウエアをロードします。
$ sudo xmutil unloadapp
DFX-MGRD> daemon removing accel at slot 0

DFX-MGRD> Removing accel kv260-dp from slot 0

Accelerator successfully removed.
Socket 9 closed by client

$ sudo xmutil loadapp user-firmware
DFX-MGRD> daemon loading accel user-firmware

DFX-MGRD> Successfully loaded base design.

Accelerator loaded to slot 0
Socket 6 closed by client

$ sudo xmutil listapps
                     Accelerator                            Base           Type    #slots         Active_slot

                   user-firmware                   user-firmware       XRT_FLAT         0                  0,
                        kv260-dp                        kv260-dp       XRT_FLAT         0                  -1
Socket 6 closed by client
ファームウエアのロードが確認できました!
7.終わりに
今回はプラットフォームとオーバーレイ機能をファームウエアとしてPetaLinuxに統合する手順について見てみました。
PetaLinux側の手順についてはデータシートをもっと読み込まないと理解がなかなか難しいと感じます。
Discussion