Flutter+riverpod+stateNotifierでtodoリスト
業務内容の一環でFlutterを使って開発をしていて、今回はriverpodを使ってtodoアプリを作ってみました!
riverpod stateNotifier
機能
- Todo追加
- Todo編集
- Todo削除
- Todo完了ステータスを切替
新規プロジェクト作成
今回はVSCodeを利用してtodo_list_page.dartという新規プロジェクトを作成します。
次いでmain.dart,todo_list_edit_page.dartというプロジェクトものちに使うので作成してください。
package
pubspec.yamlに追加してPub getを実行します。
今回はriverpodのみの実行なのでhooksは使いません。
dependencies:
  flutter_riverpod:
  riverpod_annotation:
dev_dependencies:
  build_runner:
  riverpod_generator:
classの定義
riverpod_generatorで自動生成して空のリスト配列をreturn値として返すのでベタ書きはしません。
part 'todo_list_page.g.dart';
class Todo {
final int id;
final String task;
final String detail;
final bool isCompleted;
Todo({
required this.id,
required this.task,
required this.detail,
required this.isCompleted,
});
}
class TodoList extends _$TodoList {
List<Todo> build() {
return [];
}
riverpod_generatorでの自動生成
プロジェクトのルートから以下のコマンドを実行することで、@riverpodが付与されたクラスと同じディレクトリにソースコードが生成されます。今回で言うとreturn値の空の配列でTodoの中身がその要素に当たります。
flutter pub run build_runner build
これで自動生成完了です
関数定義
| addTodo | removeTodo | toggleCompleted | editTodo |
|---|---|---|---|
| 要素を追加 | 要素を削除 | ステータスを変更 | 要素を編集 |
  void addTodo(Todo todo) {
    state = [...state, todo];
  }

  void removeTodo(int id) {
    state = state.where((todo) => todo.id != id).toList();
  }

  void toggleCompleted(int id) {
    state = state
        .map((todo) => todo.id == id
            ? Todo(
                id: todo.id,
                task: todo.task,
                detail: todo.detail,
                isCompleted: !todo.isCompleted)
            : todo)
        .toList();
  }

  void editTodo(Todo todo) {
    state = state.map((e) => e.id == todo.id ? todo : e).toList();
  }
ConsumerStatefulWidgetを作成
ConsumerStatefulWidgetの理由はDropdownButtonでonChangeした値を保持してmain
のページの戻った時に表示したいのでsetStateを使うためConsumerWidgetだと状態保持ができないからConsumerStatefulWidgetを作成しています。
class NextAddPage extends ConsumerStatefulWidget {
const NextAddPage({super.key});
_NextAddPageState createState() => _NextAddPageState();
}
class _NextAddPageState extends ConsumerState<NextAddPage> {
final todoContentTaskController = TextEditingController();
final todoContentDetailController = TextEditingController();
String selectedStatus = "Not yet"; // ステータスの初期値
  void onPressedAddButton() {
    List<Todo> todoList = ref.watch(todoListProvider);
    final todoListNotifier = ref.read(todoListProvider.notifier);

    String task = todoContentTaskController.text;
    String detail = todoContentDetailController.text;
    todoContentDetailController.clear();
    todoContentTaskController.clear();

    bool isCompleted = selectedStatus == "Completion";

    int id = (todoList.isEmpty) ? 1 : todoList.last.id + 1;

    Todo todo =
        Todo(id: id, task: task, detail: detail, isCompleted: isCompleted);
    todoListNotifier.addTodo(todo);
    Navigator.pop(
      context,
      MaterialPageRoute(
        builder: (context) {
          return MyHomePage();
        },
      ),
    );
  }
Widget build(BuildContext context) {
return Scaffold(
appBar: AppBar(
backgroundColor: Theme.of(context).colorScheme.inversePrimary,
title: const Text("タスク管理アプリ追加"),
),
body: Column(
children: [
const Align(
alignment: Alignment.centerLeft,
child: Text(
"タスク名",
style: TextStyle(fontSize: 20),
)),
TextField(
controller: todoContentTaskController,
style: const TextStyle(
fontSize: 20,
color: Colors.black,
),
decoration: const InputDecoration(hintText: "買い物リスト"),
),
const Align(
alignment: Alignment.centerLeft,
child: Text(
"詳細",
style: TextStyle(fontSize: 20),
)),
TextField(
controller: todoContentDetailController,
maxLines: 10,
style: const TextStyle(
fontSize: 20,
color: Colors.black,
),
decoration: const InputDecoration(hintText: "スーパーで買い物をする"),
),
const Align(
alignment: Alignment.centerLeft,
child: Text(
"ステータス",
style: TextStyle(fontSize: 20),
)),
DropdownButton<String>(
value: selectedStatus,
items: const [
DropdownMenuItem(value: "Not yet", child: Text("未着手")),
DropdownMenuItem(value: "Completion", child: Text("完了")),
],
onChanged: (String? newValue) {
setState(() {
selectedStatus = newValue!;
});
},
),
ElevatedButton(
onPressed: () {
onPressedAddButton();
},
child: const Text("追加"))
],
),
);
}
}
StateNotiferProvider
以下のコードでは追加ボタンが押された際の処理を書いています。ここでのポイントはtodoListProviderをwatchしてtodoListに入れている点です。この処理のおかげで変数todoListはTodoの状態管理を行うことができます。さらにtodoListProviderのnotifireをreadすることにより状態を保持することはできないがtodoListNotifier変数で値の変更を行うことができます。
void onPressedAddButton() {
List<Todo> todoList = ref.watch(todoListProvider);
final todoListNotifier = ref.read(todoListProvider.notifier);
String task = todoContentTaskController.text;
String detail = todoContentDetailController.text;
todoContentDetailController.clear();
todoContentTaskController.clear();
bool isCompleted = selectedStatus == "Completion";
int id = (todoList.isEmpty) ? 1 : todoList.last.id + 1;
Todo todo =
Todo(id: id, task: task, detail: detail, isCompleted: isCompleted);
todoListNotifier.addTodo(todo);
Navigator.pop(
context,
MaterialPageRoute(
builder: (context) {
return MyHomePage();
},
),
);
}
これで編集は完成しました!次はmainのページを作っていきます。
main
編集画面に行くためにpushEditPageでidを指定することによって他のtodoとの区別をしています。
import 'package:flutter/material.dart';
import 'package:flutter_application_2/todo_list_edit_page.dart';
import 'package:flutter_application_2/todo_list_page.dart';
import 'package:flutter_riverpod/flutter_riverpod.dart';
void main() {
runApp(
const ProviderScope(
child: MyApp(),
),
);
}
class MyApp extends StatelessWidget {
const MyApp({super.key});
Widget build(BuildContext context) {
return MaterialApp(
title: 'aaa Demo',
theme: ThemeData(
colorScheme: ColorScheme.fromSeed(seedColor: Colors.deepPurple),
useMaterial3: false,
),
home: MyHomePage(),
);
}
}
class MyHomePage extends ConsumerWidget {
MyHomePage({super.key});
void _pushPage(BuildContext context) {
Navigator.push(
context,
MaterialPageRoute(
builder: (context) {
return const NextAddPage();
},
),
);
}
Future<void> pushEditPage(BuildContext context, id) async {
Navigator.push(
context,
MaterialPageRoute(
builder: (context) {
return MyEditPage(
id: id,
);
},
),
);
}
int _selectedIndex = 0;
void _onItemTapped(int index) {}
Widget build(BuildContext context, WidgetRef ref) {
List<Todo> todoList = ref.watch(todoListProvider);
final todoListNotifier = ref.read(todoListProvider.notifier);
void onPressedDeleteButton(int index) {
todoListNotifier.removeTodo(todoList[index].id);
}
void onPressedToggleButton(int index) {
todoListNotifier.toggleCompleted(todoList[index].id);
}
return Scaffold(
appBar: AppBar(
backgroundColor: Theme.of(context).colorScheme.inversePrimary,
title: const Text("タスク管理アプリ"),
),
body: Column(
children: [
SizedBox(height: 30),
const TextField(
decoration: InputDecoration(
hintText: "検索",
icon: Icon(Icons.search),
),
),
ElevatedButton(
onPressed: () {
_pushPage(context);
},
child: const Text("追加"),
),
Expanded(
child: ListView.builder(
itemCount: todoList.length,
itemBuilder: (BuildContext context, int index) {
return Row(
children: [
Text(todoList[index].id.toString()),
const SizedBox(width: 20),
Text(todoList[index].task),
const SizedBox(width: 20),
Text(todoList[index].detail),
const SizedBox(width: 20),
Text(todoList[index].isCompleted ? "完了" : "未完了"),
const SizedBox(width: 20),
ElevatedButton(
onPressed: () {
onPressedDeleteButton(index);
},
style: ElevatedButton.styleFrom(
minimumSize: Size(50, 50),
),
child: const Text('削除'),
),
ElevatedButton(
onPressed: () {
onPressedToggleButton(index);
},
style: ElevatedButton.styleFrom(
minimumSize: Size(50, 50),
),
child: const Text('切り替え'),
),
ElevatedButton(
onPressed: () {
pushEditPage(context, todoList[index].id);
},
style: ElevatedButton.styleFrom(
minimumSize: Size(50, 50),
),
child: const Text('編集'),
),
],
);
},
),
),
],
),
bottomNavigationBar: BottomNavigationBar(
currentIndex: _selectedIndex,
onTap: _onItemTapped,
items: const <BottomNavigationBarItem>[
BottomNavigationBarItem(icon: Icon(Icons.home), label: 'ホーム'),
BottomNavigationBarItem(icon: Icon(Icons.list), label: 'todo作成'),
BottomNavigationBarItem(icon: Icon(Icons.person), label: 'アカウント'),
],
type: BottomNavigationBarType.fixed,
));
}
}
編集ページ
実装方法はtodo_list_pageとほぼ変わりません。
import 'package:flutter/material.dart';
import 'package:flutter_riverpod/flutter_riverpod.dart';
import 'package:flutter_application_2/todo_list_page.dart';
class MyEditPage extends ConsumerWidget {
MyEditPage({super.key, required this.id});
final int id;
final todoContentTaskController = TextEditingController();
final todoContentDetailController = TextEditingController();
String selectedStatus = "Not yet"; // ステータスの初期値
Widget build(BuildContext context, WidgetRef ref) {
List<Todo> todoList = ref.watch(todoListProvider);
final todoListNotifier = ref.read(todoListProvider.notifier);
Todo? todo = todoList.firstWhere((element) => element.id == id);
//初期値として前のデータを入れる
todoContentTaskController.text = todo.task;
todoContentDetailController.text = todo.detail;
selectedStatus = todo.isCompleted ? "Completion" : "Not yet";
onPressedSaveButton() {
String task = todoContentTaskController.text;
String detail = todoContentDetailController.text;
todoContentDetailController.clear();
todoContentTaskController.clear();
bool isCompleted = selectedStatus == "Completion";
Todo todo =
Todo(id: id, task: task, detail: detail, isCompleted: isCompleted);
todoListNotifier.editTodo(todo);
Navigator.pop(
context,
);
}
return Scaffold(
appBar: AppBar(
backgroundColor: Theme.of(context).colorScheme.inversePrimary,
title: const Text("タスク編集"),
),
body: Padding(
padding: const EdgeInsets.all(10.0),
child: Column(
children: [
const Align(
alignment: Alignment.centerLeft,
child: Text(
"タスク名",
style: TextStyle(fontSize: 20),
),
),
TextField(
controller: todoContentTaskController,
style: const TextStyle(
fontSize: 20,
color: Colors.black,
),
decoration: const InputDecoration(hintText: "タスク名を入力"),
),
const Align(
alignment: Alignment.centerLeft,
child: Text(
"詳細",
style: TextStyle(fontSize: 20),
),
),
TextField(
controller: todoContentDetailController,
maxLines: 10,
style: const TextStyle(
fontSize: 20,
color: Colors.black,
),
decoration: const InputDecoration(hintText: "詳細を入力"),
),
const Align(
alignment: Alignment.centerLeft,
child: Text(
"ステータス",
style: TextStyle(fontSize: 20),
),
),
DropdownButton<String>(
value: selectedStatus,
items: const [
DropdownMenuItem(value: "Not yet", child: Text("未着手")),
DropdownMenuItem(value: "Completion", child: Text("完了")),
],
onChanged: (String? newValue) {
selectedStatus = newValue!;
},
),
ElevatedButton(
onPressed: () {
onPressedSaveButton();
},
child: const Text("保存"),
),
],
),
),
);
}
}
これで完成です!
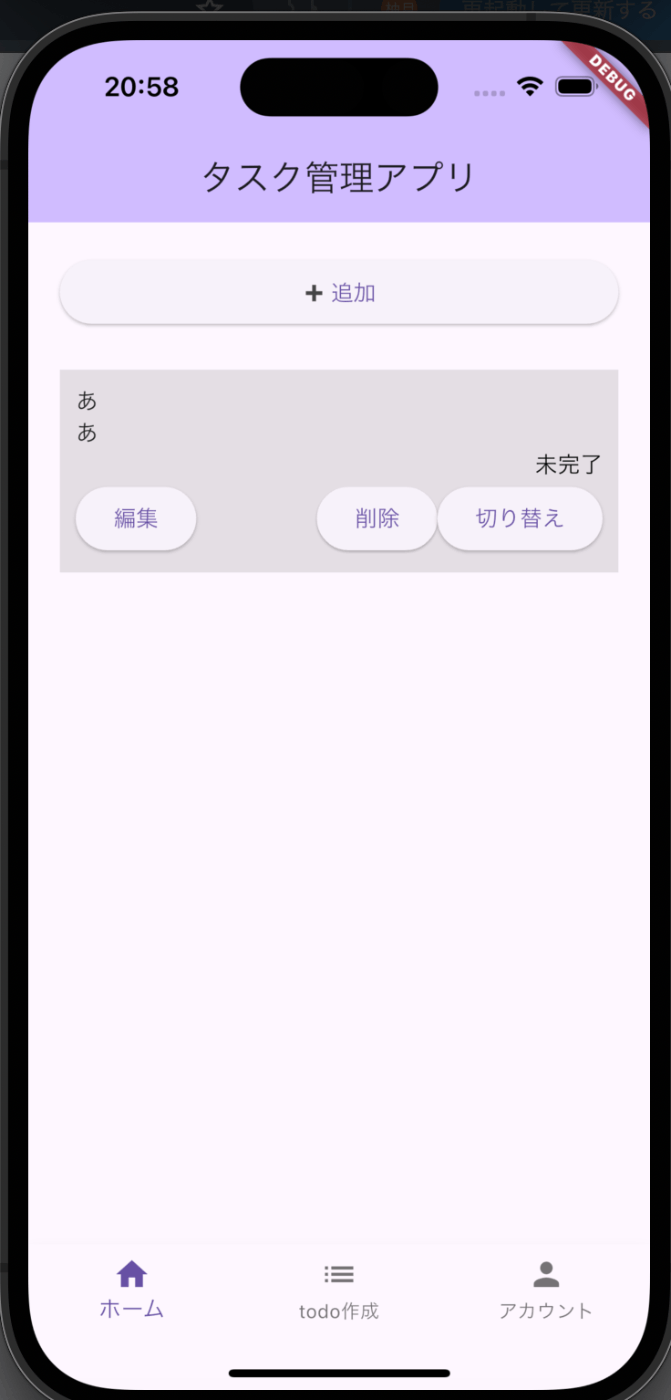
完成見本はこんな感じです。

最後に
今回初めて記事を書いたので他の投稿者様などの記事を参考にしながら取り組みました。また、理解がまだ足りてない部分、ご指摘などございましたら連絡をいただけると嬉しいです。
Discussion