【初心者向け】サークルで学んだことを生かしたオセロの作り方説明.ts
react を用いてオセロを作る
本記事について
僕は東洋大学の公認サークルである INIAD.ts に所属しており、現時点でオセロやマインスイーパーを制作し、オセロのオンライン対戦の開発に取り組んできました
その中で Typescript での開発方法やコードの書き方、教え方などの技術を向上させてきました
それらの成果の確認と記録のためにサークルメンバー以外の人にオセロを1から教えるために行ったことをまとめてみたのがこの記事になります
注意
この記事では
-vscodeでの開発を行ったことがある
- github のアカウントを持っている
- プログラミング言語を触ったことがある(if 文 for 文などの役割や変数の代入を理解している)
ことを前提に話を進めていきます
オセロを作成するための準備
node.js をインストールする
下記のリンクから公式サイトに飛んでください
公式ページの LTS(推奨版)を選んでください
質問が出た際はすべて next を選択してください
インストールが終わったら以下のコマンドをコマンドプロンプトに入力してみてください
node -v
npm -v
$ PS C:\Users\ユーザー名> node -v
v18.16.0
$ PS C:\Users\ユーザー名> npm -v
9.5.1
このような表示になれば大丈夫です
フレームワークをクローンする
今回はフレームワークに僕の所属するサークル、INIAD.tsで用いたnext-ts-starterを使用します
にアクセスし、codeと書いてある緑の部分をクリックして URL をコピーしてください
次にコマンドプロンプトを開き以下のコマンドを入力してください
git clone コピーしたurl othello
cd othello
code .

vscodeが開いたと思いますので、vscodeのターミナル上で以下のコマンドを実行してください
また、右下に推奨された拡張機能がありますという旨のポップアップが出るかと思います
それらはインストールしておいてください
npm i
npm run dev
自動的にフォルダが追加され、ターミナル上に様々なログが流れます
その中にlocalhost:3000という部分があるのでcntr+クリックします
おそらく規定のブラウザが立ち上がり、welcome to next.jsと表示されるはずです

このように表示されたら成功です
GitHub のリポジトリを作成
自身の GitHub にログインします
repository→newと進みます
リポジトリ名を入力し、既定の設定で作成します
リポジトリの URL をコピーします
リポジトリとローカル環境にあるフォルダを紐付けます
以下のようにvscodeのターミナルに入力してください
Git Hubのホームページ上の表記と異なりますが今回はこのようにしてください
git remote set-url origin コピーしたURL
git init
git add .
git commit -m 'firstcommit'
git push -u origin main(もしくはmaster)


自身のGitHub→actions→ 黄色いマークが回っている → 緑になったら成功です
オセロを作成する
見た目を作る
vscodeでothello/src/pages/index.tsx、othello/src/pages/index.tsxを開きます
6 行目から 54 行目は今回使わないので消します

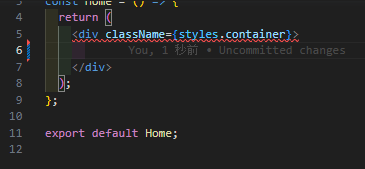
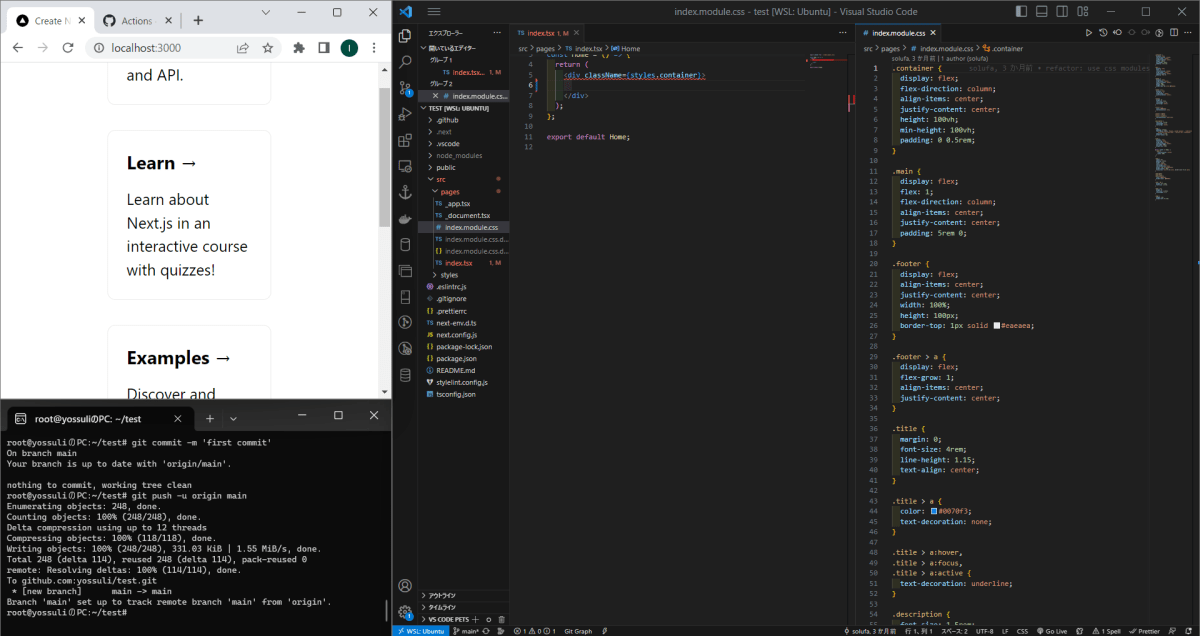
vscodeの右画面に./index.module.cssを開きます
ファイル名をドラッグして右画面に持っていくとこのようにできます
個人的には、今回の開発の最初のほうではtsxファイルとcssファイルを交互に編集することがあるのでこの配置がおすすめです
以下、このように開いているものとして説明を進めていきます
-
オセロの緑のボードを作ります
cssファイルの他のクラスや、tsx ファイルのcontainerを参考に空気を読んでクラスboardを作ってください
ボードのサイズは640px四方が良いでしょう -
オセロの線を作ります
今回はcellという80px四方のクラスを用意して、枠線を引き、それを 64 個敷き詰める方向で作成します
親子兄弟関係に注意してください -
オセロの枠線の中に石を作ります
大きさはcellの大きさより少し小さい70px四方が良いでしょう
オセロの石は円形なので角を丸める必要がありそうですね
特に何も設定していない場合下のように石が左上に寄ってしまうと思います
cssファイルを読み解き、適当そうなものを追加しましょうtsx,`css`ファイルの例
index.tsxconst Home = () => { return ( <div className={styles.container}> + <div className={styles.board}> + <div className={styles.cell}> + <div className={styles.stone} /> + </div> + </div> </div> ); };index.module.css.board { width: 640px; height: 640px; background-color: green; } .cell { display: flex; align-items: center; justify-content: center; width: 80px; height: 80px; border: solid 1px black; } .stone { width: 70px; height: 70px; background-color: white; border-radius: 50%; }一旦自力でオセロの枠線と石の塊を 64 個に増やします
増やしたコード(長いのでしまっています)
index.tsxconst Home = () => { return ( <div className={styles.container}> <div className={styles.board}> <div className={styles.cell}> <div className={styles.stone} /> </div> <div className={styles.cell}> <div className={styles.stone} /> </div> <div className={styles.cell}> <div className={styles.stone} /> </div> <div className={styles.cell}> <div className={styles.stone} /> </div> <div className={styles.cell}> <div className={styles.stone} /> </div> <div className={styles.cell}> <div className={styles.stone} /> </div> <div className={styles.cell}> <div className={styles.stone} /> </div> <div className={styles.cell}> <div className={styles.stone} /> </div> <div className={styles.cell}> <div className={styles.stone} /> </div> <div className={styles.cell}> <div className={styles.stone} /> </div> <div className={styles.cell}> <div className={styles.stone} /> </div> <div className={styles.cell}> <div className={styles.stone} /> </div> <div className={styles.cell}> <div className={styles.stone} /> </div> <div className={styles.cell}> <div className={styles.stone} /> </div> <div className={styles.cell}> <div className={styles.stone} /> </div> <div className={styles.cell}> <div className={styles.stone} /> </div> <div className={styles.cell}> <div className={styles.stone} /> </div> <div className={styles.cell}> <div className={styles.stone} /> </div> <div className={styles.cell}> <div className={styles.stone} /> </div> <div className={styles.cell}> <div className={styles.stone} /> </div> <div className={styles.cell}> <div className={styles.stone} /> </div> <div className={styles.cell}> <div className={styles.stone} /> </div> <div className={styles.cell}> <div className={styles.stone} /> </div> <div className={styles.cell}> <div className={styles.stone} /> </div> <div className={styles.cell}> <div className={styles.stone} /> </div> <div className={styles.cell}> <div className={styles.stone} /> </div> <div className={styles.cell}> <div className={styles.stone} /> </div> <div className={styles.cell}> <div className={styles.stone} /> </div> <div className={styles.cell}> <div className={styles.stone} /> </div> <div className={styles.cell}> <div className={styles.stone} /> </div> <div className={styles.cell}> <div className={styles.stone} /> </div> <div className={styles.cell}> <div className={styles.stone} /> </div> <div className={styles.cell}> <div className={styles.stone} /> </div> <div className={styles.cell}> <div className={styles.stone} /> </div> <div className={styles.cell}> <div className={styles.stone} /> </div> <div className={styles.cell}> <div className={styles.stone} /> </div> <div className={styles.cell}> <div className={styles.stone} /> </div> <div className={styles.cell}> <div className={styles.stone} /> </div> <div className={styles.cell}> <div className={styles.stone} /> </div> <div className={styles.cell}> <div className={styles.stone} /> </div> <div className={styles.cell}> <div className={styles.stone} /> </div> <div className={styles.cell}> <div className={styles.stone} /> </div> <div className={styles.cell}> <div className={styles.stone} /> </div> <div className={styles.cell}> <div className={styles.stone} /> </div> <div className={styles.cell}> <div className={styles.stone} /> </div> <div className={styles.cell}> <div className={styles.stone} /> </div> <div className={styles.cell}> <div className={styles.stone} /> </div> <div className={styles.cell}> <div className={styles.stone} /> </div> <div className={styles.cell}> <div className={styles.stone} /> </div> <div className={styles.cell}> <div className={styles.stone} /> </div> <div className={styles.cell}> <div className={styles.stone} /> </div> <div className={styles.cell}> <div className={styles.stone} /> </div> <div className={styles.cell}> <div className={styles.stone} /> </div> <div className={styles.cell}> <div className={styles.stone} /> </div> <div className={styles.cell}> <div className={styles.stone} /> </div> <div className={styles.cell}> <div className={styles.stone} /> </div> <div className={styles.cell}> <div className={styles.stone} /> </div> <div className={styles.cell}> <div className={styles.stone} /> </div> <div className={styles.cell}> <div className={styles.stone} /> </div> <div className={styles.cell}> <div className={styles.stone} /> </div> <div className={styles.cell}> <div className={styles.stone} /> </div> <div className={styles.cell}> <div className={styles.stone} /> </div> <div className={styles.cell}> <div className={styles.stone} /> </div> <div className={styles.cell}> <div className={styles.stone} /> </div> </div> </div> ); }; // 誤って消してしまった場合用 // 2 つになってしまった場合は 1 つにしてください export default Home;するとボードから枠線がはみ出してしまうと思いますので修正しましょう
例
index.module.css.board { +display: flex; +flex-wrap: wrap; width: 640px; height: 640px; background-color: green; } .cell { display: flex; align-items: center; justify-content: center; width: 80px; height: 80px; border: solid 1px black; } .stone { width: 70px; height: 70px; background-color: white; border-radius: 50%; }上手く
cssをかけると8 * 8で綺麗に収まるはずです
もちろん自力で 64 個書くのが美しいとは言えませんよね
以下のようにしてくださいindex.tsxconst Home = () => { + const board = [ + [0, 0, 0, 0, 0, 0, 0, 0], + [0, 0, 0, 0, 0, 0, 0, 0], + [0, 0, 0, 0, 0, 0, 0, 0], + [0, 0, 0, 1, 2, 0, 0, 0], + [0, 0, 0, 2, 1, 0, 0, 0], + [0, 0, 0, 0, 0, 0, 0, 0], + [0, 0, 0, 0, 0, 0, 0, 0], + [0, 0, 0, 0, 0, 0, 0, 0], + ]; return ( <div className={styles.container}> <div className={styles.board}> - <div className={styles.cell}> - <div className={styles.stone} /> - </div> - <!-- 省略 --> - <div className={styles.cell}> - <div className={styles.stone} /> - </div> + {board.map((row, y) => + row.map((color, x) => ( + <div className={styles.cell} key={`${x}-${y}`}> + <div className={styles.stone} /> + </div> + )) + )} </div> </div> ); }見た目は変わらないのにコード量が減ってすっきりしましたね
-
書き換えたコードの解説をします
-
const board = [[0, 0, 0...]]では仮想的なボードを作成しています
0 が 8 個ある配列が 8 個ある 2 次元配列になっていますね
このボードとcellクラスのdiv要素とをひとまとまりのテンプレートとして、一対一対応させることでオセロのボードの見た目を実現しています -
board.map((row, y) => {...,row.map((color, x) => {...は配列メゾットmapを用いています -
board.map((row, y) => {...では定数boardの中から y 番目の要素(0 が 8 個)をひとつひとつ取り出してrowに代入しています -
row.map((color, x) => {...では取り出したrowの中から x 番目の要素を取り出してcolorに代入しています -
(color, x) => <div>...</div>では取り出したcolor(つまり 0)ひとつひとつに対してcellクラスのdiv要素を返しています
クラスはhtmlと違ってclassName={}という書き方になります -
key{`${x}-${y}`}の部分は人間にとって意味はない部分なので気にしないでください
ここで重要なのは``で囲むと文字列を連結できるということです
${変数}で変数を文字列の中に埋め込むことができます
つまり盤面におけるこのdiv要素の座標がkeyになっているということです
座標はユニークなのでkeyになりうるということなんですね
(僕も対して理解していませんが)
-
-
useStateというreactの機能を使用します
以下のように書きかけの状態にしてください
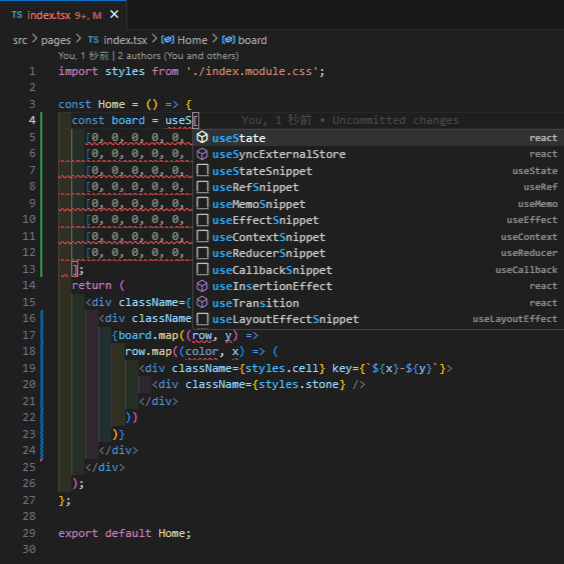
tab キーや上下キーなどで選択します
下の画像のようにimport { useState } from 'react'というコードが自動的に書かれれば大丈夫です
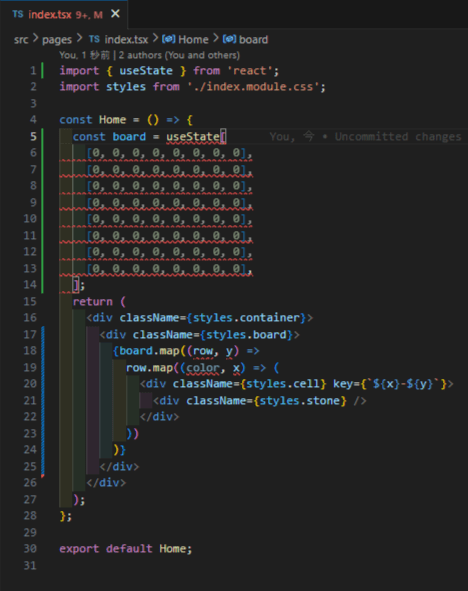
下のように()や[]などを加えてくださいindex.tsx- const board = [ + const [board, setBoard] = useState([ [0, 0, 0, 0, 0, 0, 0, 0], [0, 0, 0, 0, 0, 0, 0, 0], [0, 0, 0, 0, 0, 0, 0, 0], [0, 0, 0, 1, 2, 0, 0, 0], [0, 0, 0, 2, 1, 0, 0, 0], [0, 0, 0, 0, 0, 0, 0, 0], [0, 0, 0, 0, 0, 0, 0, 0], [0, 0, 0, 0, 0, 0, 0, 0], - ]; + ]); `` この機能を用いて、ユーザーの入力を書き換えて保存します -
オセロらしい見た目にしていきます
オセロの初期盤面は中心に白黒黒白の石がありますね
そこで定数boardを以下のように書き換えますconst [board, setBoard] = useState([ [0, 0, 0, 0, 0, 0, 0, 0], [0, 0, 0, 0, 0, 0, 0, 0], [0, 0, 0, 0, 0, 0, 0, 0], [0, 0, 0, 1, 2, 0, 0, 0], [0, 0, 0, 2, 1, 0, 0, 0], [0, 0, 0, 0, 0, 0, 0, 0], [0, 0, 0, 0, 0, 0, 0, 0], [0, 0, 0, 0, 0, 0, 0, 0], ]);colorが 0 のところの石が非表示になるようにし、colorが 1 の時黒、2 の時白になるようにします
以下のようにコードを書き換えてください<div className={styles.cell} ...> - <div className={styles.stone} /> + {color !== 0 && ( + <div + className={styles.stone} + style={{ backgroundColor: color === 1 ? "#000" : "#fff" }} + /> + )} </div> -
書き換えたコードの解説をします
-
&&はA && Bで、A がtrueならば B を実行し、A がfalseならば B を見ることなくfalseを返します(短絡評価) -
styleはcssをtsxファイル側で上書きする際に用いる属性です
波括弧を書いているので ts が始まり、その中に連想配列(辞書型、クラスともいう)を書いています
color === 1 ? #000 : #fffは三項演算子を用いた書き方です -
A ? B : Cで A がtrueならば B を実行し、A がfalseならば C を実行するという構文です
以下のように表示されたら成功です

-
-
クリックすると石が置けるようにします
以下のようにコードを追加してくださいindex.tsxconst Home = () => { const [board, setBoard] = useState([ [0, 0, 0, 0, 0, 0, 0, 0], [0, 0, 0, 0, 0, 0, 0, 0], [0, 0, 0, 0, 0, 0, 0, 0], [0, 0, 0, 1, 2, 0, 0, 0], [0, 0, 0, 2, 1, 0, 0, 0], [0, 0, 0, 0, 0, 0, 0, 0], [0, 0, 0, 0, 0, 0, 0, 0], [0, 0, 0, 0, 0, 0, 0, 0], ]); + const [turnColor, setTurnColor] = useState(1); + const clickCell = (x: number, y: number) => { + const newBoard = structuredClone(board); + newBoard[y][x] = turnColor; + setBoard(newBoard); + if (turnColor === 1) { + setTurnColor(2); + } else { + setTurnColor(1); + } + }; return ( <div className={styles.container}> <div className={styles.board}> {board.map((row, y) => row.map((color, x) => ( - <div className={styles.cell} key={`${x}-${y}`}> + <div className={styles.cell} key={`${x}-${y}`} onClick={() => clickCell(x, y)}> {color !== 0 && ( <div className={styles.stone} style={{ backgroundColor: color === 1 ? '#000' : '#fff' }} /> )} </div> )) )} </div> </div> ); };-
const [turnColor, setTurnColor] = useState(1);ではturnColorを定義しています
turnColorは黒の番の時を1、白の番の時を2で表します -
onClick={() => clickCell(x, y)}ではHTMLの属性であるonclickに自身で定義したclickCell関数を渡しています
このことで、cellがクリックされたときにclickCell関数を実行します -
const clickCell = (x: number, y: number) => {...}はclickCell関数の定義です -
const newBoard = structuredClone(board);ではboardを直接書き換えないためにboardをコピーして定数newBoardに渡しています -
newBoard[y][x] = turnColor;ではこの関数に渡された座標(クリックした座標)が引数として渡されるので対応するnewBoardの値をturnColorの値にします
石はboardの値に依存して色が変わるので、boardの値を書き換えることで見た目に反映することができます -
if (turnColor === 1) {...setTurnColor(1);}ではturnColorが 1 なら 2 に 2 なら 1 にします
typescriptでのif文はif(条件式) { 条件式が true の時に実行する式 } else if (条件式) { 条件式が true の時に実行する式 } else { 条件のいずれもが false であった時に実行する式 }と書きます
ifを用いることでで置くたびにターンを変えることができます
-
-
コードを短くします
下の部分は動作の割には冗長なコードですif (turnColor === 1) { setTurnColor(2); } else { setTurnColor(1); }実は今までに説明したテクニックを用いると 5 行から 1 行にすることができます
lv.1 回答例
turnColor === 1 ? setTurnColor(2) : setTurnColor(1);lv.2 回答例
setTurnColor(turnColor === 1 ? 2 : 1);lv.3 回答例
setTurnColor(3 - turnColor);setTurnColor(2 / turnColor);
オセロらしい動きを作る ①
いよいよオセロの機能面のコードを書いていきます
現在は盤面上のどこでも石が置けてしまいますね
ここでは少しずつおける条件を狭めていきながら最終的に実際の オセロと同じ動きができることを目指します
では解説を進めていきます
-
クリックした
cellが空白の時だけ置けるようにします
分岐なのでif文を使えば良いですね以下は一例です
index.tsxconst [turnColor, setTurnColor] = useState(1); const clickCell = (x: number, y: number) => { const newBoard = JSON.parse(JSON.stringify(board)); + if (newBoard[y][x] === 0) { newBoard[y][x] = turnColor; setBoard(newBoard); + setTurnColor(3 - turnColor); + } }ターンを変える処理を
if文の中に書くことで、置けた時のみターンを相手に渡すようにしています -
クリックした
cellの下のcell内のstoneが自分と違う色の時だけ置けるようにします
自分と違う色を簡潔に表現する方法は先ほど説明してあるので探して書いてみてください
以下は一例ですindex.tsxconst [turnColor, setTurnColor] = useState(1); const clickCell = (x: number, y: number) => { const newBoard = JSON.parse(JSON.stringify(board)); if (newBoard[y][x] === 0) { + if (newBoard[y + 1][x] === 3 - turnColor) { newBoard[y][x] = turnColor; setBoard(newBoard); setTurnColor(3 - turnColor); + } } }下のようにのみ置けるようになると思います
-
エラーを回避するコードを追加します
先ほどの状態で一番下の列のcellをクリックすると以下のようにエラーが出るかと思います
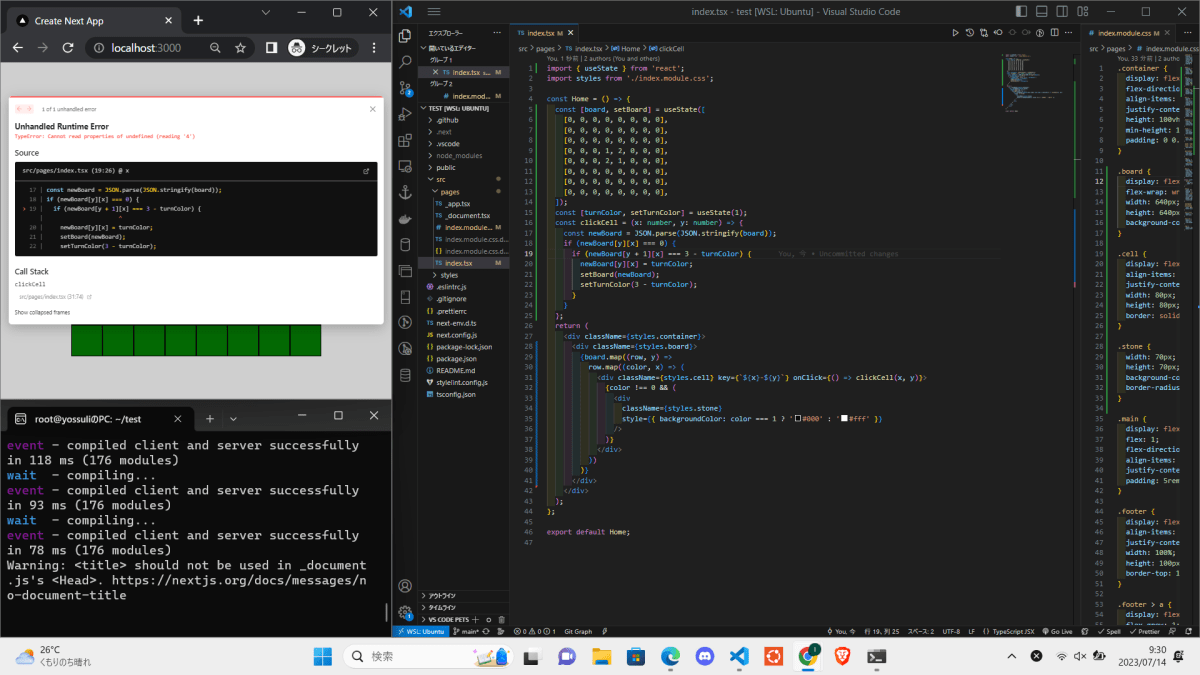
このエラーは以下のような原理で発生します
-
board[y+1][x]においてy = 7, x = 4のcellをクリックした時board[8]を実行すると存在しないのでundefinedが返ってくる -
board[8]にundefinedが代入される -
board[8][4]を計算しようとするが、実際にはundefined[4]を実行することになる -
undefinedは配列などではないため添え字をつけることはできない - エラーになる
そこで短絡評価を用いて
if文の条件式を複数にします
以下は一例です
index.tsxconst [turnColor, setTurnColor] = useState(1); const clickCell = (x: number, y: number) => { const newBoard = JSON.parse(JSON.stringify(board)); if (newBoard[y][x] === 0) { - if (newBoard[y + 1][x] === 3 - turnColor) { + if (newBoard[y + 1] !== undefined && newBoard[y + 1][x] === 3 - turnColor) { newBoard[y][x] = turnColor; setBoard(newBoard); setTurnColor(3 - turnColor); } } }短絡評価は左辺が
falseの時右辺を無視するので、エラーになる時に返ってくるundefinedを弾く条件を左辺に追加します -
-
同 ← 異 ← 空白の時のみ置けるようにします
デバッグ用の盤面として以下のように board を書き換えると良いでしょうuseState([ [0, 0, 0, 0, 0, 0, 0, 0], [0, 0, 0, 0, 0, 0, 0, 1], [0, 0, 0, 0, 0, 0, 2, 1], [0, 0, 0, 0, 0, 1, 2, 1], [0, 0, 0, 0, 2, 1, 2, 1], [0, 0, 0, 1, 2, 1, 2, 1], [0, 0, 2, 1, 2, 1, 2, 1], [0, 2, 1, 2, 1, 2, 1, 2], ]);
if文の条件式をさらに増やしても良いのですが、ここではif文をネストさせましょう
色の書き方を間違えないこととエラーをはじくことに注意してください以下は一例です
index.tsxconst [turnColor, setTurnColor] = useState(1); const clickCell = (x: number, y: number) => { const newBoard = JSON.parse(JSON.stringify(board)); if (newBoard[y][x] === 0) { if (newBoard[y + 1] !== undefined && newBoard[y + 1][x] === 3 - turnColor) { + if (newBoard[y + 2] !== undefined && newBoard[y + 2][x] === turnColor) { newBoard[y][x] = turnColor; setBoard(newBoard); setTurnColor(3 - turnColor); + } } } } -
同 ← 異 ← 異 ← 空白の時も置けるようにします
elseif 文を用いて場合わけを行うと良いでしょう
もちろん色の書き方を間違えないこととエラーをはじくことを忘れないでください
以下は一例です
index.tsxconst [turnColor, setTurnColor] = useState(1); const clickCell = (x: number, y: number) => { const newBoard = JSON.parse(JSON.stringify(board)); if (newBoard[y][x] === 0) { if (newBoard[y + 1] !== undefined && newBoard[y + 1][x] === 3 - turnColor) { if (newBoard[y + 2] !== undefined && newBoard[y + 2][x] === turnColor) { newBoard[y][x] = turnColor; setBoard(newBoard); setTurnColor(3 - turnColor); + } else if (newBoard[y + 2] !== undefined && newBoard[y + 2][x] === 3 - turnColor) { + if (newBoard[y + 3] !== undefined && newBoard[y + 3][x] === turnColor) { + newBoard[y][x] = turnColor; + setBoard(newBoard); + setTurnColor(3 - turnColor); + } + } } } } -
同 ← たくさんの異 ← 空白での時も置けるようにします
これらのコードを見るとインデントの高さが深くなるごとに、つまりネストが深くなるごとにyやxに加減する数が大きくなっていることがわかると思います
数字が大きくなりながら何回も繰り返す…そうfor文ですね!
Typescriptでのfor文はfor(変数宣言 = 初期値; 変数に関しての条件式 (true の限り繰り返す); 変数の変化の仕方) { 実行式; }と書きます
for文を用いればコードを簡潔に書くことができそうですね-
ひとつ先の
cellの状態を確認する時を考える
cellの状態は 4 つあります4 つの状態
- 存在しない
エラーの発生を防ぐためにまず最初に考えるべきです
この( = ボードの外に出た)場合はさらに先を見る必要はあるでしょうか? - 空白
この場合はさらに先を見る必要はあるでしょうか? - 自分の色
この場合はさらに先を見る必要はあるでしょうか?
ほかにすべきことはありますか? - 相手の色
この場合はさらに先を見る必要はあるでしょうか?
ほかにすべきことはありますか?
それぞれについて
if文で実行する式を設定すれば良さそうですね
さらにひとつ先を見る必要があるか(for文を続ける必要があるか)に注目するといいです
必要がある場合はcontinueない場合はbreakを書くことで上手く制御できます(詳しいことは自分で調べましょう)
それぞれの条件を判別する順番に注意して書きましょう
以下は一例です
index.tsxconst [turnColor, setTurnColor] = useState(1); const clickCell = (x: number, y: number) => { const newBoard = JSON.parse(JSON.stringify(board)); if (newBoard[y][x] === 0) { - if (newBoard[y + 1] !== undefined && newBoard[y + 1][x] === 3 - turnColor) { - if (newBoard[y + 2] !== undefined && newBoard[y + 2][x] === turnColor) { - newBoard[y][x] = turnColor; - setBoard(newBoard); - setTurnColor(3 - turnColor); - } else if (newBoard[y + 2] !== undefined && newBoard[y + 2][x] === 3 - turnColor) { - if (newBoard[y + 3] !== undefined && newBoard[y + 3][x] === turnColor) { - newBoard[y][x] = turnColor; - setBoard(newBoard); - setTurnColor(3 - turnColor); - } - } - } + for (let distance = 1; distance < 8; distance++) { + if (newBoard[y + distance] === undefined) { + break; + } else { + if (newBoard[y + distance][x] === undefined) { + break; + } else if (newBoard[y + distance][x] === 0) { + break; + } else if (newBoard[y + distance][x] === turnColor) { + newBoard[y][x] = turnColor; + setBoard(newBoard); + setTurnColor(3 - turnColor); + break; + } else if (newBoard[y + distance][x] === 3 - turnColor) { + continue; + } + } + } } } - 存在しない
-
ひっくり返す動作を作る
ひっくり返す動作は、前に進んだ分だけ戻りながらその座標の石を自身の色にすれば良さそうですね
デクリメント(--)をうまく使えそうです
以下は一例です
index.tsxconst [turnColor, setTurnColor] = useState(1); const clickCell = (x: number, y: number) => { const newBoard = JSON.parse(JSON.stringify(board)); if (newBoard[y][x] === 0) { for (let distance = 1; distance < 8; distance++) { if (newBoard[y + distance] === undefined) { break; } else { if (newBoard[y + distance][x] === undefined) { break; } else if (newBoard[y + distance][x] === 0) { break; } else if (newBoard[y + distance][x] === turnColor) { - newBoard[y][x] = turnColor; + for (let back = distance; back >= 0; back--) { + newBoard[y + back][x] = turnColor; + } setBoard(newBoard); setTurnColor(3 - turnColor); break; } else if (newBoard[y + distance][x] === 3 - turnColor) { continue; } } } } }
-
-
コードの書き方によっては 同 ← 空白 でおけてしまう場合があります(今回はそうです)
同 ← (1 個以上の)異 ← 空白である時のみ置ける(ひっくり返す)ようにすれば良いですね
以下は一例です
index.tsxconst [turnColor, setTurnColor] = useState(1); const clickCell = (x: number, y: number) => { const newBoard = JSON.parse(JSON.stringify(board)); if (newBoard[y][x] === 0) { for (let distance = 1; distance < 8; distance++) { if (newBoard[y + distance] === undefined) { break; } else { if (newBoard[y + distance][x] === undefined) { break; } else if (newBoard[y + distance][x] === 0) { break; } else if (newBoard[y + distance][x] === turnColor) { + if (distance > 1) { for (let back = distance; back >= 0; back--) { newBoard[y + back][x] = turnColor; } setBoard(newBoard); setTurnColor(3 - turnColor); + } break; } else if (newBoard[y + distance][x] === 3 - turnColor) { continue; } } } } }おそらくこれで下方向に限っては完璧になっているはずです
うまく動かない場合は条件式のいずれにも当てはまらない場合を定義しているかや、括弧の数が合っているかなどを確認しましょう
オセロらしい動きを作る ②
ここで今作ったコードの一部を書き換えて左下方向にならばどこでも置けるようにします
デバッグ用の盤面として以下のようにコードを書き換えると良いでしょう
useState([
  [0, 0, 0, 0, 0, 0, 0, 0],
  [2, 2, 1, 2, 1, 2, 1, 0],
  [1, 1, 2, 1, 2, 1, 2, 0],
  [2, 2, 1, 2, 1, 2, 1, 0],
  [1, 1, 2, 1, 2, 1, 2, 0],
  [2, 2, 1, 2, 1, 2, 1, 0],
  [1, 1, 2, 1, 2, 1, 2, 0],
  [2, 1, 2, 1, 2, 1, 2, 0],
]);
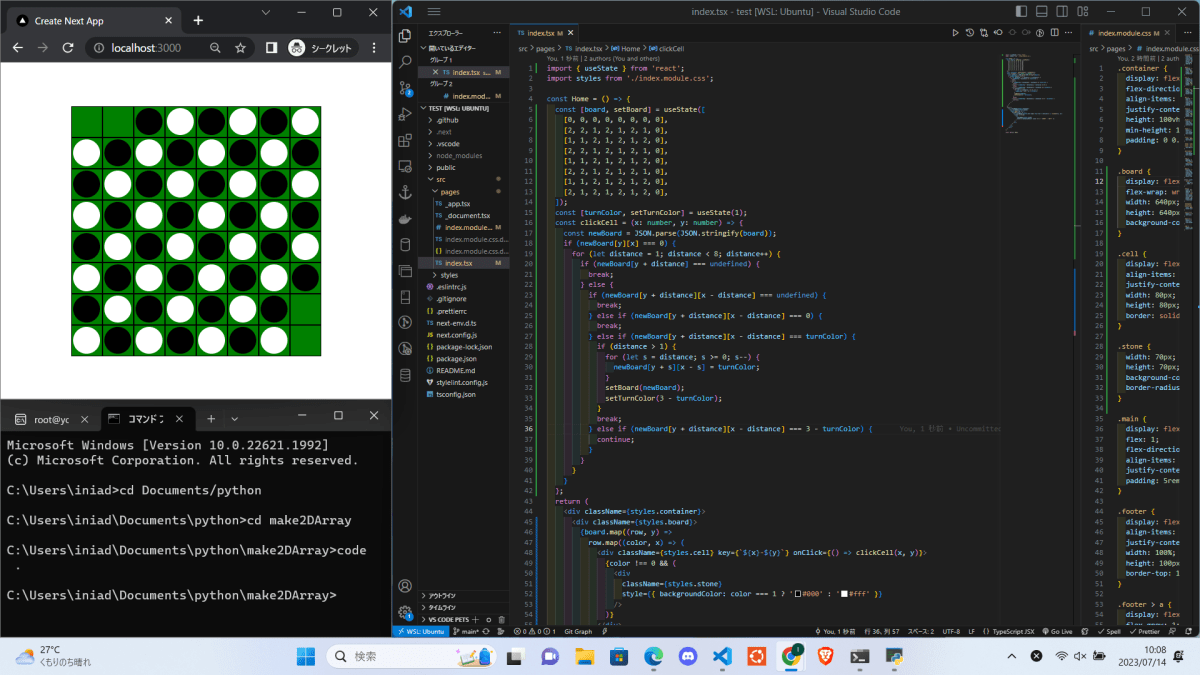
これらを踏まえてよりオセロらしい動きを作ります
for 文を用いてどの方向でもひっくり返せるようにコードを書き換えます
今回下ようのコードの一部を書き換えて左下に置けるようにしたように手動で 8 方向を作っても良いのですが、できれば簡潔なコードにしたいです
そこで 8 方向について xy 座標軸方向の単位ベクトルを用いて 8 方向を以下のように表します
const directions = [
  [-1, 1],
  [0, 1],
  [1, 1],
  [1, 0],
  [1, -1],
  [0, -1],
  [-1, -1],
  [-1, 0],
];
まずは左下方向のベクトルを取り出して現在のコードに適用させましょう
左下はdirections[4]で取り出せますね
directions[4]は[1,-1]なのでさらに添え字をつけると1と-1が取り出せます
以下は一例です

+const directions = [
+  [-1, 1],
+  [0, 1],
+  [1, 1],
+  [1, 0],
+  [1, -1],
+  [0, -1],
+  [-1, -1],
+  [-1, 0],
+];
 const [turnColor, setTurnColor] = useState(1);
 const clickCell = (x: number, y: number) => {
   const newBoard = JSON.parse(JSON.stringify(board));
   if (newBoard[y][x] === 0) {
     for (let distance = 1; distance < 8; distance++) {
-      if (newBoard[y + distance] === undefined) {
+      if (newBoard[y + directions[4][0] * distance] === undefined) {
         break;
       } else {
-        if (newBoard[y + distance][x] === undefined) {
+        if (newBoard[y + directions[4][0] * distance][x + directions[4][1] * distance] === undefined) {
           break;
-        } else if (newBoard[y + distance][x] === 0) {
+        } else if (newBoard[y + directions[4][0] * distance][x + directions[4][1] * distance] === 0) {
           break;
-        } else if (newBoard[y + distance][x] === turnColor) {
+        } else if (newBoard[y + directions[4][0] * distance][x + directions[4][1] * distance] === turnColor) {
           if (distance > 1) {
             for (let back = distance; back >= 0; back--) {
-              newBoard[y + back][x] = turnColor;
+              newBoard[y + directions[4][0] * back][x + directions[4][1] * back] = turnColor;
             }
             setBoard(newBoard);
             setTurnColor(3 - turnColor);
           }
           break;
-        } else if (newBoard[y + distance][x] === 3 - turnColor) {
+        } else if (newBoard[y + directions[4][0] * distance][x + directions[4][1] * distance] === 3 - turnColor) {
           continue;
         }
       }
     }
   }
 }
このコードを踏まえて、添え字の数字の部分を 0→7 にすることで全ての方向に対してひっくり返す動作を適用することができそうですね
typescript での for 文には
for (定数宣言 of 配列など) {
  実行式;
}
というタイプもあります
consthoge=[[0,1],[2,3],[4,5],[6,7]]
for(consthogehogeofhoge) {
 console.log(hogehoge[0])
 console.log(hogehoge[1])
}
//実行結果
//0
//1
//2
//3
//4
//5
//6
//7
このように使うことができます
以下は一例です
 const [turnColor, setTurnColor] = useState(1);
 const clickCell = (x: number, y: number) => {
   const newBoard = JSON.parse(JSON.stringify(board));
   if (newBoard[y][x] === 0) {
+    for (const direction of directions) {
       for (let distance = 1; distance < 8; distance++) {
-        if (newBoard[y + directions[4][0] * distance] === undefined) {
+        if (newBoard[y + direction[0] * distance] === undefined) {
           break;
         } else {
-          if (newBoard[y + directions[4][0] * distance][x + directions[4][1] * distance] === undefined) {
+          if (newBoard[y + direction[0] * distance][x + direction[1] * distance] === undefined) {
             break;
-          } else if (newBoard[y + directions[4][0] * distance][x + directions[4][1] * distance] === 0) {
+          } else if (newBoard[y + direction[0] * distance][x + direction[1] * distance] === 0) {
             break;
-          } else if (newBoard[y + directions[4][0] * distance][x + directions[4][1] * distance] === turnColor) {
+          } else if (newBoard[y + direction[0] * distance][x + direction[1] * distance] === turnColor) {
             if (distance > 1) {
               for (let back = distance; back >= 0; back--) {
-                newBoard[y + directions[4][0] * back][x + direction[1] * back] = turnColor;
+                newBoard[y + direction[0] * back][x + direction[1] * back] = turnColor;
               }
               setBoard(newBoard);
               setTurnColor(3 - turnColor);
             }
             break;
-          } else if (newBoard[y + directions[4][0] * distance][x + directions[4][1] * distance] === 3 - turnColor) {
+          } else if (newBoard[y + direction[0] * distance][x + direction[1] * distance] === 3 - turnColor) {
             continue;
           }
         }
       }
+    }
   }
 }
デバッグ用の盤面として以下のようにコードを書き換えると良いでしょう
useState([
  [0, 0, 0, 0, 0, 0, 0, 0],
  [1, 1, 1, 1, 1, 1, 1, 0],
  [1, 2, 2, 2, 2, 2, 1, 0],
  [1, 2, 2, 2, 2, 2, 1, 0],
  [1, 2, 2, 0, 2, 2, 1, 0],
  [1, 2, 2, 2, 2, 2, 1, 0],
  [1, 2, 2, 2, 2, 2, 1, 0],
  [1, 1, 1, 1, 1, 1, 1, 0],
]);
おそらくこれでオセロとしては問題ない動きになったと思います
動かない場合は例を参考に問題点を洗い出してみてください

重複する操作を減らすこともできます
以下は一例です

オセロの追加機能
-
石の数を数える
配列メソッドを使うと 1 行で書けます
return 部分への埋め込みは波括弧を使えばできます -
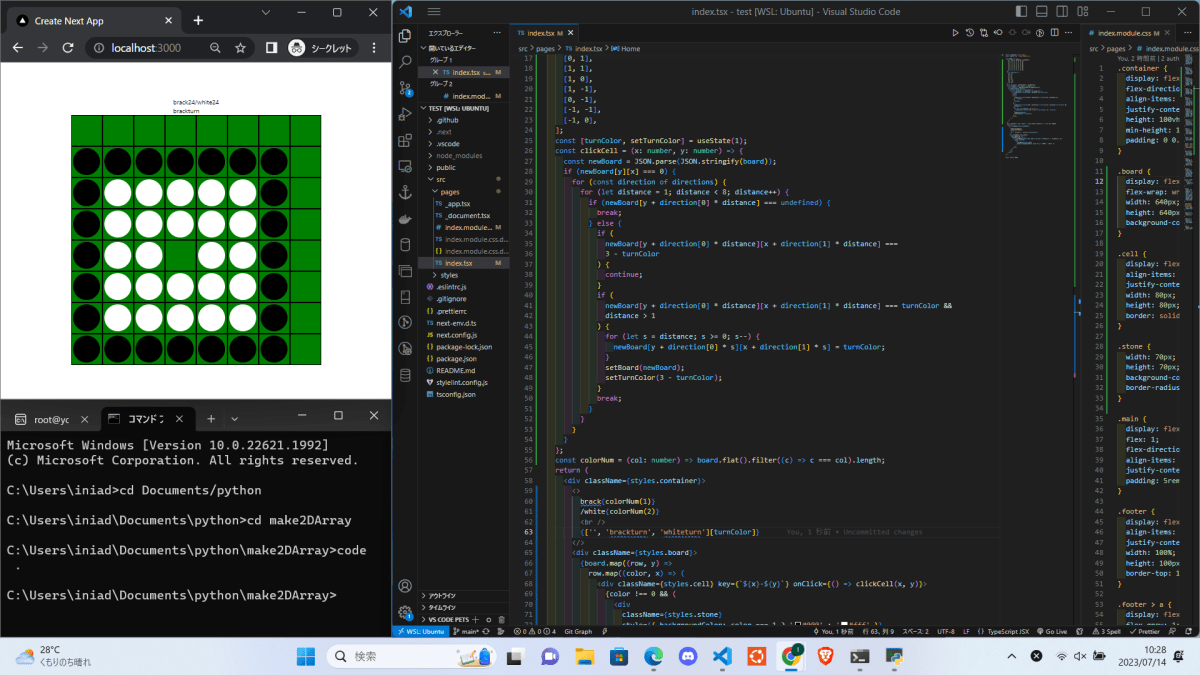
誰の番か表示する
三項演算子を使うのもいいですが配列と添え字でもできます
例です
-
置ける場所を表示する
clickCell 内の式を関数化して再利用可能にします
全てのcellに対してその関数を適用し、仮に置いたと仮定した時にひっくり返せるところをオレンジ色の小さい石などで表示します
相手のターンについて考えるということに注意してください
ボードに書き込む値は 3 か -1 がいいでしょう(僕は 3 推しです)
毎回リセットすることを忘れないようにしてください
(今後追記します) -
パスされるようにする
自分のターンで置ける場所がない際に自動的に相手のターンになるようにすれば良いです- 自分のターンで置ける場所がないということは…?
-
ゲームが終了するようする
自分のターンで置ける場所がない時に自動的に相手のターンになり、相手も置ける場所がない時にゲームが終了すればいいですね- パスされた上で相手に置ける場所がないということは…?


Discussion