Budibaseでいろいろやってみる
Docker Composeを使ってBudibase + PostgreSQLの環境を作る。
version: "3"

services:
  budibase:
    restart: unless-stopped
    image: budibase/budibase:v2.2.22
    ports:
      - "8080:80"
    volumes:
      - budibase_data:/data

  postgres:
    image: postgres:14
    container_name: budibase_postgres
    ports:
      - 5431:5432
    volumes:
      - postgres-store:/var/lib/postgresql/data
      - ./postgres/scripts:/docker-entrypoint-initdb.d
    environment:
      - POSTGRES_PASSWORD=postgres
    restart: always

volumes:
  budibase_data:
    driver: local
  postgres-store:
-- データベースの作成
create database budibase_example;

\c budibase_example

-- ロールの作成
create role budibase_dev_user with login password 'budibasedevuser';

-- 権限の追加
alter role budibase_dev_user with createdb;
PostgreSQLと接続する

Budibase DBにFilesテーブルを作成し、「Note」「File」カラムを作成する


DesignタブでExcelファイル登録用のフォームを作成する。
Budibase DBで作成したFilesテーブルと関連付けを設定する。

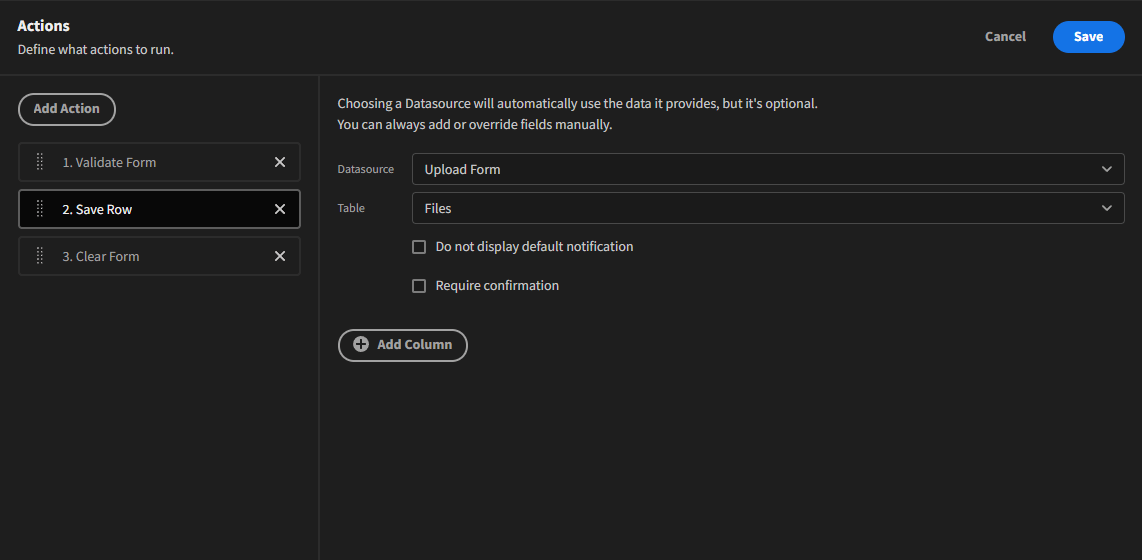
Upload Buttonにクリック時のアクションを紐づける。
-
Validate Formで必須入力チェック -
Save Rowで入力されている情報でBudibase DBのFilesテーブルにデータを追加する -
Clear Formで入力されている情報を初期化する


Previewで実際に動かしてみた結果、Budibase DBのFilesテーブルにレコードが追加されていればOK。

テストデータのExcelファイルを作成する。

Budibase DBに登録したExcelファイルの内容を読み取ってDBに書き込みたいが、
Budibaseの機能だけでの実現は難しそう。(※誰か知っていたら教えてください。)
そこで、自前でAPIを用意してBudibase Automationと連携させる形のアプローチに挑戦。
今のところ想定している処理の流れは以下。
- Budibaseで作ったUIからExcelファイルを
Budibase DBに登録する -
Budibase AutomationのTriggerでRow Createdを選択し、Fileテーブルに新規でレコードが追加されたらJavaScript実行で自前で用意しているNestJSで作ったAPIへレコード情報をポストする。(Budibaseから直接ファイルのみを送る方法がうまくいかなかった・・・。JSの実行は内部でvm2を使って実行しており、node-fetchは使えるがrequireは禁止されており・・・。) - NestJSのAPIでリクエストを受け取ったら、その中に含まれている実ファイルのURLを取り出してBudibaseへExcelファイルを取りにいく。
- Excelファイルの中身をxlsx を使って読み取り、Prismaを使ってPostgreSQLに書き込む。
Budibase側でPostgreSQLとの連携がとれていればDBの中身を表示する画面を作ることで色々とできそう。
Edit Codeモーダルを開いた時のBINDINGSが以下のようになっているので参考に。
[
  {
    "label": "trigger.row",
    "type": "object",
    "description": "The new row that was created",
    "category": "Trigger outputs",
    "path": "trigger.row"
  },
  {
    "label": "trigger.id",
    "type": "string",
    "description": "Row ID - can be used for updating",
    "category": "Trigger outputs",
    "path": "trigger.id"
  },
  {
    "label": "trigger.revision",
    "type": "string",
    "description": "Revision of row",
    "category": "Trigger outputs",
    "path": "trigger.revision"
  }
]
Budibase Automationで設定するJS Scriptingは以下を記載
fetch("http://path/to/your/api", {
  method: "POST",
  headers: {
    "Content-Type": "application/json",
  },
  body: JSON.stringify({
    tableId: trigger.row.tableId,
    files: trigger.row.File,
    note: trigger.row.Note
  }),
});
上記でPOSTリクエストを投げると、API側で受け取るBodyは下記のようになる。
{
  "tableId": "xxxxxxxxxxxxxxxxxxxxxxxxxxxxxxxxxxx",
  "files": [
    {
      "size": 10716,
      "name": "sample-sales.xlsx",
      "url": "/prod-budi-app-assets/xxxxxxxxxxxxxxxxxxxxx/attachments/yyyyyyyyyyyyyyyy.xlsx",
      "extension": "xlsx",
      "key": "xxxxxxxxxxxxxxxxxxxxx/attachments/yyyyyyyyyyyyyyyy.xlsx"
    }
  ],
  "note": "This is Example File Upload"
}
files[0].urlでとれる情報がExcelの実ファイルの取得URLなので、http://your.budibase.url/prod-budi-app-assets/xxxxxxxxxxxxxxxxxxxxx/attachments/yyyyyyyyyyyyyyyy.xlsxでアクセスするとファイルが取得できる。
参考:
Budibaseのプラグイン一覧にCSVの中身を取得できるものがありましたのでご参考まで。
Budibase Public APIのあれこれ
ここで色々と試すことができる
API Key、App IDやTable ID、Row IDの調べ方
Budibase DBのレコードの更新
curl --request PUT \
     --url http://localhost:8080/api/public/v1/tables/<table-id>/rows/<row-id> \
     --header 'accept: application/json' \
     --header 'content-type: application/json' \
     --header 'x-budibase-api-key: <api-key>' \
     --header 'x-budibase-app-id: <app-id>' \
     --data '
{
     "Column Name1": "New Value",
     "Column Name2": "New Value",
}
'
Budibase PostgreSQL Queryあれこれ
テーブル構成
テーブル名: Sales
カラム:
- sales(Number)
- cost(Number)
- month(Number)
- year(Number)
- region(Text)
- name(Text)
- marketer(Text)
- id(Text)

テーブルをTRUNCATEする
TRUNCATE public."Sales";

Budibaseで画面を作るときのあれこれ
グローバルスタイル設定
Add component -> BASIC -> Embedを使う。
下記のようにHandlebarsにスタイルタグを突っ込んで!importantすると、
スタイルの上書きが可能。下記の例は画面に表示するテーブルでスクロールさせずに100% で表示する設定。
<style>
.spectrum-Table {
  height: 100% !important;
}
</style>
OIDC接続で自己証明書を扱う際に注意点