Angularでツリー表示させる初学者向けチュートリアル
Angularでツリー表示したいのでサンプルを作ってとお願いされたけどお蔵入りになったのでこちらで供養させていただく。せっかくなので初学者向けにチュートリアル形式で参ります。
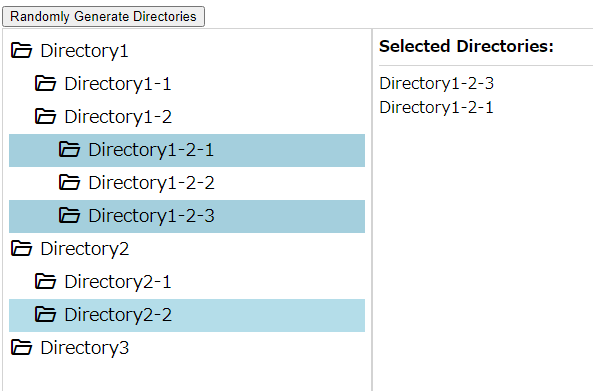
全体のソースコードは以下に。
機能
- 親子関係のあるデータをツリー表示する
- 親は子を隠すことができる
- 複数選択可能
- ツリーアイテムはドラッグ&ドロップできる
- 複数選択状態でドラッグ&ドロップできる
順番に実装していきましょう。
登場人物
- tree-list.component.ts:ツリービューコンポーネント。利用者向けのインターフェースを提供
- tree-item.component.ts:ツリーの中身。
- tree-data.service.ts:ツリーの選択状態を管理する
- app.component.html:ツリービューコンポーネントを使う人
まずはツリービューコンポーネントを追加しましょう。
ng generate component tree-list
上記が追加出来たらapp.component.htmlにツリービューコンポーネントを追加しましょう。
<app-tree-list ></app-tree-list>
ここから肉付けしていきます。
データ
以下のデータ型を使います。
// アプリ側から渡されるデータ。親子関係はparentIdで設定されている
export interface Directory{
    id:number,
    parentId:number|null,
    name:string
}

// ツリービューコンポーネント内部で使用するデータ。childrenで親子関係の変化をAngularに検知させている
export interface TreeDirectory{
    id:number,
    parentId:number|null,
    name:string,
    children:TreeDirectory[]
}
このチュートリアルでは2つのデータ型を用います。利用者からDirectory型で受け取ったデータをTreeDirectory型に詰め替えて実装します。詰め替える理由としては以下の2つ。
- TreeDirectoryには親子関係の変化(ドラッグ&ドロップで親子が変わる)をAngularに検知してもらって再描画したい(childrenプロパティを描画に使用してAngularに監視してもらう)
- 渡されたインスタンスをそのまま利用して予期せぬ変更をしたくない(利用者へは変更を通知したい)、もしくは(利用者から勝手にデータを)変更をされたくないため。仮にツリービューコンポーネント外部でデータの更新が行われるなら、そのデータ変更の通知はそれ専用のインターフェースで行ってもらいたいのでデータの詰め替え(違うインスタンス)をする
app.component.tsにデータを用意します。
private directories:Directory[] = [
    { name:'Directory1', id:1, parentId:null },
    { name:'Directory2', id:2, parentId:null },
    { name:'Directory1-1', id:3, parentId:1 },
    { name:'Directory1-2', id:4, parentId:1 },
    { name:'Directory2-1', id:5, parentId:2 },
    { name:'Directory1-2-1', id:6, parentId:4 },
    { name:'Directory3', id:7, parentId:null },
    { name:'Directory1-2-2', id:8, parentId:4 },
    { name:'Directory1-2-3', id:9, parentId:4 },
    { name:'Directory2-2', id:10, parentId:2 },
  ];
directoryData$ = new BehaviorSubject<Directory[]>(this.directories);
アプリ側でデータの更新が発生した場合にツリービューコンポーネントに通知したいのでBehaviorSubjectを利用します。BehaviorSubjectはsubscribe時に最新の状態(最後に通知した内容)を通知してくれるので通知タイミング、subscribeタイミングを考慮しなくてよいので便利です。
app.component.htmlでデータをツリービューコンポーネントに渡します。
<app-tree-list [treeData]="directoryData$ | async"></app-tree-list>
asyncパイプを使用していますが理由は以下の2つ。
- Observable(このチュートリアルではBehaviorSubject)をsubscribeしてくれるので新しいデータの通知を検知してくれる
- コンポーネントが破棄された際に自動でsubscriptionを破棄してくれる(破棄しないとメモリーリークの可能性が残る)
初期表示
tree-list.componentでデータ受け入れの準備をしましょう。
export class TreeListComponent implements  OnChanges {
  @Input() treeData!:Directory[] | null;
  directories:TreeDirectory[] = [];

  ngOnChanges(changes: SimpleChanges): void {
    if(changes['treeData']){
     if(!this.treeData){
        this.directories = [];
      }
      else{
        this.directories = [...this.treeData.map((o, i) => Object.assign({}, o) as TreeDirectory)];
      }
    }
  }
app.component.htmlでtreeDataとデータ(directoryData$)がバインドされているので、その変更通知をOnChangesインターフェースのngOnChangesで受け取っています。ngOnChangesのchangesに変更されたプロパティの名前が入っているので、treeDataが変わったのかを確認してからdirectoriesプロパティにTreeDirectory型へ変換したデータをセットします。
<div class="directory" *ngFor="let item of directories">
    <div class="name">
        <span>{{item.name}}</span>
    </div>
</div>
ついでtree-list.component.htmlで受け取ったデータ内容を描画します。実行結果が以下です。

データがリストで表示されるだけでツリー的な要素はまだありませんね。
親子関係
ツリー表示のためには親子関係を用意する必要があります。tree-list.component.tsのコードを以下のように変更します。
export class TreeListComponent implements  OnChanges {
  @Input() treeData!:Directory[] | null;
  rootDirectories:TreeDirectory[] = [];

  ngOnChanges(changes: SimpleChanges): void {
    if(changes['treeData']){
      if(!this.treeData){
        this.rootDirectories = [];
      }
      else{
        const directories = [...this.treeData.map((o, i) => Object.assign({}, o) as TreeDirectory)];

        // 親子関係
        directories.forEach(t => t.children = this.getChildrenOf(t.id, directories));

        // ルート
        this.rootDirectories = this.getRootData(directories);
      }
    }
  }
  private getChildrenOf(id:number, directories:TreeDirectory[]):TreeDirectory[]{
    return directories.filter(t => t.parentId === id);
  }
  private getRootData(directories:TreeDirectory[]):TreeDirectory[]{
    return directories.filter(t => !t.parentId);
  }
すべてのDirectoryは自分を親とする子Directoryを探してchildrenプロパティに保持しています。親データを持たないDirectoryはルートデータになるので、それらをrootDirectoriesとして保持しています。
Directoryの子Directoryの描画は再帰処理で行いたいのでtree-item.componentを追加します。
ng generate component tree-item
tree-list.component.htmlを以下のように変更します。ルートディレクトリ分だけtree-itemを描画します。
<app-tree-item *ngFor="let item of rootDirectories"
                [item]="item" [depth]="0"></app-tree-item>
tree-item.component.tsには子の階層を表すためにdepthプロパティを用意します。
export class TreeItemComponent implements OnInit {
  @Input() item!:TreeDirectory;
  @Input() depth:number = 0;
}
tree-item.component.htmlでは受け取ったdepth分だけ左にpaddingします。子要素には自分の受け取ったdepth+1を渡すことによって階層を深化させます。
<div>
    <div
        [style.padding-left.px]="depth * 24">
        <div class="name">
            <span>{{item.name}}</span>
        </div>
    </div>
    <div>
        <ng-container *ngFor="let child of item.children; let i = index">
            <app-tree-item  [item]="child" [depth]="depth + 1"></app-tree-item>
        </ng-container>
    </div>
</div>
実行結果は以下です。

おわりに
ここまでで思いのほか文量が多くなってしまったのと、ここから段々とややこしい話が増えてくるので初学者の方に向けて解説するのは時間がもっとかかりそうなので、とりあえずツリー表示できるところまできたのでお茶を濁させてください。上の機能であげたものを全部入れたコードはGithubにあげてありますので興味のある方はそちらをご覧ください。何か質問等ありましたらお気軽にお尋ねください。
Discussion