FortranコードのテストをPythonに任せてみよう、ついでにテスト自動化も。(pytest)
経緯
- 開発を引き継いだFortran製の数値計算コードについてテストが一切なかった
- さらに新規機能の開発が必要となった
- 各サブルーチンのテストはなくとも、最終結果の値くらいはテストをやりたい (ブラックボックステスト)
- Fortran製Unit testフレームワークも考えたが最終的にはpytestでリファレンスファイルとの比較をするという方法に至った
pytestとは
- Python製のテスティングフレームワーク
- パラメータを渡すためのpytest.mark.parametrizeや、オプションを渡すためのpytest.parser.addoptionなど様々なAPIが用意されている
- Fortran製Unit testフレームワークはここまで高機能ではない点と開発のアクティブさ、Web上の情報の多さからpytestを採用することに
Fortranプロジェクト的視点からみたpytestの利点、欠点
利点
- 恐らく最近のFortranプロジェクトで一番使われているctestでは難しいMPIのテストが、少し設定用スクリプトを書けばpytest --mpi 10のような実行方法で実現できる
- 現在Fortranで実装されているプロジェクトの多くに当てはまる性質であるパフォーマンス重視、大規模並列計算を考えると並列実行のテストが簡単なのはうれしい
- Makefileだったら適当なテスト実行シェルスクリプトと、MPI並列数設定用の新しい環境変数を用意し、make testでシェルスクリプトが動くようにすれば MPI_NP=10 make test のような実行方法で実現できなくはない
- だがそのためにCMakeから乗り換えたり、テストだけMakefileで書くのも微妙……
- Pythonの言語系と外部パッケージが抽象化を頑張ってくれているおかげで、テストに関してはクロスプラットフォームで動くコードが書きやすい
欠点
- 処理速度は遅くなる
- ただしテスト時だけなので(本プロジェクトでは)重大な欠点にはならなかった
- ユニットテストもファイル比較を行う必要がある
- PythonからはFortranの変数は見えないので出力を見て比べる必要がある
- f2pyなどを使えばファイル比較する必要もなくなるはずだが、導入していない。プロジェクトによっては良い解決策かも
インストール方法
pip install -U pytest
テストの実現方法
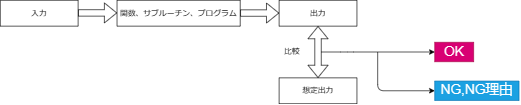
ビルドしたFortranコードのバイナリをpytestのコード上から呼び出し、計算結果と事前に作ったリファレンスファイルの中身を比べることで実現している
テストの実行例
pytest --mpi 10
ディレクトリ構成
- プロジェクトのルート直下にpytest.iniを配置
- confest.pyを適宜配置
- 使いまわす関数をmodule_testing.pyに記述
- confest.pyにまとめたほうがいいかも
- test_*.pyという名前のテストスクリプトを配置
- 各テストを実行するスクリプト
pytestの細かいルールやtipsは公式ドキュメントや他の記事を参照するのが良いでしょう
.
├── pytest.ini
├── test
│   ├── conftest.py
│   ├── module_testing.py
│   ├── dev
│   │   ├── case_dev
│   │   │   ├── input
│   │   │   ├── reference.out
│   │   │   └── test_case_dev.py
│   │   └── ...
│   ├── slow
│   │   └── ...
│   ├── unit_test
│   │   └── ...
│   ├── unmarked
│   │   └── ...
以下略
テストコード例
テストコードの基本的な処理の流れは次の通り
- インプットやアウトプット、実行コマンドのパスなどを設定
- アウトプット名やリファレンスのアウトプット名がテスト名から一意に決まるのでpytest.fixtureを使って関数env_setup_caspt2を作り、これを呼べばパスを受け取ることができるように設計
- コマンド実行
- run_testの内部ではsubprocess.runを使って別プロセスを立ち上げてコマンド実行をしている
- 比べたい情報を抜き出す
- assertで情報を比較する
- 以下の例ではfloatの値が
10^{-10}
- 以下の例ではfloatの値が
実際のテストコード例は以下の様になる
import os
import shutil
import pytest
from module_testing import (
    run_test_dcaspt2,
    get_caspt2_energy_from_output_file,
)


@pytest.mark.dev
def test_c32h_n2_dev(env_setup_caspt2) -> None:

    (test_path, ref_output_path, output_path, latest_passed_path, test_command) = env_setup_caspt2

    # Get this files path and change directory to this path
    os.chdir(test_path)  # Change directory to the path of this file
    print(test_path, "test start")  # Debug output

    run_test_dcaspt2(test_command)

    ref_energy = get_caspt2_energy_from_output_file(ref_output_path)
    test_energy = get_caspt2_energy_from_output_file(output_path)

    # Check whether the output of test run
    # matches the reference to 7th decimal places.
    assert test_energy == pytest.approx(ref_energy, abs=1e-10)

    # If it reaches this point, the result of assert is true.
    # The latest passed output file is overwritten by the current output file if assert is True.
    shutil.copy(output_path, latest_passed_path)
オプションの実現方法
-
例えば--mpi <num_of_process>で並列数を指定できるようにするにはpytest.fixtureとpytest_addoptionを使う
-
test/conftest.pyに以下のような記述を書くと--mpiオプションをつけることが許可される(実装例)
def pytest_addoption(parser): parser.addoption( "--mpi", type=int, default=1, help="run tests with MPI [default: 1]", ) @pytest.fixture def mpi_num_process(request): return request.config.getoption("--mpi") -
テストスクリプト側ではfixtureで指定した関数名を引数にして--mpiオプションに設定した値を受け取ることができる
def test_case_dev(mpi_num_process: int, omp_num_threads: int) -> None:- あとはコマンド実行時に subprocess.run(f"mpirun -np {mpi_num_process} binary", shell=True) のような感じで実行してあげればMPI並列でのテストが可能になる
テスト自動化
- GitHub ActionsやCircle CIなどCI/CDツールを用いて自動化する
- 手動テストだと以下のような問題があるので自動化できるものはしたほうがいい
- 実行し忘れ
- 特定の環境のみのテストになりがち
以下のようにテスト自動化を行うとよい
テストのカテゴライズ
- テスト時間を最小化しつつ、ソフトウェアのバグを可能な限り検出するためには、テストをカテゴライズすることが重要
例えばテストを実行時間を参考にしてdev,unmarked,slowonly(名前は任意)に分けて以下のような作業を行う
-
slowonlyなテストには@pytest.mark.slowonly、devのテストには@pytest.mark.devをつける
@pytest.mark.dev def test_case_dev(mpi_num_process: int, omp_num_threads: int) -> None: -
test/conftest.pyを以下のようにする
import pytest

slow_only_option = "--slowonly"
dev_option = "--dev"
runall_option = "--all"


def pytest_addoption(parser):
    parser.addoption(slow_only_option, action="store_true", default=False, help="run only very slow tests")
    parser.addoption(dev_option, action="store_true", default=False, help="run tests for development")
    parser.addoption(runall_option, action="store_true", default=False, help="run all tests")
    parser.addoption(
        "--mpi",
        type=int,
        default=1,
        help="run tests with MPI [default: 1]",
    )
    parser.addoption(
        "--omp",
        type=int,
        help="run tests with OpenMP. This option overrides the value of the OMP_NUM_THREADS environment variable. [default: $OMP_NUM_THREADS]",
    )

@pytest.fixture
def mpi_num_process(request):
    return request.config.getoption("--mpi")


@pytest.fixture
def omp_num_threads(request):
    return request.config.getoption("--omp")


def pytest_configure(config):
    config.addinivalue_line("markers", "slowonly: mark test as slow to run")
    config.addinivalue_line("markers", "dev: mark test as for development")


def pytest_collection_modifyitems(config, items):
    skip_slow = pytest.mark.skip(reason=f"need {runall_option} or {slow_only_option} option to run. REASON: slow test")
    skip_tests_because_dev = pytest.mark.skip(reason=f"need no option or {runall_option} option to run. REASON: --dev was activated")
    skip_fast_dev = pytest.mark.skip(reason=f"need no option or {dev_option} or {runall_option} option or  to run. REASON: --slowonly was activated")
    skip_fast_neutral = pytest.mark.skip(reason=f"need no option or {runall_option} option or  to run. REASON: --slowonly was activated")

    if config.getoption(runall_option):
        print("run all tests")
        return
    for item in items:
        # Check whether the test should be skipped or not.
        # The tests with item.add_marker("something") added will be skipped.

        # Tests marked by @pytest.mark.dev
        if item.get_closest_marker("dev"):
            # dev tests always run except when --slowonly was activated
            if config.getoption(slow_only_option):
                item.add_marker(skip_fast_dev)
            else:
                pass
        # Tests marked by @pytest.mark.slowonly
        elif item.get_closest_marker("slowonly"):
            # slow tests run when --slowonly was activated
            if config.getoption(slow_only_option):
                pass
            else:
                item.add_marker(skip_slow)
        # Unmarked tests
        else:
            # Skip neutral tests if --dev or --slowonly were activated
            if config.getoption(dev_option):
                item.add_marker(skip_tests_because_dev)
            elif config.getoption(slow_only_option):
                item.add_marker(skip_fast_neutral)
こうすると
- pytest で @pytest.marker.devとマーカーがついていないテスト
- pytest --all ですべてのテスト
- pytest --slowonly で @pytest.marker.slowonlyのテスト
- pytest --dev で @pytest.marker.devのテスト
が走るようになる
CIの設定
ここではGitHub Actionsの場合について解説します
.github/workflows/*.yml にテスト用ymlファイルを配置する
※ このサンプルはCMakeでビルドしてMKLをリンクする例を示しています。これらが不要な場合、もう少しシンプルなymlファイルになります
test.yml
name: CI-sample-with-cmake-and-mkl

on:
  push:
    paths:
    # Ref : https://mzqvis6akmakplpmcjx3.hatenablog.com/entry/2021/02/07/134133
    # Run CI when only source code, build configuration, test files or files related to CI are modified.
      - "**.f90"
      - "**.F90"
      - "**.cmake"
      - "**/CMakeLists.txt"
      - "**.py"
      - ".github/workflows/**"
  pull_request:
    branches:
      - "main"
    paths:
    # Ref : https://mzqvis6akmakplpmcjx3.hatenablog.com/entry/2021/02/07/134133
    # Run CI when only source code, build configuration, test files or files related to CI are modified.
      - "**.f90"
      - "**.F90"
      - "**.cmake"
      - "**/CMakeLists.txt"
      - "**.py"
      - ".github/workflows/**"

# Ref : https://github.com/pytest-dev/pytest/issues/7443#issue-650484842
env:
  PYTEST_ADDOPTS: "--color=yes"

defaults:
  run:
    shell: bash
jobs:
  test-linux-gfortran:
    timeout-minutes: 60 # Max execution time (min)
    runs-on: ubuntu-20.04 # gfortran-7 is not supported on ubuntu-latest
    strategy:
      matrix:
        compiler: [gcc]
        version: [7, 8, 9, 10, 11] # If you want to build multiple version, you can add version number at this line.
    env:
      KEYVERSION: v1 # If you don't want to cache (intel fortran), you should change KEYVERSION.
      FC: gfortran
    steps:
      - uses: actions/checkout@v3
      - name: cache install (MKL)
        id: cache-install
        uses: actions/cache@v3
        with:
          path: |
            /opt/intel/oneapi
          key: ${{ runner.os }}-install-${{ matrix.version }}-${{ env.KEYVERSION }}
      - name: Update packages
        run: |
          sudo apt-get update
      - name: Setup MKL
        if: steps.cache-install.outputs.cache-hit != 'true'
        run: |
          wget https://apt.repos.intel.com/intel-gpg-keys/GPG-PUB-KEY-INTEL-SW-PRODUCTS.PUB
          sudo apt-key add GPG-PUB-KEY-INTEL-SW-PRODUCTS.PUB
          echo "deb https://apt.repos.intel.com/oneapi all main" | sudo tee /etc/apt/sources.list.d/oneAPI.list
          sudo apt-get update
      - name: Install MKL
        if: steps.cache-install.outputs.cache-hit != 'true'
        run: |
          sudo apt-get install -y intel-oneapi-mkl
      - name: Install cmake
        run: |
          sudo apt-get install -y cmake
      - name: Set Intel oneAPI environments
        run: |
          source /opt/intel/oneapi/setvars.sh
          printenv >> $GITHUB_ENV
      - uses: awvwgk/setup-fortran@v1.3
        id: setup-fortran
        with:
          compiler: ${{ matrix.compiler }}
          version: ${{ matrix.version }}
      - run: ${{ env.FC }} --version
        env:
          FC: ${{ steps.setup-fortran.outputs.fc }}
      - name: Install python
        uses: actions/setup-python@v4
        with:
          python-version: "3.9"
          architecture: "x64"
      - name: Install pytest for unit test
        run: python -m pip install pytest
      - name: Build source code
        run: |
          ./setup --fc ${{ env.FC }} --omp -j 2 --build
      - name: Run unittest(serial, run slowonly tests, pull_request)
        if: ${{ github.event_name == 'pull_request' }}
        run: |
          pytest --slowonly
      - name: Run unittest(serial, run dev and normal tests, push to other than main branch)
        if: ${{ github.ref_name != 'main' && github.event_name == 'push' }}
        run: |
          pytest
      - name: Run unittest(serial, run all tests, push to main branch)
        if: ${{ github.ref_name == 'main' && github.event_name == 'push' }}
        run: |
          pytest --all
かなり長いファイルだが、本質的に重要なのは以下の部分
      - name: Run unittest(serial, run slowonly tests, pull_request)
        if: ${{ github.event_name == 'pull_request' }}
        run: |
          pytest --slowonly
      - name: Run unittest(serial, run dev and normal tests, push to other than main branch)
        if: ${{ github.ref_name != 'main' && github.event_name == 'push' }}
        run: |
          pytest
      - name: Run unittest(serial, run all tests, push to main branch)
        if: ${{ github.ref_name == 'main' && github.event_name == 'push' }}
        run: |
          pytest --all
このような書き方をすると
- 普通のpush時は引数なしのpytest
- pull request時はpytest --slowonly
- mainブランチにpush時はpytest --all
が実行される
このような設定を行うことでGitHubにコミットがpushされたりpull requestがマージされるたびに自動テストが走り、コードの品質を保障できる様になる(※テストが十分であれば)
pull request時のテストについて
pull request時の--slowonlyが@pytest.marker.slowonlyしか実行しないので問題があるように見えるが
pull requestの最新のコミットのpushイベントに対して引数なしのpytestも実行されるので
pull request時はpytestとpytest --slowonlyを合わせて実質的にpytest --allを実行していることになる
(もっとスマートな解決策があれば教えてください)
まとめ
- テストがないFortranプロジェクトに対してpytestを導入してテストを追加する方法は良い選択肢の1つ
- テスト自動化までセットアップできれば、コードの品質を保つための下地作りが進みハッピーになれる
- テスト自動化を行うためのセットアップ自体の継続的なアップデートが必要になってしまうが、その手間以上の開発体験という恩恵が得られる(はず)
Discussion