AAで擬似3D表示された迷路を一人称視点で探索する
はじめに
この記事では、ゲヱム道館氏の動画(ウィザードリィを小一時間で作ってみた【C言語ゲームプログラミング実況】Programming Wizardry)を元に、Swiftを用いて迷路構造を擬似3Dで描画する方法と、動画内で解説されている考え方をSwiftで実装する際の工夫について説明します。
▼作るもの
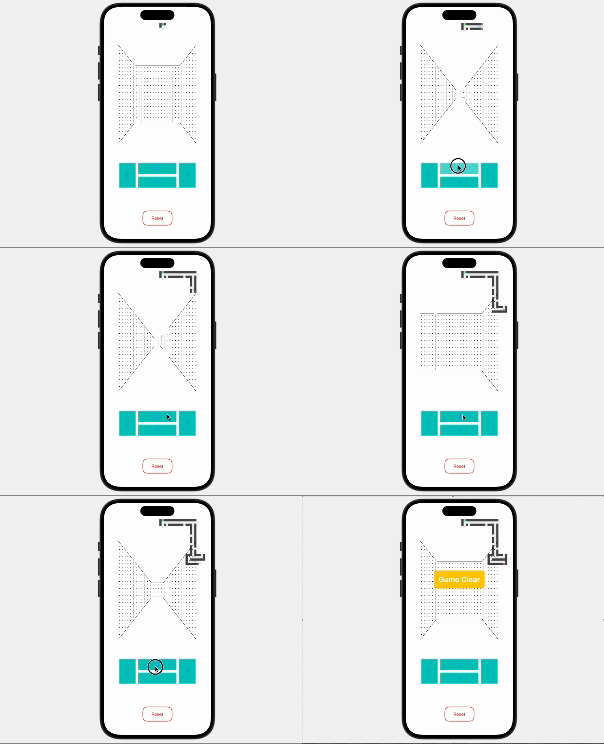
▼GitHubリポジトリ
※継続開発中のため本記事の内容と仕様・実装の違いがある場合があります。
迷路生成と迷路構造
迷路は、次のような壁と通路のマスで構成されたものを作ります。
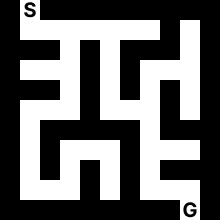
上図の迷路では、各セル(マス)は「壁・通路・開始地点・終了地点」の4つの中のいずれかの状態を持ちます。
マップの外周は原則すべて壁であり、例外として、(x: 1, y: 0) が開始地点、(x: mapWidth - 2, y: mapHeight - 1) が終了地点です。
このセルの状態を次のような enum で表現します。
enum MazeCellState {
    case wall
    case path
    case start
    case goal
}
2次元の迷路構造は、セル状態の二重配列( [[MazeCellState]] )として表すことができます。
迷路生成のアルゴリズムについて、本記事では詳細を割愛しますが、穴掘り法、壁伸ばし法、棒倒し法などのアルゴリズムを用いることで簡単に実装できます。
穴掘り法による実装例
    func generateMaze(width: Int, height: Int) -> [[MazeCellState]] {
        var maze = Array(repeating: Array(repeating: MazeCellState.wall, count: width), count: height)
        var stack: [(Int, Int)] = []

        let (startX, startY) = (1,  1)
        let (goalX, goalY) = (width - 2, height - 2)

        maze[startY][startX] = .path
        stack.append((startX, startY))

        while !stack.isEmpty {
            let (x, y) = stack.last!
            let directions = [(0, 2), (2, 0), (0, -2), (-2, 0)].shuffled()
            var moved = false

            for (dx, dy) in directions {
                let nx = x + dx
                let ny = y + dy

                if isValidPosition(nx, ny, width, height) && maze[ny][nx] == .wall {
                    carvePath(&maze, from: (x, y), to: (nx, ny))
                    stack.append((nx, ny))
                    moved = true
                    break
                }
            }

            if !moved {
                stack.removeLast()
            }
        }

        setStartAndGoal(&maze, startX, startY, goalX, goalY)

        return maze
    }

    private func isValidPosition(_ x: Int, _ y: Int, _ width: Int, _ height: Int) -> Bool {
        return x > 0 && x < width - 1 && y > 0 && y < height - 1
    }

    private func carvePath(_ maze: inout [[MazeCellState]], from: (Int, Int), to: (Int, Int)) {
        let (x1, y1) = from
        let (x2, y2) = to
        maze[y2][x2] = .path
        maze[(y1 + y2) / 2][(x1 + x2) / 2] = .path
    }

    private func setStartAndGoal(_ maze: inout [[MazeCellState]], _ startX: Int, _ startY: Int, _ goalX: Int, _ goalY: Int) {
        maze[startY][startX] = .path
        maze[startY - 1][startX] = .start
        maze[goalY][goalX] = .path
        maze[goalY + 1][goalX] = .goal
    }
このようにして生成された maze: [[MazeCellState]] を元に擬似3D描画を実装していきます。
擬似3Dによる描画範囲
話は3D描画に移ります。
一人称視点で迷路を描画する範囲を、現在地を含めて前方5マス✕左右1マスずつで合計15マスとします。
描画する際は、y軸方向は奥から順に描画しますが、x軸方向はプレイヤーから見て、左→右→中央の順で描画します。(中央を最後に描画しないと、左右のセルと共通する描画範囲を上書きされてしまうため。)
この順でセルに番号を振ります。
また、各セルの描画面(3次元でいう面、2次元でいう辺)にも番号を振ります。(奥: 0, 左: 1, 手前: 2, 右: 3)としますが、描画順は 0 → 1 → 3 → 2 として、手前を最後に描画する必要がある点に注意します。
このとき、ある面を、セルの番号と面の番号をハイフンで繋いで表現します。
たとえば、プレイヤーの現在地のセルの奥面は 14-0、右面は 14-3 となります。
14-3 は 13-1 と面を共有しています。同じように隣のマスと共有される面(=同じデザインの面)があることを覚えておきます。
ここまでを図に示します。
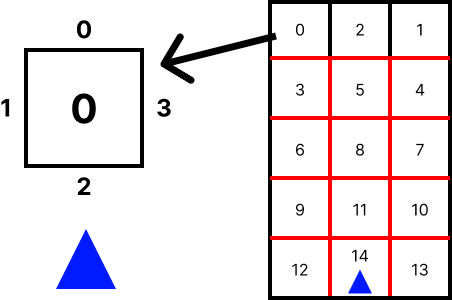
青い三角形はプレイヤーの位置とプレイヤーの向きを表しています。
描画範囲のセルの面について、黒線で表された面は描画されません。赤線の面のみが必要に応じて描画されます。
そのため、描画する必要のある面、すなわちデザインを用意する必要のある面は次のとおりです。
0-21-22-2-
3-0(=0-2)、3-2、3-3 -
4-0(=1-2)、4-2、4-3 -
5-0(=2-2)、5-1(=3-3)、5-2、5-3(=4-1) -
6-0(=3-2)、6-2、6-3 -
7-0(=4-2)、7-1、7-2 -
8-0(=5-2)、8-1(=6-3)、8-2、8-3(=7-1) -
9-0(=6-2)、9-2、9-3 -
10-0(=7-2)、10-1、10-2 -
11-0(=8-2)、11-1(=9-3)、11-2、11-3(=10-1) -
12-0(=9-2)、12-3 -
13-0(=10-2)、13-1 -
14-0(=11-2)、14-1(=12-3)、14-3(=13-1)
これを、ドア(開始or終了地点)と壁の2パターン分、画像(アスキーアート)を用意します。
画像(AA)の作成
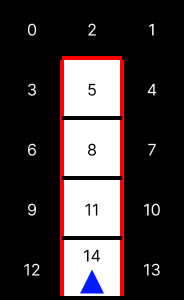
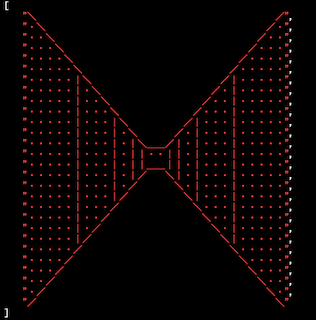
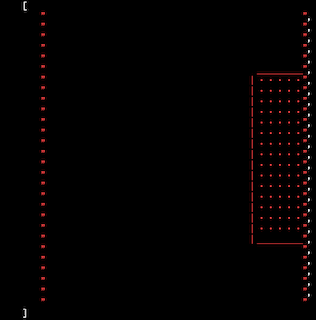
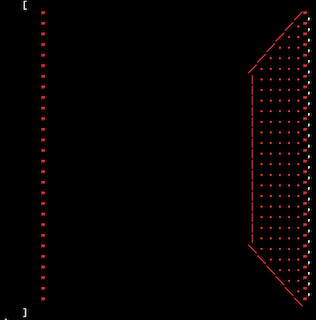
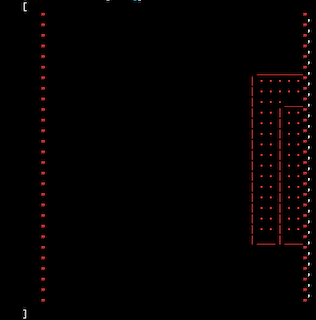
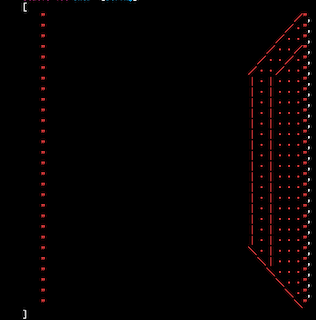
画像の作成は、最初に両側 (x: ±1)の列と奥(y: 4)の行のセルを壁とした画像を作って、そこから各セルの面に対応する画像を作るのがコツのようです。
| 表示する壁 | 対応するアスキーアート |
|---|---|
 |
 |
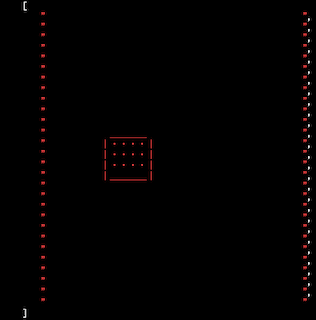
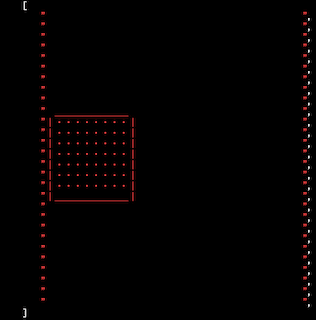
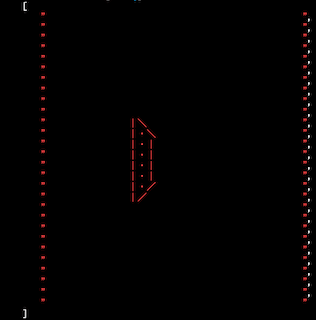
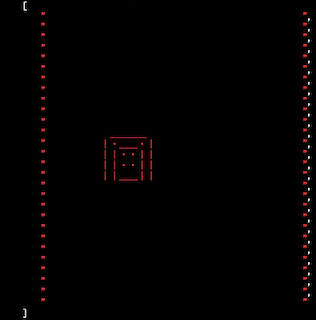
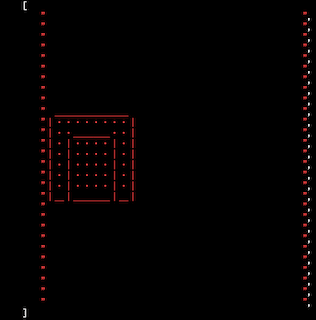
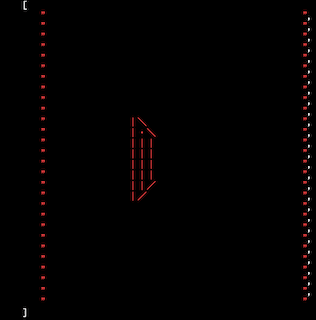
例えば、6-0、6-1、6-2、6-3についてドアと壁の画像は次のようになります。
| 6-0 | 6-1 | 6-2 | 6-3 |
|---|---|---|---|
 |
 |
 |
 |
 |
 |
 |
 |
13-0、13-1、13-2、13-3は次のようになります。
| 13-0 | 13-1 | 13-2 | 13-3 |
|---|---|---|---|
 |
 |
 |
 |
 |
 |
 |
 |
セル描画のための面の状態の定義
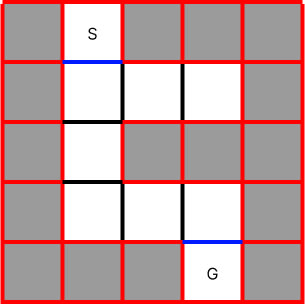
セルの各面の状態は、面が接するセルの状態によって「空(から)、壁、ドア(開始or終了地点)」のいずれかとなります。上の図の中で、各面の表示は黒線が空、赤線が壁、青線がドアです。
セルの状態は、次のように各面の状態と、それらをまとめて格納する構造体で表します。
enum WallState {
    case open
    case wall
    case door
}

struct CellWallConfiguration: Equatable {
    var top: WallState
    var left: WallState
    var bottom: WallState
    var right: WallState
}
迷路上の特定の座標のセルの状態(CellWallConfiguration)を取得するメソッドを定義します。使いやすいように迷路([[MazeCellState])の拡張メソッドとして定義しておきます。
隣接するセルのMazeCellStateによって、各面の状態を判定します。迷路外を index out of range にならないように壁として判定する点に注意します。
extension [[MazeCellState]] {
    func cellWallConfiguration(at x: Int, y: Int) -> CellWallConfiguration {
        let top: WallState = {
            if y > 0 && y <= self.count - 1 {
                switch self[y - 1][x] {
                case .wall:  return .wall
                case .goal, .start: return .door
                case .path: return .open
                }
            } else {
                return .wall
            }
        }()

        let bottom: WallState = {
            if y >= 0 && y < self.count - 1 {
                switch self[y + 1][x] {
                case .wall: return .wall
                case .goal, .start: return .door
                case .path: return .open
                }
            } else {
                return .wall
            }
        }()

        let left: WallState = {
            if x > 0 && x <= self[y].count - 1 {
                switch self[y][x - 1] {
                case .wall: return .wall
                case .goal, .start: return .door
                case .path: return .open
                }
            } else {
                return .wall
            }
        }()

        let right: WallState = {
            if x >= 0 && x < self[y].count - 1 {
                switch self[y][x + 1] {
                case .wall: return .wall
                case .goal, .start: return .door
                case .path: return .open
                }
            } else {
                return .wall
            }
        }()

        return CellWallConfiguration(top: top,
                                     left: left,
                                     bottom: bottom,
                                     right: right)
    }
}
プレイヤーの視界
まず、プレイヤーを構造体で定義します。
プレイヤーは位置(迷路上の現在地の座標)と向きを持ちます。
迷路はプレイヤーに持たせないこともできますが、ここでは持たせる設計で進めます。
迷路上を移動するメソッドと、向きを変更するメソッドも定義します。迷路外や壁のセルに移動できないように注意します。また、構造体自身のを変数を変更するので、mutating で修飾する必要があります。
enum Direction: CaseIterable {
    case up, down, left, right
}

struct Player {
    var position: (x: Int, y: Int)
    var direction: Direction
    let maze: [[MazeCellState]]

    mutating func move(toDirection newDirection: Direction) {
        direction = newDirection
        var newPosition = position

        switch newDirection {
        case .up:
            newPosition.y -= 1
        case .down:
            newPosition.y += 1
        case .left:
            newPosition.x -= 1
        case .right:
            newPosition.x += 1
        }

        guard newPosition.y >= 0
            && newPosition.y < maze.count
            && newPosition.x >= 0
            && newPosition.x < maze[0].count
            && maze[newPosition.y][newPosition.x] != .wall  else {
            return
        }
        position = newPosition
    }

    mutating func changeDirection(to newDirection: Direction) {
        direction = newDirection
    }
}
次に、プレイヤーの視界を取得する方法を考えます。
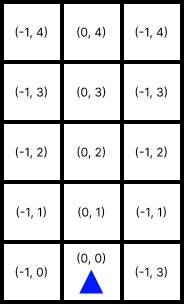
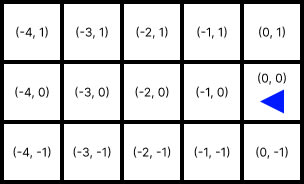
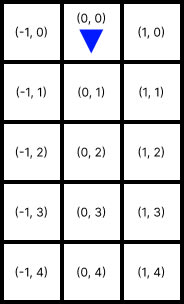
プレイヤーの向きと視界の座標は次の画像のようになります。
| up | left | down | right |
|---|---|---|---|
 |
 |
 |
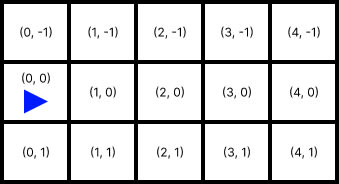 |
これらの相対座標を、プレイヤーに定義します。
struct Player {
    :
    var relativeSightCoordinates: [(x: Int, y: Int)] {
        switch self.direction {
        case .up:
            return [
                (-1, -4), (1, -4), (0, -4),
                (-1, -3), (1, -3), (0, -3),
                (-1, -2), (1, -2), (0, -2),
                (-1, -1), (1, -1), (0, -1),
                (-1, 0), (1, 0), (0, 0),
            ]
        case .down:
            return [
                (1, 4), (-1, 4), (0, 4),
                (1, 3), (-1, 3), (0, 3),
                (1, 2), (-1, 2), (0, 2),
                (1, 1), (-1, 1), (0, 1),
                (1, 0), (-1, 0), (0, 0),
            ]
        case .left:
            return [
                (-4, 1), (-4, -1), (-4, 0),
                (-3, 1), (-3, -1), (-3, 0),
                (-2, 1), (-2, -1), (-2, 0),
                (-1, 1), (-1, -1), (-1, 0),
                (0, 1), (0, -1), (0, 0),
            ]
        case .right:
            return [
                (4, -1), (4, 1), (4, 0),
                (3, -1), (3, 1), (3, 0),
                (2, -1), (2, 1), (2, 0),
                (1, -1), (1, 1), (1, 0),
                (0, -1), (0, 1), (0, 0),
            ]
        }
    }
}
プレイヤーの向きが変わったとき、取得するセルの相対座標だけでなく、プレイヤーから見たセルの描画面が変化することにも注意が必要です。
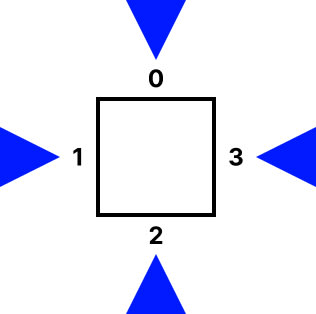
下から上に向かって見たときは、奥が0、左が1、手前が2、右が3ですが、
右から左に向かって見たとき、奥が1、左が2、手前が3、右が0になります。
この視点による見え方の違いの補正を行うメソッドを実装します。
ここでは、CellWallConfiguration に追加します。
struct CellWallConfiguration: Equatable {
    :
    mutating func rotate(to direction: Direction) {
        let defaultTop = top
        let defaultLeft = left
        let defaultBottom = bottom
        let defaultRight = right

        switch direction {
        case .up:
            break
        case .left:
            top = defaultLeft
            left = defaultBottom
            bottom = defaultRight
            right = defaultTop
        case .down:
            top = defaultBottom
            left = defaultRight
            bottom = defaultTop
            right = defaultLeft
        case .right:
            top = defaultRight
            left = defaultTop
            bottom = defaultLeft
            right = defaultBottom
        }
    }
}
これで、プレイヤーの視界にあるセルとその見え方(CellWallConfiguration)を取得する準備が完了しました。
プレイヤーの視界のCellWallConfiguration配列を取得するメソッドをPlayerの拡張に実装します。
迷路の範囲外にある座標はすべて壁として扱います。
extension Player {
    var sightWallConfigurations: [CellWallConfiguration] {
        return relativeSightCoordinates.compactMap { x, y in
            let newX = position.x + x
            let newY = position.y + y
            if newY >= 0, newY < maze.count, newX >= 0, newX < maze[newY].count {
                var config = maze.cellWallConfiguration(at: newX, y: newY)
                config.rotate(to: direction)
                return config
            } else {
                return CellWallConfiguration(top: .wall, left: .wall, bottom: .wall, right: .wall)
            }
        }
    }
}
AAの合成
セルの各面に対応するAA画像の合成を行って表示する画面を生成するための構造体 AsciiArtBuilder を実装します。
まずは、視界のセル座標の状態に対応するAAをマッピングするためのテーブルを、壁とドアの二種類用意します。
struct AsciiArtBuilder {

    let aaWallTable: [([String]?, [String]?, [String]?, [String]?)] = [
        (nil, nil, AsciiArt.Zero.two, nil), (nil, nil, AsciiArt.One.two, nil), (nil, nil, AsciiArt.Two.two, nil),
        (AsciiArt.Three.zero, nil, AsciiArt.Three.two, AsciiArt.Three.three), (AsciiArt.Four.zero, AsciiArt.Four.one, AsciiArt.Four.two, nil), (AsciiArt.Five.zero, AsciiArt.Five.one, AsciiArt.Five.two, AsciiArt.Five.three),
        (AsciiArt.Six.zero, nil, AsciiArt.Six.two, AsciiArt.Six.three), (AsciiArt.Seven.zero, AsciiArt.Seven.one, AsciiArt.Seven.two, nil), (AsciiArt.Eight.zero, AsciiArt.Eight.one, AsciiArt.Eight.two, AsciiArt.Eight.three),
        (AsciiArt.Nine.zero, nil, AsciiArt.Nine.two, AsciiArt.Nine.three), (AsciiArt.Ten.zero, AsciiArt.Ten.one, AsciiArt.Ten.two, nil), (AsciiArt.Eleven.zero, AsciiArt.Eleven.one, AsciiArt.Eleven.two, AsciiArt.Eleven.three),
        (AsciiArt.Twelve.zero, nil, nil, AsciiArt.Twelve.three), (AsciiArt.Thirteen.zero, AsciiArt.Thirteen.one, nil, nil), (AsciiArt.Fourteen.zero, AsciiArt.Fourteen.one, nil, AsciiArt.Fourteen.three),
    ]

    let aaDoorTable: [([String]?, [String]?, [String]?, [String]?)] = [
        (nil, nil, AsciiArt.Zero.twoD, nil), (nil, nil, AsciiArt.One.twoD, nil), (nil, nil, AsciiArt.Two.twoD, nil),
        (AsciiArt.Three.zeroD, nil, AsciiArt.Three.twoD, AsciiArt.Three.threeD), (AsciiArt.Four.zeroD, AsciiArt.Four.oneD, AsciiArt.Four.twoD, nil), (AsciiArt.Five.zeroD, AsciiArt.Five.oneD, AsciiArt.Five.twoD, AsciiArt.Five.threeD),
        (AsciiArt.Six.zeroD, nil, AsciiArt.Six.twoD, AsciiArt.Six.threeD), (AsciiArt.Seven.zeroD, AsciiArt.Seven.oneD, AsciiArt.Seven.twoD, nil), (AsciiArt.Eight.zeroD, AsciiArt.Eight.oneD, AsciiArt.Eight.twoD, AsciiArt.Eight.threeD),
        (AsciiArt.Nine.zeroD, nil, AsciiArt.Nine.twoD, AsciiArt.Nine.threeD), (AsciiArt.Ten.zeroD, AsciiArt.Ten.oneD, AsciiArt.Ten.twoD, nil), (AsciiArt.Eleven.zeroD, AsciiArt.Eleven.oneD, AsciiArt.Eleven.twoD, AsciiArt.Eleven.threeD),
        (AsciiArt.Twelve.zeroD, nil, nil, AsciiArt.Twelve.threeD), (AsciiArt.Thirteen.zeroD, AsciiArt.Thirteen.oneD, nil, nil), (AsciiArt.Fourteen.zeroD, AsciiArt.Fourteen.oneD, nil, AsciiArt.Fourteen.threeD),
    ]
}
このテーブルは下図の各セルとその面に対応しています。

次に、2つのAAを元に合成したAAを生成するメソッドを実装します。
引数にベースとなるAA(base)とその上に重ねるAA(overlay)を取ります。
AAは文字列配列で定義されているのでfor文のネストを用いて、各文字列内の、各文字を比較します。
このとき、overlay の文字が空白の場合には透過させる(base の文字を上書きしない)ようにします。
struct AsciiArtBuilder {
    :
    func overlay(base: [String], overlay: [String]) -> [String] {
        var result = base

        for (lineIndex, overlayLine) in overlay.enumerated() {
            if lineIndex >= result.count { continue }
            var newLine = ""
            let baseLine = result[lineIndex]

            for (charIndex, overlayChar) in overlayLine.enumerated() {
                if charIndex >= baseLine.count {
                    newLine.append(" ")
                } else {
                    let baseChar = baseLine[baseLine.index(baseLine.startIndex, offsetBy: charIndex)]
                    newLine.append(overlayChar == " " ? baseChar : overlayChar)
                }
            }

            result[lineIndex] = newLine
        }

        return result
    }
}
この overlay メソッドを使用して、マッピングしたセル情報から画面を生成します。
引数に [CellWallConfiguration] を渡すことで、セル情報から必要なAAを割り当て、順番に合成(overlay)していきます。
最後に、生成したAAImageは配列のままでは表示できないので、改行(\n)で連結した文字列型で返却するようにします。
struct AsciiArtBuilder {
    :
    func buildAAImage(forConfiguration configuration: [CellWallConfiguration]) -> String {
        var resultAA = AsciiArt.empty

        for (index, cellWallConfig) in configuration.enumerated() {
            let aaConfig = aaWallTable[index]
            let aaDoorConfig = aaDoorTable[index]

            if case .wall = cellWallConfig.top {
                if let top = aaConfig.0 {
                    resultAA = overlay(base: resultAA, overlay: top)
                }
            } else if case .door = cellWallConfig.top {
                if let top = aaDoorConfig.0 {
                    resultAA = overlay(base: resultAA, overlay: top)
                }
            }

            if case .wall = cellWallConfig.left {
                if let left = aaConfig.1 {
                    resultAA = overlay(base: resultAA, overlay: left)
                }
            } else if case .door = cellWallConfig.left {
                if let left = aaDoorConfig.1 {
                    resultAA = overlay(base: resultAA, overlay: left)
                }
            }

            if case .wall = cellWallConfig.right {
                if let right = aaConfig.3 {
                    resultAA = overlay(base: resultAA, overlay: right)
                }
            } else if case .door = cellWallConfig.right {
                if let right = aaDoorConfig.3 {
                    resultAA = overlay(base: resultAA, overlay: right)
                }
            }

            if case .wall = cellWallConfig.bottom {
                if let bottom = aaConfig.2 {
                    resultAA = overlay(base: resultAA, overlay: bottom)
                }
            } else if case .door = cellWallConfig.bottom {
                if let bottom = aaDoorConfig.2 {
                    resultAA = overlay(base: resultAA, overlay: bottom)
                }
            }
        }

        return resultAA.joined(separator: "\n")
    }}
探索状態の地図表示とプレイヤー操作
プレイヤーの一人称視点の表示だけで迷路を攻略するのはさすがに難しいので、迷路の探索状態を地図表示できるようにします。
enum MazeCellExplorationState: Equatable {
    case notExplored
    case wall
    case path
    case start
    case goal
}
このような列挙型を用意して、 初期値 notExplored から探索したセルの状態を MazeCellState の状態に変更していきます。
地図やプレイヤー操作、画面更新などを管理するクラスを作ります。
必要なプロパティは迷路([[MazeCellState]])、地図([[MazeCellExplorationState]])、プレイヤー(Player)、探索が完了したかどうか、現在の画面(AA)です。
AAを生成するための AsciiArtBuilderインスタンスも保持します。
class MazeGameManager {
    private var maze: [[MazeCellState]]
    private(set) var exploredMaze: [[MazeCellExplorationState]]
    private(set) var player: Player
    private var completed = false
    var aaImage: String {
        aaBuilder.buildAAImage(forConfiguration: player.sightWallConfigurations)
    }
    let playerStartPosition: (x: Int, y: Int) = (1, 0)

    private let aaBuilder = AsciiArtBuilder()

    init(maze: [[MazeCellState]]?) {
        self.maze = maze ?? [[]]
        self.exploredMaze = Array(repeating: Array(repeating: .notExplored, count: self.maze[0].count), count: self.maze.count)
        self.player = Player(position: playerStartPosition, direction: .down, maze: self.maze)
        exploreVisibleArea()
    }

    func applyMaze(_ newMaze: [[MazeCellState]]?) {
        completed = false
        maze = newMaze ?? maze
        exploredMaze = Array(repeating: Array(repeating: .notExplored, count: self.maze[0].count), count: self.maze.count)
        player = Player(position: playerStartPosition, direction: .down, maze: self.maze)
        exploreVisibleArea()
    }
初期化時に迷路を渡さずに初期化することもできるようにしました。
ゲームの初期化やリセットには applyMazeメソッドを使用します。
exploreVisibleAreaメソッドはこの後実装します。
プレイヤーの地図探索の仕様を考えます。
視界は現在地を含む3✕5の15マスでした。
探索は少し範囲を狭くして、次の図のように相対座標の範囲を設定します。
また、前方に壁があった場合にはその先のマスは見えない(探索できない)こととします。
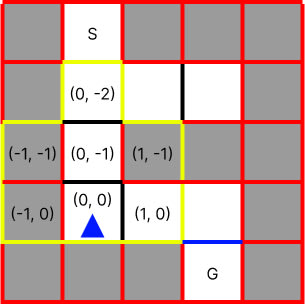
このとき、一人称の視界と同様に、プレイヤーの向きによって相対座標が変化することに注意して、探索範囲の座標を取得するメソッドを実装します。
ポイントとしては、先の図における相対座標(0, -1)、(0, -2)のインデックスを管理することです。これにより、次に「前方に壁があった場合にはその先のマスは見えない」実装を実現します。(もっといい実装があるはずですが・・・)
class MazeGameManager {
    :
    func getFrontPositions() -> [(x: Int, y: Int)] {
        var positions: [(x: Int, y: Int)] = []
        let (x, y) = player.position
        positions.append((x, y))

        switch player.direction {
        case .up:
            positions.append((x, y-1))
            positions.append((x, y-2))
            positions.append((x-1, y-1))
            positions.append((x+1, y-1))
            positions.append((x-1, y))
            positions.append((x+1, y))
        case .down:
            positions.append((x, y+1))
            positions.append((x, y+2))
            positions.append((x-1, y+1))
            positions.append((x+1, y+1))
            positions.append((x-1, y))
            positions.append((x+1, y))
        case .left:
            positions.append((x-1, y))
            positions.append((x-2, y))
            positions.append((x-1, y-1))
            positions.append((x-1, y+1))
            positions.append((x, y-1))
            positions.append((x, y+1))
        case .right:
            positions.append((x+1, y))
            positions.append((x+2, y))
            positions.append((x+1, y-1))
            positions.append((x+1, y+1))
            positions.append((x, y-1))
            positions.append((x, y+1))
        }

        return positions
    }
「前方に壁があった場合にはその先のマスは見えない」仕様に注意して、取得した探索範囲の座標をもとに地図を更新するメソッドを実装します。
進行方向2マス目をindex == 2、進行方向1マス目を frontPositions[1] と決め打ちしているので座標取得メソッドの変更修正に弱いです。要改善。
class MazeGameManager {
    :
    func exploreVisibleArea() {
        guard !maze.isEmpty else {
            return
        }
        let frontPositions = getFrontPositions()

        for (index, position) in frontPositions.enumerated() {
            let (x, y) = position
            if x >= 0 && x < maze[0].count && y >= 0 && y < maze.count {
                if index == 2 { // 進行方向2マス目
                    let (x1, y1) = frontPositions[1]
                    if maze[y1][x1] == .wall {
                        continue // 進行方向1マス目が壁なら進行方向2マス目は更新しない
                    }
                }
                switch maze[y][x] {
                case .path:
                    exploredMaze[y][x] = .path
                case .wall:
                    exploredMaze[y][x] = .wall
                case .start:
                    exploredMaze[y][x] = .start
                case .goal:
                    exploredMaze[y][x] = .goal
                }
            }
        }
    }
あとはプレイヤーを操作するメソッドを2つ実装します。移動するメソッドと、向きを変えるメソッドです。
それぞれ、プレイヤーと地図を返し、移動したときのみ探索の完了状態も返します。
class MazeGameManager {
    :
    func movePlayer(toDirection direction: Direction) -> (player: Player, exploredMaze: [[MazeCellExplorationState]], completed: Bool) {
        guard !maze.isEmpty && !completed else {
            return (player, exploredMaze, completed)
        }
        player.move(toDirection: direction)
        if maze[player.position.y][player.position.x] == .goal {
            completed = true
        }
        exploreVisibleArea()
        return (player, exploredMaze, completed)
    }

    func changePlayerDirection(to direction: Direction) -> (player: Player, exploredMaze: [[MazeCellExplorationState]]) {
        guard !maze.isEmpty && !completed else {
            return (player, exploredMaze)
        }
        player.changeDirection(to: direction)
        exploreVisibleArea()
        return (player, exploredMaze)
    }
ViewとViewModelの作成
実際にプレイするためのViewと、ロジックを切り分けるためのViewModelを実装します。
ViewModelの作成
まずはViewModelからです。
ViewModelに必要なプロパティは原則Viewに表示する必要のあるものなので、迷路([[MazeCellState]])、地図([[MazeCellExplorationState]])、プレイヤー(Player)、探索が完了したかどうか、現在の画面(AA)です。
これらのプロパティを取得するために MazeGameManager のインスタンスも保持します。
また、初期化処理とリセット処理をまとめて実装してしまいます。
class MazeGameViewModel: ObservableObject {
    let maze: [[MazeCellState]]
    @Published var exploredMaze: [[MazeCellExplorationState]] = []
    @Published var player: Player = Player(position: (1, 0), direction: .down, maze: [])
    @Published var aaImage: String = AsciiArt.empty.joined(separator: "\n")
    @Published var completed = false
    private let gameManager: MazeGameManager

    init(maze: [[MazeCellState]]) {
        self.maze = maze
        self.gameManager = MazeGameManager(maze: nil)
        initializeGameState()
    }

    func resetGame() {
        initializeGameState()
    }

    private func initializeGameState() {
        completed = false
        gameManager.applyMaze(maze)
        exploredMaze = gameManager.exploredMaze
        player = gameManager.player
        aaImage = gameManager.aaImage
    }
}
あとはユーザーによる上下左右のボタン操作を受け付けてハンドリングするだけです。
実際にプレイしてみた結果、上ボタンのタップで前進、それ以外のボタンタップでは移動せずに向きだけを変える仕様がプレイしやすかったので採用します。
ここでもプレイヤーの向きとユーザーがタップしたボタンの向きの組み合わせによる補正を行います。
class MazeGameViewModel: ObservableObject {
    :
    func handlePlayerMovement(fromDirection direction: Direction) {
        var modifiedDirection: Direction

        if case .up = direction {
            let (player, exploredMaze, completed) = gameManager.movePlayer(toDirection: player.direction)
            withAnimation {
                self.player = player
                self.exploredMaze = exploredMaze
                self.completed = completed
            }
            self.aaImage = gameManager.aaImage
        } else {
            switch player.direction {
            case .up:
                modifiedDirection = direction
            case .down:
                switch direction {
                case .up: modifiedDirection = .down
                case .down: modifiedDirection = .up
                case .left: modifiedDirection = .right
                case .right: modifiedDirection = .left
                }
            case .left:
                switch direction {
                case .up: modifiedDirection = .left
                case .down: modifiedDirection = .right
                case .left: modifiedDirection = .down
                case .right: modifiedDirection = .up
                }
            case.right:
                switch direction {
                case .up: modifiedDirection = .right
                case .down: modifiedDirection = .left
                case .left: modifiedDirection = .up
                case .right: modifiedDirection = .down
                }
            }
            let (player, exploredMaze) = gameManager.changePlayerDirection(to: modifiedDirection)
            withAnimation {
                self.player = player
                self.exploredMaze = exploredMaze
            }
            self.aaImage = gameManager.aaImage
        }
    }
}
ViewModelが完成しました。
Viewの作成
あとはViewModelの状態をViewに描画し、ViewのユーザーアクションをViewModelに通知するだけです。
お好みで実装いただけるといいかと思いますが、以下にSwiftUIによるサンプル実装を示します。
import SwiftUI

struct MazeGameView: View {
    @StateObject private var viewModel: MazeGameViewModel

    init(maze: [[MazeCellState]]) {
        self._viewModel = StateObject(wrappedValue: .init(maze: maze))
    }

    var body: some View {
        VStack {
            Text(viewModel.aaImage)
                .font(.caption2.bold())
                .frame(maxWidth: .infinity, alignment: .center)
                .frame(maxHeight: .infinity, alignment: .top)
                .padding(.top, 80)
                .overlay {
                    GameView
                        .scaleEffect(0.8)
                        .opacity(0.7)
                        .frame(maxWidth: .infinity, alignment: .trailing)
                        .frame(maxHeight: .infinity, alignment: .top)
                        .offset(y: -20)
                }
                .fixedSize(horizontal: false, vertical: true)
                .overlay {
                    if viewModel.completed {
                        Text("Game Clear")
                            .font(.title.bold())
                            .foregroundStyle(Color.white)
                            .padding()
                            .background(
                                RoundedRectangle(cornerRadius: 8)
                                    .fill(Color.yellow)
                            )
                    }
                }

            HStack(spacing: 10) {
                Button {
                    viewModel.handlePlayerMovement(fromDirection: .left)
                } label: {
                    Image(systemName: "chevron.left")
                        .frame(width: 60, height: 90)
                        .background(
                            Rectangle()
                                .fill(Color.mint)
                        )
                }

                VStack(spacing: 10) {
                    Button {
                        viewModel.handlePlayerMovement(fromDirection: .up)
                    } label: {
                        VStack(spacing: 0) {
                            Image(systemName: "chevron.up")
                            Image(systemName: "chevron.up")
                        }
                        .frame(width: 140, height: 40)

                        .background(
                            Rectangle()
                                .fill(Color.mint)
                        )
                    }

                    Button {
                        viewModel.handlePlayerMovement(fromDirection: .down)
                    } label: {
                        Image(systemName: "chevron.down")
                            .frame(width: 140, height: 40)
                            .background(
                                Rectangle()
                                    .fill(Color.mint)
                            )
                    }
                }

                Button {
                    viewModel.handlePlayerMovement(fromDirection: .right)
                } label: {
                    Image(systemName: "chevron.right")
                        .frame(width: 60, height: 90)
                        .background(
                            Rectangle()
                                .fill(Color.mint)
                        )
                }
            }
            .frame(maxHeight: .infinity, alignment: .center)

            Button {
                viewModel.resetGame()
            } label: {
                Text("Reset")
                    .foregroundStyle(Color.red)
                    .padding(.horizontal)
                    .padding()
                    .background(
                        RoundedRectangle(cornerRadius: 16)
                            .stroke(Color.red, lineWidth: 2)
                    )
            }
            .padding()
        }
    }

    private var GameView: some View {
        VStack(spacing: 0) {
            ForEach(0..<viewModel.exploredMaze.count, id: \.self) { y in
                HStack(spacing: 0) {
                    ForEach(0..<viewModel.exploredMaze[y].count, id: \.self) { x in
                        ZStack {
                            Rectangle()
                                .foregroundColor(colorForState(viewModel.exploredMaze[y][x]))
                                .frame(width: 10, height: 10)
                            if viewModel.player.position == (x, y) {
                                Image(systemName: "triangle.fill")
                                    .resizable()
                                    .scaledToFit()
                                    .frame(width: 10, height: 10)
                                    .scaleEffect(x: 0.6)
                                    .rotationEffect(angleForDirection(viewModel.player.direction))
                                    .foregroundColor(.blue)
                            }
                        }
                    }
                }
            }
        }

    }

    private func colorForState(_ state: MazeCellExplorationState) -> Color {
        switch state {
        case .notExplored:
            return .clear
        case .path:
            return .gray.opacity(0.2)
        case .wall:
            return .black
        case .start:
            return .green
        case .goal:
            return .red
        }
    }

    private func angleForDirection(_ direction: Direction) -> Angle {
        switch direction {
        case .up:
            return .degrees(0)
        case .down:
            return .degrees(180)
        case .left:
            return .degrees(270)
        case .right:
            return .degrees(90)
        }
    }
}
完成

あとがき
この記事を通して、Swiftを用いた迷路ゲームの制作方法を解説しました。ゲヱム道館氏の動画を参考にしつつ、Swift言語での実装例を具体的に示しながら進めてきました。擬似3D描画や探索状態の地図表示など、迷路探索ゲームを作る上での基本的な技術を学ぶことができたかと思います。
この記事で紹介した実装例は、あくまで一例に過ぎません。この記事の内容が、いつか皆さんがより複雑で面白いゲームを作り上げるきっかけになることを願っています。
ご覧いただきありがとうございました。
Discussion