sphinxによるドキュメント化とGitHub Actionsによる自動デプロイ
sphinxによるドキュメント化とGitHub Actionsによる自動デプロイ
はじめに
3ヶ月後の自分は他人、とはよく言ったもので、特に自動化をしていた部分に関しては、なにをどうやってこのようなシステムを作ったのか全く覚えていないことがあります。
わたしの場合、sphinxによってドキュメントを自動デプロイする環境を作り、それを忘れないためにドキュメント化をしていたのですが、悪いことにドキュメントを完成させずにドキュメントの存在自体を忘れ、再構築に時間と労力を無駄にしました。
さきほどその作りかけのドキュメントを発見し、膝から崩れ落ちるとはこの事か…という気分を味わいました。
sphinxでのハマりどころの解法が書いてありました。書いてありましたとも。
ですので襟を正して、きっちりとアウトプットをしておきます。

環境
$ inxi -Sxxx --filter
System:
  Kernel: 6.5.0-44-generic x86_64 bits: 64 compiler: N/A Desktop: Unity
    wm: gnome-shell dm: GDM3 42.0 Distro: Ubuntu 22.04.4 LTS (Jammy Jellyfish)
sphinxによるドキュメント生成
ここでは新しくsphinx-testというプロジェクトフォルダを作り、ここにsphinxを使ってドキュメント環境を構築していきます。
ディレクトリ構造とそれぞれのコード内容
user@user:~/bin/sphinx-test$ tree
.
├── Module_folder
│   ├── __init__.py
│   └── my_library.py
└── main.py
それぞれのファイルの内容は以下のようにします。
main.py
from Module_folder.my_library import greet


def main():
    """
    メイン関数。Module-folder/my_library.pyのgreet関数を呼び出して出力します。

    Example:
        実行方法:
        $ python main.py

    """
    greet()


if __name__ == "__main__":
    main()
Module_folder/my_library.py
def greet():
    """
    挨拶を表示する関数。

    This function prints a welcome message to the console.

    Example:
        実行例:
        >>> greet()
        こんにちは、Sphinxテスト環境へようこそ!

    """
    print("こんにちは、Sphinxテスト環境へようこそ!")
__init__.pyの中身はカラでOkです。
python仮想環境を作成
プロジェクトフォルダにpython仮想環境を作成します。
python3 -m venv .venv
. .venv/bin/activate
pip install -U pip setuptools wheel
モジュールや拡張のインストール
pyproject.tomlを使用してモジュールなどのインストールを行います。
[build-system]
requires = ["setuptools>=42", "wheel"]
build-backend = "setuptools.build_meta"

[project]
name = "sphinx-test"
version = "0.1.0"
requires-python = ">=3.8"
dependencies = [
    "sphinx",
    "sphinx-rtd-theme",
    "myst-parser",
    'sphinx-wagtail-theme'
]
license = {file = "LICENSE"}
readme = "README.md"
description = "A test project for Sphinx documentation"
authors = [
    { name = "Your Name", email = "your.email@example.com" }
]
keywords = ["sphinx", "documentation"]

[project.urls]
Homepage = "https://yourhomepage.com/"
Documentation = "https://yourdocumentation.com/"
Repository = "https://github.com/yourusername/sphinx-test"

[tool.setuptools]
include-package-data = true

[tool.setuptools.packages.find]
where = ["Module_folder"]
pyproject.tomlを作成した後、以下のコマンドでインストールを行います。
pip install .
動作確認
(.venv) user@user:~/bin/sphinx-test$ python main.py
こんにちは、Sphinxテスト環境へようこそ!
成功です。
さて、現在のディレクトリ構造は以下のようになっています。
user@user:~/bin/sphinx-test$ tree -L 2 -F
sphinx-test
├── Module_folder/
│   ├── __init__.py
│   ├── __pycache__/
│   ├── my_library.py
│   └── sphinx_test.egg-info/
├── build/
│   └── bdist.linux-x86_64/
├── main.py
└── pyproject.toml
それではここからsphinxによるドキュメント自動生成を行います。
sphinxによるドキュメント自動生成
sphinx-quickstartコマンドにて、雛形の生成を行います。
(.venv) user@user:~/bin/sphinx-test$ sphinx-quickstart --sep
Sphinx 7.4.7 クイックスタートユーティリティへようこそ。

以下の設定値を入力してください(Enter キーのみ押した場合、
かっこで囲まれた値をデフォルト値として受け入れます)。

選択されたルートパス: .

プロジェクト名は、ビルドされたドキュメントのいくつかの場所にあります。
> プロジェクト名: SPHINX-TEST
> 著者名(複数可): USER
> プロジェクトのリリース []: 0.1

ドキュメントを英語以外の言語で書く場合は、
 言語コードで言語を選択できます。Sphinx は生成したテキストをその言語に翻訳します。

サポートされているコードのリストについては、
https://www.sphinx-doc.org/en/master/usage/configuration.html#confval-language を参照してください。
> プロジェクトの言語 [en]: ja

ファイル /home/user/bin/sphinx-test/source/conf.py を作成しています。
ファイル /home/user/bin/sphinx-test/source/index.rst を作成しています。
ファイル /home/user/bin/sphinx-test/Makefile を作成しています。
ファイル /home/user/bin/sphinx-test/make.bat を作成しています。

終了:初期ディレクトリ構造が作成されました。

マスターファイル /home/user/bin/sphinx-test/source/index.rst を作成して
他のドキュメントソースファイルを作成します。次のように Makefile を使ってドキュメントを作成します。
 make builder
"builder" はサポートされているビルダーの 1 つです。 例: html, latex, または linkcheck。
ディレクトリ構造は以下のように変化します。
(.venv) user@user:~/bin/sphinx-test$ tree -L 2 -F
./
├── Makefile                      # <-- NEW
├── Module_folder/
│   ├── __init__.py
│   ├── __pycache__/
│   ├── my_library.py
│   └── sphinx_test.egg-info/
├── build/
│   └── bdist.linux-x86_64/
├── main.py
├── make.bat                      # <-- NEW
├── pyproject.toml
└── source/                       # <-- NEW
    ├── _static/
    ├── _templates/
    ├── conf.py
    └── index.rst
Makefile, make.bat, sourceディレクトリが新たに作成されました。
それではsource/conf.pyをみてみましょう。
source/conf.pyを編集する
新たに作成されたconf.pyは以下ののようになっています。
# -- Project information -----------------------------------------------------
# https://www.sphinx-doc.org/en/master/usage/configuration.html#project-information

project = 'SPHINX-TEST'
copyright = '2024, USER'
author = 'USER'
release = '0.1'

# -- General configuration ---------------------------------------------------
# https://www.sphinx-doc.org/en/master/usage/configuration.html#general-configuration

extensions = []

templates_path = ['_templates']
exclude_patterns = []

language = 'ja'

# -- Options for HTML output -------------------------------------------------
# https://www.sphinx-doc.org/en/master/usage/configuration.html#options-for-html-output

html_theme = 'alabaster'
html_static_path = ['_static']
この conf.pyファイルを修正します。
いまconf.pyはプロジェクトルートディレクトリのsourceフォルダにあります。この位置だとパスをプロジェクトルートディレクトリに合わせる必要があります。
そこでconf.pyにパスを通す修正を加える必要があります。
import os
import sys

sys.path.append(os.path.abspath(".."))
for i in sys.path:
    print(i)
![NOTE]
conf.pyにおける最後の2行のfor文ですが、これを加えることを推奨します。
プロジェクトルートディレクトリからconf.pyを実行する場合が主だと思いますが、それ以外のディレクトリから実行した場合、相対パスで記述しているため思わぬパスが加えられている場合があるからです。for文を追加することで、追加されたパスを確認できます。
またスクリプトファイルのdocstringからドキュメントを作成するため、sphinx.ext.autodoc, sphinx.ext.napoleonを指定する必要があります。
なお、napoleonではgoogle形式のドキュメントを認識するようnapoleon_google_docstringをTrueにする必要があります。
extensions = [
    'sphinx.ext.napoleon',
    'sphinx.ext.autodoc',
]
# Napoleon settings
napoleon_google_docstring = True
これらをconf.pyに加筆修正します。
もしマークダウンで書かれたドキュメントがあるのなら、以下の拡張も必要になります。
conf.pyを以下のように修正します。
extensions = [
    'sphinx.ext.napoleon',
    'sphinx.ext.autodoc',
    'myst_parser',
]

source_suffix = {
    '.rst': 'restructuredtext',
    '.md': 'markdown'
}

source_parsers = {
    '.md': 'recommonmark.parser.CommonMarkParser',
}
sphinxをビルドする
ここまで用意が出来たらsphinxをビルドします。
sphinx-apidoc
sphinx-apidoc -f -o {conf.pyのあるディレクトリ} {プロジェクトルートディレクトリ}
sphinx-apidoc -f -o {conf.pyのあるディレクトリ} {モジュールのあるディレクトリ}
APIドキュメントのソースファイルを生成します。
docstringを含むスクリプトファイルが存在するディレクトリに対して複数回実行する必要があります。(少なくともわたしの場合は)
-oで指定した{conf.pyのあるディレクトリ}は、新たに作成したドキュメント用のディレクトリを選んでもOk。
sphinx-apidocを実行することにより、出力先のディレクトリにrstファイルが作成されます。
これらのrstファイルをindex.rstに記述することにより、各ドキュメントの関連付けが行われます。
この関連付けに矛盾点があると、次に実行するsphinx-buildコマンドでエラーが出力されます。
rstファイルを修正する
この時点で、sourceディレクトリには複数のrstファイルが作成されているはずです。(作成されていない場合はモジュールが含まれるディレクトリを対象に、sphinx-apidocを再度実行してください。)

index.rstがHTMLでいうところのindex.html、つまりドキュメントのホームページになります。
index.rstにmain.rstとModule_folder.rstへのリンクを貼ります。
このとき、拡張子は省略可能です。
index.rst
SPHINX-TEST documentation
=========================

Add your content using ``reStructuredText`` syntax. See the
`reStructuredText <https://www.sphinx-doc.org/en/master/usage/restructuredtext/index.html>`_
documentation for details.

.. toctree::
   :maxdepth: 2
   :caption: Contents:

   main                     # <-- 加筆
   Module_folder            # <-- 加筆

Indices and tables
==================

* :ref:`genindex`
* :ref:`modindex`
* :ref:`search`
main.rst
main module
===========

.. automodule:: main
   :members:
   :undoc-members:
   :show-inheritance:
Module_folder.rst
Module\_folder package
======================

Submodules
----------

Module\_folder.my\_library module
---------------------------------

.. automodule:: Module_folder.my_library
   :members:
   :undoc-members:
   :show-inheritance:

Module contents
---------------

.. automodule:: Module_folder
   :members:
   :undoc-members:
   :show-inheritance:
sphinx-build
sphinx-build -a -b html -E {conf.pyのあるディレクトリ} {ドキュメントフォルダ}
conf.pyに基づいて、指定されたフォーマット(html等)のドキュメントを生成します。
プロジェクトルートディレクトリで実行します。
sphinx-build -a -b html -E source doc
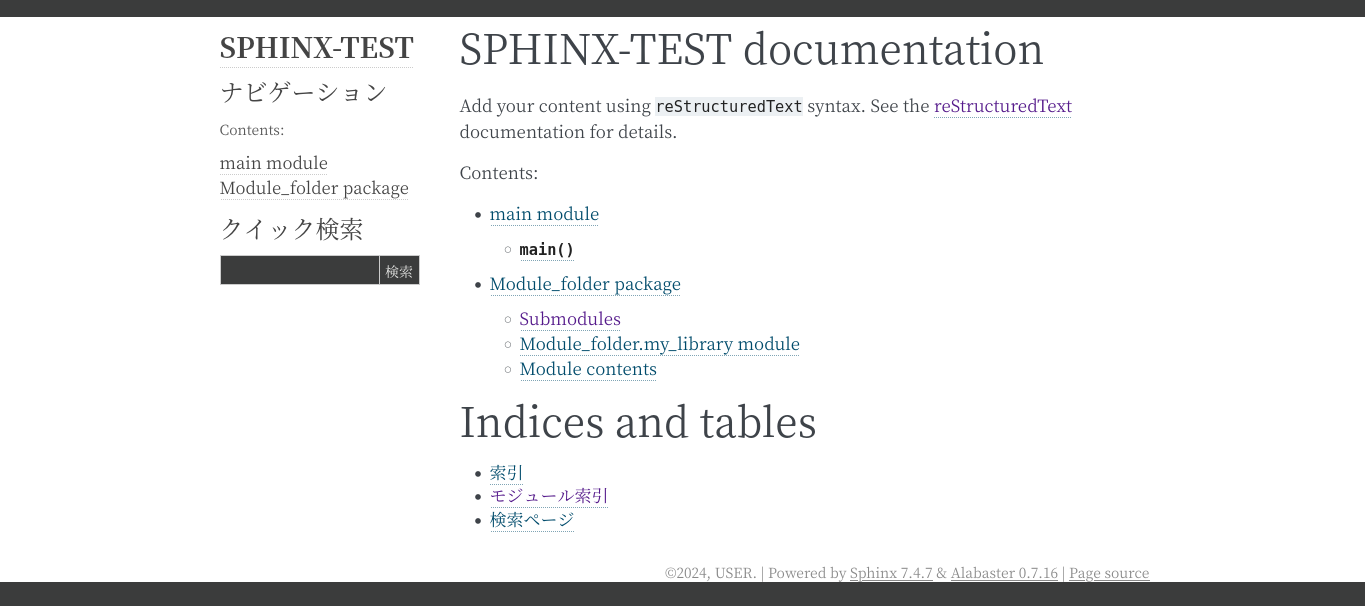
うまくいけば、下記のようにドキュメントが生成されます。(doc/index.html)
themeの変更
テーマ変更についてはたくさんのドキュメントがウェブにありますので、ここでは簡単に紹介します。
ロゴを追加します。

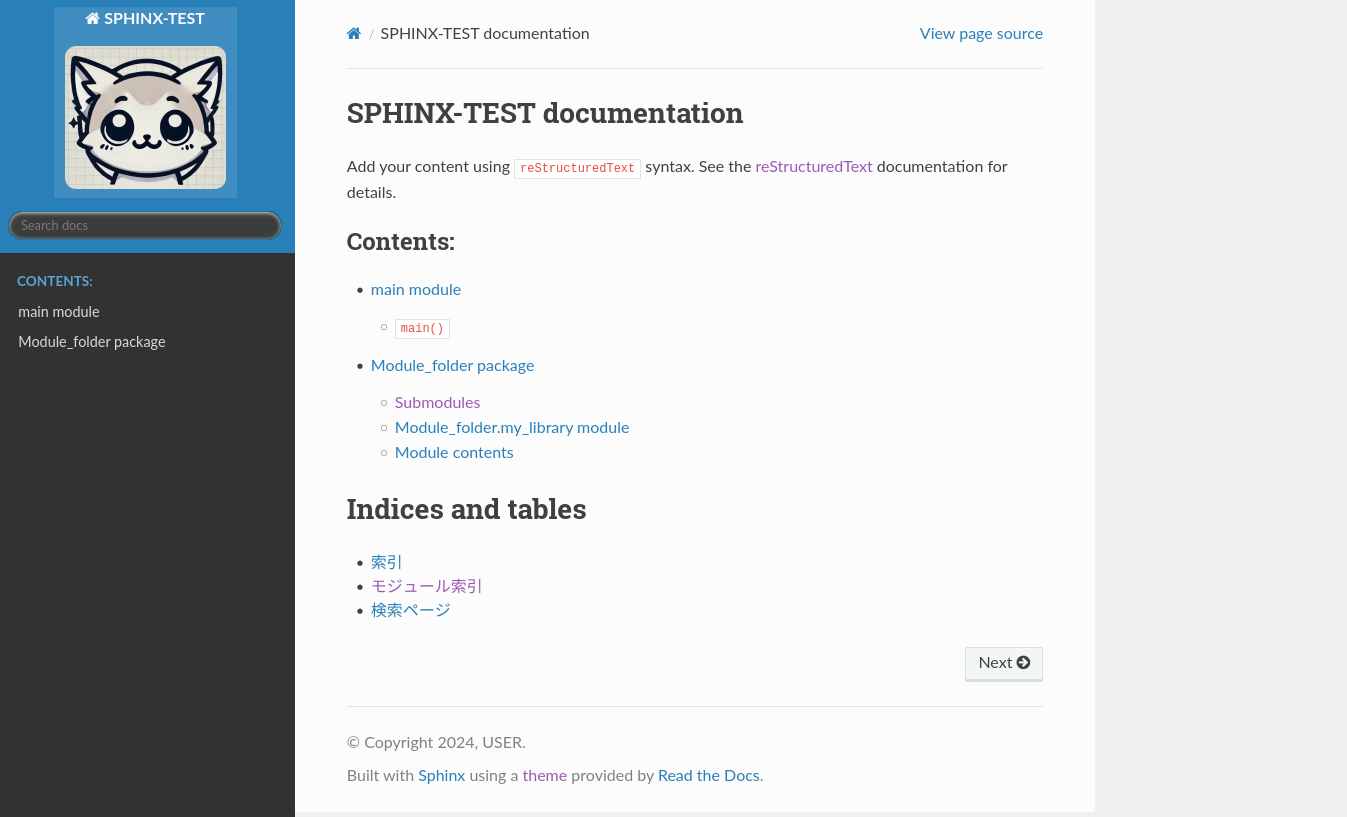
read the docsの場合
以下をconf.pyに加筆修正します。
html_theme = 'sphinx_rtd_theme'
html_logo = 'https://raw.githubusercontent.com/yKesamaru/sphinx_documentation/master/https://raw.githubusercontent.com/yKesamaru/sphinx_documentation/master/assets/logo.png'
html_favicon = 'https://raw.githubusercontent.com/yKesamaru/sphinx_documentation/master/https://raw.githubusercontent.com/yKesamaru/sphinx_documentation/master/assets/logo.ico'
変更が終わったらsphinx-buildを実行します。
WAGTAILの場合
まずpipでテーマをインストールします。
pip install sphinx-wagtail-theme
以下をconf.pyに加筆修正します。
ロゴイメージの表示は、wagtailドキュメントの記述と異なり、source/_staticディレクトリに配置しないと正常に動作しませんでした。バージョンにより相違があるのかも知れません。
extensions = [
    'sphinx.ext.napoleon',
    'sphinx.ext.autodoc',
    'sphinx.ext.intersphinx',
    'myst_parser',
    'sphinx_wagtail_theme'
]

html_theme = 'sphinx_wagtail_theme'
html_theme_options = dict(
    project_name="SPHINX-TEST",
    logo="logo.png",
    logo_alt="logo",
    logo_height=50,
    logo_width=50,
    github_url="https://github.com/yKesamaru/sphinx_documentation/tree/master",
    footer_links=",".join([
        "About Us|https://pypi.org/project/sphinx-wagtail-theme/",
        "wagtail github|https://github.com/wagtail/sphinx-wagtail-theme",
        "wagtail document|https://sphinx-wagtail-theme.readthedocs.io/en/latest/",
    ]),
)
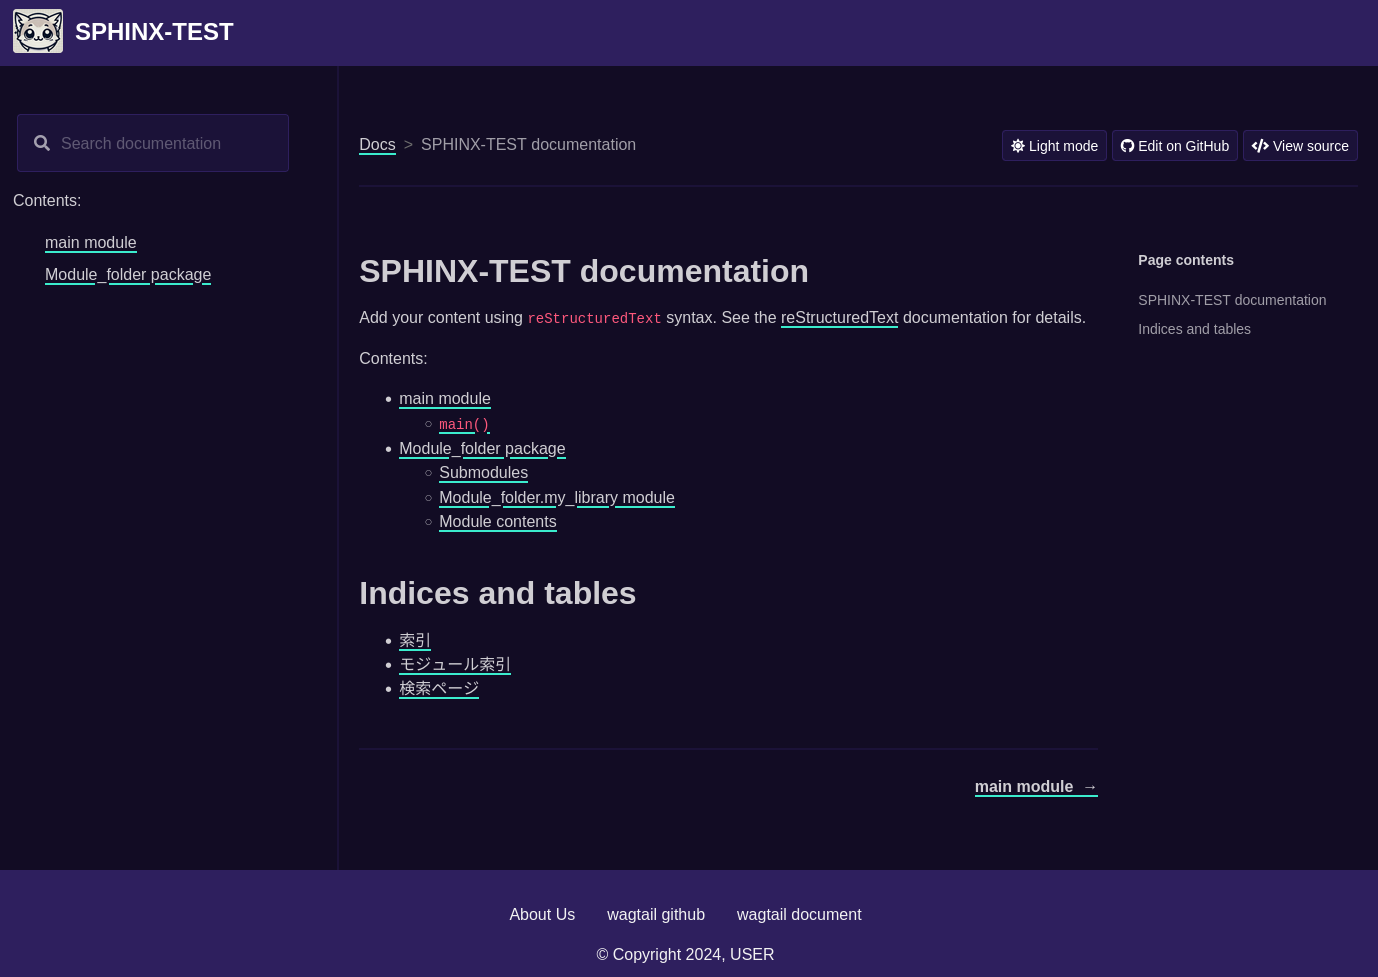
今風のモダンな見た目になりました。
GitHub Actionsによる自動デプロイ
.github/workflows/{deploy_to_github_pages}.yml({}内は任意のファイル名)をプロジェクトルートディレクトリに作成します。
name: Deploy Sphinx Docs to GitHub Pages.

on:
  push:
    branches:
        - '**'  # 全てのブランチでトリガー

permissions:
  contents: write  # 必要な権限を設定
  id-token: write
  pages: write

jobs:
  build:
    runs-on: ubuntu-latest

    steps:
      - name: Checkout repository
        uses: actions/checkout@v3

      - name: Set up Python
        uses: actions/setup-python@v3
        with:
          python-version: '3.10.12'

      - name: Install dependencies
        run: |
          pip install -e .

      - name: Generate Sphinx documentation
        run: |
          sphinx-apidoc -f -o ./source ./
          sphinx-apidoc -f -o ./source ./Module_folder
          sphinx-build -a -b html -E ./source ./doc

      - name: List uploaded artifacts  # アーティファクトの内容をリスト表示
        run: ls -al ./doc

      - name: Upload artifact for GitHub Pages
        uses: actions/upload-pages-artifact@v2
        with:
          path: ./doc
          name: github-pages
          retention-days: 1

  deploy:
    runs-on: ubuntu-latest
    needs: build

    steps:
      - name: Deploy to GitHub Pages
        uses: actions/deploy-pages@v3
        with:
          token: ${{ secrets.GITHUB_TOKEN }}
          artifact_name: github-pages
崩れを防止するために以下のファイルを追加します。
touch doc/.nojekyll
次にGitHub Pagesの設定を変更し、保存しておきます。
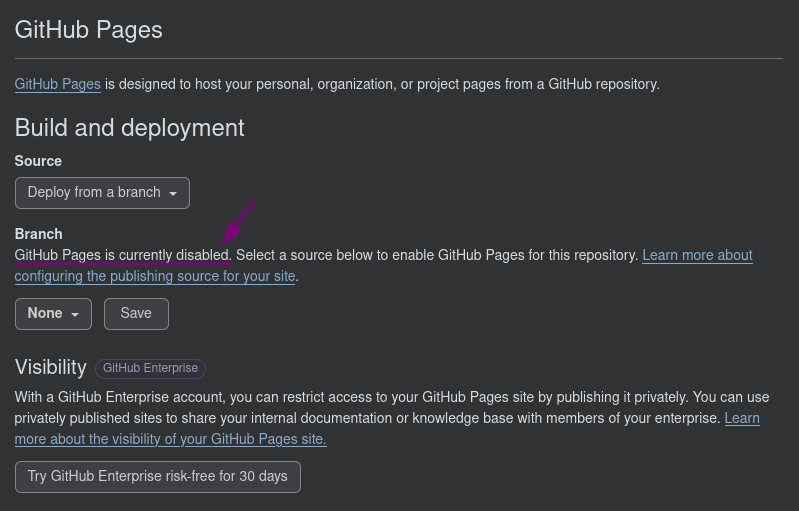

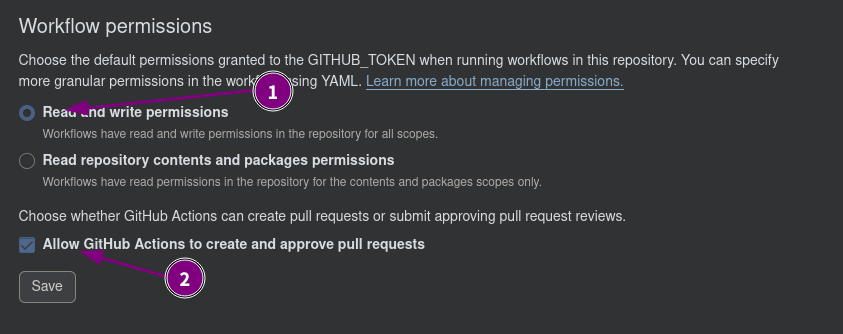
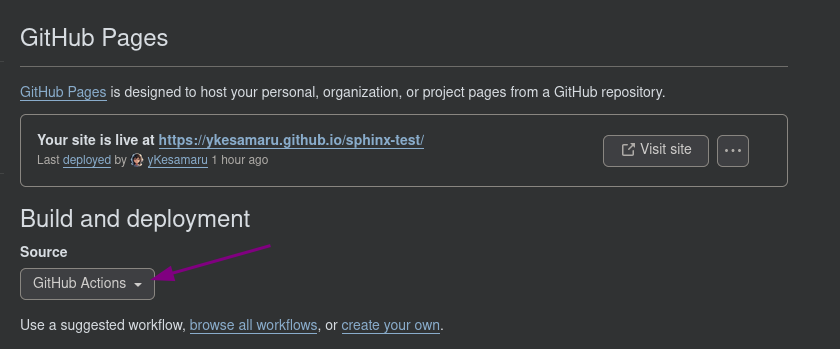
それぞれ上記のスクリーンショットのようにパーミッションを変更します。

この日はサーバーエラーが発生しました。
この場合、WEB上でdeployだけリトライさせることが出来ます。
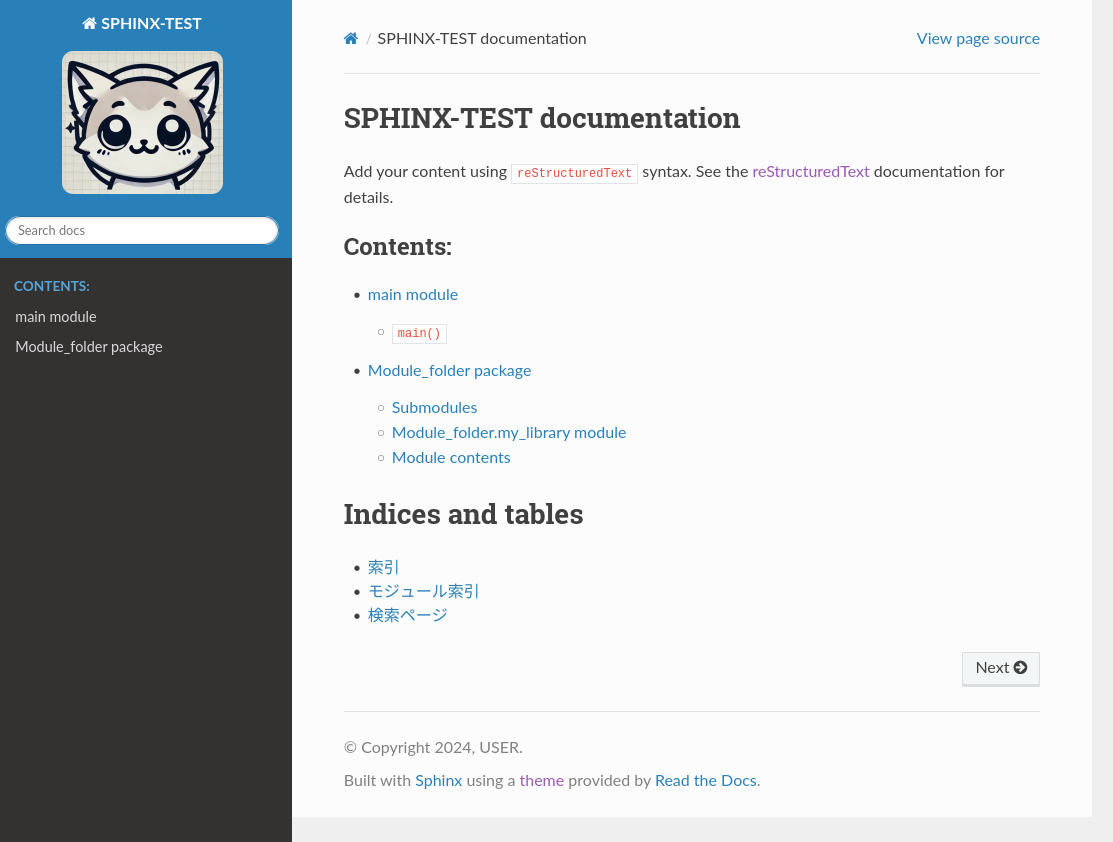
最終的にデプロイ出来ましたのでリンクを以下に貼ります。
最後に
散々こすられているsphinxによるドキュメント生成と自動デプロイですが、自分だけハマるポイントというのが結構あるものです。そのようなポイントに限ってどのドキュメントにも載っていなかったりするものです。
たとえば
-
sphinx-apidocを、コードが存在する複数のディレクトリに対して複数回行う
はどのサイトにも(わたしの観測圏内では)見当たりませんでした。
これらは環境が変わるとまた違った結果になるのかも知れません。
以上です。ありがとうございました。


Discussion