vagrantにwordpress環境を構築する(centos7+nginx+PHP8.3+Mysql8.0)
vagrantにcentos7+nginx+PHP8.3+Mysql8.0をインストールし、wordpressを構築しましたので、備忘録として記録に残しておきます!
かなり構築に手こずったので、少しでも誰かの参考になれば幸いです。。
Vagrant起動〜nginx起動確認まで
Vagrantfile詳細
Vagrant.configure("2") do |config|
  config.vm.box = "centos/7"
  config.vm.network "private_network", ip: "192.168.50.4" #追加
  config.vm.synced_folder "./", "/var/www/html/", owner: 'vagrant', group: 'vagrant'
end
ホスト環境のhosts設定も忘れずに!
vi /etc/hosts
以下追記(IPアドレスと紐付けるホスト名を記載)
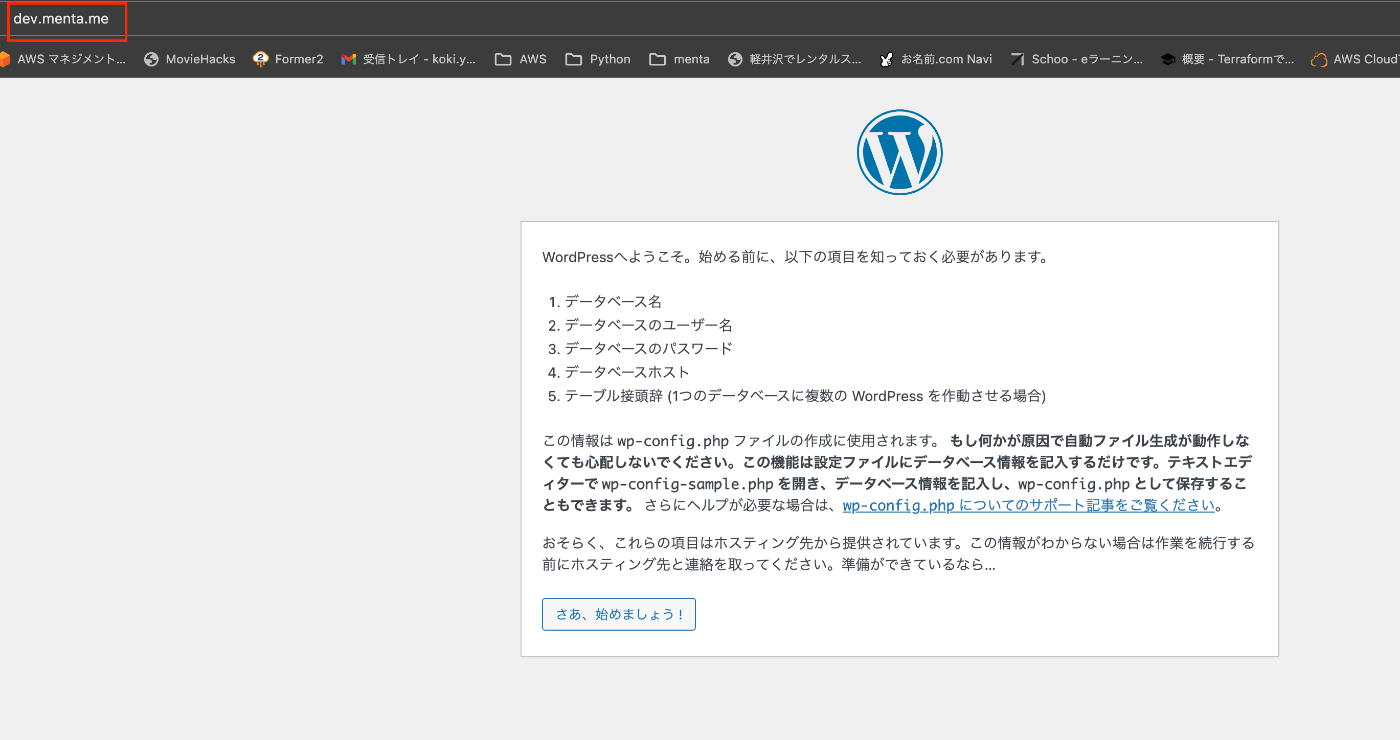
192.168.50.4 dev.menta.me
今回IPは192.168.50.4で指定しています。
vagrantの起動と接続
vagrant up
vagrant reload #必要に応じて
vagrant ssh
ルートユーザに変更する
$ sudo su -
yumのアップデート
$ yum -y update
EPELリポジトリの追加
$ yum -y install epel-release
以下もインストールしておく
vimのインストール (ついvimって打ってしまうので入れとく)
$ yum -y install vim
wgetのインストール (wordpressインストールとかに使う)
$ yum -y install wget
remiリポジトリの追加
$ rpm -Uvh http://rpms.famillecollet.com/enterprise/remi-release-7.rpm
nginxのインストール準備
リポジトリの追加
$ vim /etc/yum.repos.d/nginx.repo
以下を記述して保存する
[nginx]
name=nginx repo
baseurl=http://nginx.org/packages/mainline/centos/7/$basearch/
gpgcheck=1
enabled=1
gpgkey=http://nginx.org/keys/nginx_signing.key

[nginx-source]
name=nginx source
baseurl=http://nginx.org/packages/mainline/centos/7/SRPMS/
gpgcheck=1
enabled=0
gpgkey=http://nginx.org/keys/nginx_signing.key
nginxをインストールする
$ yum -y install nginx
nginxの状態確認(起動前)
$ systemctl status nginx
Active: inactive (dead)
nginxの起動
$ systemctl start nginx
nginxの状態確認(起動後)
$ systemctl status nginx
Active: active (running)
サーバ再起動時にnginxが自動起動するように設定するようにする
$ systemctl enable nginx.service
ブラウザで192.168.50.4にアクセス
welcome to nginx!
表示されればOKです!!
nginx設定~phpインストールおよび設定
筆者はnginxとphpの疎通に苦労し、かなりハマりました。。
nginxの設定ファイル編集
default.confはデフォルトの名称なので、自身の環境で名称はよしなに変えてください
※筆者の環境だと ファイル名をdev.menta.me.confに変えてます
vi /etc/nginx/conf.d/default.conf
server {
    listen       80;
    server_name  dev.menta.me;
    root /var/www/dev.menta.me/wordpress;
    charset UTF-8;
    access_log  /var/log/nginx/sample.com.access.log  main;
    error_log /var/log/nginx/sample.com.error.log;

    location / {
        index  index.php index.html index.htm;
    }

    error_page   500 502 503 504  /50x.html;
    location = /50x.html {
        root   /usr/share/nginx/html;
    }

    location ~ \.php$ {
        fastcgi_pass   unix:/var/run/php-fpm/php-fpm.sock;
        fastcgi_index  index.php;
        fastcgi_param  SCRIPT_FILENAME  $document_root$fastcgi_script_name;
        include        fastcgi_params;
    }
}
location ~ \.php$各項目の説明
fastcgi_pass unix:/var/run/php-fpm/php-fpm.sock;
nginxがFastCGIプロセスに.phpファイルを転送する方法を指定。unix:/var/run/php-fpm/php-fpm.sock は、php-fpmソケットへのパスを指している。
fastcgi_index index.php;
FastCGIが.phpファイルの中でデフォルトのインデックスファイルとして使用するファイル名を指定。通常、WordPressなどのCMSではindex.phpがデフォルトのインデックスファイルとして使用される。
fastcgi_param SCRIPT_FILENAME $document_root$fastcgi_script_name;
FastCGIプロセスにスクリプトファイルのパスを渡すためのパラメータを設定。document_root$fastcgi_script_name は、nginxのドキュメントルートとリクエストされたファイル名を組み合わせてスクリプトのフルパスを生成。
・include fastcgi_params;
FastCGIパラメータを含む外部ファイル fastcgi_params をインクルードする。このファイルには、一般的なFastCGIパラメータが事前に設定されている。
構文エラーがないことを確認。
nginx -t
nginx: the configuration file /etc/nginx/nginx.conf syntax is ok
nginx: configuration file /etc/nginx/nginx.conf test is successful
nginxの再起動
systemctl restart nginx
php 8.3のインストール
Remiリポジトリのリリースパッケージをインストール
yum -y install https://rpms.remirepo.net/enterprise/remi-release-7.rpm
RemiリポジトリでPHP 8.3を有効にする。
yum-config-manager --enable remi-php83
PHP 8.3と必要な拡張機能をインストール
yum -y install php php-cli php-mysqli php-fpm
php-confの設定を行う
$ vim /etc/php-fpm.d/www.conf
以下全コピでもOK
[www]

user = nginx
group = nginx
listen = /var/run/php-fpm/php-fpm.sock
listen.owner = nginx
listen.group = nginx
listen.mode = 0660
listen.allowed_clients = 127.0.0.1
pm = static
pm.max_children = 10
pm.start_servers = 10
pm.min_spare_servers = 10
pm.max_spare_servers = 10
slowlog = /var/log/php-fpm/www-slow.log
php_admin_value[error_log] = /var/log/php-fpm/www-error.log
php_admin_flag[log_errors] = on
php_value[session.save_handler] = files
php_value[session.save_path]    = /var/lib/php/session
php_value[soap.wsdl_cache_dir]  = /var/lib/php/wsdlcache
php-fpmの再起動
systemctl restart php-fpm
php-fpmが自動起動するように設定するようにする
$ systemctl enable php-fpm
wordpressのインストール~Mysqlインストールおよび設定
ドキュメントルートの作成
mkdir /var/www/dev.menta.me
解凍先に移動
cd /var/www/dev.menta.me
日本語版の最新のwordpressを取得する
$ wget https://ja.wordpress.org/latest-ja.tar.gz
解凍する
$ tar xfz latest-ja.tar.gz
wordpressディレクトリが生成される
[root@localhost www]# ls -l | grep wordpress
drwxr-xr-x. 5    1006    1006     4096 Apr 12 14:00 wordpress
wordpressディレクトリの所有権を変更する
$ chown -R nginx. wordpress
192.168.50.4もしくはnginxの設定ファイルの項目のservernameで指定した名称でブラウザ接続してみるとセットアップ画面が表示される!
MySQL8のインストール
MySQLリポジトリから以下のGPGキーを取得してインポートする。
rpm --import https://repo.mysql.com/RPM-GPG-KEY-mysql-2022
rpm --import https://repo.mysql.com/RPM-GPG-KEY-mysql-2023
リポジトリ設定ファイルに移動
cd /etc/yum.repos.d/
MySQL 公式サイトからリポジトリ設定用の RPM ファイルをダウンロード
wget https://dev.mysql.com/get/mysql80-community-release-el7-3.noarch.rpm
ダウンロードした RPM ファイルをインストール
rpm -ivh mysql80-community-release-el7-3.noarch.rpm
リポジトリの設定が正しく反映されるように、以下のコマンドを実行してリポジトリのキャッシュクリア
yum clean all
MySQL Community Server をインストール
yum -y install mysql-community-server
mysql バージョン確認
mysql --version
mysql  Ver 8.0.36 for Linux on x86_64 (MySQL Community Server - GPL)
nginxの起動および自動起動設定
systemctl start mysqld
systemctl enable mysqld
MySQLの初期パスワードを取得
grep 'temporary password' /var/log/mysqld.log
取得したパスワードでmysqlログインし、rootユーザのパスワード変更
パスワードは大文字小文字記号数字で8文字以上記載しないとダメみたいです
mysql -u root -p
ALTER USER 'root'@'localhost' IDENTIFIED BY 'MYPASSWORD';
WordPress用のデータベースを作成
CREATE DATABASE wordpress_db;
CREATE USER 'wordpress_user'@'localhost' IDENTIFIED BY 'password';
GRANT ALL PRIVILEGES ON wordpress_db.* TO 'wordpress_user'@'localhost';
FLUSH PRIVILEGES;
サンプルファイルのコピーおよび wp-config.php ファイルの編集
cd /var/www/dev.menta.me/wordpress/
cp -a wp-config-sample.php wp-config.php
vim wp-config.php
下記、項目を編集
define( 'DB_NAME', 'wordpress_db' );

/** Database username */
define( 'DB_USER', 'wordpress_user' );

/** Database password */
define( 'DB_PASSWORD', 'MYPASSWD' );

/** Database hostname */
define( 'DB_HOST', 'localhost' );
vi /var/www/wordpress/wp-config.php
<?php
/**
 * The base configuration for WordPress
 *
 * The wp-config.php creation script uses this file during the installation.
 * You don't have to use the website, you can copy this file to "wp-config.php"
 * and fill in the values.
 *
 * This file contains the following configurations:
 *
 * * Database settings
 * * Secret keys
 * * Database table prefix
 * * ABSPATH
 *
 * @link https://wordpress.org/documentation/article/editing-wp-config-php/
 *
 * @package WordPress
 */

// ** Database settings - You can get this info from your web host ** //
/** The name of the database for WordPress */
define( 'DB_NAME', 'wordpress_db' );

/** Database username */
define( 'DB_USER', 'wordpress_user' );

/** Database password */
define( 'DB_PASSWORD', 'MYPASSWORD' );

/** Database hostname */
define( 'DB_HOST', 'localhost' );

/** Database charset to use in creating database tables. */
define( 'DB_CHARSET', 'utf8' );

/** The database collate type. Don't change this if in doubt. */
define( 'DB_COLLATE', '' );

/**#@+
 * Authentication unique keys and salts.
 *
 * Change these to different unique phrases! You can generate these using
 * the {@link https://api.wordpress.org/secret-key/1.1/salt/ WordPress.org secret-key service}.
 *
 * You can change these at any point in time to invalidate all existing cookies.
 * This will force all users to have to log in again.
 *
 * @since 2.6.0
 */
define( 'AUTH_KEY',         'put your unique phrase here' );
define( 'SECURE_AUTH_KEY',  'put your unique phrase here' );
define( 'LOGGED_IN_KEY',    'put your unique phrase here' );
define( 'NONCE_KEY',        'put your unique phrase here' );
define( 'AUTH_SALT',        'put your unique phrase here' );
define( 'SECURE_AUTH_SALT', 'put your unique phrase here' );
define( 'LOGGED_IN_SALT',   'put your unique phrase here' );
define( 'NONCE_SALT',       'put your unique phrase here' );

/**#@-*/
nginxおよびphp-fpm再起動
systemctl restart nginx
systemctl restart php-fpm
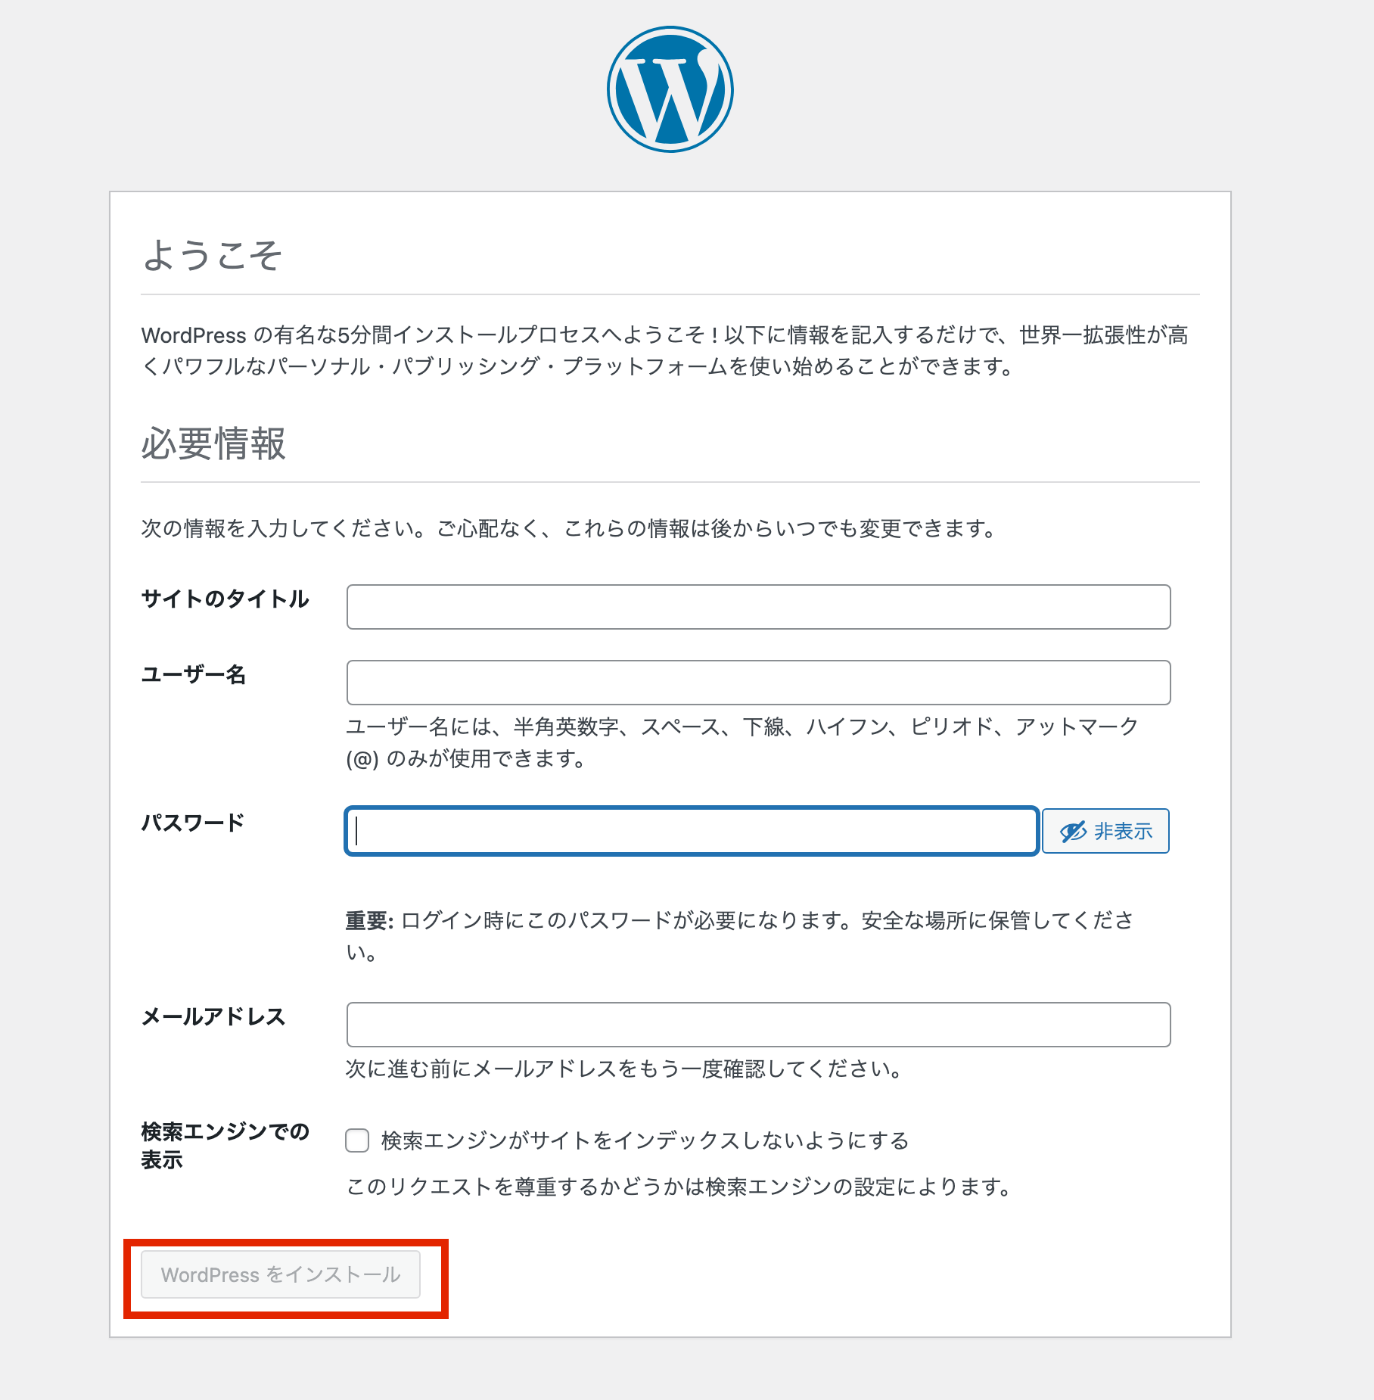
ブラウザのwordpressの画面でさぁ始めましょうをクリック

データベース作成時に設定した必要事項を記入し、wordpressをインストールをクリック
成功しました!と表記されたらログインをクリック
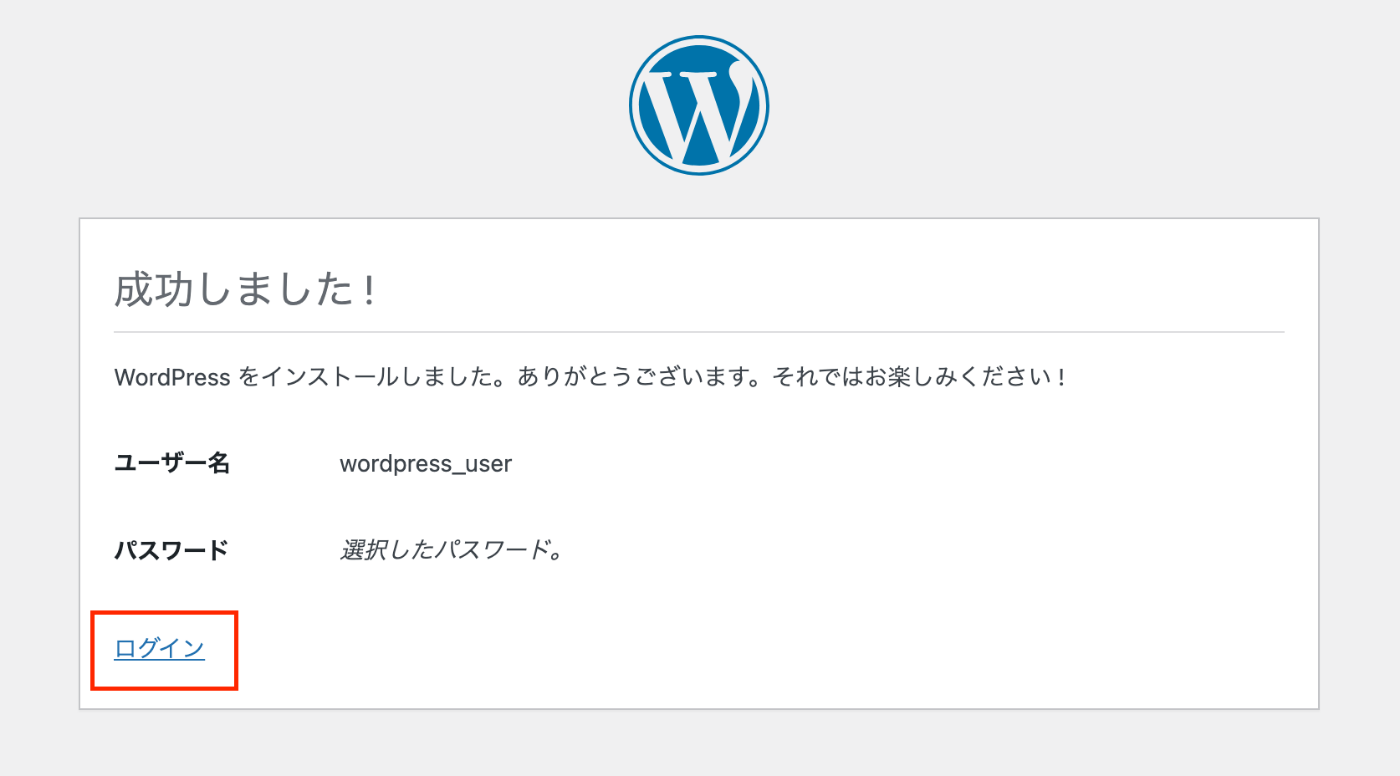
設定したメールアドレス、パスワードを記入しログイン

wordpressのダッシュボード画面が表記されればOK!
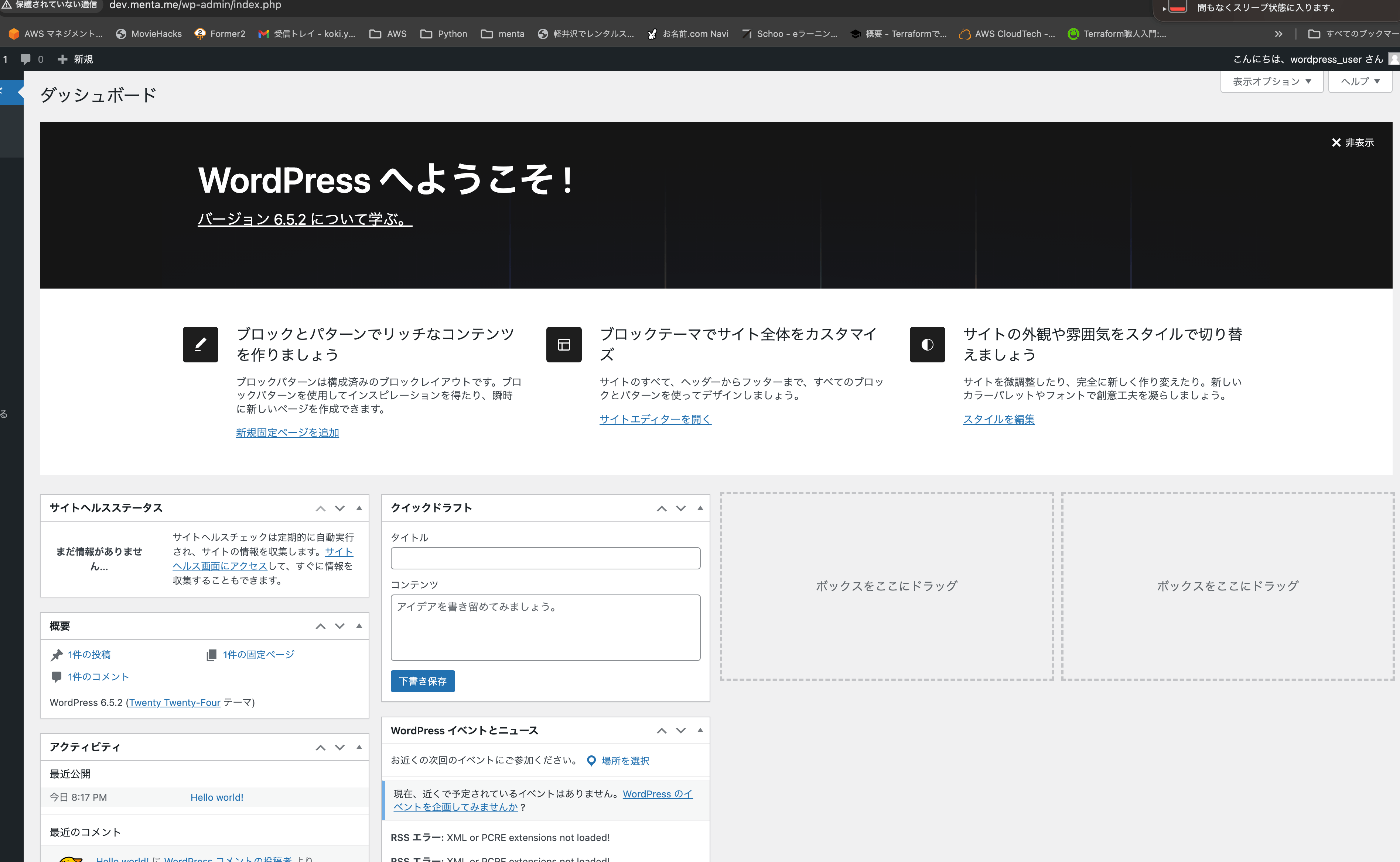
とりあえずこの手順で完成しました。。
どなたかの参考になれば幸いです!
参考
Discussion