plotly dashの内部構造
pythonのみでデータ分析のアプリケーションを実装することが出来るwebフレームワークの1つplotly dashの裏側がどうなっているのか
githubにある次のソースコードを解析してみました。(※Dash Enterpriseのコードではありません)
streamlitと比較して、パフォーマンス・データフォーマットの違いについて触れています。
streamlitの仕組みについては、こちらを参照ください。
レイアウトの初期化について
dashの画面レイアウトでは、dashのコンポーネントを使うことで、javascript/cssのコードを書かずにラップされたReactのコンポーネントを使って実装出来るようになります。
その中にpythonで編集した値の埋め込みを行うことが出来ます。
簡単なサンプルの例として以下に示します。
app = Dash()

app.layout = [
    html.H1(children='Title of Dash App', style={'textAlign':'center'}),
    dcc.Dropdown(df.country.unique(), 'Canada', id='dropdown-selection'),
    dcc.Graph(id='graph-content')
]
この例では、h1のタイトルの下に、国のdataframeを使ったドロップダウンメニューを配置し、末尾にグラフコンポーネントを配置しています。
dash.pyのDashクラスの初期化プロセスを解析すると、
レイアウトの初期化では、次のようにして、pythonのapp.layoutにdashコンポーネントの配列 → javascriptのscriptタグに変換しています。

dash-renderer - dash.py: _generate_scripts_html
    def _generate_scripts_html(self):
      # Dash renderer has dependencies like React which need to be rendered
        # before every other script. However, the dash renderer bundle
        # itself needs to be rendered after all of the component's
        # scripts have rendered.
        # The rest of the scripts can just be loaded after React but before
        # dash renderer.
        # pylint: disable=protected-access

        mode = "dev" if self._dev_tools["props_check"] is True else "prod"

        deps = [
            {
                key: value[mode] if isinstance(value, dict) else value
                for key, value in js_dist_dependency.items()
            }
            for js_dist_dependency in _dash_renderer._js_dist_dependencies
        ]
        dev = self._dev_tools.serve_dev_bundles
        srcs = (
            self._collect_and_register_resources(
                self.scripts._resources._filter_resources(deps, dev_bundles=dev)
            )
            + self.config.external_scripts
            + self._collect_and_register_resources(
                self.scripts.get_all_scripts(dev_bundles=dev)
                + self.scripts._resources._filter_resources(
                    _dash_renderer._js_dist, dev_bundles=dev
                )
                + self.scripts._resources._filter_resources(
                    dcc._js_dist, dev_bundles=dev
                )
                + self.scripts._resources._filter_resources(
                    html._js_dist, dev_bundles=dev
                )
                + self.scripts._resources._filter_resources(
                    dash_table._js_dist, dev_bundles=dev
                )
            )
        )

        self._inline_scripts.extend(_callback.GLOBAL_INLINE_SCRIPTS)
        _callback.GLOBAL_INLINE_SCRIPTS.clear()

        return "\n".join(
            [
                format_tag("script", src)
                if isinstance(src, dict)
                else f'<script src="{src}"></script>'
                for src in srcs
            ]
            + [f"<script>{src}</script>" for src in self._inline_scripts]
        )
javascriptになった後は、ブラウザでレンダリングの処理になります。
フロントエンドの実装について
dashでは、フロントエンドにはReact Reduxを利用しています。
Reduxとは、state管理Javascriptライブラリ
actionというイベントを使用してアプリケーション stateを管理および更新するためのライブラリ
コアコンセプトが下の図

Storeの入り口で、非同期処理のAPI呼び出しを行って結果や既存の値をreducerでマージなどしてStoreに保持しています。その後、UIに反映する流れになっています。
app.callbackの呼び出しについて
callbackでユーザ定義した処理はどのように動作させているのか、
例えば以下のような簡単なcallbackの呼び出しについて
@callback(
    Output('graph-content', 'figure'),
    Input('dropdown-selection', 'value')
)
def update_graph(value):
    dff = df[df.country==value]
    return px.line(dff, x='year', y='pop')
ここでは、先ほどのレイアウトの国のドロップダウンから選ばれた値をInputにして、その値を抽出条件としてdataframeの内容をlineグラフに出力し、そのfigureオブジェクトをOutputに渡しています。
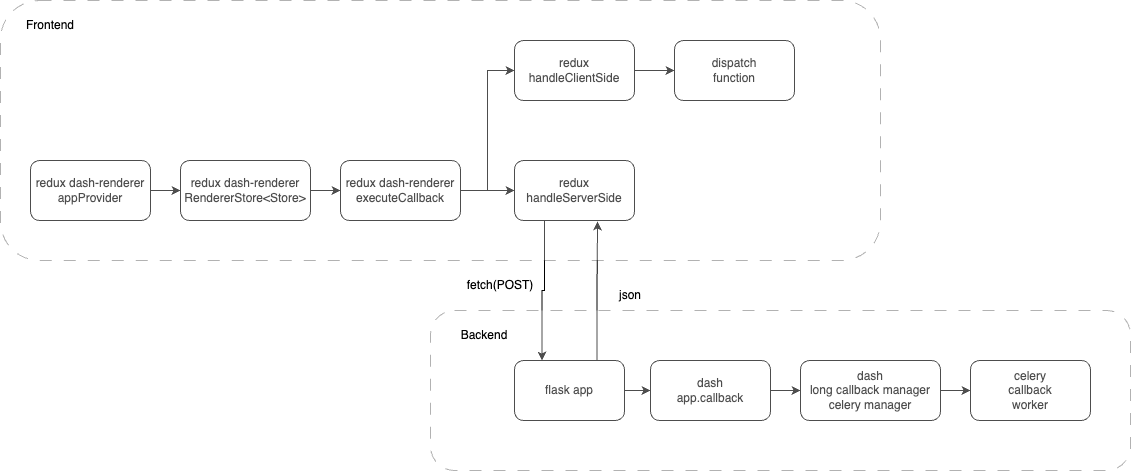
下の図の上部が、ReduxのStore(コンセプト図の右側にあるStoreの入り口)でcallbackを呼び出す流れを指してます。
外部APIコールなど非同期を行う副作用がある処理をStoreのcallbackとして依存性を注入する形で、Reducerの直前に呼び出されます。
その後、戻り値を各コンポーネントに対応したReducerで処理し、StateにセットしてUIにレンダリングする流れになっています。

バックエンドは下部の流れで、flaskで実装されています。REST APIエンドポイントがPOSTリクエストをフロントエンドから受け取って、callbackの処理が呼び出されます。
各アプリで実装するdashのapp.callbackデコレータが付いた関数は、celeryジョブとして定義され、その制御を行うcelery manager経由でcelery workerとして呼び出されます。
backend -> frontendのデータフォーマット
callbackのjobが終わった後、Outputで返されるデータがnumpy, pandas, PIL.image, plotly figureオブジェクトなどの場合は、JSONに文字列としてシリアライズされています。
dash_renderer - _callbackのL.520 to_json
add_context一部抜粋
                output_value = callback_manager.get_result(cache_key, job_id)
                # Must get job_running after get_result since get_results terminates it.
                job_running = callback_manager.job_running(job_id)
                if not job_running and output_value is callback_manager.UNDEFINED:
                    # Job canceled -> no output to close the loop.
                    output_value = NoUpdate()

                elif (
                    isinstance(output_value, dict)
                    and "long_callback_error" in output_value
                ):
                    error = output_value.get("long_callback_error")
                    raise LongCallbackError(
                        f"An error occurred inside a long callback: {error['msg']}\n{error['tb']}"
                    )

                if job_running and output_value is not callback_manager.UNDEFINED:
                    # cached results.
                    callback_manager.terminate_job(job_id)

                if multi and isinstance(output_value, (list, tuple)):
                    output_value = [
                        NoUpdate() if NoUpdate.is_no_update(r) else r
                        for r in output_value
                    ]
                updated_props = callback_manager.get_updated_props(cache_key)
                if len(updated_props) > 0:
                    response["sideUpdate"] = updated_props
                    has_update = True

                if output_value is callback_manager.UNDEFINED:
                    return to_json(response)
まとめ
dashの内部処理を解析することで、次のメリットをどのように実装しているこかをよく理解することが出来ました。
- 本来はフロントエンドのスキルが必要な画面レイアウトを、dashのコンポーネントを使って、html/javascript/cssを直接書かずにpythonのみでコーディング出来ます。
- @callbackデコレータを付けたバックエンドの処理は、celeryによってマルチプロセッシングで動作します。そのため、同時アクセスされた場合にもリクエスト毎にpythonのプロセスが分かれ、複数CPUを効率良く使います。
データ分析アプリケーションのwebフレームワークを選定する際に、画面レイアウトのコーディングスタイルやパフォーマンス観点で参考になれば幸いです。
また、プロダクション環境で利用する際にパフォーマンスを考慮したアプリケーションの設計やセキュリティ上の課題調査のとっかかりとりとして役立てればと思います。
Discussion