ブロックテーマを作った時の作業メモ
ディレクトリ構造
├── plugins
│   └── my-custom-block
│       ├── build
│       │   └── blocks
│       │       ├── page-title
│       │       │   ├── index.asset.php
│       │       │   └── view.asset.php
│       │       └── site-header
│       │           ├── index.asset.php
│       │           └── view.asset.php
│       ├── src
│       │   ├── assets
│       │   │   └── scss
│       │   └── blocks
│       │       ├── page-title
│       │       │   ├── block.json
│       │       │   ├── edit.js
│       │       │   ├── editor.scss
│       │       │   ├── index.js
│       │       │   ├── save.js
│       │       │   ├── style.scss
│       │       │   └── view.js
│       │       └── site-header
│       │           ├── block.json
│       │           ├── edit.js
│       │           ├── editor.scss
│       │           ├── index.js
│       │           ├── save.js
│       │           ├── style.scss
│       │           └── view.js
│       ├── my-blocks.php
│       ├── package.json
│       └── yarn.lock
├── themes
│   └── mytheme
│       ├── assets
│       │   ├── images
│       │   └── scss
│       ├── parts
│       ├── patterns
│       ├── templates
│       ├── common.css
│       ├── editor-style.css
│       ├── functions.php
│       ├── package.json
│       ├── screenshot.png
│       ├── style.css
│       └── theme.json
├── package.json
├── webpack.config.js
└── yarn.lock
理由
npx @wordpress/create-block
で始めたらカスタムブロック1つだけの環境ができあがるだけなので、複数のブロックが包括できるやり方で最初から置いておきたかったから。
テーマも同じ環境に置きたかったから。
最終的に、scssをカスタムブロック外でも書きたかったので、いつも使っているwebpackを流用して、WP関連のwpディレクトリと同じ階層にsrcディレクトリを作った。
※カスタムブロックスタイルをfunctions.phpにcssでベタ書きするのがだるくなったからである。
├── package.json
├── src
│   └── assets
│       ├── images
│       ├── scripts
│       └── scss
├── webpack
│   ├── path.config.js
│   ├── webpack.common.js
│   ├── webpack.config.dev.js
│   └── webpack.config.prod.js
└── wp
    ├── package.json
    ├── plugins
    │   └── my-custom-block
    ├── themes
    │   └── mytheme
    ├── webpack.config.js
    ├── wp-config.php
    └── wp_data
        ├── sql
        └── uploads
随時テーマディレクトリのassetsに書き出されるようにした。
devServer: {
略
    writeToDisk: true
}
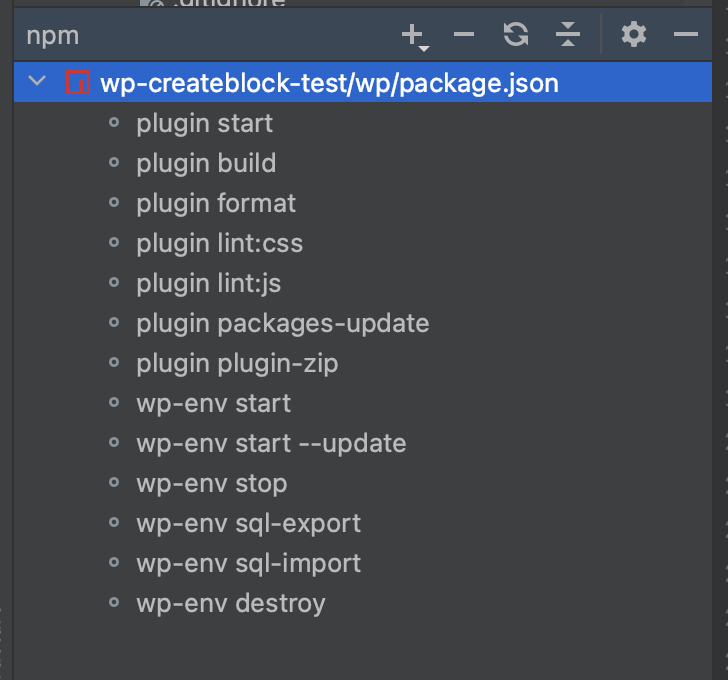
npm scriptのカスタム
wp-scriptとwp-envの各コマンドが1つのpackage.jsonのscriptsから呼び出せるようにしておいた。
ルートにあるpackage.jsonをインストール
yarn install
"scripts": {
		"plugin start": "cd plugins/my-custom-block && wp-scripts start",
		"plugin build": "cd plugins/my-custom-block && wp-scripts build",
		"plugin format": "cd plugins/my-custom-block && wp-scripts format",
		"plugin lint:css": "cd plugins/my-custom-block && wp-scripts lint-style",
		"plugin lint:js": "cd plugins/my-custom-block && wp-scripts lint-js",
		"plugin packages-update": "cd plugins/my-custom-block && wp-scripts packages-update",
		"plugin plugin-zip": "cd plugins/my-custom-block && wp-scripts plugin-zip",
		"wp-env start": "wp-env start",
		"wp-env start --update": "wp-env start --update cross-env WP_ENV_PORT=$npm_package_port_wpenv",
		"wp-env stop": "wp-env stop",
		"wp-env sql-export": "yarn run wp-env run cli wp db export sql/local.sql",
		"wp-env sql-import": "yarn run wp-env run cli wp db import sql/local.sql",
		"wp-env destroy": "wp-env destroy"
	},
srcのassetsもまとめてビルドできるようにした。
"plugin build": "cd ../ && yarn run build && cd wp/plugins/my-custom-block && wp-scripts build",
cdはcdしたディレクトリから次のcdへ移動するので、package.jsonがある場所からのcdにならないことに注意。少しはまった。
.wp-env.jsonの中身
"./plugins/my-custom-block",でカスタムブロックのディレクトリ名を指定すること。
その他のデフォルトプラグインはお任せ。
(create-block-themeは必須)
{
	"core": "https://ja.wordpress.org/latest-ja.zip",
	"phpVersion": "8.0",
	"themes": [ "./themes/mytheme" ],
	"plugins": [
		"./plugins/my-custom-block",
		"https://downloads.wordpress.org/plugin/create-block-theme.latest-stable.zip",
		"https://downloads.wordpress.org/plugin/duplicate-post.latest-stable.zip",
		"https://downloads.wordpress.org/plugin/all-in-one-wp-migration.latest-stable.zip",
		"https://downloads.wordpress.org/plugin/wordpress-seo.latest-stable.zip"
	],

	"port": 10999,
	"env": {
		"tests": {
			"port": 10998
		}
	},

	"config": {
		"WP_DEBUG": true,
		"AUTOSAVE_INTERVAL": 1800,
		"WP_POST_REVISIONS": 5
	},
	"mappings": {
		"sql": "./wp_data/sql",
		"wp-content/uploads": "./wp_data/uploads"
	}
}
ローカルWP起動
yarn run wp-env start --update
基本的に、wp-env start を使うことで環境を起動できますが、依存関係を更新したい場合は wp-env start --update を使用すると良いでしょう。例えば、wp-env.json ファイルで指定されたプラグインやテーマのバージョンを変更した後に、それらの最新バージョンを反映させたい場合などに有効です。
Create Block ThemeでテーマにGoogleフォントを追加
Create Block Themeで作った子テーマの中のreadme.txtを削除したら、Googleフォントを追加時にエラーが出るため、削除せずそのまま置いておく。
追加された。
"settings": {
		"layout": {
			略
		},
		"typography": {
			"fontFamilies": [
				{
					"fontFamily": "Noto Sans JP",
					"slug": "noto-sans-jp",
					"fontFace": [
						{
							"fontFamily": "Noto Sans JP",
							"fontStyle": "normal",
							"fontWeight": "400",
							"src": [
								"file:./assets/fonts/noto-sans-jp_normal_400.ttf"
							]
						},
						{
							"fontFamily": "Noto Sans JP",
							"fontStyle": "normal",
							"fontWeight": "700",
							"src": [
								"file:./assets/fonts/noto-sans-jp_normal_700.ttf"
							]
						},
						{
							"fontFamily": "Noto Sans JP",
							"fontStyle": "normal",
							"fontWeight": "400",
							"src": [
								"file:./assets/fonts/noto-sans-jp_normal_400.ttf"
							]
						},
						{
							"fontFamily": "Noto Sans JP",
							"fontStyle": "normal",
							"fontWeight": "700",
							"src": [
								"file:./assets/fonts/noto-sans-jp_normal_700.ttf"
							]
						}
					]
				}
			]
		}
	},
自作テーマは基本的に製作時に最新のデフォルトテーマ(2023年11月時点はtwentytwentyfour)の子テーマとして作っておく
子テーマじゃなくてもいいんじゃね?
という結論に達したので、親子関係を解消しました。特に問題なかった。
理由
- TT4デフォルトのパターンやテンプレートを削除しまくっていたし、jsonもデザインに合わせて自分で書いたから。
- クラシックテーマ時代のお作法的に子テーマにしてただけで結果意味がなかった。
サイトエディターで「更新に失敗しました」
投稿で「更新に失敗しました。返答が正しい JSON レスポンスではありません。」
と出た。
途中でtwentytwentythreeからtwentytwentyfourの子テーマに変更したからかな?
パーマリンクで「更新」
大体なんかこれで治る。
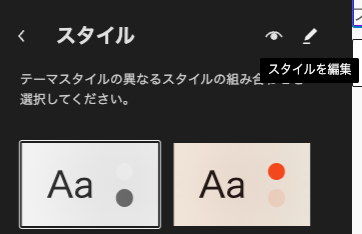
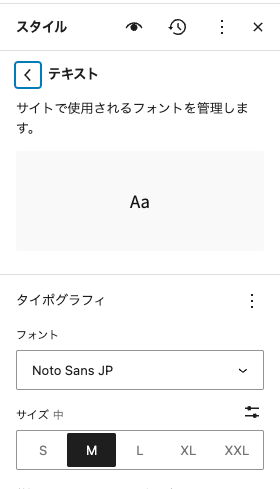
フォントファミリーをスタイルに適用していく
サイトエディター > スタイル
鉛筆アイコンから
Gナビ用のナビゲーションを作る
サブメニューいける

つまづき
複数のナビゲーションを作った時に(ヘッダー・フッターなど)、ブロックリストには1つのナビゲーションブロックしか表示されない

対処方法
コードエディターに切り替え、refの数字を直接変更する。アドレスバー参照

<!-- wp:navigation {"ref":4} /-->
直接「ナビゲーション」ブロックを挿入しても、ナビゲーションブロック設定ができない(謎)ので、
テンプレートパーツに変換する。ここでは「グローバルナビ」というテンプレート名にした。

「グローバルナビ」の「ナビゲーション」を選択した状態だと、設定項目が出てくる。(謎)

Google Fonts IconをWPで使う
上記と同じ要領でアイコンフォントを追加する(Material Icons 〜)

Outlined/Rounded/Sharp の種別があるので、よほどのことがない限り、ここの種別はまたがないはずなので、「Material Icons Outlined」とかで選択したらいい。
cssで擬似要素にアイコンフォントを設定する
アイコンを選択したら右に出てくるパネルの一番下の「Code print」をコピペ

contentに指定。「\」を先頭につけないと出てこないので注意。
&:after {
        content: '\f1e1';
        font-family: var(--wp--preset--font-family--material-icons-outlined);
      }
カスタムブロックを更新したらリロードで反映されるわけではない。
多分再度挿入する必要があるのかな。
ブロック更新後、エディターをリロードしたら「ブロックのリカバリーを実行」と出るボタンを押したら反映される
theme.jsonにはカスタムブロックのスタイルも設定できる
	"styles": {
		"blocks": {
			"cb/site-footer": {
				"color": {
					"text": "var(--wp--preset--color--white)"
				},
				"elements": {
					"link": {
						"color": {
							"text": "var(--wp--preset--color--white)"
						}
					}
				}
			}
		},
	},
カスタム投稿タイプを登録したら、「テンプレートを追加」の選択肢の中に「アーカイブ:カスタム投稿名」という項目が増えてる。
カスタム投稿アーカイブページを作る
アーカイブページはサイトエディター > テンプレートでしか編集できない。
そのため、担当者が中身を編集したい場合に導線がややこしい&管理者権限以外メニューに入れないので、
内容自体は固定ページへ置くことにする。
固定ページを読み込むショートコードを作成しておく。
アーカイブページへショートコードブロックを設置
[show_page_content id="記事のID"]
function show_page_content_shortcode($atts) {
  $atts = shortcode_atts(array('id' => ''), $atts, 'show_page_content');
  $page_content = get_post_field('post_content', $atts['id']);
  return apply_filters('the_content', $page_content);
}
add_shortcode('show_page_content', 'show_page_content_shortcode');
カスタム投稿タイプに「抜粋欄」をつける
function add_excerpt_to_pages() {
  add_post_type_support('project', 'excerpt');
}
add_action('init', 'add_excerpt_to_pages');
ディスクリプションは固定ページの方に書いても無駄なので注意。
自分はYoast SEOを使っているのでそっちに書く
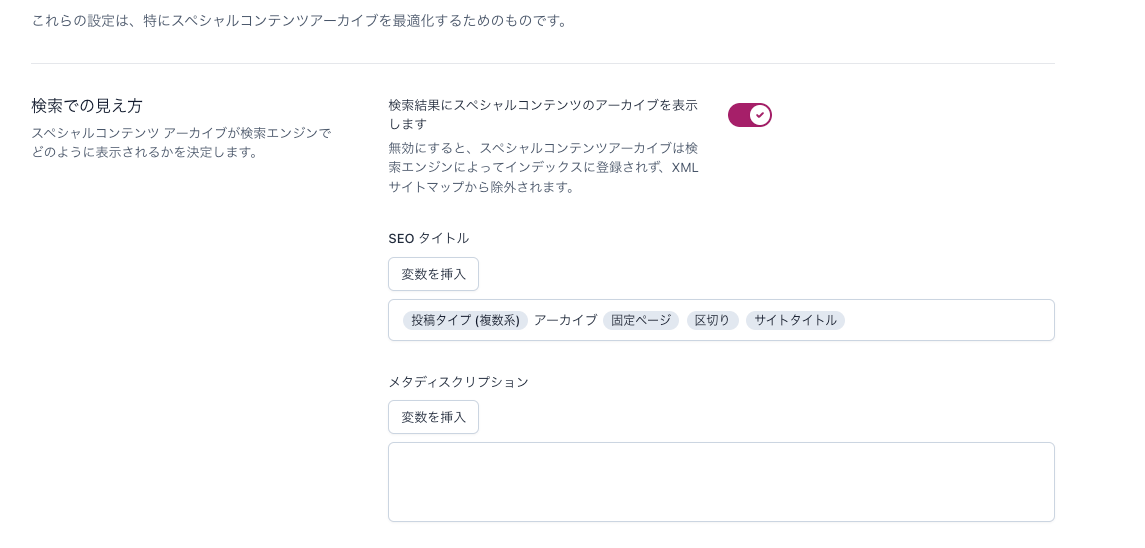
titleの「アーカイブ」っていうカタカナが不要なので取っとく。
「アーカイブタイトル」というブロックがある。
「タイトルにアーカイブタイプを表示」という設定項目があり、
デフォルトは「タイトルにアーカイブタイトル:カスタム投稿名」を
「カスタム投稿名」だけにすることができる
投稿タイトルにリンクを付ける
「投稿タイトル」ブロックを選択すると、そのブロックの設定で「リンクを投稿にする」オプションがあります。これを有効にすると、タイトルが自動的にその投稿のページへのリンクになります。
アイキャッチも同じ
ブロックエディターのクエリーループ内では各記事IDが取得できないらしいので、カスタムフィールドを表示させることができない。(表示側では出力できるから、エディター側はダミーテキストでいくしかない。)
wp-scripts format
間違って作業の途中で↑実行してもたら、フォーマットされて個人的にはなんかムズムズする整形ルールだったけど、しょうがない。
templateにカスタムブロックを仕込む場合、{}を省略すると表示されなくなる
export default function Edit() {
	const blockProps = useBlockProps( {} );
	// テンプレートの定義
	const TEMPLATE = [
		[ 'cb/mark-arrorw-forward', {} ], //丸アイコン/右矢印
		[
			'core/paragraph',
			{
				// 段落ブロック
				content: 'ここにテキストを入力してください',
				placeholder: 'ここにテキストを入力してください',
				className: 'wp-block-cb-next-page-link__label',
			},
		],
		[
			'core/image',
			{
				// 画像ブロック
				className: 'wp-block-cb-next-page-link__image',
			},
		],
	];
	return (
		<div { ...blockProps }>
			<InnerBlocks template={ TEMPLATE } templateLock={ false } />
		</div>
	);
}
<InnerBlocks template={ TEMPLATE } templateLock="all" />
templateLock="all" にしたらデフォルトで中身の全ブロックがロックされる。
管理画面上では解除も可能
Material Icons(Google Font Icons)のブロック
export default function Edit() {
	const blockProps = useBlockProps( {} );
	return (
		<div { ...blockProps }>
			<span className="material-symbols-outlined" aria-hidden="true">
				east
			</span>
		</div>
	);
}
クラス名とかじゃなく、span内のテキストによってアイコンが変わる。
使いようによっては、側だけcssで作って、中のアイコンは記事内で自由に変えることもできる。
カスタムブロックの行数が多かったら勝手に外部cssになるようだ。
<link rel='stylesheet' id='cb-page-title-style-css' href='http://localhost:10104/wp-content/plugins/my-custom-block/build/blocks/page-title/style-index.css?ver=0.1.0' media='all' />
ブロックに背景画像を設置できるtheme.json設定
"settings": {
		"background": {
			"backgroundImage": true
		},
略
}
PC/SP切り替えられない。
カラーパレット作る
"settings"の中。
"color": {
			"palette": [
				{
					"color": "#ffffff",
					"name": "Base",
					"slug": "base"
				},
				{
					"color": "#3E3E3E",
					"name": "Contrast",
					"slug": "contrast"
				},
				{
					"color": "#D0D3CC",
					"name": "Gray / primary",
					"slug": "gray-primary"
				},
				{
					"color": "#F4F5F1",
					"name": "Gray / secondary",
					"slug": "gray-secondary"
				},
				{
					"color": "#009333",
					"name": "Green / primary",
					"slug": "green-primary"
				},
				{
					"color": "#6FBA2C",
					"name": "Green / secondary",
					"slug": "green-secondary"
				},
				{
					"color": "#ABCD03",
					"name": "Green / tertiary",
					"slug": "green-tertiary"
				},
				{
					"color": "#FFE100",
					"name": "Yellow",
					"slug": "yellow"
				},
				{
					"color": "#F29A76",
					"name": "Pink",
					"slug": "pink"
				}
			],
			"duotone": [],
			"gradients": []
		},
.wp-env.jsonで、キャッシュ無効にする
"config": {
		"SCRIPT_DEBUG": true,
略
}
styles 直下にスタイルに関するプロパティ (border / color 等) を定義した場合は、サイト全体 (body タグ) にスタイルが適用される
特定のブロックにスタイルを適用する時は、styles.blocks.{blockName} プロパティに定義する
特定の要素にスタイルを適用する時は、styles.elements.{elementName} プロパティに定義する
フォントサイズのfluidのmin,maxの値はGPTで聞く
フォントサイズのslugで数字を含んでたら
:rootのcss変数名上では「2x-large」なのに「2-x-large」となり、ハイフンが間に入ってくる。
(--wp--preset--font-size--2-x-large)
{
					"fluid": {
						"max": "1.625rem",
						"min": "1.25rem"
					},
					"name": "2X Large",
					"size": "1.625rem",
					"slug": "2x-large"
				},
でも、エディターで見出しスタイル設定したら、var(--wp--preset--font-size--2x-large)となるのでフォントサイズが適用されない。(バグなの?仕様?)
h2 {
    font-size: var(--wp--preset--font-size--2x-large);
}
fontSizesは数字入れないようにしておこう
{
					"fluid": {
						"max": "1.375rem",
						"min": "1.125rem"
					},
					"name": "X Large",
					"size": "1.375rem",
					"slug": "xl"
				},
				{
					"fluid": {
						"max": "1.625rem",
						"min": "1.25rem"
					},
					"name": "2X Large",
					"size": "1.625rem",
					"slug": "xxl"
				},
				{
					"fluid": {
						"max": "2.25rem",
						"min": "1.5rem"
					},
					"name": "3X Large",
					"size": "2.25rem",
					"slug": "xxxl"
				},
				{
					"fluid": {
						"max": "3.0rem",
						"min": "1.875rem"
					},
					"name": "4X Large",
					"size": "3.0rem",
					"slug": "xxxxl"
				}
エディタでletter-spacingが設定できるようにする
"settings": {
		"typography": {
			"letterSpacing": true,
		}
	}
ブロックのスタイルをエディターで編集して「Create Block Theme > Save Changes」をクリックして保存したらtheme.jsonに勝手に反映してくれる。
font-feature-settings: 'palt';をtheme.jsonに設定するには
settingsの中
"typography": {
			"fontFamilies": [
				{
					"fontFace": [
						{
							"fontFamily": "Noto Sans JP",
							"fontStyle": "normal",
							"fontWeight": "400",
							"src": [
								"file:./assets/fonts/noto-sans-jp_normal_400.ttf"
							],
							"fontFeatureSettings": "palt"
						},
						{
							"fontFamily": "Noto Sans JP",
							"fontStyle": "normal",
							"fontWeight": "700",
							"src": [
								"file:./assets/fonts/noto-sans-jp_normal_700.ttf"
							],
							"fontFeatureSettings": "palt"
						}
					],
					"fontFamily": "Noto Sans JP",
					"slug": "noto-sans-jp"
				},
WP6.4から Fluid font size のビューポートの最小幅と最大幅が設定できるようになってる。
デザインカンバスのPCとSPのサイズを入れておこう。
settingsの中
"typography": {
"fontSizes": [
略
],
"fluid": {
"minViewportWidth": "390px",
"maxViewportWidth": "1440px"
}
}
reset用cssはtheme.jsonに書けばいいんだ
"styles": {
"css": "ここに1行で書く",
略
}
画像ブロックを全て角丸にするには
"core/image": {
"border": {
"radius": "値"
}
},
settings.spacing.blockGap
ブロック内のリンクホバーの設定
"styles": {
"blocks": {
"cb/site-footer": {
"color": {
"text": "var(--wp--preset--color--white)"
},
"elements": {
"link": {
"color": {
"text": "var(--wp--preset--color--white)"
},
":hover": {
"color": {
"text": "var(--wp--preset--color--green-tertiary)"
}
}
}
}
},
略
}
カスタムブロックに画像を直接仕込む
装飾用の画像になるのでエディターからは編集できないでokの画像
export default function save()
{
const blockProps = useBlockProps.save({});
const themeDirectoryUrl = wp.data.select('core').getSite().url + '/wp-content/themes/テーマ名';
return (
<div {...blockProps}>
<InnerBlocks.Content />
<div className="wp-block-cb-site-footer__deco-leaf1" data-anime="footer-leaf1" aria-hidden="true">
<img src={themeDirectoryUrl + "/assets/images/leaf_footer1.svg"} alt="" />
</div>
</div>
);
}
wp.data.select('core').getSite().urlだとエラーになるブロックもあったので下記のように変更
function my_custom_block_scripts() {
wp_enqueue_script(
'my-custom-block',
get_stylesheet_directory_uri() . '/blocks/my-custom-block.js',
array( 'wp-blocks', 'wp-element', 'wp-editor' ),
'1.0.0',
true
);
wp_localize_script(
'my-custom-block',
'themeDirectoryUrl',
array( 'url' => get_stylesheet_directory_uri() )
);
}
add_action( 'enqueue_block_editor_assets', 'my_custom_block_scripts' );
※親テーマのURLではなく、子テーマのURLを取得したい場合は、get_stylesheet_directory_uri()関数を使用する。
save.jsに下記のように読み込ませる
const imageUrl = themeDirectoryUrl.url + '/assets/images/';
VSCode(Cursor)でユーザースニペットを登録する方法
ローカル環境をスマホ実機で確認したかったので、ローカルIPで見れるようにする
デフォルトはhttp://localhost:xxxx/なので、途中から変更した場合は、
wp-env start --updateして、WPログイン後、パーマリンクを何もせず更新ボタンを押す。
ポート番号はなんでもいい
略
"port": 10104,
"env": {
"tests": {
"port": 10105
}
},
"config": {
"WP_HOME": "http://192.168.x.x:10104",
"WP_SITEURL": "http://192.168.x.x:10104",
"WP_DEBUG": true,
"SCRIPT_DEBUG": true
},
ローカルのIPの確認方法(mac)
システム設定 > ネットワーク
使用している回線を選択し、その中に「IPアドレス」という欄があるのでそれをコピペ。
svg画像を背景画像にする場合、引き延ばせるようにするには、
svgタグに下記を追加
preserveAspectRatio="none"
<svg xmlns="http://www.w3.org/2000/svg" width="1379" height="558" fill="none" preserveAspectRatio="none">
オプションで選択した項目によって分岐する
{/* 「XXX」のオプションが有効の場合 */}
{ blockProps.className.includes('is-style-xxx') && (
<div>ここに表示したい内容</div>
)}
非同期のパターン(もしくはカスタムブロック)に更新を加えたら、
埋め込んだページで「ブロックのリカバリーを試行」ボタンを押さないと反映されないのか
cssやjsは関係なし。DOMに手を加えたりしたら必要
ブロックにオプションをつけるときのインラインスタイルにメディアクエリを書く
register_block_style(
'core/post-template',
array(
'name' => 'alternating',
'label' => __('互い違い', 'twentytwentyfour'),
'inline_style' => '
@media not all and (max-width: 600px) {
.is-style-alternating li:nth-child(odd) {
margin-top: var(--wp--preset--spacing--40);
}
}',
)
);
ブロックにオプションを複数登録する
Google Iconを読み込むようにする例
$mark_styles = array(
array(
'name' => 'west',
'label' => __('左矢印', 'twentytwentyfour'),
'inline_style' => '
.is-style-west {
> span:after {
content: "\f1e6";
}
}',
),
// 他のスタイルを追加...
array(
'name' => 'hoge',
'label' => __('ほげほげ', 'twentytwentyfour'),
'inline_style' => '
.is-style-hoge {
> span:after {
content: "\xxxx";
}
}',
),
);
foreach ($mark_styles as $style) {
register_block_style('cb/mark-arrorw-forward', $style);
}
カスタムブロックに機能を追加する(属性を操作するUIを追加)
'core/separator'の「ドット」を削除する方法がわからん
ブロックバリエーション
ブロックスタイル
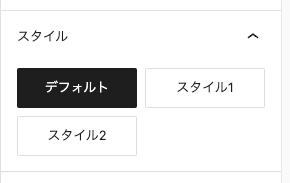
カスタムブロックのブロックスタイルはfunctions.phpじゃなくてblock.jsonに書けばいいのか
"styles": [
{
"name": "default",
"label": "デフォルト",
"isDefault": true
},
{
"name": "style1",
"label": "スタイル1"
},
{
"name": "style2",
"label": "スタイル2"
}
],
スタイルによって出し分けたいとき
return (
<div {...blockProps}>
{ /* 「xxx」のオプションが有効の場合 */}
{blockProps.className.includes('is-style-xxx') && (
<div class="">なにか書く</div>
)}
略
</div>
);
ボタンブロックのホバー時の背景色などはtheme.jsonだと設定できないっぽい
styles.elements.buttonの方かー
"button": {
"typography": {
"fontFamily": "var(--wp--preset--font-family--noto-sans-jp)"
},
"border": {
"style": "solid",
"width": "2px",
"color": "transparent"
},
":active": {
"color": {
"background": "var(--wp--preset--color--green-primary)",
"text": "var(--wp--preset--color--base)"
}
},
":focus": {
"color": {
"background": "var(--wp--preset--color--green-primary)",
"text": "var(--wp--preset--color--base)"
},
"outline": {
"color": "var(--wp--preset--color--green-primary)",
"offset": "0px",
"style": "solid",
"width": "0px"
},
"border": {
"color": "var(--wp--preset--color--green-primary)"
}
},
":hover": {
"color": {
"background": "var(--wp--preset--color--base)",
"text": "var(--wp--preset--color--green-primary)"
},
"border": {
"color": "var(--wp--preset--color--green-primary)"
}
}
},
やっぱり、PCのspacingのルールで設定しても、SPでデザインとズレるのが問題だなあ・・・
PCのspacingルールがSPでどうなるかのところもガイドラインで定めてもらう方がいいのかも。
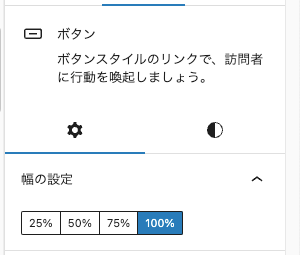
ボタンの幅を設定するには、「ボタンs(buttons)」 ブロックの中に「ボタン(button)」ブロックを入れないと効かない

投稿テンプレートブロックのgapを縦横で設定する
エディターだと値1つしか設定できない
"core/post-template": {
"spacing": {
"blockGap": "40px var(--wp--preset--spacing--40)"
}
},
theme.jsonのコアブロックの"css"に追加したい場合、
セレクタは「&」から。
"core/post-featured-image": {
"border": {
"radius": "var(--wp--preset--spacing--32)"
},
"elements": {
"link": {
"border": {
"radius": "var(--wp--preset--spacing--32)"
}
}
},
"css": "& > a { overflow:hidden; } & > a > img { transition: all .3s ease-in-out; } & > a:hover > img { transform: scale(1.1); }"
},
記事タイトルのリンクホバーに下線しない&ふわっとホバー
"core/post-title": {
"elements": {
"link": {
":hover": {
"typography": {
"textDecoration": "none"
}
}
}
},
"css": "& > a {transition: color var(--wp--custom--hover-transition);}"
},
GSAPのターゲットのセレクタはいつもはdata属性にしてたけど、デフォルトブロックだとそれを入れるためだけにカスタムするのは不毛だと思ったのでクラスにすることにした。
自作のjsをdeferでエンキューする
wp_enqueue_script(
'common-script',
get_stylesheet_directory_uri() . '/assets/scripts/common.js',
array(),
'1.0.0',
false //footerに差し込むかどうか
);
wp_script_add_data( 'common-script', 'strategy', 'defer' );
phpで波括弧を改行しないようにする
今更だけどやっぱり気になったから。
VSCodeの拡張機能PHP Intelephenseの自動整形で波括弧を改行しない
jsで波括弧を改行しないようにする
Cursor(VScode)の検索窓でsetting.jsonって検索したら出てくる。
{
略
"javascript.format.placeOpenBraceOnNewLineForFunctions": false,
}
ajax-load-moreというプラグインでページングの代わりにajaxでロードさせたら、lenisのマウスホイールスクロールが完全に下までいかない問題。どうしましょうか
Hostsアプリの場所
Hosts App 1.4.5
テスト環境にアップ
まず、WP-Optimize でゴミデータを綺麗にする。(DBの最適化、リビジョンの削除など)
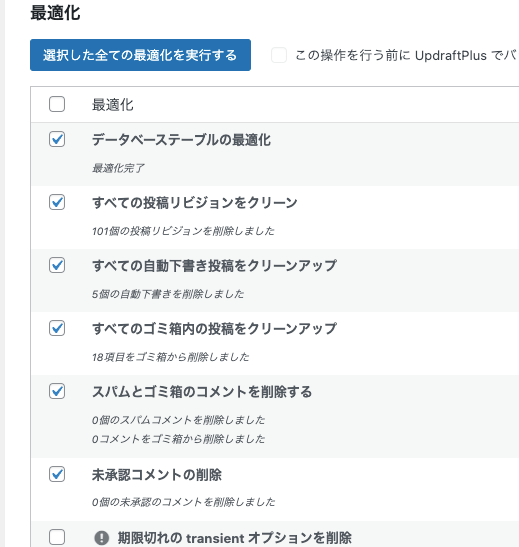
All-in-One WP Migrationでエクスポート
テスト環境にインポート
wp-envのデフォのadmin/passwordのアカウントのままインポートされてしまうので秒速で
本来の管理者アカウントを登録しなおす。
adminでログイン状態なのをログアウトして登録しなおしたの管理者アカウントでログインし直すと、adminが削除可能
一般設定の管理者メールアドレス の方も変更しておくこと
パーマリンク更新したら、.htaccessがないと言われたので、作ってFTPでアップ
パーミッションは604にした
いつも通り、テスト環境のWPのインストールディレクトリは別名にしておいてた。
wp-env上では特に何も気にせず作業していたのだが、インポートしたらディレクトリ構造はインストールディレクトリ別名のまま変わらずそのままいけた。
WordPress アドレス (URL)→https://サイトのURL/wpのdir/
サイトアドレス (URL)→https://サイトのURL/
wp-envのデフォのadmin/passwordのアカウントのままインポートされてしまうので秒速で
本来の管理者アカウントを登録しなおす。
次回インポートするときに面倒なので、
同じユーザーアカウントをローカルでも作っておく
カスタムブロック内で画像などを読み込んでいる場合(フルパスで読み込んでいるもの)、
ブロックのリカバリーをかけないとローカルのURLのままになっているので注意する。
Wordfenceをインストール
無料ライセンスで登録
Cursorでscssのcssプロパティの順序整列だけをstylelintで行う
拡張機能でstylelintをインストール。
package.jsonに追加(devDependencies)
"scripts": {
略
"fix:stylelint": "stylelint --fix '**/**/*.scss'"
},
略
"devDependencies": {
略
"stylelint": "^14.16.0",
"stylelint-order": "^5.0.0",
"postcss-scss": "^4.0.9",
}
順序はボックスモデル順にしている。ここは好みで。
{
"customSyntax": "postcss-scss",
"plugins": [
"stylelint-order"
],
"rules": {
"order/properties-order": [
"display",
"flex",
"flex-basis",
"flex-direction",
"flex-flow",
"flex-grow",
"flex-shrink",
"flex-wrap",
"justify-content",
"align-content",
"align-items",
"align-self",
"order",
"visibility",
"opacity",
"clip",
"clip-path",
"list-style",
"list-style-image",
"list-style-position",
"list-style-type",
"position",
"top",
"right",
"bottom",
"left",
"z-index",
"float",
"clear",
"transform",
"transform-origin",
"width",
"min-width",
"max-width",
"height",
"min-height",
"max-height",
"margin",
"margin-top",
"margin-right",
"margin-bottom",
"margin-left",
"padding",
"padding-top",
"padding-right",
"padding-bottom",
"padding-left",
"overflow",
"overflow-x",
"overflow-y",
"border",
"border-width",
"border-top-width",
"border-right-width",
"border-bottom-width",
"border-left-width",
"border-style",
"border-top-style",
"border-right-style",
"border-bottom-style",
"border-left-style",
"border-bottom",
"border-left",
"border-right",
"border-top",
"border-color",
"border-top-color",
"border-right-color",
"border-bottom-color",
"border-left-color",
"border-image",
"border-image-outset",
"border-image-repeat",
"border-image-slice",
"border-image-source",
"border-image-width",
"border-radius",
"border-top-left-radius",
"border-top-right-radius",
"border-bottom-right-radius",
"border-bottom-left-radius",
"box-sizing",
"box-shadow",
"background",
"background-attachment",
"background-clip",
"background-color",
"background-image",
"background-origin",
"background-position",
"background-position-x",
"background-position-y",
"background-repeat",
"background-size",
"color",
"font",
"font-family",
"font-size",
"font-size-adjust",
"font-stretch",
"font-style",
"font-variant",
"font-weight",
"line-height",
"letter-spacing",
"text-decoration",
"text-align",
"text-align-last",
"text-indent",
"text-transform",
"white-space",
"word-break",
"hyphens",
"word-spacing",
"word-wrap",
"text-shadow",
"text-emphasis",
"text-emphasis-color",
"text-emphasis-position",
"text-emphasis-style",
"text-justify",
"text-outline",
"text-overflow",
"text-overflow-ellipsis",
"text-overflow-mode",
"text-wrap",
"table-layout",
"border-collapse",
"border-spacing",
"empty-cells",
"caption-side",
"vertical-align",
"content",
"quotes",
"counter-increment",
"counter-reset",
"outline",
"outline-color",
"outline-offset",
"outline-style",
"outline-width",
"cursor",
"resize",
"transition",
"transition-delay",
"transition-duration",
"transition-property",
"transition-timing-function",
"animation",
"animation-delay",
"animation-direction",
"animation-duration",
"animation-iteration-count",
"animation-name",
"animation-play-state",
"animation-timing-function",
"box-decoration-break",
"nav-down",
"nav-index",
"nav-left",
"nav-right",
"nav-up",
"pointer-events",
"tab-size",
"user-select",
"zoom"
]
}
}
headerタグにクラスを追加
<header>タグに.js-scrollFix-topを追加したい(ヘッダー固定用)
function add_class_to_header_block($block_content, $block) {
if ($block['blockName'] === 'core/template-part' && $block['attrs']['slug'] === 'header') {
$block_content = preg_replace('/(<header\b[^>]*class="[^"]*)(")/', '$1 js-scrollFix-top$2', $block_content);
}
return $block_content;
}
add_filter('render_block', 'add_class_to_header_block', 10, 2);
stickyは親要素に当てないと動かないなので無理矢理感あるが。
テーマを管理画面から更新する
/wp/themes/theme-name/をFinderでzipにする
外観 > テーマ > 新しいテーマを追加 > テーマのアップロード からzipをアップ
目的のフォルダーはすでに存在しています。と出るので、
「アップロードしたもので現在のものを置き換える」
ボタンを押す。
プラグインをzipにするコマンドのバグ?
プラグインルートのディレクトリが含まれない・・
プラグインを管理画面から更新する
/wp/plugins/my-custom-block/をFinderでzipにする
プラグイン > 新規プラグインを追加 > プラグインをアップロード からzipをアップ
目的のフォルダーはすでに存在しています。と出るので、
「アップロードしたもので現在のものを置き換える」
ボタンを押す。
wp-scripts plugin-zipは使わない
先にプラグイン更新して、テーマ更新がよかったか。
カスタムブロックが壊れてた。
そうじゃなくて、ブロックパターンのrefの値がズレるからっぽい
<!-- wp:block {"ref":840} /-->
どしたらいいの
ブロックのリカバリーボタンがなぜか、押せないとき
画像をカスタムブロックに直接入れている場合、サーバの方のテーマを更新したらブロックのリカバリーしないと画像のURLがローカルのままになる。
→一旦グループ化して、解除する
フロントにしか必要ない要素(装飾画像とか)をsave.jsにだけ記述してたら、記事画面のコンソールにエラーが出るんだが解消方法がわからない。

save関数によって生成されたコンテンツと、投稿本文から取得されたコンテンツが異なることが原因である可能性があります。
らしい。
コンテンツ幅のバリエーションが複数ある場合、エディター側の「コンテント幅を使用するインナーブロック」のmax-widthを投稿タイプごとに分けたい。
デフォルトはtheme.jsonの
settings.layout.contentSizeの値になる。
bodyのpost-type-{投稿タイプ}を使う。
editor-style.cssだとbodyはすべて.editor-styles-wrapperに変換されてしまうので、別のcssを読み込ませる必要あり。
これはエディタ側で手入力で都度いれることにした。
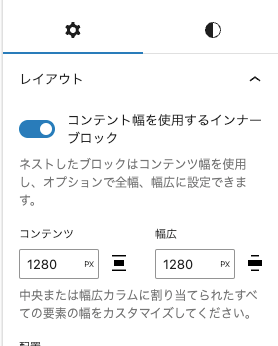
エディタ側でコンテント幅の最大値をカスタムしたい
editor-style.cssだとbodyはすべて.editor-styles-wrapperに変換されてしまうので、別のcssを読み込ませる必要あり。
テーマフォルダにeditor-max-width.css(ファイル名は任意)を作成し、エディタに読み込ませる。
//エディターのmax-widthを投稿タイプによって切り分けるためのcss
function my_theme_editor_width_styles() {
wp_register_style('custom-max-width', get_stylesheet_directory_uri() . '/editor-max-width.css', array(), time(), 'all');
wp_enqueue_style('custom-max-width');
}
add_action('enqueue_block_editor_assets', 'my_theme_editor_width_styles');
/*エディターの横幅を広げる*/
:root:root body.post-type-page .block-editor-block-list__layout > :where(:not(.alignleft):not(.alignright):not(.alignfull)) {
max-width: var(--wp--style--global--wide-size);
}
:root:rootは優先度を上げるために入れている。
body.post-type-pageを入れることで、固定ページのみを対象にしている。
カスタム投稿タイプで多階層にする
array(
'post_type' => 'child',
'rewrite' => array('slug' => 'parent/child'),// カスタム投稿タイプのパーマリンク設定
略
),
カスタム投稿タイプでカテゴリー/タグ(カスタムタクソノミー)の欄が表示されないとき
register_taxonomy(
略
array(
'show_in_rest' => true,
)
);
'show_in_rest' => true,
を入れる。
レスポンシブ画像を登録できるプラグイン
同期パターンにカスタムフィールドを取得するショートコード入れても無効になる(ショートコードが単なる文字列として出力される)
「テンプレートパーツ」はサイトエディターのテンプレートを作成するときにしか使えない。
通常の記事や固定ページ作成時のブロックリストには出てこない。
/theme-name/parts/の中に.htmlとして保存される。
「コンテント幅を使用するインナーブロック」が有効の直下(子要素)に
「コンテント幅を使用するインナーブロック」を有効にしたらネガティブマージンで左右のパディングが相殺される。
.has-global-padding {
padding-right: var(--wp--style--root--padding-right);
padding-left: var(--wp--style--root--padding-left);
}
.has-global-padding > .alignfull {
margin-right: calc(var(--wp--style--root--padding-right) * -1);
margin-left: calc(var(--wp--style--root--padding-left) * -1);
}
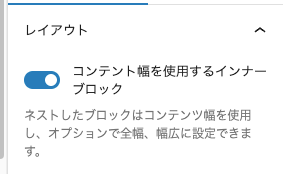
ネストしたブロックはこのコンテナ幅を埋めます。トグルで強制。
というキャプションがそういう意味
カスタムブロック命名規則を統一したいな
カスタムブロックのcss(scss)内にbackground-imageを設定するには・・?パスは?
カスタムブロックのディレクトリ内に置いて、相対パスで読み込みで良かった。
小さい画像はbase64に変換されて読み込まれる。
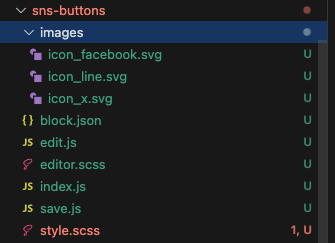
テーマフォルダから読み込むのは無理そう。
カスタムブロックにimgタグとして画像を挿入したい場合は、
import { useBlockProps, InnerBlocks } from '@wordpress/block-editor';
import myImg from './images/hogehoge.svg'; <-画像
export default function save() {
const blockProps = useBlockProps.save({
className: '', // 追加したいクラス名
});
return (
<div {...blockProps}>
<InnerBlocks.Content />
略
<img src={myImg} alt="" />
</div>
);
}
個別記事に埋め込むSNSシェアボタンを作る
function social_share_buttons_shortcode() {
global $post;
$url = get_permalink($post->ID);
$url_encoded = urlencode($url);
$title = get_the_title($post->ID);
$title_encoded = urlencode($title);
$output = '<ul>';
$output .= '<li><a href="javascript:void(0);" onclick="window.open(\'https://www.facebook.com/sharer/sharer.php?u=' . $url_encoded . '\', \'newwindow\', \'width=600, height=450\');" class="icon-share-fb">Facebook</a></li>';
$output .= '<li><a href="javascript:void(0);" onclick="window.open(\'https://twitter.com/intent/tweet?url=' . $url_encoded . '&text=' . $title_encoded . '\', \'newwindow\', \'width=600, height=450\');" class="icon-share-tw">Twitter</a></li>';
$output .= '<li><a href="javascript:void(0);" onclick="window.open(\'https://social-plugins.line.me/lineit/share?url=' . $url_encoded . '\', \'newwindow\', \'width=600, height=450\');" class="icon-share-line">LINE</a></li>';
$output .= '</ul>';
return $output;
}
add_shortcode('social_share_buttons', 'social_share_buttons_shortcode');
ショートコードブロックへ
[social_share_buttons]
カスタムブロックのstyle.scss(フロント側のcss)はエディタ側で共通で反映されるんだけど、エディタのデフォルトのcssが優先されるので、editor.scssにセレクタの詳細度を上げた状態で記述する。
ということをやってたんだけど、面倒なので、@importしちゃう
//:root:root body:not(__) はCSSの優先度を上げるため
:root:root body:not(__) {
@import 'style';
}
アイコンフォント(Google Fonts)を挿入するカスタムブロック
import {
useBlockProps,
InnerBlocks,
InspectorControls,
} from '@wordpress/block-editor';
import { PanelBody, TextControl } from '@wordpress/components';
import { Fragment } from '@wordpress/element';
import './editor.scss';
export default function Edit( { attributes, setAttributes } ) {
const blockProps = useBlockProps();
const { iconName } = attributes;
return (
<Fragment>
<InspectorControls>
<PanelBody title="Icon Settings">
<TextControl
label="Icon Name"
value={ iconName }
help="アイコンの名前を入力してください。https://fonts.google.com/icons"
onChange={ ( newIconName ) =>
setAttributes( { iconName: newIconName } )
}
/>
</PanelBody>
</InspectorControls>
<div { ...blockProps }>
<span className="material-symbols-outlined" aria-hidden="true">
{ attributes.iconName }
</span>
</div>
</Fragment>
);
}
export default function save( { attributes } ) {
const blockProps = useBlockProps.save( {
className: '', // 追加したいクラス名
} );
return (
<div { ...blockProps }>
<span className="material-symbols-outlined" aria-hidden="true">
{ attributes.iconName }
</span>
</div>
);
}
略
"attributes": {
"iconName": { <- edit.jsの「attributes」と同じ値を入れる
"type": "string",
"default": ""
}
},
略
やっぱり、clampでマージンサイズを流動的に設定していても、PCとSPのデザイン上でそれに当てはまらないところは多数出てくる。
例えば、PCデザインでパディングが48pxだったから、
padding: var(--wp--preset--spacing--48);
としていたとしても、
SPのデザインではパディングが少なくなっていて、
padding: var(--wp--preset--spacing--32);
とせざるを得ない。
って、cssだったらメディアクエリでできるけどブロックエディター上だと1つの値しか設定できないので、
いろんな箇所をPCデザインの調子で設定していってるとSP調整時に詰む。
数値の変化のパターンをデザイナーさんに全部出してもらうというのも非現実的な気もするし・・
とりあえず今の所はカスタムブロック内でメディアクエリで切り替えるようにする。
折り返しありのflexで横並びにしたタグリストで右端に余計な隙間が出る問題
Custom Taxonomy Orderで任意の順番で並び替えてもらうことにした。
カスタムブロックを作る時、未完成のまま記事に入れて量産したらダメ。
「ブロックのリカバリー」ボタンをクリックしないとコードが記事に反映されないので全記事開いてリカバリーボタンを押していく羽目になる。
(これもっといい方法ないのかな)
インラインstyleで背景画像を直接入れてたらmigrationでインポートした時ローカルのURLのままになる。注意
メディアでアップする画像をwebpにするプラグイン。シンプル。
(既にアップ済みのものはそのまま)
カスタムブロックからlenisのスクロール領域を更新する
カスタムブロックのview.jsからテーマ共通jsで使っているlenisを呼び出してスクロール領域を更新させたかった。
タブ切り替えやajaxの記事ロードでコンテンツの長さが変わった時に、lenisを使っていると、初期のコンテンツの縦の長さより先にスクロールが進めない現象があるので。
※lenisは慣性スクロールのjsライブラリです。
import Lenis from '@studio-freight/lenis';
const lenis = new Lenis({
lerp: 0.25, // スクロールのスムーズさを設定
duration: 1, // スクロールのアニメーション時間
easing: easeOutQuint, // イージング関数
orientation: 'vertical',
gestureOrientation: 'vertical',
smoothWheel: true, //マウスホイールイベントのスムーズスクロールを有効にするかどうか
smoothTouch: false, // タッチイベントでも慣性スクロールを有効にするかどうか
touchMultiplier: 1, // タッチイベントのスクロール速度の係数
});
// グローバル変数として設定(スクロール可能領域を更新するため)
// カスタムブロックのview.jsから呼び出し可能
window.wpGlobalLenis = lenis;
/**
* イージング関数
* @see https://easings.net/ja
* @param {number} x アニメーションの進行度(正規化された0から1までの値)
* @return {number} イージングを適用した後の進行度(正規化された0から1までの値)
*/
const easeOutQuint = (x) => {
return 1 - Math.pow(1 - x, 5);
};
function raf(time) {
lenis.raf(time);
requestAnimationFrame(raf);
}
requestAnimationFrame(raf);
lenisを更新したいタイミングにこれを挿入
略
if (window.wpGlobalLenis) {
//Lenisのスクロール可能領域を更新
window.wpGlobalLenis.resize();
}
カスタムブロック内でsave/edit共通のパーツをコンポーネントに分けて、その中でReact的な書き方で
例えば
<div style={{ zIndex: 0 }}>
</div>
のようなインラインスタイルを書くとエディタ側のコンソールでエラーを吐くので避ける
カスタマイザーでアップする場合のファビコン、apple-touch-iconのリンクを別々にする
ファビコンはカスタマイザーからアップしたものを使用
apple-touch-iconはテーマフォルダに保管しているものを使用
透過の関係で別がよかったため。
function my_custom_site_icon_meta_tags($meta_tags) {
// カスタマイザーで設定されたファビコンのURLを取得
$custom_favicon_url = get_site_icon_url();
// カスタマイザーで設定されたファビコンを使用
$meta_tags[0] = "<link rel='icon' href='" . esc_url($custom_favicon_url) . "' sizes='32x32'>";
$meta_tags[1] = "<link rel='icon' href='" . esc_url($custom_favicon_url) . "' sizes='192x192'>";
// Apple Touch Iconだけをテーマフォルダ内の画像に指定
$meta_tags[2] = "<link rel='apple-touch-icon' href='" . get_stylesheet_directory_uri() . "/assets/images/apple-touch-icon.png'>";
// カスタマイザーで設定されたファビコンを使用
$meta_tags[3] = "<meta name='msapplication-TileImage' content='" . esc_url($custom_favicon_url) . "'>";
return $meta_tags;
}
add_filter('site_icon_meta_tags', 'my_custom_site_icon_meta_tags');
段落ブロックでタグ(<wbr>)を入れたい
ブロックを選択し、
三点アイコン > HTMLとして編集
でタグが編集できる。
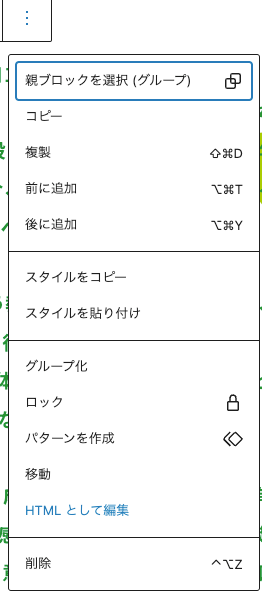
<wbr>は
word-break: keep-all;
の指定がある要素でないと効かないので注意。
用途としては、PCとは違う改行位置で、SPで意図的な改行をしたいときに使う。
段落ブロックの中で<wbr>を使い、ビジュアル編集モード中に文章を編集して、再度HTML編集モードにしたら、<wbr>が消える現象が起こった。
そうなると使いにくい、、というか実質使えないのか、、、
inline-blockのspanで囲むか、<br class="display-none-sp">や<br class="display-none-pc">で切り替えるしかないか・・・(spanは消えない)
display-none-pc、display-none-spのクラスはtheme.jsonのcssに自分で記述していることが前提。
<br class="display-none-sp">や<br class="display-none-pc">で切り替えるしかないか
だめだ。<br>に入れているクラスもビジュアルモード中に文字編集したら消えてしまう。
連続する<span>は勝手に省略されてまとめられてしまう現象。
なんだこれは・・・
こうやったらいけた。
<span class="display-none-pc" aria-hidden="true"><br></span>
theme.jsonに書く共通cssメモ
lenis入れない場合は「.lenis〜」のクラスは不要
"css": "*, *::before, *::after { margin: 0; padding: 0; box-sizing: border-box; } :where([hidden]:not([hidden='until-found'])) { display: none !important; } :where(html) { -webkit-text-size-adjust: none; } @supports not (min-block-size: 100dvb) { :where(html) { block-size: 100%; } } @media (prefers-reduced-motion: no-preference) { :where(html:focus-within) { } } :where(body) { block-size: 100%; block-size: 100dvb; line-height: 1.5; font-family: system-ui, sans-serif; -webkit-font-smoothing: antialiased; } :where(input, button, textarea, select) { font: inherit; color: inherit; } :where(textarea) { resize: vertical; resize: block; } :where(a, button, label, select, summary, [role='button'], [role='option']) { cursor: pointer; } :where(:disabled) { cursor: not-allowed; } :where(label:has(> input:disabled), label:has(+ input:disabled)) { cursor: not-allowed; } :where(button) { border-style: solid; } :where(a) { text-underline-offset: 0.2ex; } :where(img, svg, video, canvas, audio, iframe, embed, object) { display: block; } :where(img, picture, svg) { max-inline-size: 100%; block-size: auto; } :where(img){ width: 100%;} :where(p, h1, h2, h3, h4, h5, h6) { overflow-wrap: break-word; } :where(h1, h2, h3) { line-height: calc(1em + 0.5rem); } :where(hr) { border: none; border-block-start: 1px solid; color: inherit; block-size: 0; overflow: visible; } :where(:focus-visible) { outline: 2px solid var(--focus-color, Highlight); outline-offset: 2px; } :where(.visually-hidden:not(:focus, :active, :focus-within, .not-visually-hidden)) { clip-path: inset(50%) !important; height: 1px !important; width: 1px !important; overflow: hidden !important; position: absolute !important; white-space: nowrap !important; border: 0 !important; } :where(p, h1, h2, h3, h4, h5, h6, li, dt, dd, figcaption, a, button, input, textarea) { font-feature-settings: 'palt'; } .wp-site-blocks { display: flex; flex-direction: column; justify-content: space-between; min-height: 100vh; /*overflow:hidden;*/} .wp-site-blocks > main { flex: 1; overflow: hidden; } :where(footer) {overflow:hidden;} html.lenis { height: auto; } .lenis.lenis-smooth { scroll-behavior: auto !important; } .lenis.lenis-smooth [data-lenis-prevent] { overscroll-behavior: contain; } .lenis.lenis-stopped { overflow: hidden; } .lenis.lenis-scrolling iframe { pointer-events: none; } @media screen and (min-width: 768px) { .display-none-pc { display: none !important;}} @media not all and (min-width: 768px) { .display-none-sp { display: none !important;}}",
整形したバージョン
*,
*::before,
*::after {
margin: 0;
padding: 0;
box-sizing: border-box;
}
:where([hidden]:not([hidden='until-found'])) {
display: none !important;
}
:where(html) {
-webkit-text-size-adjust: none;
}
@supports not (min-block-size: 100dvb) {
:where(html) {
block-size: 100%;
}
}
@media (prefers-reduced-motion: no-preference) {
:where(html:focus-within) {}
}
:where(body) {
block-size: 100%;
block-size: 100dvb;
line-height: 1.5;
font-family: system-ui, sans-serif;
-webkit-font-smoothing: antialiased;
}
:where(input, button, textarea, select) {
font: inherit;
color: inherit;
}
:where(textarea) {
resize: vertical;
resize: block;
}
:where(a, button, label, select, summary, [role='button'], [role='option']) {
cursor: pointer;
}
:where(:disabled) {
cursor: not-allowed;
}
:where(label:has(> input:disabled), label:has(+ input:disabled)) {
cursor: not-allowed;
}
:where(button) {
border-style: solid;
}
:where(a) {
text-underline-offset: 0.2ex;
}
:where(img, svg, video, canvas, audio, iframe, embed, object) {
display: block;
}
:where(img, picture, svg) {
max-inline-size: 100%;
block-size: auto;
}
:where(img) {
width: 100%;
}
:where(p, h1, h2, h3, h4, h5, h6) {
overflow-wrap: break-word;
}
:where(h1, h2, h3) {
line-height: calc(1em + 0.5rem);
}
:where(hr) {
border: none;
border-block-start: 1px solid;
color: inherit;
block-size: 0;
overflow: visible;
}
:where(:focus-visible) {
outline: 2px solid var(--focus-color, Highlight);
outline-offset: 2px;
}
:where(.visually-hidden:not(:focus, :active, :focus-within, .not-visually-hidden)) {
clip-path: inset(50%) !important;
height: 1px !important;
width: 1px !important;
overflow: hidden !important;
position: absolute !important;
white-space: nowrap !important;
border: 0 !important;
}
:where(p, h1, h2, h3, h4, h5, h6, li, dt, dd, figcaption, a, button, input, textarea) {
  font-feature-settings: 'palt';
}
.wp-site-blocks {
display: flex;
flex-direction: column;
justify-content: space-between;
min-height: 100vh;
/*overflow:hidden;*/
}
.wp-site-blocks>main {
flex: 1;
overflow: hidden;
}
:where(footer) {
overflow: hidden;
}
html.lenis {
height: auto;
}
.lenis.lenis-smooth {
scroll-behavior: auto !important;
}
.lenis.lenis-smooth [data-lenis-prevent] {
overscroll-behavior: contain;
}
.lenis.lenis-stopped {
overflow: hidden;
}
.lenis.lenis-scrolling iframe {
pointer-events: none;
}
@media screen and (min-width: 768px) {
.display-none-pc {
display: none !important;
}
}
@media not all and (min-width: 768px) {
.display-none-sp {
display: none !important;
}
}
.wp-site-blocks > mainは .l-mainに修正した。
テキストデザインが
PCは左寄せで、SPは中央寄せ
ってデフォルトブロックじゃどうしようもできないよね??
カスタムブロックのカスタムスタイル(.is-style-hogehoge)は、ブロック挿入時にはクラスがつかないのでデフォルト(一番初めの選択肢)にスタイルを適用させたかったら、一旦別のスタイルを選択してデフォルトのを選び直さないとダメ。
デフォルトはプレーンなやつをダミーでも置いておかないと分かりにくいかも。?
画像ブロックの右寄せ・左寄せはfloatだった。

例えば、ボタンブロックに設定したカスタムスタイルを、そのボタンブロックがあるときにだけinline cssで吐き出させることできないのかな。
1つでもボタンブロックがあったら全部の.is-styleのセレクタがheadタグに出てきて邪魔だ
Block Visibility — ブロックエディターの条件付き表示コントロール
PC/SPでブロックの表示、非表示を切り替えるために使おうと思っていたけど、
URL文字列クエリーやCookieも判別して表示、非表示できるので、ローディング用のブロックもここで設定すればいいなぁ。(ヘッダーロゴからの遷移はローディング出さない、初訪問からx時間以内は2回目のローディング出さないとか)
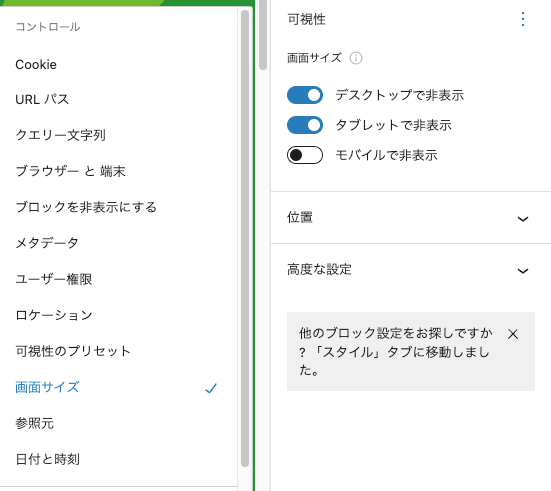
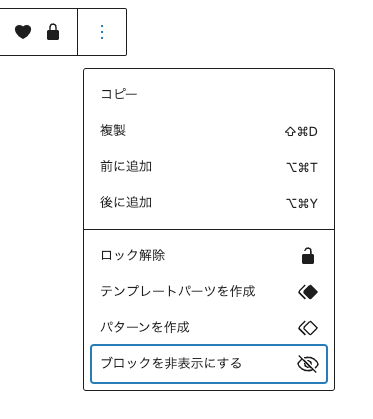
ブロックごとに非表示にするのにも便利だった(表示テスト的にとか、一時的に消しとこ、とか)
display:noneになるのではなく、DOMから消える。
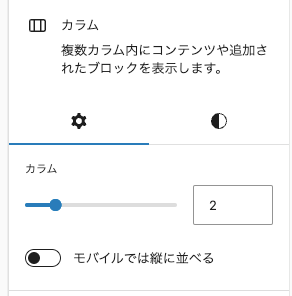
カラムブロックのモバイルでは縦に並べる、のブレイクポイントは変えれないのか?
imgタグにanimationしたらiOSのSafariでブツブツ切れる現象あるので、divで囲み、それにcss当てる。
あと、なんか↑に直しても、borderがないと表示自体がされないことがあった。
透明ボーダーいれとく。
border: solid 1px transparent;
カスタムブロックの中身は基本的にオリジナルブロックで構成しているので、cssのセレクタを既存のクラスにしてしまうと仮にアップデートでクラス名が変わってしまった時に恐怖ですね、というお気持ち。
こうするのではなく、
.wp-block-cb-hogehoge .wp-block-image {...}
部分一致な書き方にしておいたほうがいいのかもしれない。
.wp-block-cb-hogehoge [class*="-image"]
(-image が -img になってしまったときはもうどうしようもないが)
.wp-block-cb-hogehogeはカスタムブロックのクラス名(自分ルールでcbとつけることにしている)
.wp-block-imageは画像ブロックにデフォルトでついているクラス名
同じ理由で、>や+とかの子、隣接セレクタもなるべく使わないほうがいいのかも。
いつDOMが破壊的に変わるかもわからんから。
ちょっと面倒でもcssで直接スタイルをつける場合は、「追加 CSS クラス」のほうに明示的にクラス名を与えてあげたほうがいい。
というわけで自分のscssを見直してくる。
カスタムブロックもスコープがきいたらな
wp-envで開発中に急に画像アップロードでエラーが起こったらパーマリンクの更新ボタン押せば治る
段落ブロックで<wbr>タグを使うには
前提として、<wbr>タグを使う場合、その親要素にword-break: keep-all;がないと効かない。
3点メニューから「HTMLとして編集」を選択。
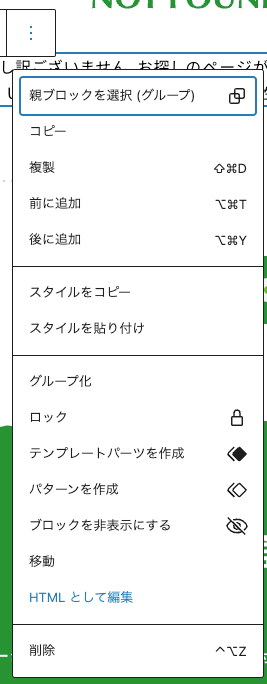
<p>タグ自体に、word-break: keep-all;のスタイルを追加すると、
「このブロックには、想定されていないか無効なコンテンツが含まれています。」と出るので、
中のテキストを<span style="word-break: keep-all;">で囲う。
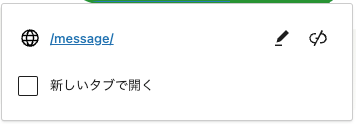
リンク先について
リンクアイコン(鎖マーク)からリンクを貼る場合、ページ名やスラッグから選択したら自動的にフルパスで挿入してくれるけれども、それをローカルから本番に移した際に、WPのインストールディレクトリを1階層落としてたりすると、そこのURLを参照してしまう。
つまり、WordPress アドレス (URL) の方のURLで書き換えられてしまうのだなあ。
自分で「/」から書けば大丈夫なんだが・・モヤるね

後追いでにblock.jsonでカスタムスタイルを選択できるようにした場合、デフォルトになるブロックについても一旦スタイルをスイッチングしてやらないと.is-style-defaultのクラスもついてないままになるので注意。
"styles": [
		{
			"name": "default",
			"label": "デフォルト",
			"isDefault": true
		},
		{
			"name": "hoge1",
			"label": "カスタムスタイル1"
		}
	],
カスタムフィールドの値の一致での条件分岐ができる。
これは便利そう
ブロックパターンのカテゴリーを新規作成時以外でつける場合は、パターンを開いて、右側のメニューから
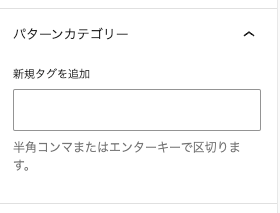
新規記事を作るときのパターン(雛形)を選択できるようにする
新規作成ボタンを押した後、自動的に選択モーダルが開く。
mytheme > patterns > create-xxx.php にphpを作成。
自分の場合、create-xxx(投稿タイプ).phpという命名にしている。
カスタム投稿タイプごとに設定可能
<?php

/**
 * Title: 〇〇ページ雛形
 * Slug: mytheme/create-xxx
 * Categories: mypagebase <-任意
 * Block types: core/post-content
 * Post Types: xxx <-「投稿」だったら「post」
 */
?>
ここにブロックのhtmlを入れる
実際のブロックエディタで組んだ後、コードエディターからコードをコピペする。
注意点
ダミー画像としておきたい画像はテーマ内のassets/imagesに保存しておき、そこから呼び出す。
<img src="<?php echo esc_url(get_theme_file_uri('assets/images/840x560.png')); ?>" alt="" class="wp-image-639" />
パターンファイルのInserter: noの意味は「ブロックエディターのインサーターに表示されない」。
/**
 * Title: Sidebar
 * Slug: twentytwentyfour/hidden-sidebar
 * Inserter: no
 */
親テーマ(twentytwentyfourの場合)の既存ブロックパターンの削除
/** ========================
 * 親テーマの既存ブロックパターンの削除
 * ========================== */
function mytheme_parent_block_remove() {
  if (class_exists('WP_Block_Patterns_Registry')) {
    $registry = WP_Block_Patterns_Registry::get_instance();
    $registered_patterns = $registry->get_all_registered();
    foreach ($registered_patterns as $pattern) {
      if (strpos($pattern['name'], 'twentytwentyfour/') === 0) {
        unregister_block_pattern($pattern['name']);
      }
    }
  }
};
add_action('init', 'mytheme_parent_block_remove');
テンプレートのラベルを日本語に変える
theme.jsonの"customTemplates"の項目を編集
既存のブロックスタイルを削除したい
見出しブロックの「asterisk(With Asterisk)」しか削除できなかった。
区切りブロックとかを入れたらエラーが出た
/** ========================
 * デフォルトのカスタムスタイルを削除
 * ========================== */
function mytheme_remove_block_styles() {
  // 削除するブロックスタイルのリスト
  $block_styles_to_remove = [
    'core/heading' => ['asterisk'],
    //'core/separator' => ['wide', 'dots'],
    // 他のブロックとスタイルを追加する場合はここに追記
    // 'ブロック名' => ['スタイル名1', 'スタイル名2'],
  ];

  foreach ($block_styles_to_remove as $block_name => $styles) {
    foreach ($styles as $style_name) {
      unregister_block_style($block_name, $style_name);
    }
  }
}
add_action('init', 'mytheme_remove_block_styles', 20);
All-in-One WP Migrationからの乗り換えプラグイン
- ローカル→本番に環境移行でデータ上限なし(勝手に分割してくれる)
- 自動バックアップ(データの保管場所にGドラが連携できる)
「WPVivid」