Google Documentで起動時にサイドバーを開いて、そこからGASを実行する
Google Documentでスクリプトを実行したいとき、スプレッドシートのようにボタン画像にスクリプトを割り当てることができません。しかし、サイドバーを活用することで、ユーザーフレンドリーなスクリプト実行環境を構築できます。
ただ、少し苦戦したので記録を残しておきます。
背景・課題
Google Documentで以下のような課題に直面していました:
- ファーストビューでのスクリプト実行: ドキュメントを開いたときに、すぐに使えるスクリプト実行ボタンが欲しい
- Google Spreadsheetとの違い: スプレッドシートでは画像にスクリプトを割り当てられるが、Documentでは制約がある
- ユーザビリティ: 拡張機能メニューを毎回開くのは手間
これらの課題を解決するため、HTMLサイドバーを使ったアプローチを採用しました。

実装方法
1. GASコード(Code.gs)
コード
/**
 * サイドバーを表示します。
 */
function showSidebar() {
  var html = HtmlService.createHtmlOutputFromFile('sidebar')
    .setTitle('高機能サイドバー');
  DocumentApp.getUi().showSidebar(html);
}

/**
 * サイドバーからテキストを受け取り、ドキュメントに挿入します。
 * @param {string} text 挿入するテキスト。
 * @return {string} HTML側に返す成功メッセージ。
 */
function insertTextToServer(text) {
  try {
    // 入力値が空でないかチェック
    if (!text || text.trim() === '') {
      throw new Error('挿入するテキストが空です。');
    }

    // ドキュメントの末尾に入力されたテキストを段落として追加
    DocumentApp.getActiveDocument().getBody().appendParagraph(text);

    // 成功メッセージをHTML側に返す
    return '「' + text + '」をドキュメントに挿入しました。';

  } catch (e) {
    // エラーが発生した場合、その内容をHTML側に投げる
    Logger.log('エラーが発生しました: ' + e.message);
    throw new Error('サーバー側でエラーが発生しました: ' + e.message);
  }
}
2. HTMLファイル(sidebar.html)
コード
<!DOCTYPE html>
<html>
  <head>
    <base target="_top">
    <link href="https://fonts.googleapis.com/css2?family=Roboto:wght@400;500;700&display=swap" rel="stylesheet">
    <style>
      /* --- 全体のスタイル --- */
      body {
        font-family: 'Roboto', sans-serif;
        padding: 15px;
        background-color: #f8f9fa;
        color: #202124;
      }
      .container {
        display: flex;
        flex-direction: column;
        gap: 15px;
      }
      h3 {
        font-size: 18px;
        font-weight: 500;
        margin: 0 0 5px 0;
        color: #5f6368;
      }

      /* --- フォームのスタイル --- */
      .form-group {
        display: flex;
        flex-direction: column;
        gap: 5px;
      }
      label {
        font-size: 14px;
        font-weight: 500;
      }
      input[type="text"] {
        width: 100%;
        padding: 8px;
        border: 1px solid #dadce0;
        border-radius: 4px;
        font-size: 14px;
        box-sizing: border-box;
      }
      input[type="text"]:focus {
        outline: none;
        border-color: #1a73e8;
      }

      /* --- ボタンとローダーのスタイル --- */
      button {
        background-color: #1a73e8;
        color: white;
        border: none;
        padding: 10px 16px;
        font-size: 14px;
        font-weight: 500;
        border-radius: 4px;
        cursor: pointer;
        transition: background-color 0.3s;
        display: flex;
        align-items: center;
        justify-content: center;
        gap: 8px;
      }
      button:hover {
        background-color: #287ae6;
      }
      button:disabled {
        background-color: #f1f3f4;
        color: #9aa0a6;
        cursor: not-allowed;
      }
      .loader {
        border: 2px solid #f3f3f3;
        border-top: 2px solid #1a73e8;
        border-radius: 50%;
        width: 16px;
        height: 16px;
        animation: spin 1s linear infinite;
        display: none;
      }
      @keyframes spin {
        0% { transform: rotate(0deg); }
        100% { transform: rotate(360deg); }
      }

      /* --- ステータスメッセージのスタイル --- */
      .status-message {
        font-size: 12px;
        padding: 8px;
        border-radius: 4px;
        display: none;
        margin-top: 10px;
        border: 1px solid transparent;
      }
      .success {
        background-color: #e6f4ea;
        color: #1e8e3e;
        border-color: #ceead6;
      }
      .error {
        background-color: #fce8e6;
        color: #d93025;
        border-color: #f9ab9f;
      }
    </style>
  </head>
  <body>
    <div class="container">
      <h3>テキスト挿入</h3>

      <div class="form-group">
        <label for="inputText">挿入するテキスト:</label>
        <input type="text" id="inputText" value="サイドバーから実行されました">
      </div>

      <button id="executeBtn" onclick="runGAS()">
        <div id="loader" class="loader"></div>
        <span>実行</span>
      </button>

      <div id="status" class="status-message"></div>
    </div>

    <script>
      function runGAS() {
        // 各種HTML要素を取得
        const executeBtn = document.getElementById('executeBtn');
        const loader = document.getElementById('loader');
        const statusDiv = document.getElementById('status');

        // 処理中のUIに変更(ボタンを無効化し、ローダーを表示)
        executeBtn.disabled = true;
        loader.style.display = 'inline-block';
        statusDiv.style.display = 'none';

        // 入力フォームからテキストを取得
        const textToInsert = document.getElementById('inputText').value;

        // GASのサーバーサイド関数を呼び出し
        google.script.run
          .withSuccessHandler(onSuccess)
          .withFailureHandler(onFailure)
          .insertTextToServer(textToInsert);
      }

      // 処理が成功したときに呼ばれる関数
      function onSuccess(message) {
        const executeBtn = document.getElementById('executeBtn');
        const loader = document.getElementById('loader');
        const statusDiv = document.getElementById('status');

        // UIを元の状態に戻す
        executeBtn.disabled = false;
        loader.style.display = 'none';

        // 成功メッセージを表示
        statusDiv.textContent = message;
        statusDiv.className = 'status-message success';
        statusDiv.style.display = 'block';
      }

      // 処理が失敗したときに呼ばれる関数
      function onFailure(error) {
        const executeBtn = document.getElementById('executeBtn');
        const loader = document.getElementById('loader');
        const statusDiv = document.getElementById('status');

        // UIを元の状態に戻す
        executeBtn.disabled = false;
        loader.style.display = 'none';

        // エラーメッセージを表示
        statusDiv.textContent = 'エラー: ' + error.message;
        statusDiv.className = 'status-message error';
        statusDiv.style.display = 'block';
      }
    </script>
  </body>
</html>
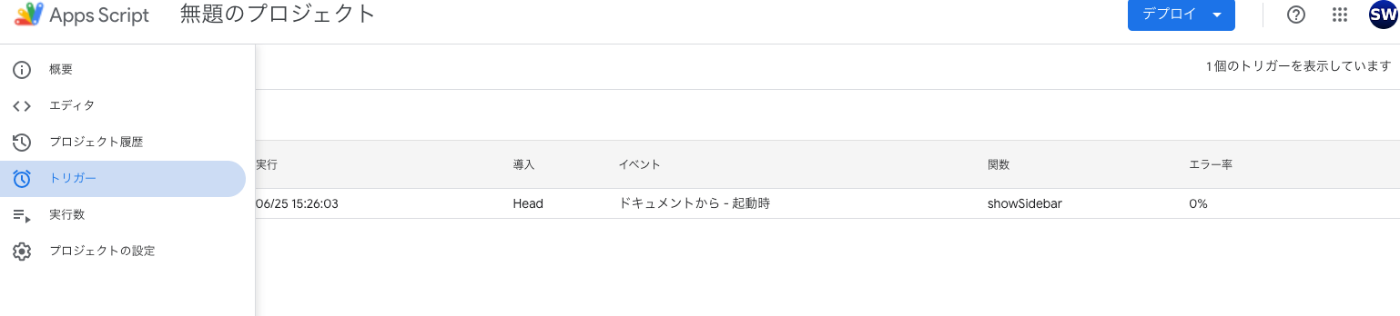
3. 自動起動の設定
ドキュメントを開いたときに自動でサイドバーを表示するには、インストール可能なトリガーを設定します:
- GASエディタで「トリガー」タブを開く
- 「トリガーを追加」をクリック
- 以下の設定で追加:
- 実行する関数:
showSidebar - イベントのソース:ドキュメントから
- イベントの種類:起動時
- 実行する関数:
サンプルコードのポイント
- ローディングアニメーションで処理状況が分かるようにしました
ハマったポイントと解決方法
onOpen関数では動かない
最初にonOpen関数でサイドバーを表示しようとしましたが、以下のエラーが発生:
Exception: 指定された権限では Ui.showSidebar を呼び出すことができません。
必要な権限: https://www.googleapis.com/auth/script.container.ui
appsscript.jsonに権限を追加しても解決せず。調査の結果、onOpenなどのシンプルトリガーからは、セキュリティ上の理由でUIの表示ができないことが判明。
解決:インストール可能なトリガーで設定する
Google Issue Trackerで同様の問題を確認し、インストール可能なトリガーを使用することで解決しました。
注意点
- 初回実行時は、サイドバーから呼び出す関数の権限がないため、エラーが発生する可能性があります。呼び出す関数を別のところから実行して権限を付与する必要があるかもしれません。
- サイドバーを閉じたあと再度開くには、
showSidebarを呼び出す必要があるので、メニューでの表示は別途必要かもしれません。
まとめ
無事、Google Documentで起動時にサイドバーを表示しGASを実行することができました。

株式会社ウェイブのエンジニアによるテックブログです。 弊社では、電子コミック、アニメ配信などのエンタメコンテンツを自社開発で運営しております! wwwave.jp/service/
Discussion