Next.js から Astro に移行する
弊社の Web サイトを Astro に移行してみる。
公式のドキュメントを参考に進める。
プロジェクトの作成
pnpm create astro@latest
React のインストール
pnpm astro add react
これで React を使うのに必要なパッケージ一式をインストールできる。astro.config.mjs や tsconfig.json も合わせて更新される。
JSX ファイルを Astro コンポーネントに変換
Astro にも独自のコンポーネントシステムが存在し、.astro という拡張子で区別される。主に JavaScript (TypeScript) を記述する Component Script 部と、主に HTML(と JS の式)を記述する Component Template 部に分かれる。
Component Script は Frontmatter のように --- で囲んでファイル先頭に記述する。
---
// Component Script (JavaScript)
---
<!-- Component Template (HTML + JS Expressions) -->
_document.jsx ファイルの移行
Astro にも各ページで再利用可能なレイアウトの仕組みがある。Next.js の Document コンポーネントで定義した内容は共通のレイアウトファイルに置き換えられる。
src/layouts/Document.astro を作成し、<Html> や <Head> などの React コンポーネントを全て HTML の標準タグに置き換える。ページの実際のコンテンツは <slot /> が使用される。
import { Html, Head, Main, NextScript } from 'next/document'

export default function Document() {
  return (
    <Html>
      <Head />
      <body>
        <Main />
        <NextScript />
      </body>
    </Html>
  )
}
<html lang="ja">
  <head>
    <link rel="icon" href="/favicon.ico" />
  </head>
  <body>
    <slot />
  </body>
</html>
スタイリング
Astro コンポーネントのテンプレート部に記述する <style> タグの中で行う。
<style>
  h1 { color: red; }
</style>
これはデフォルトで自動的にスコープされ、コンパイル後はこのようになる。
<style>
  h1:where(.astro-HHNQFKH6) {
     color: red;
  }
</style>
CSS-in-JS は部分的に対応しているが、完全ではない。
Props
Astro.props で取得できる。
Props の型付けは Frontmatter に Props インタフェースを定義する。
---
interface Props {
  title: string;
}

const { title } = Astro.props;
---

<h1>{title}</h1>
getStaticProps
Next.js ではプリレンダリング時に必要な外部データの取得は getStaticProps 内で行っていたが、Astro だと直接 Frontmatter 上に記述することができる。
export async function getStaticProps() {
  const res = await fetch('https://api.github.com/repos/withastro/astro');
  const json = await res.json();
  return {
    props: { message: json.message, stars: json.stargazers_count || 0 },
  };
}

const Component = ({ stars, message }) => {
  return (
    <p>Astro has {stars}</p>
  );
};

export default Component;
---
const res = await fetch('https://api.github.com/repos/withastro/astro')
const json = await res.json()
const message = json.message;
const stars = json.stargazers_count || 0;
---

<p>Astro has {stars}</p>
Dynamic Routing と getStaticPaths
Next.js にある Dynamic Routing の仕組みはそのまま Astro に流用でき、たとえば src/pages/posts/[id].astro を作成すれば、id ごとのページがビルド時に生成される。
getStaticPaths についても、Astro で同名の関数が存在するので、これを Frontmatter 内で export 宣言すればよい。
---
export async function getStaticPaths() {
  const data = await fetch('...').then(response => response.json());

  return data.map((post) => {
    return {
      params: { id: post.id },
      props: { post },
    };
  });
}

const { id } = Astro.params;
const { post } = Astro.props;
---
<h1>{id}: {post.name}</h1>
ファイル名に含まれるパラメータ(ここでは id)は、getStaticPaths が返す params オブジェクトに含めなければならない。また、props を返すこともできる。
HTML の挿入
set:html ディレクティブを使えば HTML を直接設定できる。React でいう dangerouslySetInnerHTML に相当するもの。
<!-- Examples of explicit HTML setting -->
<div set:html={`<span>Hello, trusted or already escaped HTML</span>`} />
<div set:html={`<script>alert('oh yes');</script>`} />
<div set:html={trustedOrAlreadyEscapedHtml} />
<div> のラッパーが必要ない場合は <Fragment> コンポーネントを使う。
<Fragment set:html={`<span>Hello, trusted or already escaped HTML</span>`} />
SPA っぽい挙動にする
現状はまだ experimental だが、SPA Router という機能の追加が検討されている。
pnpm add astro@next--spa
export default defineConfig({
  experimental: {
    router: 'spa'
  }
})
View Transitions 機能に統合された。
prefetch
next/link ではデフォルトで有効になっているプリフェッチは、Astro インテグレーションと呼ばれる公式のプラグインで対応している。
pnpm astro add prefetch
使い方も、a タグに rel="prefetch" を付与するだけでよい。
プリフェッチは正式な機能としてビルドインされた。これに伴い、@astrojs/prefetch プラグインは deprecated になっている。
sitemap の生成
これも公式のプラグインにある。
パフォーマンスの比較
Next.js と Astro のパフォーマンスを PageSpeed Insights で比較してみる。
| Next.js | Astro |
|---|---|
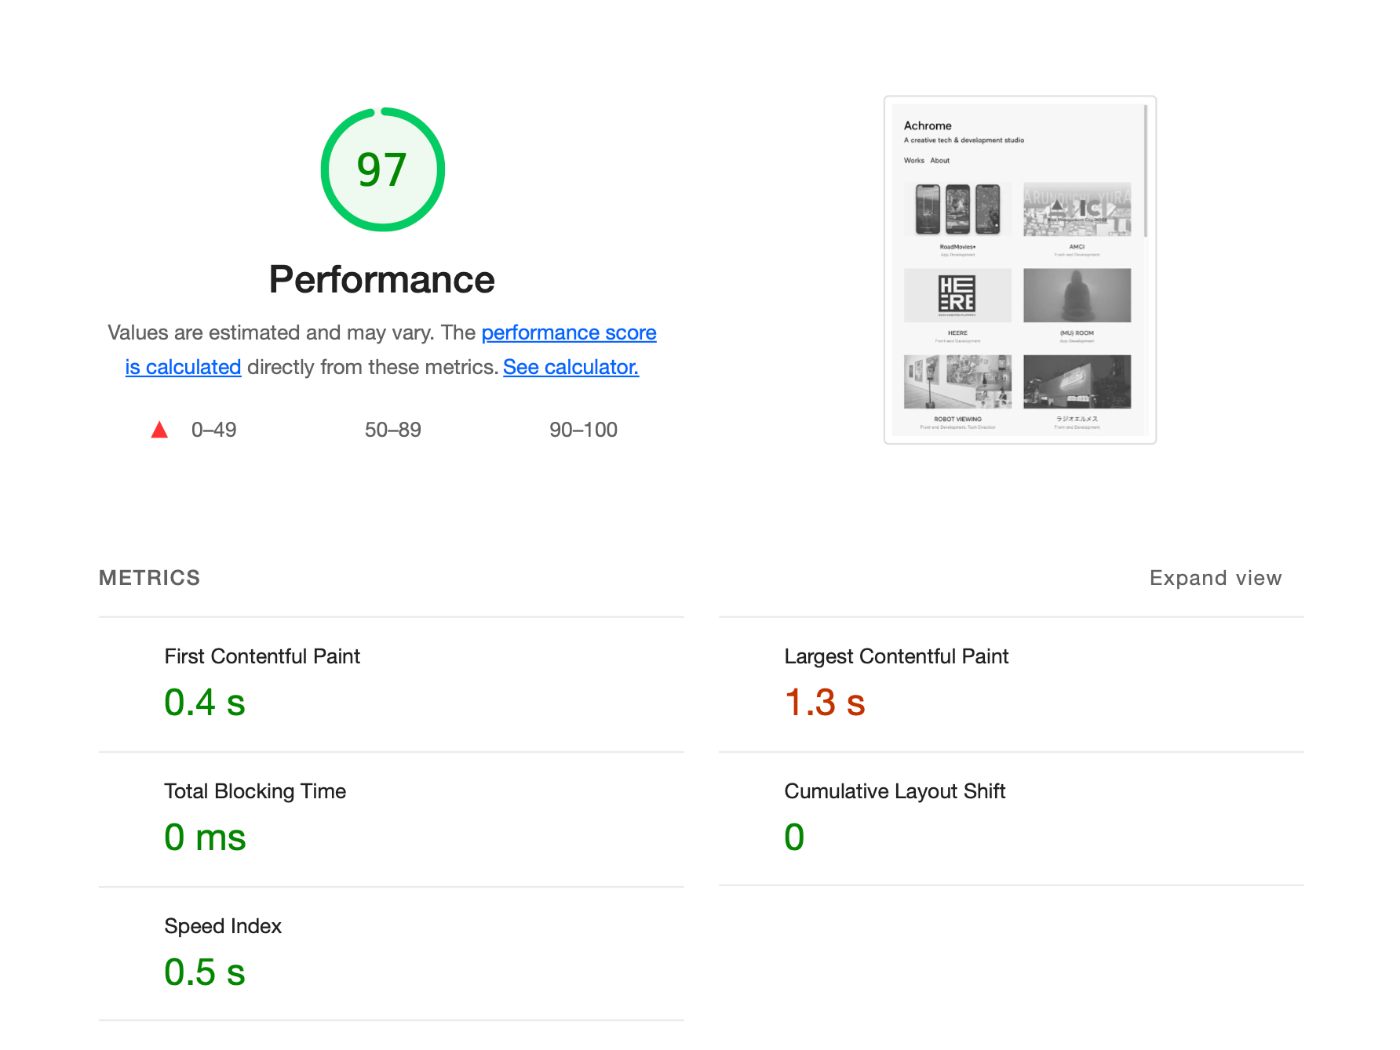 |
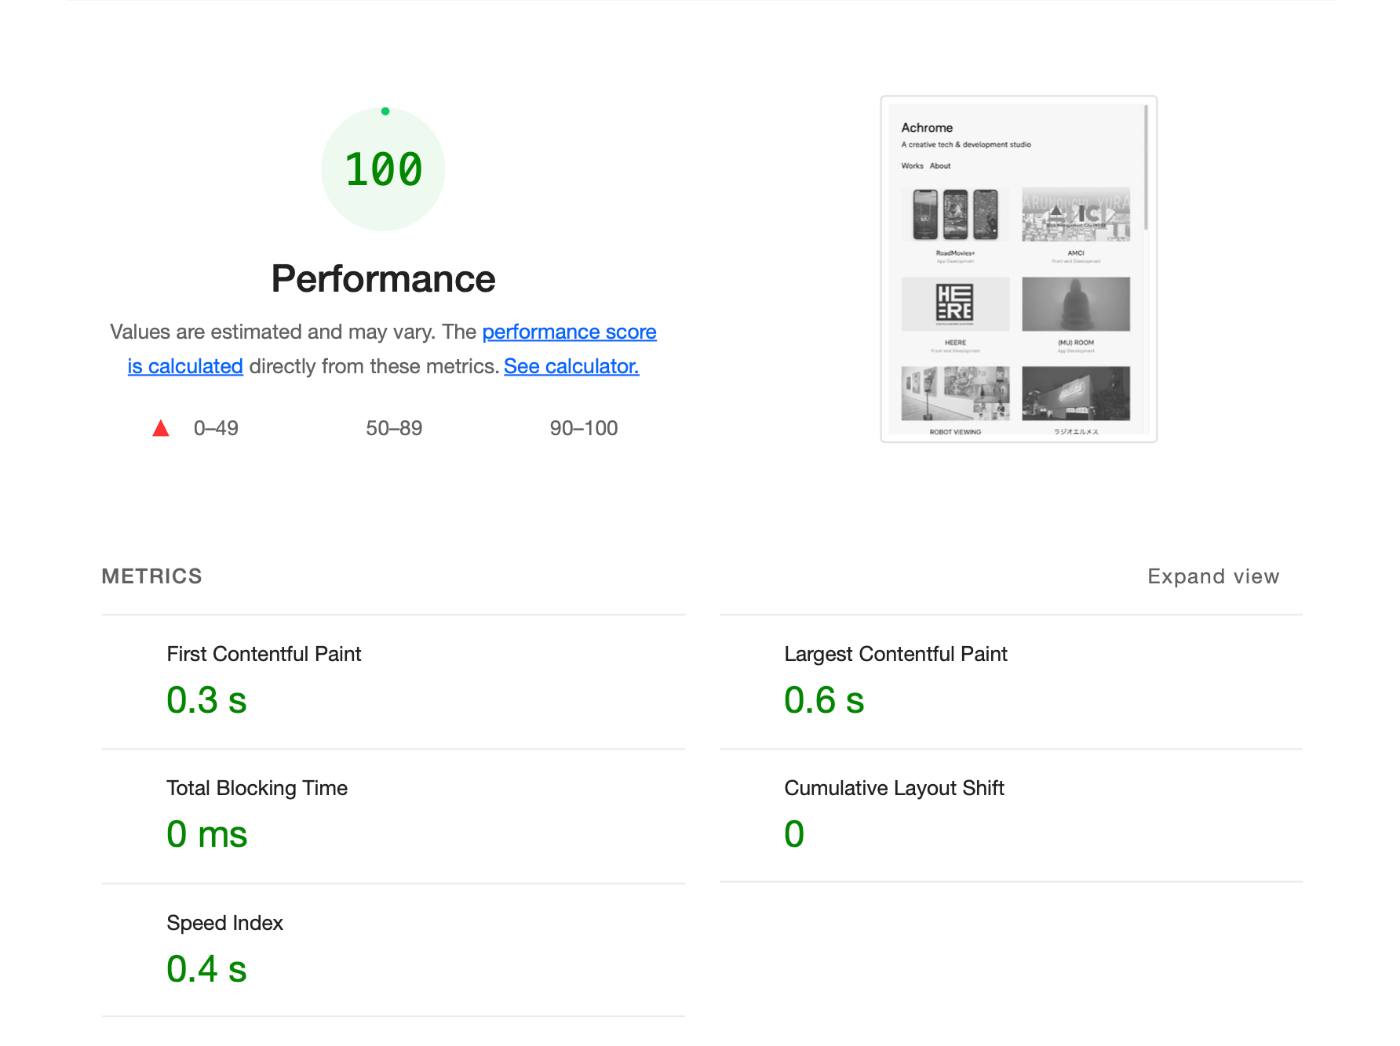 |
もともとコンテンツの少ないサイトなので Next.js でも十分速いけども、特に LCP は顕著かもしれない。