この記事はReact Native 全部俺 Advent Calendar 13目の記事です。
このアドベントカレンダーについて
このアドベントカレンダーは @itome が全て書いています。
基本的にReact NativeおよびExpoの公式ドキュメントとソースコードを参照しながら書いていきます。誤植や編集依頼はXにお願いします。
React NativeのScrollViewとFlatListの違いを理解する
今回はReact Nativeでスクロール可能なリストを実装するときによく使うScrollViewとFlatListの違いについて解説します。
ScrollViewとFlatListの基本的な違い
React Nativeには、スクロール可能なコンテンツを表示するためのコンポーネントとしてScrollViewとFlatListの2つが用意されています。
ScrollView
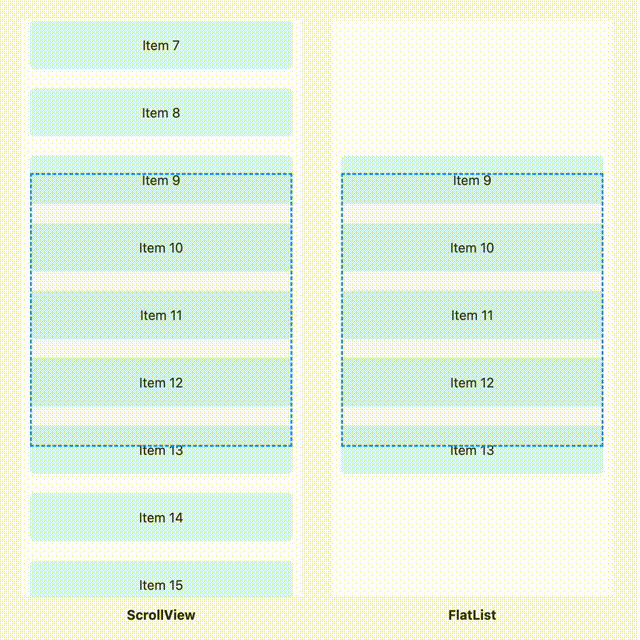
ScrollViewは、全ての子要素を一度にレンダリングする単純なスクロールコンテナです。子要素は事前に全て用意されている必要があり、親コンポーネントがマウントされた時点で全てメモリに読み込まれます。
import { ScrollView, Text, StyleSheet } from 'react-native';

export const SettingsScreen = () => {
  return (
    <ScrollView style={styles.container}>
      <Text style={styles.heading}>アカウント設定</Text>
      <Text style={styles.item}>プロフィール</Text>
      <Text style={styles.item}>パスワード変更</Text>
      <Text style={styles.item}>通知設定</Text>
      <Text style={styles.heading}>アプリ設定</Text>
      <Text style={styles.item}>テーマ</Text>
      <Text style={styles.item}>言語</Text>
      <Text style={styles.item}>プライバシー</Text>
      <Text style={styles.heading}>その他</Text>
      <Text style={styles.item}>利用規約</Text>
      <Text style={styles.item}>プライバシーポリシー</Text>
      <Text style={styles.item}>ログアウト</Text>
    </ScrollView>
  );
};

const styles = StyleSheet.create({
  container: {
    flex: 1,
    backgroundColor: '#fff',
  },
  heading: {
    fontSize: 18,
    fontWeight: 'bold',
    padding: 16,
    backgroundColor: '#f5f5f5',
  },
  item: {
    fontSize: 16,
    padding: 16,
    borderBottomWidth: 1,
    borderBottomColor: '#eee',
  },
});
この例では、設定画面の項目をScrollViewを使って表示しています。項目数は固定で少ないため、全ての要素を一度にレンダリングしても問題ありません。
FlatList
一方FlatListは、画面に表示される要素のみをレンダリングする最適化されたリストコンポーネントです。スクロールに応じて必要な要素だけをレンダリングし、画面外の要素はメモリから解放します。
import { FlatList, Text, View, StyleSheet } from 'react-native';

type Tweet = {
  id: string;
  author: string;
  content: string;
  timestamp: string;
};

export const TimelineScreen = () => {
  const [tweets, setTweets] = useState<Tweet[]>([]);
  const [isLoading, setIsLoading] = useState(false);

  const loadMoreTweets = async () => {
    setIsLoading(true);
    // 新しいツイートを20件取得する処理
    const newTweets = await fetchTweets();
    setTweets([...tweets, ...newTweets]);
    setIsLoading(false);
  };

  const renderTweet = ({ item }: { item: Tweet }) => (
    <View style={styles.tweetContainer}>
      <Text style={styles.author}>{item.author}</Text>
      <Text style={styles.content}>{item.content}</Text>
      <Text style={styles.timestamp}>{item.timestamp}</Text>
    </View>
  );

  return (
    <FlatList
      data={tweets}
      renderItem={renderTweet}
      keyExtractor={(item) => item.id}
      onEndReached={loadMoreTweets}
      onEndReachedThreshold={0.5}
      refreshing={isLoading}
      onRefresh={loadMoreTweets}
    />
  );
};

const styles = StyleSheet.create({
  tweetContainer: {
    padding: 16,
    borderBottomWidth: 1,
    borderBottomColor: '#eee',
  },
  author: {
    fontSize: 16,
    fontWeight: 'bold',
  },
  content: {
    fontSize: 16,
    marginTop: 8,
  },
  timestamp: {
    fontSize: 14,
    color: '#666',
    marginTop: 8,
  },
});
この例では、SNSのタイムラインをFlatListを使って実装しています。ツイートの数は動的に増えていくため、表示される要素のみをレンダリングすることでパフォーマンスを最適化しています。
いつどちらを使うべきか
ScrollViewを使うべき場合
- 要素数が少なく固定の場合
- 全ての要素を一度に表示する必要がある場合
- スクロールの量が少ない場合
- 設定画面やフォームなど、静的なコンテンツを表示する場合
FlatListを使うべき場合
- 要素数が多い、または動的に変化する場合
- パフォーマンスの最適化が必要な場合
- 無限スクロールなどの高度な機能が必要な場合
- SNSのタイムラインやECサイトの商品リストなど、動的なコンテンツを表示する場合
FlatListの便利な機能
FlatListには、リスト表示に便利な機能が多く用意されています。
無限スクロール
onEndReachedとonEndReachedThresholdプロパティを使うことで、簡単に無限スクロールを実装できます。
<FlatList
  data={items}
  renderItem={renderItem}
  onEndReached={loadMoreItems}
  onEndReachedThreshold={0.5} // 末尾から50%の位置でロード開始
/>
Pull to Refresh
refreshingとonRefreshプロパティを使うことで、プルトゥリフレッシュを実装できます。
<FlatList
  data={items}
  renderItem={renderItem}
  refreshing={isRefreshing}
  onRefresh={refreshItems}
/>
セクション分け
SectionListコンポーネントを使うことで、セクション分けされたリストを実装できます。
<SectionList
  sections={[
    {
      title: 'アカウント設定',
      data: ['プロフィール', 'パスワード変更', '通知設定'],
    },
    {
      title: 'アプリ設定',
      data: ['テーマ', '言語', 'プライバシー'],
    },
  ]}
  renderItem={({ item }) => <Text style={styles.item}>{item}</Text>}
  renderSectionHeader={({ section }) => (
    <Text style={styles.sectionHeader}>{section.title}</Text>
  )}
/>
まとめ
ScrollViewとFlatListは、それぞれ異なる用途に適したコンポーネントです。要素数や更新頻度、必要な機能を考慮して適切なコンポーネントを選択することで、より良いユーザー体験を提供できます。
特にFlatListは高度な機能が豊富で、大量のデータを扱う場合でもパフォーマンスを維持できる優れたコンポーネントです。SNSのタイムラインやECサイトの商品リストなど、動的なコンテンツを表示する場合は積極的に活用しましょう。

Discussion