👏
Re:ゼロから始めるSpring Boot #5 Mybatisの統合


Mybatisとは
参考サイト
やってみよう
1. データソースの用意
以下のデータソースを用意。

2. Mybatisのスターター依存を追加
pom.xmlに以下の依存を追加してMavenをリロードさせる。
<dependency>
    <groupId>com.mysql</groupId>
    <artifactId>mysql-connector-j</artifactId>
</dependency>
<dependency>
    <groupId>org.mybatis.spring.boot</groupId>
    <artifactId>mybatis-spring-boot-starter</artifactId>
    <version>3.0.0</version>
</dependency>
3. プロパティ設定
application.ymlに以下の設定を追加
spring:
  datasource:
    driver-class-name: com.mysql.cj.jdbc.Driver
    url: jdbc:mysql://localhost:3306/mybatis
    username: root
    password: *****
4. Mapper
@Mapper
public interface UserMapper {

    @Select("select * from user where id = #{id}")
    public User findById(Integer id);
}
5. DTO
DTOとは、DTO(Data Transfer Object)は、 エンティティの中から必要な値だけを取得したクラス。
public class User {

    private Integer id;
    private String name;
    private Short age;
    private Short gender;
    private String phone;
// getter/setterなどを省略
6. Serviceとその実装
public interface UserService {

    public User findById(Integer id);
}


@Service
public class UserServiceImpl implements UserService {

    @Autowired
    private UserMapper userMapper;

    @Override
    public User findById(Integer id) {
        return userMapper.findById(id);
    }
}
7. Controller
@RestController
public class UserController {

    @Autowired
    private UserService userService;

    @RequestMapping("/findById")
    public User findById(Integer id){
        return  userService.findById(id);
    }
}
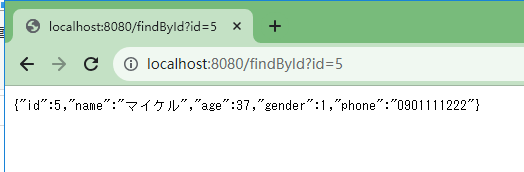
実行結果
以下のURLでidを指定することでDBからデータ取得できた。
http://localhost:8080/findById?id=5
まとめ
Spring Bootでは、Mybatisとjdbcの依存パッケージを追加して、あとはビジネスロジックを作成すれば、データベースからのデータ取得ができる。
余談ですが、Spring MVCの場合は.xmlファイルでコツコツとBeanを定義しないとダメでした。Spring BootはAutoConfigure(自動設定)してくれるので本当に早いですね。
Spring BootのBootはAutoConfigureについて以下のサイトは必要に参考になる。
Discussion