【Tello】ドローン操縦をしてみる
TelloをC++(Pythonもサブで)で操縦する方法についてまとめました。
Telloとは
Telloドローンは、Ryze Tech社によって製造された小型のクワッドコプターで、重量はわずか80gと非常に軽量です。このドローンは、DJIのフライトテクノロジーを利用しており、Vision Positioning Systemという高度な飛行制御システムを搭載しています。このシステムにより、Telloは室内での飛行に適しており、特定の位置にホバリングすることができます。
Vision Positioning System
VPS(Visual Positioning System)は、カメラ画像から位置や姿勢を推定するシステムで、カメラと慣性計測装置を利用して、より詳細な位置や方向を得ることができます。GNSS(衛星測位システム)が働かない屋内・地下空間での活用が見込まれます。
接続方法について
Telloドローンと接続する方法としてUDPプロトコル利用が含まれます。
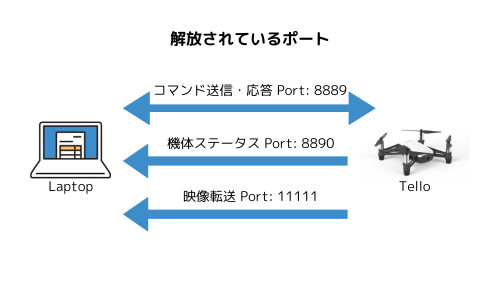
Tello SDK 2.0 User Guideを参考に以下のような開放されているPortとUDP通信を行います。
いくつかのステップを行うことで接続が確立します。
- IPアドレスとポートの設定
TelloのIPアドレスは192.168.10.1でUDPのポート番号は8889となります。 - WiFi接続
PCからTelloのWiFiネットワーク(TELLO-XXXXXX)に接続する必要があります。 - ソケットプログラムの作成
// C++ version 11
// Standard Library
#include <stdio.h>
#include <string.h>
// Socket Library
#include <sys/socket.h>
#include <netinet/in.h>
#include <arpa/inet.h>
#include <unistd.h>
// Used for standby processing
#include <thread>
#include <chrono>

int main() {
    int socket_desc;
    struct sockaddr_in server;
    const char *command;

    // Create UDP Socket
    socket_desc = socket(AF_INET, SOCK_DGRAM, 0);
    if (socket_desc == -1) {
        printf("Failed to create socket.");
        return 1;
    }

    // Prepare the sockaddr_in structure
    server.sin_addr.s_addr = inet_addr("192.168.10.1"); // IP Address of the server
    server.sin_family = AF_INET; // IPv4 Protocol If you want to use IPv6, you can use AF_INET6
    server.sin_port = htons(8889); // Port

    command = "command";
    if (sendto(socket_desc, command, strlen(command), 0, (struct sockaddr *)&server, sizeof(server)) < 0) {
        printf("Failed to send command.");
        return 1;
    }

    // 「Takeoff」command send to server
    command = "takeoff";
    if (sendto(socket_desc, command, strlen(command), 0, (struct sockaddr *)&server, sizeof(server)) < 0) {
        printf("Failed to send command.");
        return 1;
    }

    // Wait 3 seconds
    std::this_thread::sleep_for(std::chrono::seconds(3));

    // 「Land」command send to server
    command = "land";
    if (sendto(socket_desc, command, strlen(command), 0, (struct sockaddr *)&server, sizeof(server)) < 0) {
        printf("Failed to send command.");
        return 1;
    }

    // Close the socket
    close(socket_desc);
    return 0;
}
Python
import socket
import time

def main():
    # UDPソケットを作成
    sock = socket.socket(socket.AF_INET, socket.SOCK_DGRAM)

    # サーバのアドレスとポートを設定
    server_address = ('192.168.10.1', 8889)

    try:
        # 'command' コマンドを送信
        message = 'command'
        sock.sendto(message.encode(), server_address)

        # 'takeoff' コマンドを送信
        message = 'takeoff'
        sock.sendto(message.encode(), server_address)

        # 3秒間待機
        time.sleep(3)

        # 'land' コマンドを送信
        message = 'land'
        sock.sendto(message.encode(), server_address)

    finally:
        # ソケットを閉じる
        sock.close()

if __name__ == "__main__":
    main()
- プログラムのコンパイルを行い、PCのWiFiをTelloのものに切り替えてください。
- プログラムを実行すると処理通り「離陸」、3秒後に「着陸」します。
Commandモードで使用できるコマンドについて
基本的に、「Tello SDK 2.0 User Guide」を元にしています。
初期コマンド
| コマンド名 | 説明 |
|---|---|
command |
SDKモードを開始(コマンドで遠隔操作する際に最初に必ず実行) |
streamon |
ビデオストリームを有効化(カメラ映像を送信を開始) |
streamoff |
ビデオストリームを無効化(カメラ映像を送信を停止) |
emergency |
緊急停止(すぐにモーターを停止させる) |
wifi ssid pass |
Wi-FiのSSIDとパスワードを設定(Telloアプリからでも設定可能) |
ap ssid pass |
Telloをステーションモードに設定し、アクセスポイントのSSIDとパスワードを使用して新しいアクセスポイントに接続 |
制御コマンド
| コマンド名 | 説明 |
|---|---|
takeoff |
離陸 |
land |
着陸 |
stop |
空中で停止(ホバリング) |
speed x |
速度をx[cm/s]に設定(値の範囲:10~100) |
left x |
左にx[cm]移動(値の範囲:20~500) |
right x |
右にx[cm]移動(値の範囲:20~500) |
forward x |
前にx[cm]移動(値の範囲:20~500) |
back x |
後ろにx[cm]移動(値の範囲:20~500) |
cw x |
時計回りにx[deg]回転(値の範囲:1~3600) |
cow x |
反時計回りにx[deg]回転(値の範囲:1~3600) |
flip x |
x方向にフリップ(l/r/f/b) |
状態取得コマンド
| コマンド名 | 説明 |
|---|---|
battery? |
バッテリーの残量(パーセンテージ)を取得 |
speed? |
現在の飛行速度(cm/s)を取得 |
time? |
累計飛行時間(秒)を取得 |
height? |
現在の高度(cm)を取得 |
temp? |
最低と最高の温度(℃)を取得 |
attitude? |
ピッチ、ロール、ヨーの角度を取得 |
baro? |
現在の気圧(hPa)を取得 |
acceleration? |
x,y,z軸に沿った加速度(0.001G)を取得 |
tof? |
Time-of-Flight(距離センサー)による高度(cm)を取得 |
wifi? |
Wi-Fiの信号強度(dBm)を取得 |
カメラ接続&画像処理
Telloは、2.4GHzのWi-Fiを利用し、Port: 11111で受信側に直接映像をストリーミングしています。
カメラ品質は、720p HDの品質で映像をキャプチャし、リアルタイムで伝送することができますが、気づくほどに遅延があるにはあります。伝送距離は周囲の干渉によって異なりますが、最大約100mまで可能とのこと。
事前準備
OpenCVをダウンロードしてください。
Mac OS (Inte, Arm)
homebrewでopencvをインストールします。
$ brew install opencv
以下のコマンドでバージョンが確認できれば完了
$ brew list --versions | grep opencv
opencv 4.8.1_2
※homebrewが入っていなかったらこちらから入れてください さらに、コンパイル時にOpenCVが見当たらない場合は以下の記事を参考にhomebrewからやり直してください。
Windows10・11
このコードは、UDPを通じてポート8889でドローンに接続し、command と streamon コマンドを送信してビデオストリーミングを開始します。その後、ポート11111からのドローンのビデオストリームをOpenCVでキャプチャし、PC上に表示します。'q'キーでプログラムを終了させることができます。
// Standard Library
#include <stdio.h>
#include <string.h>
// Socket Library
#include <sys/socket.h>
#include <netinet/in.h>
#include <arpa/inet.h>
#include <unistd.h>
// OpenCV Library
#include <opencv2/opencv.hpp>

int main() {
    int socket_desc;
    struct sockaddr_in server;
    const char *command;

    // Create UDP Socket
    socket_desc = socket(AF_INET, SOCK_DGRAM, 0);
    if (socket_desc == -1) {
        printf("Failed to create socket.");
        return 1;
    }

    // Prepare the sockaddr_in structure
    server.sin_addr.s_addr = inet_addr("192.168.10.1"); // IP Address of the server
    server.sin_family = AF_INET; // IPv4 Protocol If you want to use IPv6, you can use AF_INET6
    server.sin_port = htons(8889); // Port

    command = "command";
    if (sendto(socket_desc, command, strlen(command), 0, (struct sockaddr *)&server, sizeof(server)) < 0) {
        printf("Failed to send command.");
        return 1;
    }

    command = "streamon";
    if (sendto(socket_desc, command, strlen(command), 0, (struct sockaddr *)&server, sizeof(server)) < 0) {
        printf("Failed to send command.");
        return 1;
    }

    std::string telloStreamAddress = "udp://0.0.0.0:11111";

    cv::VideoCapture cap(telloStreamAddress);

    if (!cap.isOpened()) {
        printf("Error: Cloud not open video stream.");
        return 1;
    }

    cv::Mat frame;

    while (true) {
        cap >> frame;

        if (frame.empty()) {
            printf("Error: Received empty frame.");
            continue;
        }

        cv::imshow("Tello Stream", frame);

        if (cv::waitKey(1) == 'q') {
            close(socket_desc);
            break;
        }
    }
}
Python
import socket
import cv2
import numpy as np

def main():
    # UDPソケットを作成
    sock = socket.socket(socket.AF_INET, socket.SOCK_DGRAM)
    server_address = ('192.168.10.1', 8889)

    # コマンドを送信する関数
    def send_command(command):
        sock.sendto(command.encode(), server_address)

    try:
        # 'command' コマンドを送信
        send_command('command')

        # 'streamon' コマンドを送信
        send_command('streamon')

        # Telloのビデオストリームアドレス
        tello_stream_address = 'udp://0.0.0.0:11111'

        # ビデオキャプチャを開く
        cap = cv2.VideoCapture(tello_stream_address)

        if not cap.isOpened():
            print("Error: Could not open video stream.")
            return

        while True:
            ret, frame = cap.read()

            if not ret or frame is None:
                print("Error: Received empty frame.")
                continue

            cv2.imshow("Tello Stream", frame)

            if cv2.waitKey(1) & 0xFF == ord('q'):
                break

    finally:
        cap.release()
        cv2.destroyAllWindows()
        sock.close()

if __name__ == "__main__":
    main()
まとめ
Telloでいじれる大体のことを今回は説明しました。ここから、どんな拡張をするかは人それぞれですので色んなことを試してほしいです。
Discussion