NestJS を Cloud Run にデプロイするぞ
こちらのスクラップは記事にまとめました
性能とか実用に耐えるかとかはあとや!
- ソースコードからデプロイ
- =>
Container terminated due to sandbox error.がどう頑張っても解消できないのであきらめた
- =>
- コンテナデプロイ
- CloudBuildから上記をどちらかを継続的デプロイ
まずは一番簡単そうなソースコードデプロイから。
ソースコードデプロイ:参考
ソースコードから直接デプロイするとCloud Build Pack というものを介してコンテナ化=>Cloud Run へデプロイという流れを勝手にやってくれるらしい。これで済むならそうしたい。
使ったソース
これ。初期設定を済ませて GraphQL API と REST API がローカルで叩ける状態にしたもの。最初はプロンプト形式でいろいろ聞かれる。
$ gcloud run deploy backend-user --source .

Please specify a region:
[4] asia-northeast2

API [artifactregistry.googleapis.com] not enabled on project [xxxxxxxxxxxx]. Would you like to enable and retry (this will take a few minutes)? (y/N)?  y

Do you want to continue (Y/n)?  y

Allow unauthenticated invocations to [backend-user] (y/N)?  y


Deployment failed
ERROR: (gcloud.run.deploy) Cloud Run error: Container failed to start. Failed to start and then listen on the port defined by the PORT environment variable. Logs for this revision might contain more information.
失敗しました。あれですね、Cloud Run でよくあるやつ。ポート番号は環境変数 PORT で起動するようにしておきなさいっていうやつ。
main.tsを修正。
import { NestFactory } from '@nestjs/core';
import { AppModule } from './app.module';
import {
  FastifyAdapter,
  NestFastifyApplication,
} from '@nestjs/platform-fastify';

async function bootstrap() {
  const app = await NestFactory.create<NestFastifyApplication>(
    AppModule,
    new FastifyAdapter({ logger: true }),
  );
+  const port = Number(process.env.PORT) || 3000;
+  await app.listen(port);
}

bootstrap();
改めてもう一度実行。
$ gcloud run deploy backend-user --source . --region asia-northeast2

Deployment failed
ERROR: (gcloud.run.deploy) Cloud Run error: Container failed to start. Failed to start and then listen on the port defined by the PORT environment variable. Logs for this revision might contain more information.
同じように失敗。たぶんだけど、全部おまかせだと yarn start を実行することになる。package.json をみてみると、
  "scripts": {
    "start": "nest start",
    "start:dev": "nest start --watch",
    "start:debug": "nest start --debug --watch",
    "start:prod": "node dist/main"
  },
こんな感じなので start:prod を実行したいところ。コマンドラインのSDKをみて修正する。
$ gcloud run deploy backend-user --region asia-northeast2 --command "yarn start:prod" --source .

This command is equivalent to running `gcloud builds submit --pack image=[IMAGE] .` and `gcloud run deploy backend-user --image [IMAGE]`

Building using Buildpacks and deploying container to Cloud Run service [backend-user] in project [my-project] region [asia-northeast2]
X Building and deploying... Cloud Run error: Internal error occurred while performing container health check.
  ✓ Uploading sources...
  ✓ Building Container... Logs are available at [https://console.cloud.google.com/cloud-build/builds/xxx].
  X Creating Revision... Cloud Run error: Internal error occurred while performing container health check.
  . Routing traffic...
Deployment failed
ERROR: (gcloud.run.deploy) Cloud Run error: Internal error occurred while performing container health check.
ヘルスチェックで失敗。なんぞ〜?
先にビルドが必要だった可能性
ありうる。
$ yarn build
$ gcloud run deploy backend-user --region asia-northeast2 --command "yarn start:prod" --source .
やっぱりエラー。
エラー
2021-10-28T07:23:26.628381ZCloud Runbackend-user-00004-map {@type: type.googleapis.com/google.cloud.audit.AuditLog, resourceName: namespaces/my-project/revisions/backend-user-00004-map, response: {…}, serviceName: run.googleapis.com, status: {…}}
{@type: type.googleapis.com/google.cloud.audit.AuditLog, resourceName: namespaces/my-project/revisions/backend-user-00004-map, response: {…}, serviceName: run.googleapis.com, status: {…}}
エラーログをみてもあまりよくわからない。要調査。
この記事、ブラックボックスになってる gcloud run deploy --sourceの詳細を追ってくれててすごい。ありがとうございます。
ソースコードデプロイ:エラー調査
$ yarn build
$ gcloud run deploy backend-user --region asia-northeast2 --command "yarn start:prod" --source .
でエラーになる。ログをみてもわからないので、作成されたコンテナを pull して確かめてみることに。Artifact Registry というところに保存されている模様。
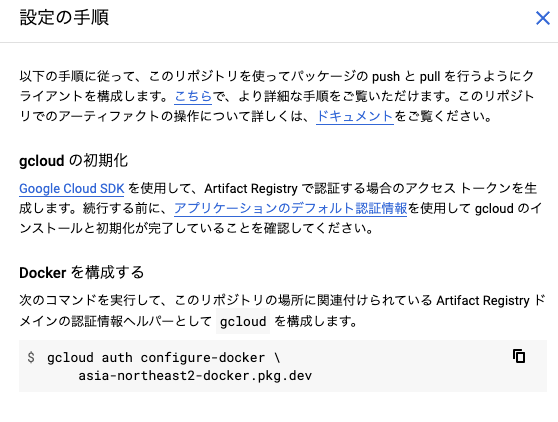
gcloud までは設定しているので Docker 構成を実行することに。こんなコマンドがあるのですね。
gcloud auth configure-docker \
             asia-northeast2-docker.pkg.dev
これで asia-northeast2-docker.pkg.dev に対するクレデンシャルが設定される模様。docker run してみる。
docker run asia-northeast2-docker.pkg.dev/my-project/cloud-run-source-deploy/backend-user:latest

$ nest start
/bin/sh: 1: nest: not found
error Command failed with exit code 127.
info Visit https://yarnpkg.com/en/docs/cli/run for documentation about this command.
nest start だと…? yarn start:prod を指定したはずだが…?
少しgcloud run deployの仕組みを振り返ると、
- Uploading sources: gcsにソースコードをアップロード
- Building Container: イメージの作成・GCRへアップロード
- Creating Revision: イメージを用いてCloud Runの新しいリビジョンの作成
- Routing traffic: トラフィックを新しいリビジョンに100%移行
という流れなのだった。[1]
Cloud Storage へアップロードされたファイルを見る
自動で走った Cloud Build のログを見ると アップロードされたファイルを利用していることがわかるので、自ら ダウンロードしてみる。すると...

node_modules と ビルド後に生成される dist が入っていない。これじゃあ実行できない。実は「アップロードされるファイル」というのは選別されていたということか...。まあnode_modulesは重いので仕方ないにしても、distはアップロードされて欲しいところ。postinstall で build してもいいのだけど、そうするとビルド用のパッケージもインストールしなければならなくなってしまう。
.gcloudignore ないけどなんで無視される?
ドキュメントをみるとどうやら gcloud run deploy でも使うと書いてある。ただ、node_modulesやdistが自動的に除外されるみたいなことは書いていない。もう少し深く。gcloud run deploy のコマンドラインリファレンス。
--sourceのところ。
f --ignore-file is not specified, use.gcloudignore file. If a .gcloudignore file is absent and a .gitignore file is present in the local source directory, gcloud will use a generated Git-compatible .gcloudignore file that respects your .gitignored files. The global .gitignore is not respected.
これだ。.gcloudignore がないときは、.gitinogre をベースに使うと書いている!謎がとけた。.gitinogreに .gcloudignoreの事情を入れるのはあまり好みではないので .gcloudignore をつくります。
# compiled output
/node_modules

# Logs
logs
*.log
npm-debug.log*
pnpm-debug.log*
yarn-debug.log*
yarn-error.log*
lerna-debug.log*

# OS
.DS_Store

# Tests
/coverage
/.nyc_output

# IDEs and editors
/.idea
.project
.classpath
.c9/
*.launch
.settings/
*.sublime-workspace

# IDE - VSCode
.vscode/*
!.vscode/settings.json
!.vscode/tasks.json
!.vscode/launch.json
!.vscode/extensions.json
これでビルドした dist もアップロード対象になるはず。
ダメでした:commandの指定のやりかたを間違えたかも…
--command=[COMMAND,…]
なので、
gcloud run deploy backend-user --region asia-northeast2 --command="yarn start:prod" --source .
かな?そんなに変わるとも思わないけど。
やはりだめでした。
エラーの内容が Container terminated due to sandbox error. なのでそもそも起動コマンドがうんぬんというレベルまで到達していない気がするんだよな…あきらめたほうがよさそうか。
コンテナデプロイ:参考
コンテナイメージからデプロイするにしても、さらに手順が分岐する。
- ソースコードデプロイで、Google Cloud buildpacks で自動でやってもらうかわりに Dockerfile を使う
- 自分で先にコンテナイメージをビルドし、レジストリに上げ、そのレジストリのURLを指定してデプロイする
まずは1からやってみることに。
そもそもnode.jsのベースイメージどれを使えばいいの問題
みんなalpineつかってるよね。公式によると‥
node:<version>
Some of these tags may have names like bullseye, buster, or stretch in them. These are the suite code names for releases of Debian and indicate which release the image is based on. If your image needs to install any additional packages beyond what comes with the image, you'll likely want to specify one of these explicitly to minimize breakage when there are new releases of Debian.
特に追加でインストールするものがない場合はこちらでよさそう。
node:<version>-alpine
The main caveat to note is that it does use musl libc instead of glibc and friends, so software will often run into issues depending on the depth of their libc requirements/assumptions.
glibc じゃないので深いところで問題が発生するかも?とのこと。今回は node:16 使います。
さらに参考
めっちゃまとめてくれてた。
十分なテストをする余裕がなく、環境を素早く立ち上げなければいけない場合、stretch, buster, jessie, bullseyeあたりを適当に選ぶ
コンテナを軽量化する必要があり、最小限のパッケージだけで動作することが分かっていれば、slimを採用する
コンテナを限界まで軽量化する必要があり、十分なテストが可能であればalpineを採用する。ただし、移植等した際に挙動がおかしくなる可能性がある
頻繁にimageを取得するユースケースであれば、slimやalpineを優先的に採用する
それから今回はビルドと本番起動用イメージを分けたいのでマルチステージビルドを検討する。
nestjs についても先人たちがいくつかやってくれている。
初歩的なミスをやってた可能性…
サーバーの待ち受けるアドレスは localhost じゃなくて 0.0.0.0 ですね…アカン…
import { NestFactory } from '@nestjs/core';
import { AppModule } from './app.module';
import {
  FastifyAdapter,
  NestFastifyApplication,
} from '@nestjs/platform-fastify';

async function bootstrap() {
  const app = await NestFactory.create<NestFastifyApplication>(
    AppModule,
    new FastifyAdapter({ logger: true }),
  );
  const port = Number(process.env.PORT) || 3000;
+  await app.listen(port, '0.0.0.0');
}

bootstrap();
コンテナデプロイ
gcloud run deploy backend-user --region asia-northeast2 --source .
✓ Building and deploying... Done.
  ✓ Uploading sources...
  ✓ Building Container...
  ✓ Creating Revision...
  ✓ Routing traffic...
あっ…
もしかして
ソースコードデプロイ
Dockerfileが使われないようにリネーム
mv Dockerfile not_Dockerfile
デプロイ
gcloud run deploy backend-user-from-source --region asia-northeast2 --command="yarn start:prod" --source .
あ、こっちはやっぱりダメだ。ちょっとエラーが違うもんね。
2021-10-29T08:50:52.291799580ZContainer terminated due to sandbox error.
2021-10-29T08:50:57.616962186ZContainer terminated due to sandbox error.
2021-10-29T08:51:24.786037533ZContainer terminated due to sandbox error.
なので「ソースコードデプロイは利用できない」という結論でいったんよさそう。
コンテナデプロイできたので継続的デプロイの可能性を探っていく
ここまで整理すると、
- ソースコードデプロイはできなかった(原因不明)
- コンテナデプロイはできた via gcloud run deploy
という状況。なので継続的デプロイはコンテナベースで実行する。
GitHub リポジトリと連携して Cloud Build トリガーで gcloud run deploy は?
パッと思いつくのはこれ。個人開発だったらこれで十分だと思われ。gcloud run deployは、先も述べたように、
- ソースコードを GCS にアップロードする
- そのソースに対して docker build
- コンテナをデプロイ
という流れになる。リリースするタイミングで これをすべてやっていたら時間がかかるのでコンテナイメージのビルドとコンテナのビルドはできれば分離したい。
gcloud run deploy はイメージURLを指定できるのであとはどうにか頑張ってコンテナイメージを作れば良いことになる。ここを考えていく。
ここを参考に。
Artifact Registry にやるか?
コンテナデプロイの箇所をみると、
たしかに Artifact Registry からのデプロイもいけると書いてある。こっちのほうが新しいし検討したいところ。たぶん。「どこ」でイメージのビルドとプッシュをやるにしてもArtifact Registry にプッシュすることは変わりないと思うので、まずは手元からできるようにしてみる。
NestJSイメージのビルドと Artifact Registry へプッシュ
手元でテストするために Docker Image のビルド自体は手元でやっている。
docker build -t nest-backend-user .
Artifact Registry へプッシュするにあたり他に何か必要になるかもしれないけど、ひとまずこのイメージを使う。
Artifact Registry リポジトリ作成
リポジトリが必要になる。ここは、gcloud でも コンソールでもいいけど、組織やチームで定められたインフラ管理方法を適用するのがよさそう。ここではTerraformを使って適用してみることにする。
ほぼ記載どおりの tf ファイルで作成できる。次のような module をつくった。
variable "artifact_registry_location" {
  type = string
  # https://cloud.google.com/storage/docs/locations
  description = "Artifact Registry のロケーションをどこにするか"
}


resource "google_artifact_registry_repository" "gql-nest-prisma-training" {
  provider = google-beta

  location      = var.artifact_registry_location
  repository_id = "gql-nest-prisma-training"
  description = "ユーザー向けバックエンドAPI"
  format = "DOCKER"
}
を用意して
terrafrom apply
とした。これでリポジトリが作成された。リポジトリ名はとりあえずGitHubリポジトリと一致させるようにした。
ローカルイメージへのタグ付け
ローカル イメージを Artifact Registry リポジトリに push するには、リポジトリ名でタグ付けしてからイメージを push します。
なるほど。いわれたとおりにしてみる
docker tag SOURCE-IMAGE LOCATION-docker.pkg.dev/PROJECT-ID/REPOSITORY/IMAGE
docker tag nest-backend-user asia-northeast2-docker.pkg.dev/my-project/backend-user/nest-backend-user
タグ付きイメージを Container Registry に push する
docker push asia-northeast2-docker.pkg.dev/my-project/gql-nest-prisma-training/nest-backend-user
latestのイメージが Arifact Registry へプッシュされた。
Artifact Registry のイメージを使って Cloud Run へデプロイ
おそらくシンプルにいけるのではなかろうか。
このあたり。さっきの、ソースコードからデプロイするパターンの --source を --image へ変えてやれば良さそう。
gcloud run deploy backend-user --region asia-northeast2 --image asia-northeast2-docker.pkg.dev/my-project/gql-nest-prisma-training/nest-backend-user:latest

✓ Deploying... Done.
  ✓ Creating Revision...
  ✓ Routing traffic...
は、はやい!
イメージをCloud Run へデプロイするが、すぐにトラフィックを移さずに別コマンドでトラフィックを移す
もうひとつよくあるデプロイパターンも試しておく。Cloud Run のリビジョン自体は作成するが、トラフィックをすぐさま新しいリビジョンに流すのではなくタイミングと割合を開発者がコントロールするというもの。難しく言っているけど要するに以下ふたつのコマンドを別々のタイミングで実行するということになる。
gcloud run deploy backend-user --no-traffic ...
gcloud run services update-traffic ...
具体的に実行していく。
トラフィック移行なしでリビジョンを作成
先程のデプロイコマンドに --no-traffic をつければいいだけ。
gcloud run deploy backend-user --no-traffic --region asia-northeast2 --image asia-northeast2-docker.pkg.dev/my-project/gql-nest-prisma-training/nest-backend-user:latest

✓ Deploying... Done.
  ✓ Creating Revision...
  ✓ Routing traffic...
Done.
Service [backend-user] revision [backend-user-00006-vur] has been deployed and is serving 0 percent of traffic.
所要時間はだいたい10秒〜20秒くらいだった。実行すると Cloud Run の画面はこのようになる。
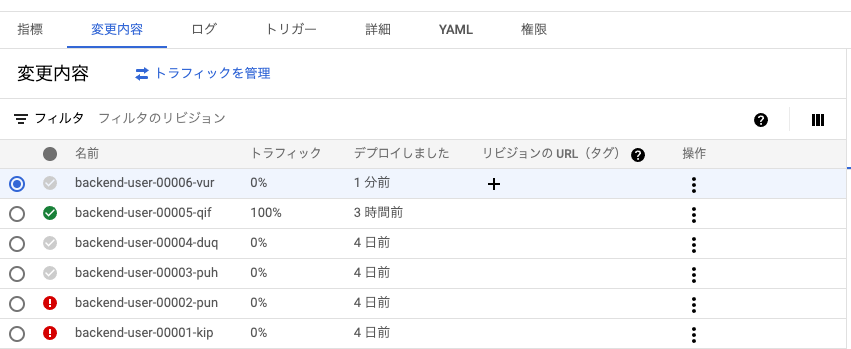
新しく作成したリビジョンにトラフィックが移っていないことがわかる。意図どおり。
トラフィック移行
あとはこの新しいリビジョンに流すコマンドを実行。--to-latest でもいけるみたいだけど切り戻しも考慮してあえて明示的に指定してみた。
gcloud run services update-traffic myservice --to-revisions=backend-user-00006-vur=100

X Updating traffic...
  . Routing traffic...
Updating traffic failed
ERROR: (gcloud.run.services.update-traffic) Service [backend-user] could not be found.
あれ?失敗した。cloud not be found.. オプションが足りないかしら。 リージョン名ミスでした。
gcloud run services update-traffic myservice --region=asia-northeast2 --to-revisions=backend-user-00006-vur=100

✓ Updating traffic... Done.
  ✓ Routing traffic...
Done.
Traffic:
  100% backend-user-00006-vur
このコマンドを実行するのに5秒くらいでした。
Cloud Build で継続的デプロイ
ここまでやってきてCloud Runへデプロイするにあたり以下の仕事をこなすひつようがあるとわかった。
- コンテナイメージの作成
- 作成したイメージのプッシュ
- イメージを指定して Cloud Run のサービスとリビジョンを作成
- トラフィックの移行
個人開発なら 1~4 まで全部やってもらえる gcloud run deploy with Dockerfile で十分。ただ5分〜10分かかるのでもう少しDXをあげようと思ったら例えばmainブランチにマージされた時点で3までは自動で実行しても稼働中サービスに影響がない。なのでここでは リビジョン作成までをCloud Build でやってみることにする。
一番めんどいのが権限よね
こればかりはやってみるしかないね。
Cloud Build サービスアカウントに必要な権限
デフォルトでは Cloud Build サービス アカウントには、同じプロジェクトのリポジトリからアップロードとダウンロードする権限が付与されます。Cloud Build がご使用中のリポジトリではなく異なるプロジェクト内にある場合、リポジトリを持つそのプロジェクトの Cloud Build サービス アカウントに権限を付与する必要があります。
ほう?じゃあコンテナイメージについてはビルドしてデプロイすればよさそうね。あとは Cloud Run のリビジョンの作成(と、はじめての場合はサービスの作成)
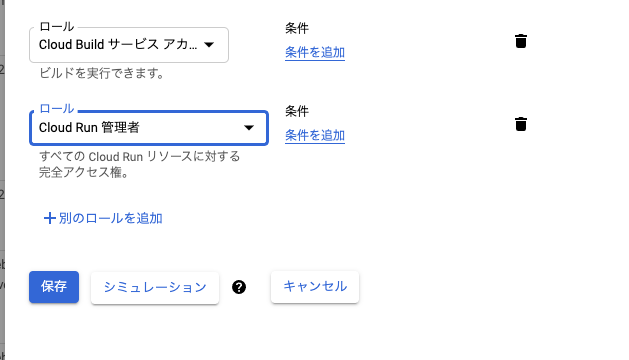
Cloud Run にデプロイするには、Cloud Run 管理者とサービス アカウント ユーザーのロールを Cloud Build サービス アカウントに付与します。
管理者なのね。結構強い権限がいるね。Cloud Build のサービスアカウントは Google 様が作成するものなので割り切って画面から追加してしまおうと思います。
Cloud Run のサービスアカウント
いったんあとまわしにする。
CloudBuild トリガーを作成
アプリケーションリポジトリに以下のように作成した。
steps:
  # Build the container image
  - name: 'gcr.io/cloud-builders/docker'
    args: ['build', '-t', '${_REGION}-docker.pkg.dev/$PROJECT_ID/${_REPOSITORY}/${_SERVICE_NAME}:$SHORT_SHA', '.' ]
  # Push the container image to Container Registry
  - name: 'gcr.io/cloud-builders/docker'
    args: ['push', '${_REGION}-docker.pkg.dev/$PROJECT_ID/${_REPOSITORY}/${_SERVICE_NAME}:$SHORT_SHA']
  # Create Cloud Run Revision using image
  - name: 'gcr.io/google.com/cloudsdktool/cloud-sdk'
    entrypoint: gcloud
    args:
      - 'run'
      - 'deploy'
      - ${_SERVICE_NAME}
      - '--no-traffic'
      - '--image'
      - '${_REGION}-docker.pkg.dev/$PROJECT_ID/${_REPOSITORY}/${_SERVICE_NAME}:$SHORT_SHA'
      - '--region'
      - '$_REGION'
      - '--revision-suffix'
      - $SHORT_SHA
  # Display traffic update command
  - name: 'bash'
    entrypoint: 'echo'
    args:
      - 'gcloud run services update-traffic ${_SERVICE_NAME} --region=${_REGION} --to-revisions=${_SERVICE_NAME}-$SHORT_SHA=100'

substitutions:
  _REGION: asia-northeast2
  _REPOSITORY: $REPO_NAME
  _SERVICE_NAME: backend-user
このビルドファイルを含むソースに対する Cloud Build トリガー:Terrafrom で作成
resource "google_cloudbuild_trigger" "deploy-nestjs-training" {
  name        = "deploy-nestjs-training"
  description = "【検証】nestjsをCloudRunへデプロイする試み"
  github {
    owner = "cm-wada-yusuke"
    name  = "gql-nest-prisma-training"
    push {
      branch = "^main$"
    }
  }
  included_files = ["*/**"]
  ignored_files  = ["*.md", ".gitignore"]
  filename       = "deploy/cloudbuild.yml"
}
トリガー実行〜トラフィック切り替えまで
このトリガーを実行すると Cloud Run に対してリビジョンが作成され、トラフィックは0%に。あとはトラフィック移行のためのコマンドを echo 出力するようにしたので Cloud Shell なりで実行すればOK。
Cloud Run 実行環境のカスタマイズ
いわゆるCPUの数などのことです。App Engine では app.yml で指定していたが Cloud Run では2つ方法があるみたい。
-
service.yamlを定義してgcloud run services replace service.yamlを実行 -
gcloud run deployのときに--cpuなどを指定してサービス設定値を上書き
たぶん gcloud run deploy は想像以上にリッチなコマンドで、リビジョンを作成しつつ service の定義を更新したりしてるっぽい。service.yaml を定義するのもいいかな?と思ったけどあまりステップを増やしたくないのでオプションでいくことにする。