Milk-V Duo256MでYOLOv5の物体検知を行う
CVITEKのTDL SDKを使ってYOLOv5の物体検知を行う。
それを行うための流れはざっと以下な感じ
- TDL SDK使った推論器をビルドする
- プリモデルyolov5s.ptからONNXモデルへ変換する
- ONNXモデルからMLIR、MLIRからcvimodelを作成する
- 推論器とcvimodelをMilk-V Duoにコピーする
- Milk-V Duo上で、画像を使って推論してみる
そもそもCVITEKのTDLとは?
CVITEKが提供するSDKで、物体検知、顔認識、セグメンテーション、姿勢検出などの
機械学習アルゴリズムをラップした統一したプログラムインタフェースとしてこのTDLなるものを提供している。
このSDKを使うと、搭載されているTPUプロセッサで効率よく推論を行うことができる。
ちなみにMilk-V Duoでは、CV1800BというCVITEK社のチップが採用されているが、
Duo256MではチップがSOPHGO社?のSG2002に変更されており、性能がUPされている。
チップのモデルを指定するときにDuoなのか、Duo256Mを区別しないと動作しない。
cvimodelとは?
上記のTPU向けにビルドされた機械学習モデル
TDL SDK使った推論器をビルドする
> wget https://sophon-file.sophon.cn/sophon-prod-s3/drive/23/03/07/16/host-tools.tar.gz
> tar xvf host-tools.tar.gz
> export PATH=$PATH:$(pwd)/host-tools/gcc/riscv64-linux-musl-x86_64/bin
上記の環境変数が利いた状態で、Duo256M用のSDKをダウンロードしたら、サンプルフォルダ内のビルドシェルを実行する。
シェルを実行すると、サンプル一式まとめてコンパイルされる。
> git clone https://github.com/milkv-duo/cvitek-tdl-sdk-sg200x.git
> cd cvitek-tdl-sdk-sg200x
> cd sample
> ./compile_sample.sh
コンパイルが成功すると、sample以下の各モジュールがビルドされる。今回はcvi_yoloディレクトリ配下に生成されたsample_yolo5モジュールを使う。
(後程、このモジュールをDuo256Mにコピーして実行する)
TPU向けの機械学習モデルを作成する
今回は公式サイトの手順通り、PyTorchモデルであるyolov5s.ptからスタートして、
最終的にMilk-V Duo256Mで利用できるcvimodelを生成する。
YOLOv5環境の構築とONNXモデルの生成
venv環境を作成してアクティベートした状態で、依存モジュールをインストールする。
> git clone https://github.com/ultralytics/yolov5.git
> cd yolov5
> python3 -m venv venv
> source venv/bin/activate
> pip3 install -r requirements.txt
> pip3 install onnx
yolov5s.ptとyolov5_export.pyをダウンロードして、ONNXモデルをエクスポートする。
> wget https://github.com/ultralytics/yolov5/releases/download/v7.0/yolov5s.pt
> wget https://raw.githubusercontent.com/milkv-duo/cvitek-tdl-sdk-sg200x/main/sample/yolo_export/yolov5_export.py
> python3 yolov5_export.py --weights ./yolov5s.pt --img-size 640 640
> ls *.onnx
yolov5s.onnx
ONNXモデルからMLIR、MLIRからcvimodelを作成する
ONNXモデルからは直接cvimodelへの変換はできない。一旦MLIRという中間オブジェクトに変換する。
yolov5フォルダをカレントディレクトリとしたまま、続けてMLIR変換用のツールキットの入手とそのコンパイル環境をDockerコンテナで構築する。
> docker run --rm --privileged --name tpudev -v ${PWD}:/workspace -it sophgo/tpuc_dev:latest
root@xxxx:/workspace# git clone https://github.com/milkv-duo/tpu-mlir.git
root@xxxx:/workspace# source ./tpu-mlir/envsetup.sh
以降、ファイルを生成していくので、workフォルダを作成してそこで作業する。
root@xxxx:/workspace# mkdir work && cd work
ONNXモデルからMLIRモデルへ変換する
root@xxxx:/workspace# model_transform.py \
--model_name yolov5s \
--model_def ../yolov5s.onnx \
--input_shapes [[1,3,640,640]] \
--mean 0.0,0.0,0.0 \
--scale 0.0039216,0.0039216,0.0039216 \
--keep_aspect_ratio \
--pixel_format rgb \
--test_input ../tpu-mlir/regression/image/dog.jpg \
--test_result yolov5s_top_outputs.npz \
--mlir yolov5s.mlir
データセットを指定してキャリブレーション?結構時間がかかる。
root@xxxx:/workspace# run_calibration.py \
yolov5s.mlir \
--dataset ../tpu-mlir/regression/dataset/COCO2017 \
--input_num 100 \
-o yolov5s_cali_table
cvimodelを生成する。SG2002向けの場合は、--chip cv181xになる。
root@xxxx:/workspace# model_deploy.py \
--mlir yolov5s.mlir \
--quant_input --quant_output \
--quantize INT8 \
--calibration_table yolov5s_cali_table \
--chip cv181x \
--test_input yolov5s_in_f32.npz \
--test_reference yolov5s_top_outputs.npz \
--tolerance 0.85,0.45 \
--model yolov5_cv181x_int8_sym.cvimodel

root@xxxx:/workspace# ls *.cvimodel
yolov5_cv181x_int8_sym.cvimodel
Milk-V Duo256Mで推論してみる
Milk-V Duo256Mに必要なファイル一式をコピーする。000000000113.jpgやdog.jpgは公式サイトから拝借。
> ls
000000000113.jpg  dog.jpg  sample_yolov5  yolov5_cv181x_int8_sym.cvimodel
> scp * root@192.168.42.1:~/
> ssh root@192.168.42.1
まずはdog.jpgを推論してみる。
> ./sample_yolov5 yolov5_cv181x_int8_sym.cvimodel dog.jpg
version: 1.4.0
yolov5s Build at 2024-05-06 16:30:56 For platform cv181x
Max SharedMem size:5734400
model opened:yolov5_cv181x_int8_sym.cvimodel
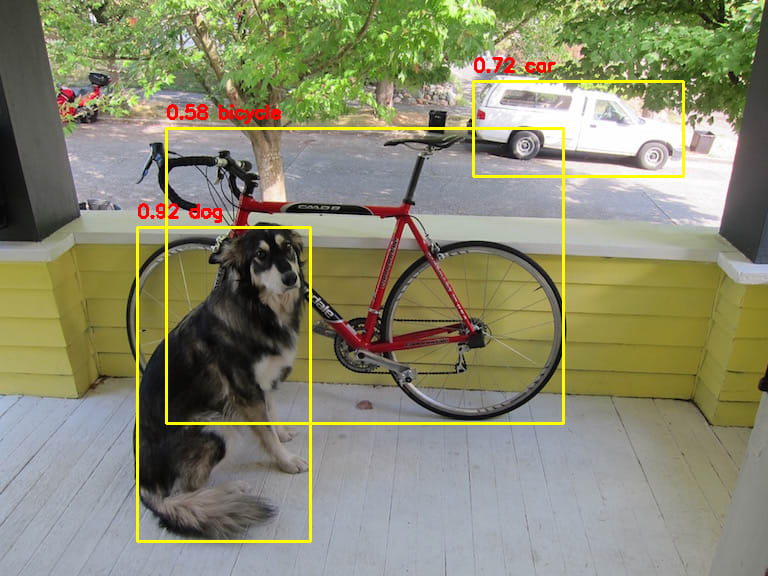
detect res: 137.379303 217.066299 310.982025 541.966858 0.915610 16
detect res: 473.738098 71.988899 683.512390 176.103775 0.722637 2
detect res: 166.451904 118.458267 563.148132 423.640594 0.580343 1
detect res:の後の値は、PyTorchなどのBounding Boxies形式X1, Y1, X2, Y2, Score, Classesになる。
ClassesのインデックスはCOCO2017のデータセットを使っているので、以下テキストに従う。ただし、ツールで出力するインデックスはゼロオリジンなので、+1した値と以下のテキストを照合する。
例えば上記の結果だと、以下になる。
16 => dog(17)
2 => car(3)
1 => bicycle(2)
上記のBoundingBox情報を使って、後述するPythonプログラムで矩形描画してみた結果が以下になる。ちゃんと認識している。

同様に次は000000000113.jpgを推論してみる。
> ./sample_yolov5 yolov5_cv181x_int8_sym.cvimodel 000000000113.jpg
version: 1.4.0
yolov5s Build at 2024-05-06 16:30:56 For platform cv181x
Max SharedMem size:5734400
model opened:yolov5_cv181x_int8_sym.cvimodel
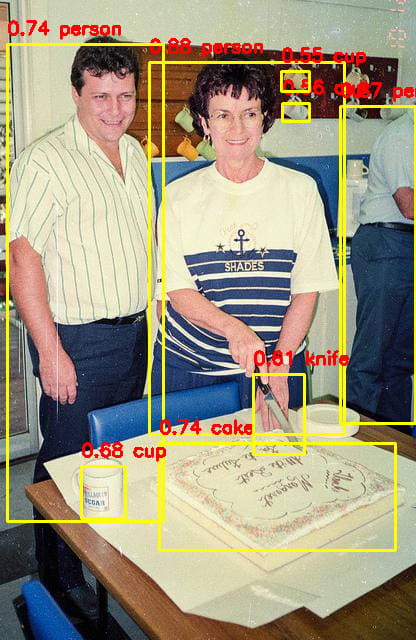
detect res: 149.599243 52.756699 344.154053 434.715759 0.877362 0
detect res: 340.399902 96.056824 415.000000 423.052612 0.866147 0
detect res: 7.182785 34.055344 163.182800 521.089905 0.741203 0
detect res: 159.104950 433.623596 395.260651 550.903992 0.739044 55
detect res: 81.713333 456.810913 125.030563 518.194275 0.683194 41
detect res: 253.461395 364.123352 304.291901 454.123352 0.611235 43
detect res: 282.405457 93.188477 309.046570 121.621582 0.558343 41
detect res: 281.694244 61.441063 309.968231 91.748878 0.553116 41

一応ちゃんと動作していることが分かった。
yolov5s.ptのモデルの代わりに自作したカスタムモデルを用意すれば、特定の物体をMilk-V Duo256Mで検知できるはず。
検出結果のBoundingBoxを使って矩形を描画するPythonプログラム
sample_yolo5はBoundingBox情報しか出力しないので、この情報を使って矩形描画するPythonプログラムを以下に掲載。結果情報はハードコードされているので、適宜変更して使う。
> python draw_boundingbox.py
# draw_boudingbox.py
import cv2
import numpy as np

# dog.jpg
input1 = {
  "file":"dog.jpg",
  "bounding_boxes" : [
    [137.379303, 217.066299, 310.982025, 541.966858, 0.915610, 16],
    [473.738098, 71.988899, 683.512390, 176.103775, 0.722637, 2],
    [166.451904, 118.458267, 563.148132, 423.640594, 0.580343, 1],
  ]
}

# 000000000113.jpg
input2 = {
  "file":"000000000113.jpg",
  "bounding_boxes" : [
    [149.599243, 52.756699, 344.154053, 434.715759, 0.877362, 0],
    [340.399902, 96.056824, 415.000000, 423.052612, 0.866147, 0],
    [7.182785, 34.055344, 163.182800, 521.089905, 0.741203, 0],
    [159.104950, 433.623596, 395.260651, 550.903992, 0.739044, 55],
    [81.713333, 456.810913, 125.030563, 518.194275, 0.683194, 41],
    [253.461395, 364.123352, 304.291901, 454.123352, 0.611235, 43],
    [282.405457, 93.188477, 309.046570, 121.621582, 0.558343, 41],
    [281.694244, 61.441063, 309.968231, 91.748878, 0.553116, 41],
  ]
}

# どのデータを描画するか?
input_data = input2

# COCO2017 Labels
# https://github.com/amikelive/coco-labels/blob/master/coco-labels-2014_2017.txt
coco2017_labels = [
"person",
"bicycle",
"car",
"motorcycle",
"airplane",
"bus",
"train",
"truck",
"boat",
"traffic light",
"fire hydrant",
"stop sign",
"parking meter",
"bench",
"bird",
"cat",
"dog",
"horse",
"sheep",
"cow",
"elephant",
"bear",
"zebra",
"giraffe",
"backpack",
"umbrella",
"handbag",
"tie",
"suitcase",
"frisbee",
"skis",
"snowboard",
"sports ball",
"kite",
"baseball bat",
"baseball glove",
"skateboard",
"surfboard",
"tennis racket",
"bottle",
"wine glass",
"cup",
"fork",
"knife",
"spoon",
"bowl",
"banana",
"apple",
"sandwich",
"orange",
"broccoli",
"carrot",
"hot dog",
"pizza",
"donut",
"cake",
"chair",
"couch",
"potted plant",
"bed",
"dining table",
"toilet",
"tv",
"laptop",
"mouse",
"remote",
"keyboard",
"cell phone",
"microwave",
"oven",
"toaster",
"sink",
"refrigerator",
"book",
"clock",
"vase",
"scissors",
"teddy bear",
"hair drier",
"toothbrush"
]

def draw_bounding_boxes(image, bounding_boxes, labels, color=(0, 255, 255), thickness=2):
  for bbox in bounding_boxes:
    x1, y1, x2, y2, score, classes = bbox
    cv2.rectangle(image, (int(x1), int(y1+10)), (int(x2), int(y2)), color, thickness)
    txt = "%.2f %s"%(float(score), labels[int(classes)])
    cv2.putText(image, txt, (int(x1), int(y1)), cv2.FONT_HERSHEY_SIMPLEX, 0.6, (0,0,255), 2)
  return image

# 画像の読み込み
image = cv2.imread(input_data["file"])
# Bounding Boxesの描画
image_with_boxes = draw_bounding_boxes(image.copy(), input_data["bounding_boxes"], coco2017_labels)
# 描画された画像の表示
cv2.imshow("Image with Bounding Boxes", image_with_boxes)
cv2.waitKey(0)
cv2.destroyAllWindows()
Discussion