Whisper API, ChatGPT API, VOICEVOXを使ってAIと会話する
概要
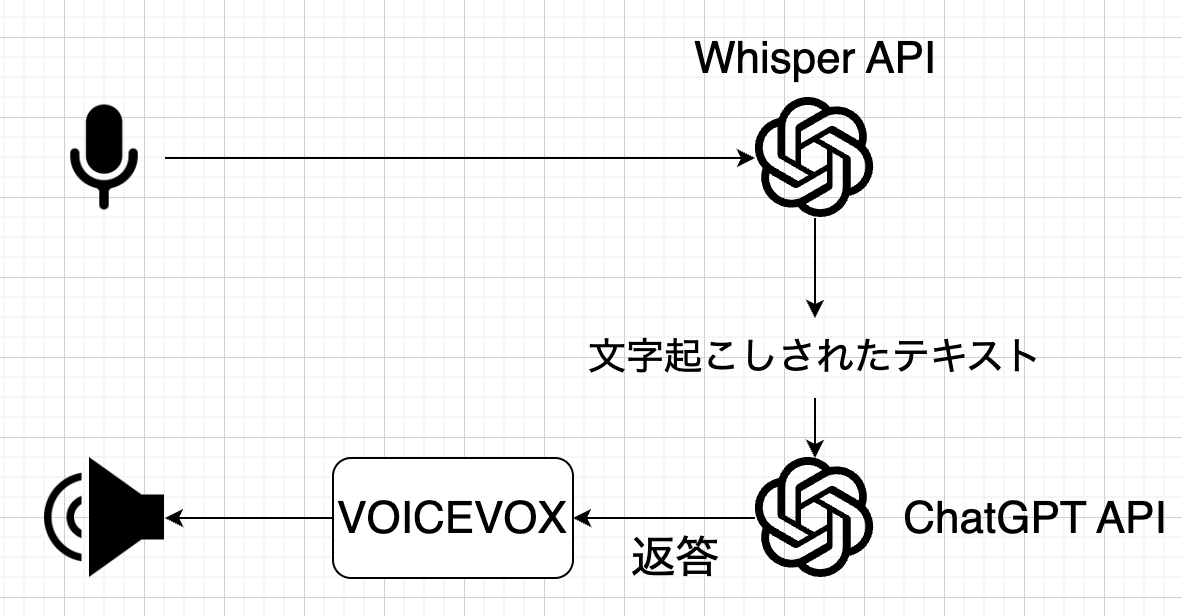
マイク入力をWhisper APIで文字起こしし、音声から起こした文字をChatGPT APIに投げて返答をVOICEVOXに渡すことによってChatGPTとの会話を行います。
概要図
リポジトリはこちらです
Whisper APIを使用してマイク入力をテキストに
マイクからの入力をWhisperで文字起こしをするコードはこちらの記事を参考にさせていただきました。
get_audio_from_micでマイク入力を取得し、Whisper APIを使って文字に起こします
def voice_to_text():
    audio = get_audio_from_mic()
    audio_data = BytesIO(audio.get_wav_data())
    audio_data.name = 'from_mic.wav'
    transcript = openai.Audio.transcribe('whisper-1', audio_data)
    return transcript['text']
get_audio_from_micの内容はこちらです
import speech_recognition as sr
r = sr.Recognizer()

def get_audio_from_mic():
    with sr.Microphone(sample_rate=16000) as source:
        print("なにか話してください")
        audio = r.listen(source)
        print("考え中...")
        return audio
ChatGPT APIを使用して返答を取得
ChatGPT APIに会話のリストであるmessagesを渡して返答を受け取ります
ChatGPTからのレスポンスは以下の様なフォーマットになっています
{
 'id': 'chatcmpl-6p9XYPYSTTRi0xEviKjjilqrWU2Ve',
 'object': 'chat.completion',
 'created': 1677649420,
 'model': 'gpt-3.5-turbo',
 'usage': {'prompt_tokens': 56, 'completion_tokens': 31, 'total_tokens': 87},
 'choices': [
   {
    'message': {
      'role': 'assistant',
      'content': 'The 2020 World Series was played in Arlington, Texas at the Globe Life Field, which was the new home stadium for the Texas Rangers.'},
    'finish_reason': 'stop',
    'index': 0
   }
  ]
}
詳しいChatGPT APIの仕様についてはこちらをご覧ください
def chat(messages: list) -> str:
    result = openai.ChatCompletion.create(
        model='gpt-3.5-turbo',
        messages=messages
    )
    response_text = result['choices'][0]['message']['content']
    return response_text
VOICEVOXを使用してテキストを音声に
VOICEVOXは無料で使えるテキスト読み上げソフトです。 今回はVOICEVOXを使用して音声を読み上げてもらおうと思います。
VOICEVOXのAPI
VOICEVOXはGUIだけでなくREST APIも提供されており、VOICEVOXを起動してhttp://localhost:50021/docsにアクセスすることでAPI仕様書を確認することができます。
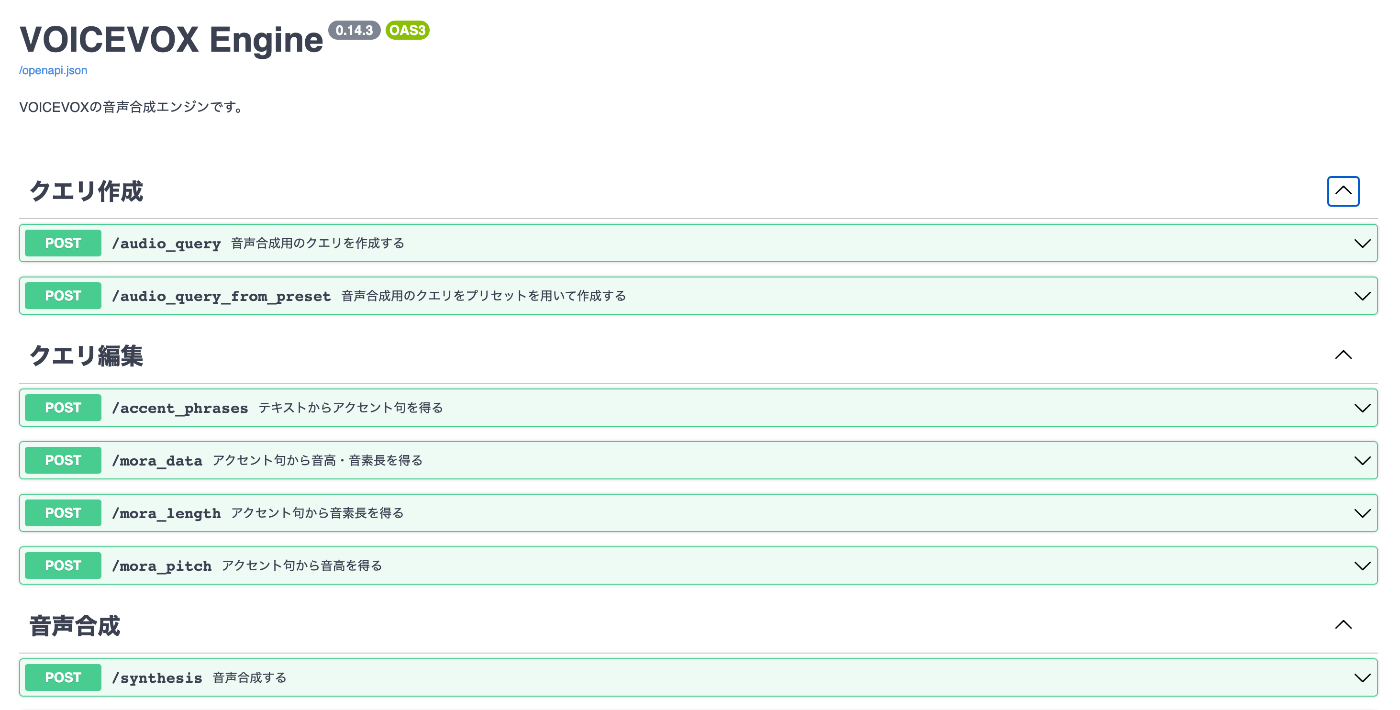
また、Dockerイメージも公開されておりGUIが不要な場合はこちらを利用することもできます。
今回は/audio_query, /synthesisの二つエンドポイントを使用します。
VOICEVOXを使用してwavファイルを取得する
/audio_queryで音声合成用のクエリを取得し、その結果を/synthesisにPOSTすることでwavファイルを取得します
def post_audio_query(text: str) -> dict:
    params = {'text': text, 'speaker': 1}
    res = requests.post('http://localhost:50021/audio_query', params=params)
    return res.json()

def post_synthesis(audio_query_response: dict) -> bytes:
    params = {'speaker': 1}
    headers = {'content-type': 'application/json'}
    audio_query_response_json = json.dumps(audio_query_response)
    res = requests.post(
        'http://localhost:50021/synthesis',
        data=audio_query_response_json,
        params=params,
        headers=headers
    )
    return res.content
wavを再生する
PyAudioを使用してVOICEVOXから取得した音声ファイルを再生します。
再生の最後でノイズが乗ってしまうのでsleep(0.5)を入れています(stream.close()のタイミングが原因だと思うのですが🤔)
def play_wavfile(wav_file: bytes):
    wr: wave.Wave_read = wave.open(io.BytesIO(wav_file))
    p = pyaudio.PyAudio()
    stream = p.open(
        format=p.get_format_from_width(wr.getsampwidth()),
        channels=wr.getnchannels(),
        rate=wr.getframerate(),
        output=True
    )
    chunk = 1024
    data = wr.readframes(chunk)
    while data:
        stream.write(data)
        data = wr.readframes(chunk)
    sleep(0.5)
    stream.close()
    p.terminate()
実行する
上記の処理を組み合わせてChatGPTと会話をしてみましょう
main.pyは以下のようになっています
import openai
from chat import chat
from whisper import voice_to_text
from voicevox import text_to_voice
from conf import APIKEY

openai.api_key = APIKEY
EXIT_PHRASE = 'exit'

def main():
    messages = [
        {'role': 'system', 'content': 'You are a helpful assistant.'},
        {'role': 'user', 'content': f'終了やストップなどの会話を終了する内容で話しかけられた場合は{EXIT_PHRASE}のみを返答してください。'}
    ]
    exit_flag = False
    while not exit_flag:
        text = voice_to_text()
        messages.append(
            {'role': 'user', 'content': text}
        )
        response = chat(messages)

        if response == EXIT_PHRASE:
            exit_flag = True
            response = 'またね!'

        messages.append(
            {'role': 'assistant', 'content': response}
        )
        print(f'User   : {text}')
        print(f'ChatGPT: {response}')
        text_to_voice(response)


if __name__ == '__main__':
    main()
事前に{'role': 'user', 'content': f'終了やストップなどの会話を終了する内容で話しかけられた場合は{EXIT_PHRASE}のみを返答してください。'}というプロンプトを渡しておくことで、EXIT_PHRASEがChatGPTから帰ってきたらプログラムを終了するようにしています。
こうするによって
END_PHRASES = ['終了', 'ストップ', 'stop']

text = voice_to_text()
if text in END_PHRASES:
    # 終了処理
↑のように手動で指定した文字列に一致させて停止するのではなく、終わりや会話終了といった会話を終了する内容で話しかけられた場合に当てはまるテキストをChatGPTに解釈させてEND_PHRASEを返答させることにより柔軟に停止することが可能になっています。
ただし、ChatGPT側の解釈によっては停止しないことがあるのでそこはデメリットです
python main.pyで実行することができます
参考
Discussion
自分はwindows10(64bit) 22H2の環境なのですが
こちらの記事を参考にAIと会話できるようになりました!
python全く触ったことなくて
今のこの盛り上がりを体験するには今やるっきゃねえ!!のノリで挑戦する自分には
とてもぴったりな記事でありがとうございました!
値段も安いし今後もいろいろと楽しめそうです
ずんだもんと会話できて楽しいですね!
pythonを業務で書かなくなって久しく、拙いコードになってしまいましたがお役に立てたようで良かったです!