

はじめに
airflow上でdbtを実行するパッケージcosmosがリリースされたので触ってみました。
これまでの課題
airflow上で直接dbtを動かすパターン
airflow上でdbtを実行する場合、基本はBashOperatorが選択肢になります。この場合、以下のような課題点がありました。
- dbtと他のパッケージの依存関係の管理が必要
- dbt上の処理がすべてまとまって表示されるため、途中からやり直しなどの細かい制御は効かない
ECSなどの別サービスを呼び出すパターン
以下の記事のようにecsでdbtを実行することによってパッケージの依存関係からは解放されます。
ただし処理の細分化に関しては以前課題が残ったままの状況でした。
astronomerのblogではtaskを動的に生成することも行なっていましたが、かなり複雑な処理になります。
今回のパッケージについて
cosmosは上記を踏まえて以下のメリットを謳っています。
- Run dbt projects against Airflow connections instead of dbt profiles
- Native support for installing and running dbt in a virtual environment to avoid dependency conflicts with Airflow
- Run tests immediately after a model is done to catch issues early
- Utilize Airflow's data-aware scheduling to run models immediately after upstream ingestion
- Turn each dbt model into a task/task group complete with retries, alerting, etc.
特に2番目の仮想環境上での実行、5番目のmodelのtask groupへの細分化はこれまでairflowでの実行で課題に上がっていたものを解決するように思われます。
環境
- アーキテクチャ
- aws mwaa
- airflowバージョン
- v2.6.3
- dbtバージョン
- v1.6.0
- アダプター
- dbt-snowflake
セットアップ
前準備
まずはmwaa環境をドキュメントに従って作成します。
その後の大きな流れはGetting Started on MWAAに記載の通りですが、若干コードを変えないと上手くいかないところがあります。
MWAA環境設定
MWAA環境の初期インストールには以下の2ファイルが必要です。これらはMWAA上でPythonの仮想環境を扱う際に必要になります。
- startup.sh
- requirements.txt
それぞれの中身は以下になります。
#!/bin/sh

export DBT_VENV_PATH="${AIRFLOW_HOME}/dbt_venv"
export PIP_USER=false

python3 -m venv "${DBT_VENV_PATH}"

${DBT_VENV_PATH}/bin/pip install dbt-snowflake

export PIP_USER=true
MWAAの初期構築時にdbtのインストールとworkerが使用する仮想環境を作成します。
astronomer-cosmos==1.0.5
apache-airflow-providers-snowflake==4.4.2
virtualenv
この2つのファイルをS3にアップロードし、MWAAからパスを設定すれば準備完了です!

dbtのファイルを置く
S3のdags/dbtディレクトリの下にdbtのプロジェクトを丸々置きましょう。
今回はjaffle_shopのコードをdags/dbt/jaffle_shop`の下に置きます。

dagの作成
dagファイルを作成します。以下のように作成してください。ここでexecution_configで仮想環境を指定しています。
from pendulum import datetime

from airflow import DAG
from airflow.operators.empty import EmptyOperator
from cosmos import DbtTaskGroup, DbtDag, ProjectConfig, ProfileConfig, ExecutionConfig
from cosmos.constants import ExecutionMode
from cosmos.profiles import SnowflakeUserPasswordProfileMapping
import os


profile_config = ProfileConfig(
    profile_name="jaffle_shop",
    target_name="dev",
    profile_mapping = SnowflakeUserPasswordProfileMapping(
        conn_id = 'my_snowflake_connection',
    ),
)

project_config = ProjectConfig(
    dbt_project_path="/usr/local/airflow/dags/dbt/jaffle_shop",
)

execution_config = ExecutionConfig(
    dbt_executable_path=f"{os.environ['AIRFLOW_HOME']}/dbt_venv/bin/dbt",
    execution_mode=ExecutionMode.VIRTUALENV,
)

with DAG(
    dag_id="dbt_build_dag",
    start_date=datetime(2022, 11, 27),
    schedule=None,
):
    e1 = EmptyOperator(task_id="start_task")

    dbt_tg = DbtTaskGroup(
        group_id="dbt_task",
        project_config=project_config,
        profile_config=profile_config,
        execution_config=execution_config,
    )

    e2 = EmptyOperator(task_id="end_task")

    e1 >> dbt_tg >> e2
これをS3のdagsの下に配置します。

connectionの設定
cosmosはairflowのconnectionをprofiles.ymlにそのままマッピングしてくれます。なのでairflow側の設定のみでdbtを動かすことができます。
airflowにログインし、Admin > connetionを選択します。
新規追加からSnowflakeを選択し、諸々の値を入力します。
今回はdagでSnowflakeUserPasswordProfileMappingにしているのでパスワード認証にしましょう。
名称もdagと合わせてmy_snowflake_connectionとします。

こちらを入力すれば準備完了です!
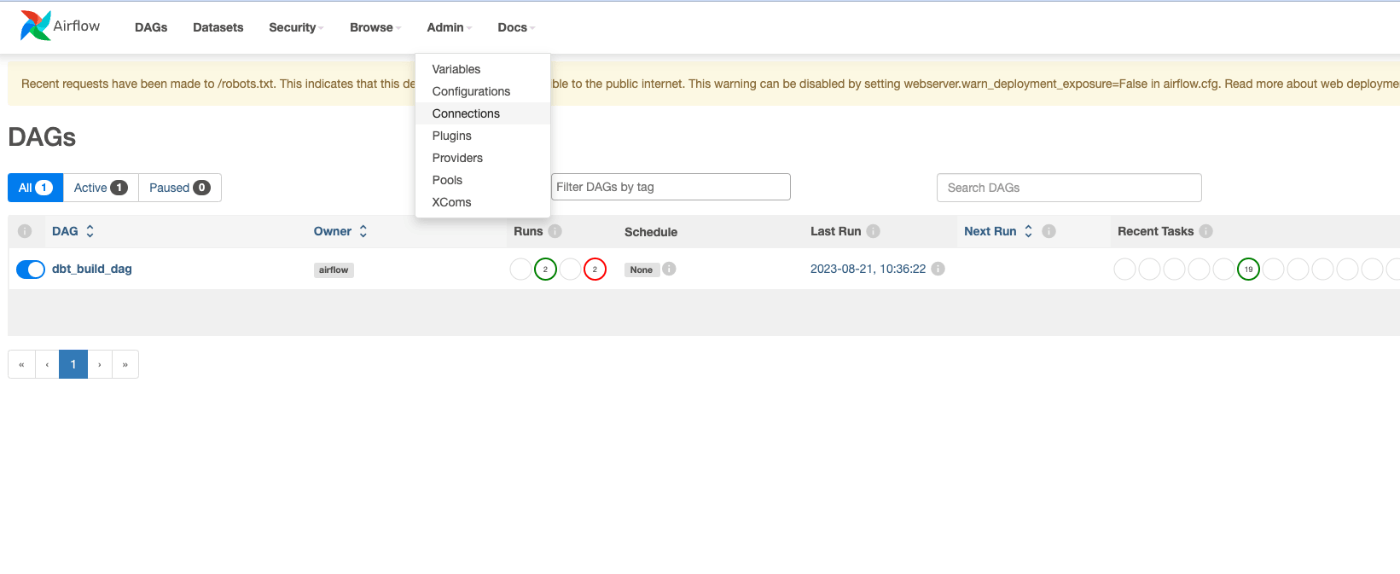
動作確認
DAGの画面に戻り、手動実行をしてみましょう。

上手くいけばすべてpassとなります。

本番化に向けて
認証情報をSecrets managerに移す
参考:
現在認証情報をairflowのconnectionに記載していますが、これをSecrets managerに移しましょう。
secrets managerの作成
airflow/connections/my_snowflake_connectionという名前でsecretを作成しましょう(my_snowflake_connectionがairflowのconnection名に対応する)。
中身は以下を参考にkey-valueのペアにしましょう。
参考:
MWAA設定
次にMWAAのaiflow configrationを以下のように設定します。
| Configuration option | Custom value |
|---|---|
| secrets.backend | airflow.providers.amazon.aws.secrets.secrets_manager.SecretsManagerBackend |
| secrets.backend_kwargs | {"connections_prefix" : "airflow/connections"} |
これでairflow/connectionsのprefixがついたsecretはairflowのconnectionとして認識されるようになります。
最後にMWAAの実行roleでSecrets managerにアクセスできるように権限を追加します。
{
    "Version": "2012-10-17",
    "Statement": [
        ...中略
        {
            "Action": [
                "secretsmanager:ListSecretVersionIds",
                "secretsmanager:GetSecretValue",
                "secretsmanager:GetResourcePolicy",
                "secretsmanager:DescribeSecret"
            ],
            "Effect": "Allow",
            "Resource": "arn:aws:secretsmanager:ap-northeast-1:1234567890:secret:airflow/connections/my_snowflake_connection-abcdefg"
        },
        {
            "Action": "secretsmanager:ListSecrets",
            "Effect": "Allow",
            "Resource": "*"
        }
    ]
}
airflowのconnectionからsnowflakeへの接続を削除し、再度同じDAGが成功すれば問題ありません。
エラーをslackに通知する
エラーが起こった際に通知を飛ばしてみましょう。Airflow 2.6系からは通知系のクラスNotifierが利用可能です。今回はSlackNotifierで通知を飛ばしてみましょう。
以下のような関数を定義します。
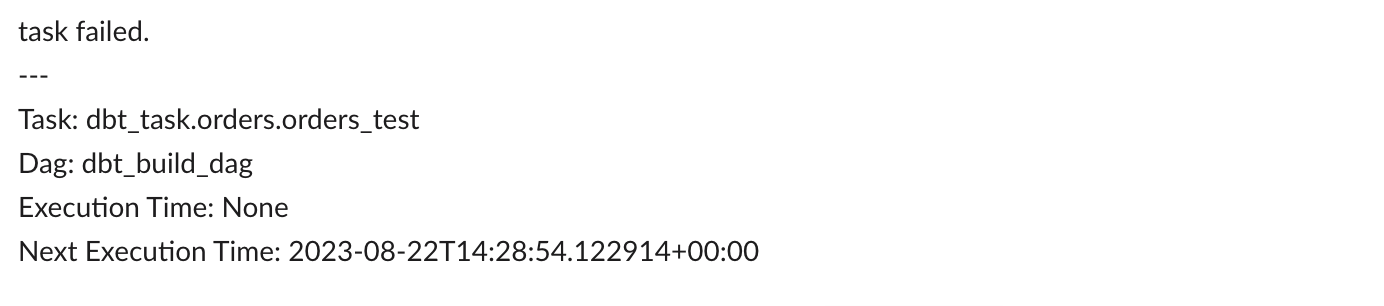
def slack_notify(context):
    message = f"""
        task failed.
        ---
        Task: {context.get('task_instance').task_id}
        Dag: {context.get('task_instance').dag_id}
        Execution Time: {context.get('execution_date')}
        Next Execution Time: {context.get('next_execution_date')}
    """

    return SlackNotifier(
        slack_conn_id='slack_connection',
        text=textwrap.dedent(message)[1:-1],
        channel="#channel-name",
    ).notify(context)
これをDAGの引数に加えます。
default_args = {
    'owner': 'airflow',
    'depends_on_past': False,
    "on_failure_callback": slack_notify,
}
また、SlackのWebhookをconnection設定に追加するために、Secret managerに以下のように追加を行います。passwordにはwebhookを入れてください。

これでtaskを失敗させると、以下のような通知を飛ばすことができます。
細かな挙動について
testの順序
testについては以下の通り、各modelの実行後に実施するパターンとすべてのmodelのrun実行後に実施するパターンの2通りが設定できます。
testのみの実行にはまだ対応していないようです。
on-run-start/on-run-endのタイミング
on-run-start/on-run-endがどのタイミングで実行されるか確認しましょう。
適当なテーブルを作り、そこにinsertをしてみます。
create table test_db.public.run_test
(
	text varchar,
	execution_date timestamp
);
dbt_project.ymlにon-run-start/endを追加します。
on-run-start: "insert into test_db.public.run_test values ('run started', current_timestamp())"
on-run-end: "insert into test_db.public.run_test values ('run ended', current_timestamp())"
テーブルをselectしてみます。
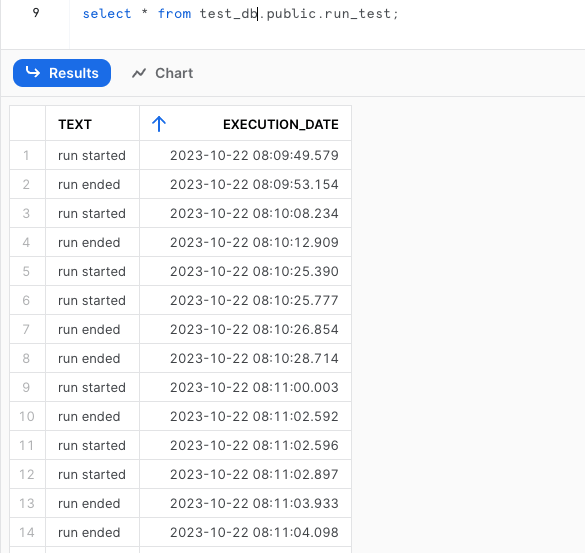
どうやらすべてのmodelごとにon-run-startが実行されているようです。elementaryのようにrun_resultをinsertするような処理は少しオーベーヘッドになりそうな感触がありますね。
すべてのmodelで実行する必要がない処理はairflowのtask自体を分けたほうがよさそうです。
parseがいつされるか
documentを読む限り、parseは最初の実行時に1回のみ行われるようです。parseの方法はdbt lsを使う方法とmanifestファイルを自分でアップロードする方法があります。基本はdbt lsで自動生成させるのが楽そうです。巨大なprojectでparseの時間が気になる場合はS3などに事前にファイルを置いておくとよいかと思います。
課題点
ログがイケてない
適当に1/0を入れたバグったSQLを入れてDAGを落とした場合、以下のようなエラーメッセージになります。
[2023-10-22, 15:24:47 UTC] {{taskinstance.py:1824}} ERROR - Task failed with exception
Traceback (most recent call last):
  File "/usr/local/airflow/.local/lib/python3.10/site-packages/cosmos/operators/virtualenv.py", line 95, in execute
    output = super().execute(context)
  File "/usr/local/airflow/.local/lib/python3.10/site-packages/cosmos/operators/local.py", line 282, in execute
    result = self.build_and_run_cmd(context=context)
  File "/usr/local/airflow/.local/lib/python3.10/site-packages/cosmos/operators/local.py", line 194, in build_and_run_cmd
    return self.run_command(cmd=dbt_cmd, env=env, context=context)
  File "/usr/local/airflow/.local/lib/python3.10/site-packages/cosmos/operators/local.py", line 185, in run_command
    self.exception_handling(result)
  File "/usr/local/airflow/.local/lib/python3.10/site-packages/cosmos/operators/local.py", line 77, in exception_handling
    raise AirflowException(
airflow.exceptions.AirflowException: ('dbt command failed. The command returned a non-zero exit code 1. Details: ', '\x1b[0m15:24:38  Running with dbt=1.6.6', '\x1b[0m15:24:39  Registered adapter: snowflake=1.6.4', '\x1b[0m15:24:39  Unable to do partial parsing because saved manifest not found. Starting full parse.', '\x1b[0m15:24:42  Found 5 models, 3 seeds, 2 operations, 20 tests, 0 sources, 0 exposures, 0 metrics, 375 macros, 0 groups, 0 semantic models', '\x1b[0m15:24:42', '\x1b[0m15:24:44', '\x1b[0m15:24:44  Running 1 on-run-start hook', '\x1b[0m15:24:44  1 of 1 START hook: jaffle_shop.on-run-start.0 .................................. [RUN]', '\x1b[0m15:24:44  1 of 1 OK hook: jaffle_shop.on-run-start.0 ..................................... [\x1b[32mSUCCESS 1\x1b[0m in 0.80s]', '\x1b[0m15:24:44', "\x1b[0m15:24:44  Concurrency: 1 threads (target='dev')", '\x1b[0m15:24:44', '\x1b[0m15:24:44  1 of 1 START sql table model PUBLIC.customers .................................. [RUN]', '\x1b[0m15:24:46  1 of 1 ERROR creating sql table model PUBLIC.customers ......................... [\x1b[31mERROR\x1b[0m in 1.31s]', '\x1b[0m15:24:46', '\x1b[0m15:24:46  Running 1 on-run-end hook', '\x1b[0m15:24:46  1 of 1 START hook: jaffle_shop.on-run-end.0 .................................... [RUN]', '\x1b[0m15:24:46  1 of 1 OK hook: jaffle_shop.on-run-end.0 ....................................... [\x1b[32mSUCCESS 1\x1b[0m in 0.70s]', '\x1b[0m15:24:46', '\x1b[0m15:24:46', '\x1b[0m15:24:46  Finished running 1 table model, 2 hooks in 0 hours 0 minutes and 4.11 seconds (4.11s).', '\x1b[0m15:24:46', '\x1b[0m15:24:46  \x1b[31mCompleted with 1 error and 0 warnings:\x1b[0m', '\x1b[0m15:24:46', '\x1b[0m15:24:46    Database Error in model customers (models/customers.sql)', '  100051 (22012): Division by zero', '  compiled Code at target/run/jaffle_shop/models/customers.sql', '\x1b[0m15:24:46', '\x1b[0m15:24:46  Done. PASS=0 WARN=0 ERROR=1 SKIP=0 TOTAL=1')
横一列にdbtのログが表示されるので少しみづらいですね(ある程度は耐えられる程度ではありますが)。
model数が変化すると過去の履歴が見られなくなる
これはairflowの仕様の問題かと思いますが、先ほどerrorを起こしたcustomer.sqlを削除します。すると過去の実行履歴もcustomerのtaskが削除され、エラーログが閲覧できない状態になります。

上図の場合、stg_customerの後ろにcustomerがあったのですが、UI上では表示されず、end_taskがupstream_failedの状態となっています。MWAAの場合cloudwatchにもログが残るため完全に閲覧不可能となるわけではないですが、この点は十分に押さえておく必要がある点になります。
チューニングTips
DAGパース時のエラー
Cosmosはdbtのmodelごとにtaskを動的に生成するため、一般的なワークフローよりもtask数が増加する傾向にあります。特にdbt lsを使ったparseを行う場合にはdbt実行に時間がかかり、import timeoutが発生する場合が多いです。その場合は以下のような対策が必要になります。
- core.dagbag_import_timeoutを延ばす
- dbt lsでなく、manifestファイルをあらかじめS3に配置しておき、parseを行う
- スケールする選択肢ですが、cicdで自動的にmanifest.jsonをアップロードするような仕組みが必要になります。
参考
実行時のエラー
前項の通り、一般的なワークフローよりもtaskが多くなる傾向にあるため、airflowのschedulerやworkerに負荷がかかりやすい傾向があります。dbt projectの肥大化で特定のmodelが実行されない、ログが出力されずに失敗する、などの問題が発生することもあります。そのような場合は以下のような対策をお勧めします。
- celery.worker_autoscaleの調整
- workerが同時に実行できるtask数を軽減します。worker内でOOMが発生している場合に有効です
- retryの設定
- 実行タイミングや、同時に実行しているmodelの複雑さによってworkerのリソース使用状況が変わるため、retryするとうまくいく場合が多いです。異なるwokerにtaskをアサインされるのが望ましいため5分程度の待機時間を設けるのがよいでしょう
- workerノードの最小数を増やす
- airflowではキューに入ったまま一定時間実行されなかったtaskはzombie taskとして扱われ、失敗することがあります。workerのスケーリングがオーバーヘッドになることがあるので、min_workersを増やすと解決することがあります(詳細は私も調査できていないです、、、)
- ワークロードの変更
- 上記の通り、キューに入ったtaskをなるべく減らすようなワークロードの見直しを行いましょう
- testをすべてのmodelの完了後に実行する
- レイヤごとにtask groupを分割する
- 上記の通り、キューに入ったtaskをなるべく減らすようなワークロードの見直しを行いましょう
いずれの場合でも、cloudwatchからワークフロー実行時のリソース使用状況や、taskのキュー数などを確認していくことが必要になります。サンプルのモニタリングダッシュボードがawsから提供されているので、それを活用するのがよいでしょう。
監視設定
MWAAのtask単位でcloudwatchのcustom metricsが発生されるため、DAGが多いと結構バカにならない量の課金が発生します。
そのため、MWAAのConfigから送信対象のmetricsを絞るような設定をしてあげるとよいです。
詳細はドキュメントを見て各自で取捨選択した方がよいですが、以下のmetricsでほぼ事足りるかと思います。
- dag_processing.total_parse_time
- dag_processing.processor_timeouts
- scheduler.tasks.pending
- scheduler.tasks.killed_externally
- scheduler_heartbeat
- ti_failure
- zombies_killed
おわりに
airflowでdbtを実行するcosmosを触ってみました。まだ発展途上の面もありますが、十分に本番投入できるパッケージだと感じました。dagstarやprefectもdbt向けのライブラリを提供しているようで、エコシステムもどんどん発展が期待されますね。

Discussion