TypeScriptとMaterial UIを使った開発環境をセットアップする手順
この記事では、TypeScriptとMaterial UIを使った開発環境をセットアップする手順について紹介します。
はじめに
最近、フロントエンドのWebアプリケーション開発に興味が出てきました。
いろいろ調べてみたところ、これから始めるのであれば TypeScript と Material UI を使うと良さそうな気がします。というわけで、さっそく開発環境をセットアップしてみました。
インストール
インストールからステップバイステップで進めましょう。
私の環境はUbuntu 20.04 Desktopですが、他のOSを使っていても同じようにできると思います。
準備
はじめに適当なディレクトリを作ってそこへ移動します。
mkdir -p ~/projects/webapp/hello
cd ~/projects/webapp/hello/
それから npm init -y を実行して、初期化された package.json を生成します。
npm init -y
React
Material UIの基盤として React が必要なので、これを先にインストールしましょう。
npm install react react-dom react-scripts
TypeScript
続けてTypeScript、関連する型の定義をインストールします。
npm install -D typescript @types/react @types/react-dom
また、npx tsc --init を実行して、TypeScriptの設定ファイル tsconfig.json を生成します。
npx tsc --init
Material UI
Material UIと関連するモジュールをインストールします。
npm install @mui/material @mui/icons-material @emotion/react @emotion/styled
package.json
インストールは以上で終わりで、このとき package.json は次のような感じになるはずです。
{
  "name": "hello",
  "version": "1.0.0",
  "description": "",
  "main": "index.js",
  "scripts": {
    "test": "echo \"Error: no test specified\" && exit 1"
  },
  "keywords": [],
  "author": "",
  "license": "ISC",
  "dependencies": {
    "@emotion/react": "^11.9.0",
    "@emotion/styled": "^11.8.1",
    "@mui/icons-material": "^5.8.2",
    "@mui/material": "^5.8.2",
    "react": "^18.1.0",
    "react-dom": "^18.1.0",
    "react-scripts": "^5.0.1"
  },
  "devDependencies": {
    "@types/react": "^18.0.11",
    "@types/react-dom": "^18.0.5",
    "typescript": "^4.7.3"
  }
}
Hello world
それでは、TypeScriptとMaterial UIを使って Hello world してみましょう。
ファイルの作成と編集
まずは src と public のディレクトリを作って、最低限必要なファイルをそこへ置きます。
mkdir src public
touch src/index.tsx src/App.tsx public/index.html
それぞれファイルの中身は次のようにしました。
import React from 'react';
import ReactDOM from 'react-dom/client';
import { App } from './App';

const root = ReactDOM.createRoot(document.getElementById('root') as HTMLElement);

root.render(
  <React.StrictMode>
    <App />
  </React.StrictMode>
);
import Button from '@mui/material/Button';

export const App = () => <Button variant="contained">Hello World</Button>;
<!DOCTYPE html>
<html>
<head>
  <meta charset="UTF-8">
  <title>Hello, TypeScript and Material UI world! App</title>
</head>
<body>
  <div id="root"></div>
</body>
</html>
設定変更
動作確認する前に、2つ設定を変更する必要があります。
1つは package.json へ設定を追加することです。次のように1行追加します。
  "scripts": {
+   "start": "react-scripts start",
    "test": "echo \"Error: no test specified\" && exit 1"
  },
もう1つは tsconfig.json でコメントになっている箇所のコメントを解除することです。
+   "jsx": "preserve",
-   // "jsx": "preserve",
これで動作確認できます。
動作確認
ターミナルで次のように実行しましょう。
npm run start
おそらく Would you like to add the defaults to your package.json? › (Y/n) と聞かれますので、その時は Y を押します。
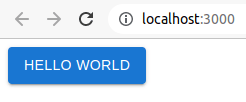
ブラウザが自動的に開いて、次のように表示されるはずです。

Hello Worldボタンが表示された様子
ひとまずこれで最低限、TypeScriptとMaterial UIを使った開発環境をセットアップできました。
おわりに
今回は省略したのですけれど、フロントエンドのWebアプリケーション開発は他にもやることがありまして、例えば次のようなライブラリをインストールして設定したり
あるいは package.json や tsconfig.json をカスタマイズしたり、やることが沢山あるなという感じです。
というわけで、今回はTypeScriptとMaterial UIを使った開発環境をセットアップする手順について紹介しました。どなたかのお役に立てば幸いです。
Discussion