🧣
五段階評価と平均点の実装
この記事で分かること
- 五段階評価(Raty)の実装
- 平均点の出力
前提条件
- 実装したいページの基本的な機能が実装済み
- bootstrapが導入済み
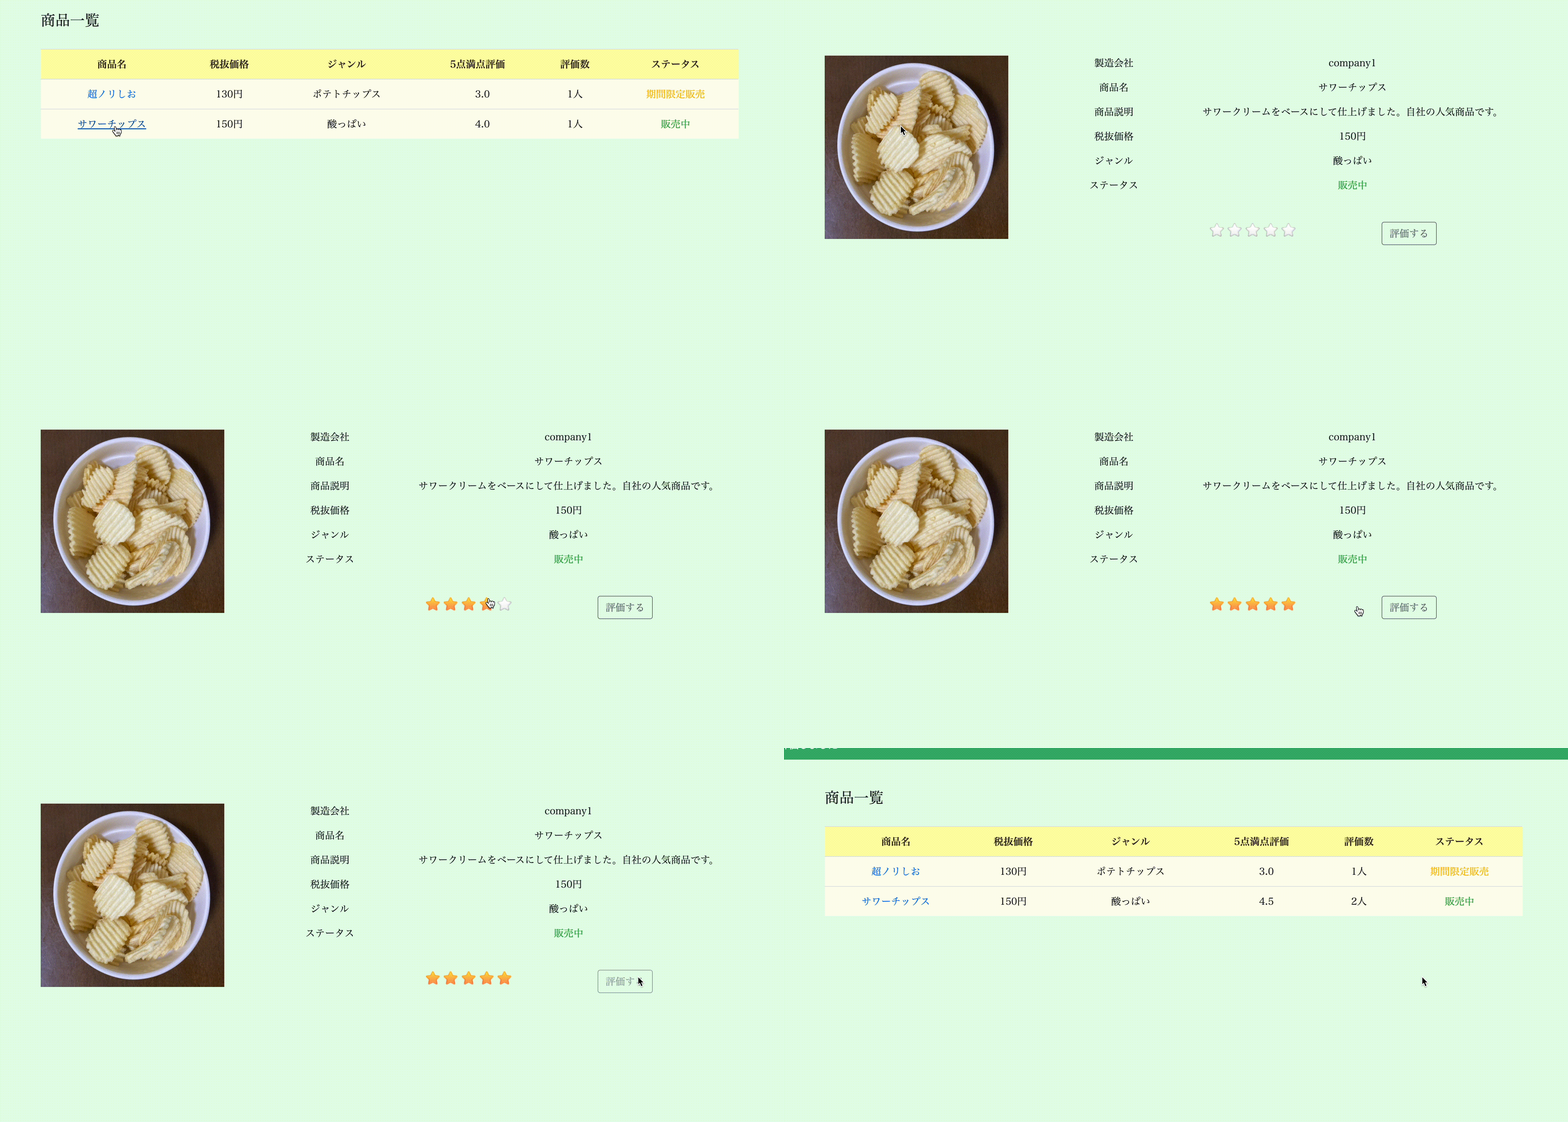
動作デモ

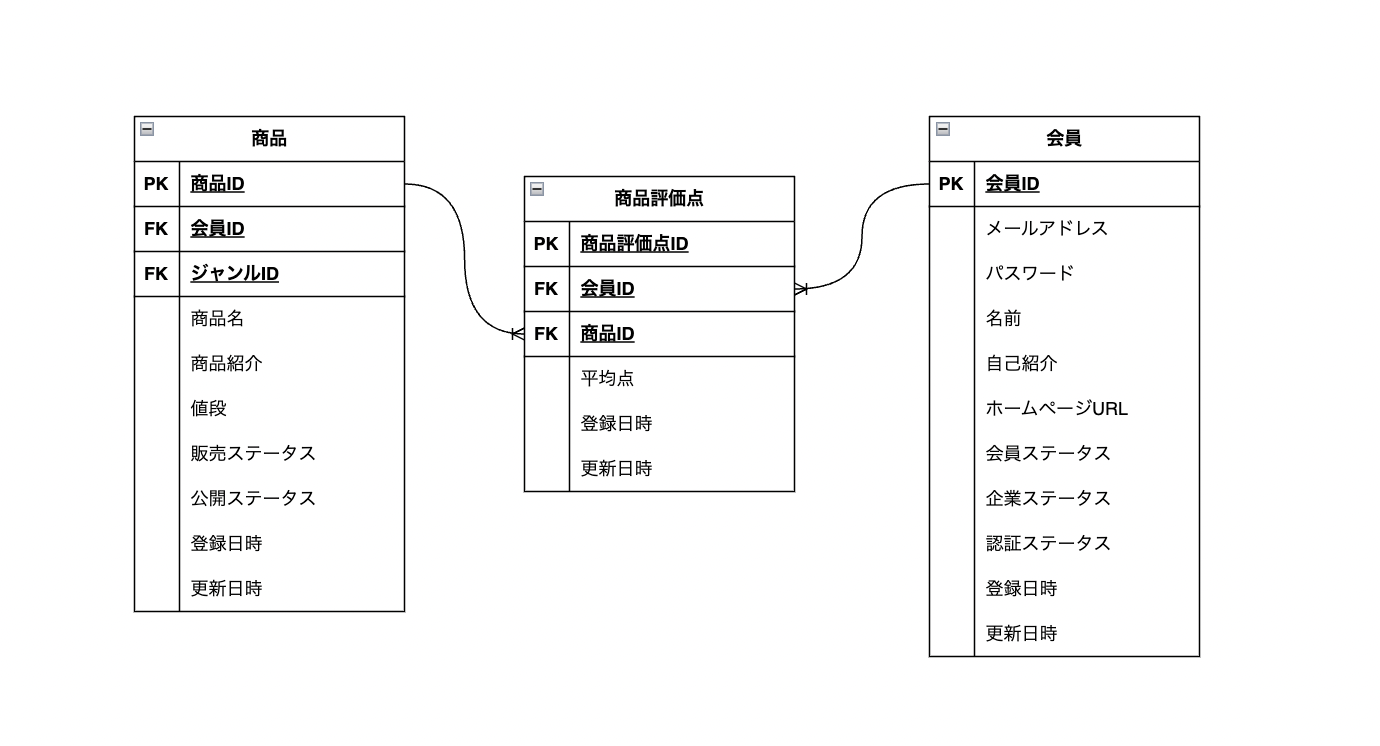
ER図

テーブル


実装手順
- jQueryの導入
- Ratyの導入
- モデル・コントローラの作成
- Routingの作成
- Controllerの作成
- Viewの作成
実装方法
実装手順に沿って紹介します。
jQueryの導入
下記のコードより「jQuery」をインストール
$ yarn add jquery
webpackerの設定をして「jQuery」を使用できるようにする。
config/webpack/enviroment.js
const { environment } = require('@rails/webpacker')

module.exports = environment

const webpack = require('webpack')
environment.plugins.prepend(
  'Provide',
  new webpack.ProvidePlugin({
    $: 'jquery/src/jquery',
    jQuery: 'jquery/src/jquery',
    Popper: 'popper.js'
  })
)
「jQuery」の呼び出しを行います。
app/javascript/packs/application.js
window.$ = window.jQuery = require('jquery');
以上で「jQuery」の設定は完成です。
Ratyの導入
手順は以下の通りです。
- Raty.jsをダウンロード
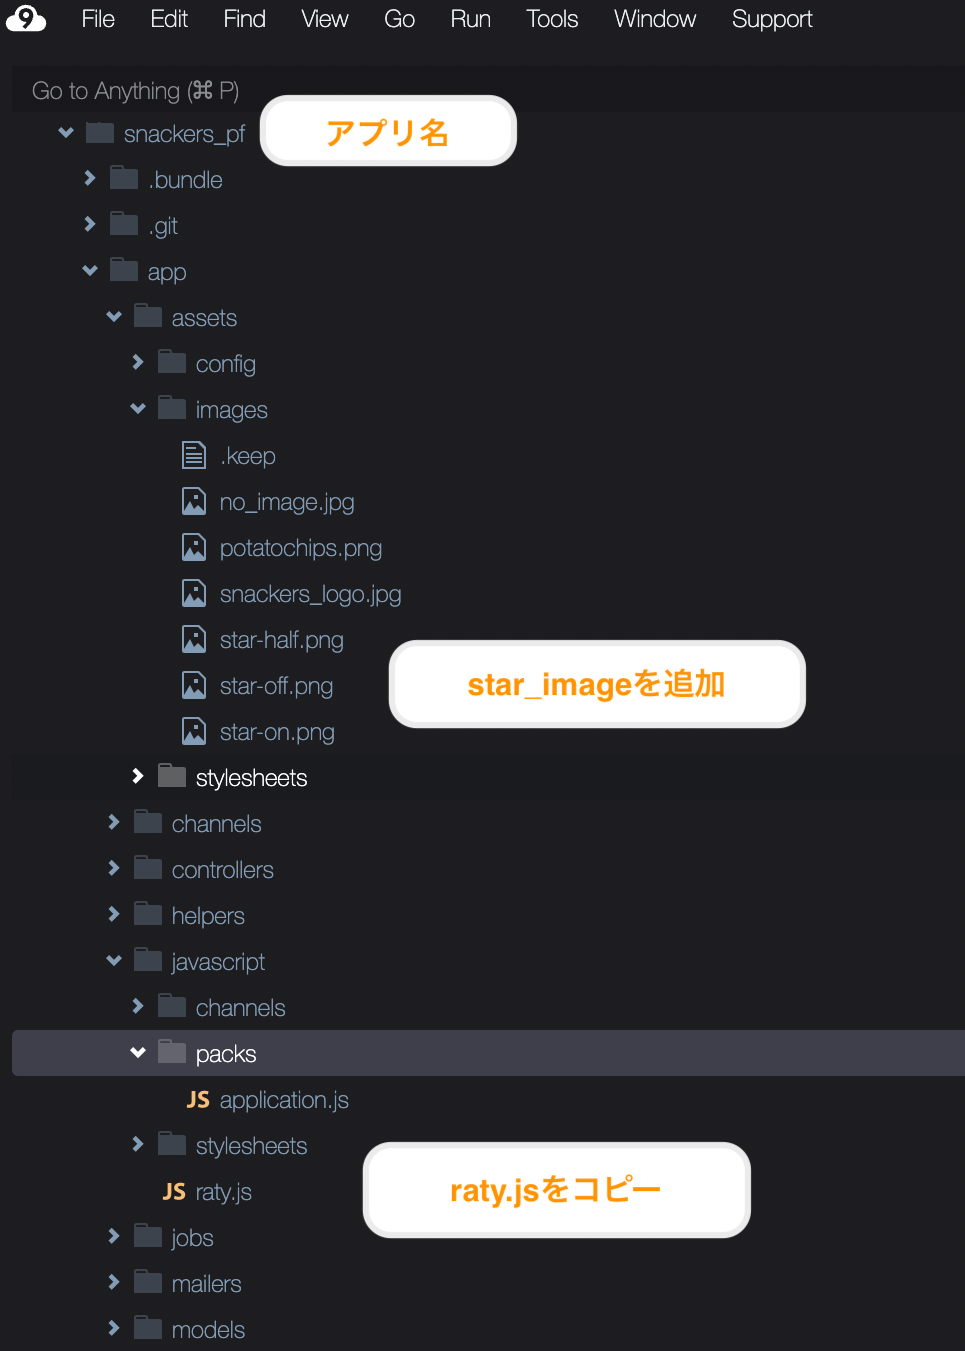
- 星の画像を(app/assets/images)に移動
- raty.jsファイルを(app/javascript)にコピー
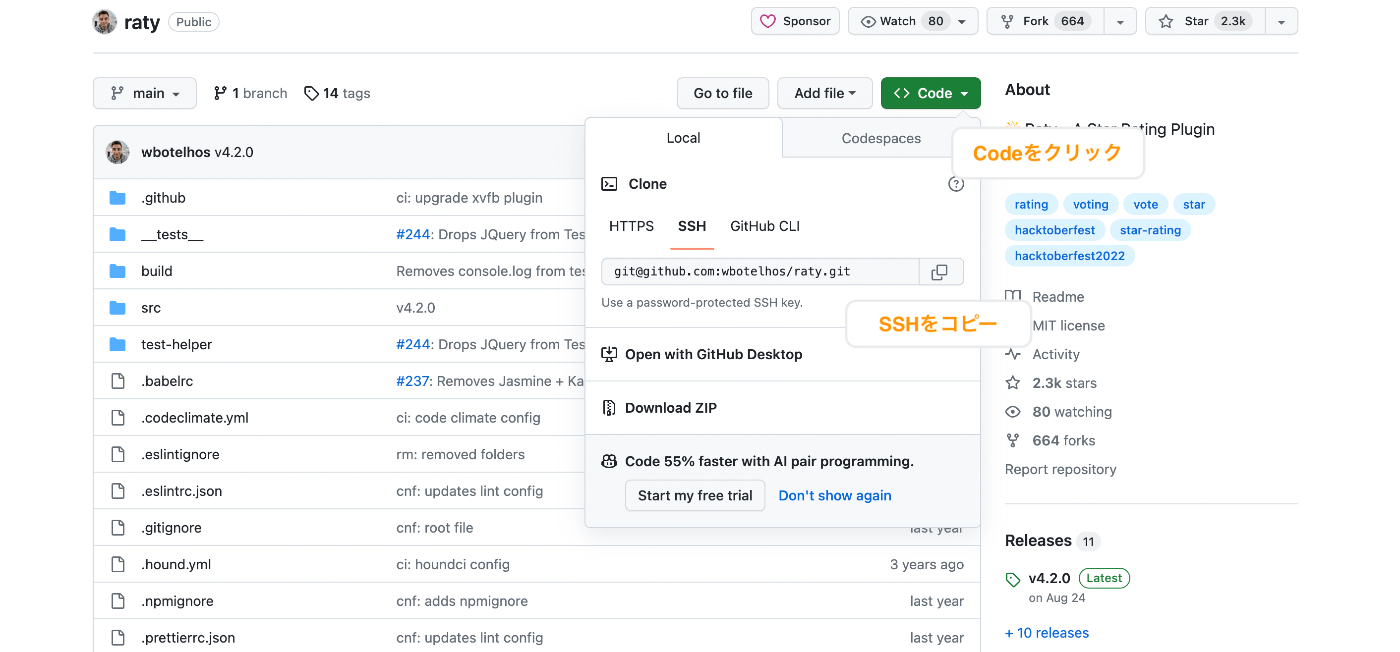
下記のurlからRaty.js(jQueryのプラグイン)をダウンロードします。

$ git clone git@github.com:wbotelhos/raty.git # リモートリポジトリをローカルリポジトリにダウンロード
また上記は「raty git」で検索するとヒットします。
続いてratyディレクトリおよび(scr/images)ファイルをクリックします。
ファイル内の以下3点を(実装中のapp/assets/images)にドラッグ・アンド・ドロップ
- star-on.png
- star-off.png
続いて(raty/src/raty.js)を(実装中app/javascript)にコピーします。
最後に「Raty」の呼び出しを行います。
app/javascript/packs/application.js
import Raty from "raty.js"
window.raty = function(elem,opt) {
  let raty =  new Raty(elem,opt)
  raty.init();
  return raty;
}
以上で「Raty」の設定は完成です。
- 完成イメージ

モデル・コントローラの作成
モデル名を「Reviews」で作成します。
$ rails g model Review user_id:integer product_id:integer all_rating:float
$ rails g controller
$ rails db:migrate
バリデーションの設定をします。
app/models/review.rb
  validates :all_rating, numericality: {
    less_than_or_equal_to: 5,
    greater_than_or_equal_to: 1}, presence: true
Routingの設定
config/routes.rb
    resources :users, only: [:show, :edit, :update] do
       resources :products, only: [:new, :index, :show, :create, :edit, :update] do
+        resources :reviews, only: [:create]
controllerを作成
public/reviews_controller
   before_action :authenticate_user!

  def create
    @user = current_user
    @product = Product.find(params[:product_id])
    @review = Review.create(review_params)
    if @review.save
      flash[:notice] = "商品を評価しました"
      redirect_to user_products_path(@product.user)
    else
      flash[:alert] = "評価に失敗しました"
      redirect_to user_products_path(@product.user)
    end
  end

  private

  def review_params
    params.require(:review).permit(:all_rating).merge(
      user_id: current_user.id, product_id: params[:product_id]
    )
  end
.mergeメソッド
.mergeメソッドを使用して、許可されたパラメータに2つの追加の情報(user_idとproduct_id)を追加する。
以下に.mergeメソッドなし版を追加
public/reviews_controller2
   before_action :authenticate_user!
  def create
    @user = current_user
    @product = Product.find(params[:product_id])
    @review = Review.create(review_params)
+   @review.user_id = @user.id  # レビューのユーザーIDを設定
+   @review.product_id = @product.id
    if @review.save
      flash[:notice] = "商品を評価しました"
      redirect_to user_products_path(@product.user)
    else
      flash[:alert] = "評価に失敗しました"
      redirect_to user_products_path(@product.user)
    end
  end

  private

  def review_params
-   params.require(:review).permit(:all_rating)
  end
結論).mergeメソッドがあるとコードを短縮でき、分かりやすい
viewを作成
public/products/show
<!-- スター投稿フォーム-->
<% if @product.reviewed_by?(current_user) %>
<div class = "row">
  <h3 class= "mt-5">🌟評価していただきありがとうございました🌟</h3>
 </div>
<% else %>
<div>
<%= render "public/products/starform" ,product: @product , review: @review %>
</div>
<% end %>
解説
if文を使って、五段階評価を1度していたらフォームを表示しないように設定する
public/products/_starform
<%= form_with model: review, url: user_product_reviews_path(current_user,product.id), local: true do |f|%>
  <div class='row group mt-5 text-center'>
    <div class= "col-sm-6 col-12 offset-sm-2 mb-sm-0 mb-3">
        <div id="star">
          <div id="post_raty"></div>
           <!-- スターの表示 -->
            <script>
              $(document).on('turbolinks:load', function() {
                let elem = document.querySelector('#post_raty');
                if (elem == null) return;

                elem.innerHTML = ""
                let opt = {
                  starOn: "<%= asset_path('star-on.png') %>",
                  starOff: "<%= asset_path('star-off.png') %>",
                  starHalf: "<%= asset_path('star-half.png') %>",
                  scoreName: 'review[all_rating]',
                };
                raty(elem, opt);
              });
            </script>
        </div>
    </div>
    <div class= "col-sm-1 col-12">
     <%= f.submit "評価する", class: 'btn btn-outline-secondary' %>
    </div>
  </div>
<% end %>
public/products/_product_all
 <% if products.blank? %>
  <h4 class= "col-4 offset-4 mt-5 background text-center">投稿した商品はありません</h4>
 <% else %>
  <div class= "row">
    <div class="col-12 table-responsive-sm">
      <table class='table table_group text-nowrap'>
        <tr class="head align-middle text-center">
          <th>商品名</th>
          <th>税抜価格</th>
          <th>ジャンル</th>
          <th>5点満点評価</th>
          <th>評価数</th>
          <th>ステータス</th>
        </tr>
        <% products.each do |product| %>
        <tr class="td mb-sm-0 align-middle text-center">
          <td><%= link_to product.name, user_product_path(@user, product) %></td>
          <td><%= product.price %><span>円</span></td>
          <td><%= product.genre.name %></td>
+         <td class="average-review-rating" data-score=<%= product.reviews.average(:all_rating) %>></div>
+          <%= product.reviews.average(:all_rating).to_f.round(1) %>
          </td>
+         <td><%= product.reviews.count %><span>人</span></td>
          <td>
            <% if product.active_status == "sale" %>
            <div class= "text-success"><%= product.active_status_i18n %></div>
            <% elsif product.active_status == "limited_time_sale" %>
             <div class= "text-warning"><%= product.active_status_i18n %></div>
             <% else %>
             <div class= "text-secondary"><%= product.active_status_i18n %></div>
             <% end %>
          </td>
        </tr>
        <% end %>
      </table>
    </div>
  </div>
 <% end %>
補足
 # Productモデルからall_ratingフィールドの平均値を取得
average_rating = Product.average(:all_rating)
以上で実装は完成です。
感想
記事を書いていると(javascript)や(.merge)などが理解できていないことが認識できました。javascriptはまだ勉強中なので、終わり次第また記事の更新をします。
この記事をかいた人
23/6/1にDWCに入学し、主にRailsの学習に取り組みました。卒業が近づきこれから何で学習をするか悩んだときに、技術ブログをしようと考えました。初心者ですがよろしくお願いします。
Discussion