[Symfony/Form] CollectionTypeの基本的な使い方
symfony/formのCollectionTypeの基本的な使い方についてまとめてみます。
ほぼ 公式ドキュメント の日本語訳ですが😅
最もベーシックな使い方
FormType
CollectionTypeを使う場合、 entry_type と entry_options という2つのオプションを付けるのが基本になります。
-
entry_typeで「コレクション(まとまり)の一つひとつのフィールドがどの型なのか」を定義 -
entry_optionsで「一つひとつのフィールドにどのようなオプションを設定するか」を定義
最もベーシックな使い方は以下のようなものです。
$builder
    ->add('emails', CollectionType::class, [
        'entry_type' => EmailType::class,
        'entry_options' => [
            'attr' => ['class' => 'email-box'],
        ],
    ])
;
この例では、
- 複数の
EmailTypeのフィールドをまとめたCollectionTypeのフィールドを定義 - 一つひとつの
EmailTypeには'attr' => ['class' => 'email-box']というオプションを設定
しています。
twig
テンプレートをレンダリングする際には、特に何も考えずに
{{ form_row(form.emails) }}
とだけ書けばデフォルトのform themeの定義に従ってそれらしいHTMLがレンダリングされます。

上の画面キャプチャは ttskch/symfony-micro-skeleton をベースに動かしたものなので、Bootstrap4のスタイルが適用されています。
ただ、CollectionTypeを使うケースというのは画面もそれなりに複雑なことが多いので、以下のようにforを回して1レコードずつ自分でマークアップすることが必要になることも多いかなと思います。
{{ form_label(form.emails) }}
{{ form_errors(form.emails) }}

<ul>
{% for email in form.emails %}
    <li>
        {{ form_errors(email) }}
        {{ form_widget(email) }}
    </li>
{% endfor %}
</ul>

初期データをセットする方法
CollectionTypeを使っているフォームに初期データをセットするには、以下のように配列を渡すだけでOKです。
$emails = [
    'foo@foo.com',
    'bar@bar.com',
];

$form = $this->createForm(EmailCollectionType::class, ['emails' => $emails]);
今回は entry_type が EmailType なので、普通にメールアドレスの文字列を配列にして、フィールド名である emails をキーとする連想配列として渡してあげればセットできます。
例えば entry_type がエンティティにマッピングされている自作FormTypeの場合は、文字列ではなくエンティティのインスタンスを渡すことになります。
画面上でデータを追加/削除してから送信する方法
CollectionTypeのフィールドをHTMLとしてレンダリングすると、以下のように <input> タグが複数並んでいて name 属性が配列になっている 形になります。
<input type="email" id="form_emails_0" name="form[emails][0]" class="email-box" value="foo@foo.com"/>
<input type="email" id="form_emails_1" name="form[emails][1]" class="email-box" value="bar@bar.com"/>
FormTypeを定義する際に、以下のように allow_add オプションを true にしておくと、 <input> タグを画面側で増やして、追加のデータを送ることができます。
$builder
    ->add('emails', CollectionType::class, [
        'entry_type' => EmailType::class,
        'entry_options' => [
            'attr' => ['class' => 'email-box'],
        ],
        'allow_add' => true, // コレ
    ])
;
つまり、
<input type="email" id="form_emails_2" name="form[emails][2]" value="baz@baz.com"/>
こんな感じの <input> タグを追加した状態で送信すれば、バックエンド側では
[
    0 => 'foo@foo.com',
    1 => 'bar@bar.com',
    2 => 'baz@baz.com',
]
というデータとして受け取れるというわけです。
<input> タグを増やすには普通にJavaScriptを駆使してDOMを複製すればいいのですが、Formを createView() して作られる <input> タグのHTML文字列と同じものがもともとテンプレートとして与えられていれば、その文字列からDOMを作ればいいので楽ですよね。
CollectoinTypeの prototype オプションを有効にしておくと、このテンプレートを出力することができます👍
$builder
    ->add('emails', CollectionType::class, [
        'entry_type' => EmailType::class,
        'entry_options' => [
            'attr' => ['class' => 'email-box'],
        ],
        'allow_add' => true,
        'prototype' => true, // コレ
    ])
;
FormTypeで prototype を true にした上で、twig側で
{{ form_widget(form.emails.vars.prototype)|e
とすると、テンプレートの文字列を取得できます。( |e は特殊文字をエスケープする |escape フィルタのエイリアスです)
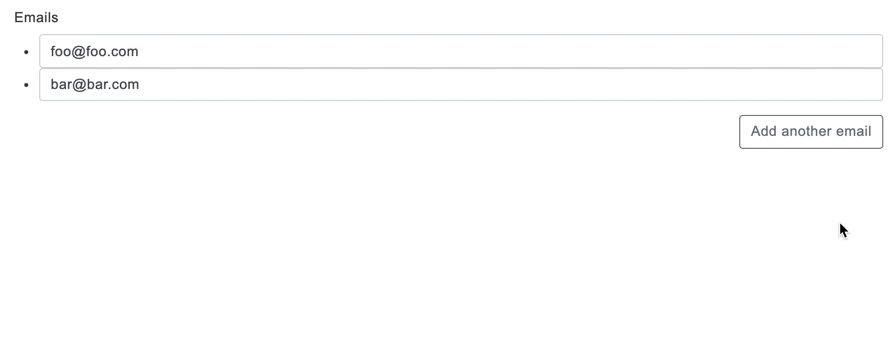
例えば、以下のようなtwigテンプレートとJavaScriptコードによって、「必要なだけ入力欄を増やせるフォーム」を作ることができます。
{{ form_start(form) }}

<ul id="email-fields-list"
    data-prototype="{{ form_widget(form.emails.vars.prototype)|e }}"
    data-widget-tags="{{ '<li></li>'|e }}"
    data-widget-counter="{{ form.emails|length }}">
{% for email in form.emails %}
    <li>
        {{ form_errors(email) }}
        {{ form_widget(email) }}
    </li>
{% endfor %}
</ul>

<button type="button"
    class="add-another-collection-widget"
    data-list-selector="#email-fields-list">Add another email</button>

{{ form_end(form) }}

<script src="add-collection-widget.js"></script>
// add-collection-widget.js
jQuery(document).ready(function () {
    jQuery('.add-another-collection-widget').click(function (e) {
        var list = jQuery(jQuery(this).attr('data-list-selector'));
        // 入力欄の数をカウント
        var counter = list.data('widget-counter') || list.children().length;

        // テンプレート文字列を取得
        var newWidget = list.attr('data-prototype');

        // テンプレート内の "__name__" を現在の入力欄の数で置き換え
        newWidget = newWidget.replace(/__name__/g, counter);

        // カウントを増やす
        counter++;
        list.data('widget-counter', counter);

        // 入力欄のDOMを生成してドキュメントに追加
        var newElem = jQuery(list.attr('data-widget-tags')).html(newWidget);
        newElem.appendTo(list);
    });
});
これで、以下のように入力欄を自由に増やせるフォームが作れます👍
また、allow_add の反対の allow_delete というオプションもあり、これを true にしておけば、画面側で <input> タグ自体を削除した状態で送信すれば、バックエンド側では「なくなっている要素をコレクションから削除する」という意図として処理してくれます。
こちらは画面側の対応としては無造作にDOMを削除してしまえばいいだけなので簡単ですね。
注意点:allow_add allow_delete をオブジェクトに対して使う場合は by_reference を false にする必要あり
公式ドキュメントの by_reference オプションの項 に、以下のような記載があります。
Similarly, if you’re using the CollectionType field where your underlying collection data is an object (like with Doctrine’s
ArrayCollection), thenby_referencemust be set tofalseif you need the adder and remover (e.g.addAuthor()andremoveAuthor()) to be called.
- CollectionTypeにおいて
- コレクションデータがオブジェクトで
- adderやremoverを使いたい(つまり
allow_addallow_deleteを有効にしたい)場合は -
by_referenceは必ずfalseにする必要がある
とのことです。
$builder
    ->add('foos', CollectionType::class, [
        'entry_type' => FooType::class,
        'entry_options' => [
            'attr' => ['class' => 'foo-box'],
        ],
        'allow_add' => true,
        'prototype' => true,
        'by_reference' => false, // コレ
    ])
;
こんな具合ですね。
これを忘れていると、CollectionTypeにおける by_reference のデフォルト値は true なので、結果的に親エンティティに Foo エンティティが addFoo() されず、正常にデータの追加ができない感じになるので要注意です。
by_reference の意味については
[Symfony/Form] DateTimeTypeなどの必須項目がInvalidArgumentExceptionになる時に読む記事
こちらの別記事の中でも詳細に説明しているので、ぜひ参考にしてみてください。
参考URL
より細かい機能については公式ドキュメントをご参照ください。
Discussion