🔘
Xへのシェアボタンの実装
開発環境
- macOS
- VSCode
- Rails 7.1.3.3
- ruby-3.2.3
- PostgreSQL 16.2
- Heroku
行いたいこと
-
Xのシェアボタンを作成し、任意の箇所に設置する。 -
シェアボタンを押すと現在のページ(ルームの名前)が読み込まれ、ポストの文言に組み込まれる様に実装する。
表示させたいViewにボタンの表示を記載する
- Xのロゴの後ろに「
でライブをシェアする」という文言をつけ加え、Xでライブをシェアするというボタンにする。
app/views/live_rooms/show.html.erb
<div id="share-button" data-room-name="<%= @live_room.name %>" data-room-url="<%= live_room_path(@live_room) %>">
  <button id="share-to-x">
    <%= image_tag 'logo-black.png', alt: 'X Logo', style: 'width: 15px; height: 15px;' %>
    でライブをシェアする
  </button>
</div>
Xのロゴを設定する
- Xのロゴは公式サイトの
ブランドツールキットからダウンロードする。 -
app/assets/images/logo-black.pngファイルに設定する。(app/assets/imagesにダウンロードした画像をドラッグ&ドロップ)
cssの適用をする
- ボタンの大きさや配置、ホバー時の色などを調整する。
app/assets/stylesheets/application.bootstrap.scss
/* Xのシェアボタン */
#share-to-x {
  background-color: #f0f0f0; /* 通常時の背景色 */
  border: 1px solid #ccc; /* 通常時のボーダー */
  padding: 10px;
  border-radius: 5px;
  transition: background-color 0.3s, border-color 0.3s;
  display: flex; #/* フレックスボックスを使用 */
  align-items: center; #/* アイコンとテキストを縦に中央揃え */
  width: 200px; #/* ボタンの横幅を設定 */
  text-align: left; #/* テキストを左揃えにする */
  justify-content: center; #/* コンテンツを中央揃えにする */
  margin-left: 20px; #/* 左側のマージン */
  margin-top: 10px; #/* 上側のマージン */
}

#share-to-x:hover {
  background-color: #efeff1; /* ホバー時の背景色 */
  border-color: #141515; /* ホバー時のボーダー色 */
  color: rgb(14, 14, 14); #/* テキスト色を変更 */
}
ここまでの記載で表示されるボタン
- 今回はチャット欄の隣にボタンを設置した。

Xへの遷移とポストの文言の記載する
app/javascript/share.js
document.addEventListener('DOMContentLoaded', function() {
const shareButton = document.getElementById('share-button');
const liveRoomName = shareButton.getAttribute('data-room-name');
const appUrl = `https://www.live-fes.com${shareButton.getAttribute('data-room-url')}`;
document.getElementById('share-to-x').addEventListener('click', function() {
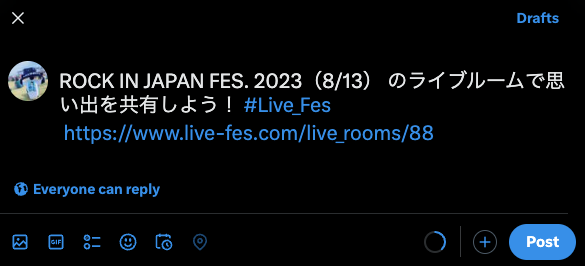
const text = `${encodeURIComponent(liveRoomName)}%20のライブルームで思い出を共有しよう!%20%23Live_Fes%20%0a`;
const url = `https://x.com/intent/tweet?text=${text}&url=${encodeURIComponent(appUrl)}`;
window.open(url, "_blank");
});
});
- ボタンをクリックすると新しいタブでポストを開く。
- ハッシュタグやルーム名が付け加えられポストの内容が生成される。
コードの詳しい解説
app/javascript/share.js
// DOMの読み込みが完了したら実行
document.addEventListener('DOMContentLoaded', function() {

  // シェアボタン要素を取得
  const shareButton = document.getElementById('share-button');

  // データ属性からライブルームの名前を取得
  const liveRoomName = shareButton.getAttribute('data-room-name');

  // data-room-urlからパスを取得し、ベースURLと結合
  const appUrl = `https://www.live-fes.com${shareButton.getAttribute('data-room-url')}`;

  // Xシェアボタンにクリックイベントリスナーを追加
  document.getElementById('share-to-x').addEventListener('click', function() {

    // ポスト本文を作成
    // encodeURIComponent()で特殊文字をエンコード
    // %23はハッシュタグ、%20は半角スペース、%0aは改行
    const text = `${encodeURIComponent(liveRoomName)}%20のライブルームで思い出を共有しよう!%20%23Live_Fes%20%0a`;

    // 最終的なポスト共有URL
    // テキストとアプリケーションURLをエンコードして結合
    const url = `https://x.com/intent/tweet?text=${text}&url=${encodeURIComponent(appUrl)}`;

    // 新しいタブでポスト画面を開く
    window.open(url, "_blank");
  });
});
-
{encodeURIComponent(liveRoomName)}%20のライブルームで思い出を共有しよう!でライブルームの名前をエンコードして、ポストの文言を生成する。 -
%23Live_Fesで#Live_Fesを生成する。
share.jsファイルのインポートを記載する
- インポートしてJavaScriptのコードをアプリに反映させる。
app/javascript/application.js
import './share'
以上でXへのシェアボタンの設定は終了です。
Discussion