【初めての人向け】Codespaces ハンズオン 〜Dockerfile 編〜
はじめに
この記事は下の動画の記事版です!
動画の方が操作方法とかがわかりやすと思うのでぜひ見てみてください
今回は、GitHub Codespaces のカスタマイズの続きで、Dockerfile を使うパターンについて解説します
今回もハンズオン形式で、Dockerfile 書くのが初めての人でも大丈夫なように、一番シンプルなパターンで解説も細かめにやっていきます
前の動画をまだ見ていない人は、見てからの方がスムーズだと思います
おさらい
まず、軽く前やったことのおさらいをしましょう
- Codespaces の Container 部分が開発コンテナ
- 開発コンテナは↓が入った Docker コンテナ
- ソースコード
- 実行環境
- 各種ツール
- 設定なしだと既定の開発コンテナが起動
- devcontainer.json を書くと↓が設定可能
- イメージ
- 追加機能
- 拡張機能
前の動画で Codespaces の簡単なカスタマイズはできるようになったと思うので、今回のゴールはより実務に近い「Codespaces で Dockerfile を使えるようになる」ですね
リポジトリに開発用の Dockerfile があるってことも多いと思うので、これができれば実務でも Codespaces で開発できるようになると思います
Docker 関連
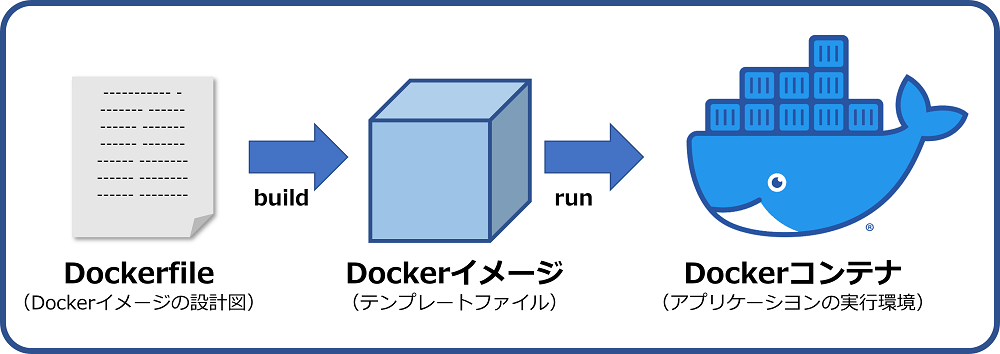
※引用: https://www.kagoya.jp/howto/cloud/container/dockerimage/
まず、Docker 関連についてもう少し詳しく解説しますね
図の通り、Docker は 3 つの状態で構成されています
前の動画とかでコマンド実行したりしてたのが、図の一番右の状態 Docker コンテナの状態ですね
Docker コンテナの状態は、主にアプリケーションの実行などをするためのものです
この Docker コンテナの状態になるまでには、図に描かれているように 2 つの状態があります
2 つの状態の内、devcontainer.json で指定していたのが、図の真ん中の Docker イメージの状態のものですね
Docker イメージの状態は、ベースとなる Docker イメージにパッケージとかをインストールして、Docker コンテナとして起動できる状態になったものですね
そして今回メインで取り扱うのが、Docker イメージの設計図となる、図の一番左の Dockerfile ですね
Dockerfile には、Docker イメージを作るために、ベースとなるイメージを指定したり、必要なパッケージをインストールしたり、ディレクトリを作ったりするコマンドなどが書かれます
前の動画でやった Rebuild は、この図の真ん中の Docker イメージをレジストリから取ってきて、Docker コンテナを起動したって感じですね
図の流れを、既定の開発コンテナでコマンドが実行できるようになるまでを例に説明しますね
まず、既定の開発コンテナ用の Dockerfile は、GitHub 上のリポジトリ内にあります
それが build され、Docker イメージになったものがレジストリに登録されています
このレジストリで有名なのが Docker Hub ですが、既定の開発コンテナは別のレジストリに登録されていますね
ここまでは Codespaces の起動とは関係ない部分で、起動より前に行われています
ユーザが Codespaces を起動すると、既定の開発コンテナの Docker イメージから Docker コンテナが起動され、コマンドが実行できるようになるって流れですね
ハンズオン
今回の内容ですが、公式ドキュメントを探してもそれっぽいものを見つけられなかったので、オリジナルな内容になります
使うリポジトリはいつも通り↓になります
まず、前の動画の Rebuild する前の状態にします
はじめはいつも通り、 Codespaces を起動して、内容は前回のコピーして .devcontainer/devcontainer.json を作れば、これで準備 OK です
code .devcontainer/devcontainer.json ってコマンドを実行するとディレクトリとファイルをいっぺんに作れて楽ですね
// For format details, see https://aka.ms/devcontainer.json. For config options, see the
// README at: https://github.com/devcontainers/templates/tree/main/src/javascript-node
{
	"name": "Node.js",
	// Or use a Dockerfile or Docker Compose file. More info: https://containers.dev/guide/dockerfile
	"image": "mcr.microsoft.com/devcontainers/javascript-node:1-22-bookworm",
	"features": {
		"ghcr.io/devcontainers-extra/features/jshint:2": {}
	},

	// Features to add to the dev container. More info: https://containers.dev/features.
	// "features": {},

	// Use 'forwardPorts' to make a list of ports inside the container available locally.
	// "forwardPorts": [],

	// Use 'postCreateCommand' to run commands after the container is created.
	"postCreateCommand": "npm install",

	// Configure tool-specific properties.
	"customizations": {
		// Configure properties specific to VS Code.
		"vscode": {
			// Add the IDs of extensions you want installed when the container is created.
			"extensions": [
				"streetsidesoftware.code-spell-checker"
			]
		}
	}

	// Uncomment to connect as root instead. More info: https://aka.ms/dev-containers-non-root.
	// "remoteUser": "root"
}
準備ができたところで、ここからが新しい部分です
まず、空の Dockerfile を .devcontainer ディレクトリ内に作ります
補足ですが、Dockerfile の置き場は投稿者が色々見た感じ 2 パターンに分かれてましたね
1 つ目がローカルマシン上でも起動する場合で、リポジトリのディレクトリ直下とかに配置されるパターン
2 つ目が開発コンテナ専用の場合で .devcontainer ディレクトリ内に置くパターンですね
なので、今回のものはローカルとかでは起動しないので、devcontainer ディレクトリ内に作ってます
Dockerfile の中身は devcontainer.json の image の部分を流用します
FROM を書いて続いて image に書いてあるのをそのまま持ってきます
FROM mcr.microsoft.com/devcontainers/javascript-node:1-22-bookworm
あとは devcontainer.json の image を dockFile にして、作った Dockerfile を指定すれば完了です
Dockerfile の指定は devcontainer.json からの相対パスで指定ですね
// For format details, see https://aka.ms/devcontainer.json. For config options, see the
// README at: https://github.com/devcontainers/templates/tree/main/src/javascript-node
{
	"name": "Node.js",
	// Or use a Dockerfile or Docker Compose file. More info: https://containers.dev/guide/dockerfile
	"dockerFile": "Dockerfile",
	"features": {
		"ghcr.io/devcontainers-extra/features/jshint:2": {}
	},

	// Features to add to the dev container. More info: https://containers.dev/features.
	// "features": {},

	// Use 'forwardPorts' to make a list of ports inside the container available locally.
	// "forwardPorts": [],

	// Use 'postCreateCommand' to run commands after the container is created.
	"postCreateCommand": "npm install",

	// Configure tool-specific properties.
	"customizations": {
		// Configure properties specific to VS Code.
		"vscode": {
			// Add the IDs of extensions you want installed when the container is created.
			"extensions": [
				"streetsidesoftware.code-spell-checker"
			]
		}
	}

	// Uncomment to connect as root instead. More info: https://aka.ms/dev-containers-non-root.
	// "remoteUser": "root"
}
前と変わらないですが Rebuild すると Dockerfile 経由で build したものが起動します
簡単ですが、今回のハンズオンはここまでです
Dockerfile のカスタマイズとかもやろうと思ったんですけど、内容が多すぎたので需要がありそうなら動画にします
今回やったことを使う場面がすでに Dockerfile がある場合で、その場合なら基本的に今回みたいに Dockerfile を指定するだけで Codespaces で使えるようになると思います
まとめ
- Docker は次の 3 つの状態で構成
- Dockerfile
- Docker イメージ
- Docker コンテナ
- Docker イメージはレジストリで配布
- devcontainer.json で Dockerfile が指定できる
- リポジトリに Dockerfile があればそのまま使用可能
Discussion