【Flutter】statefulWidgetとflutter_hooksでアニメーション実装
flutterのstatefulWidgetとflutter_hooksで、基本的なアニメーション実装してみる。
アニメーションの実装は少しめんどくさい印象があって、個人的に食わず嫌いなところがあったが、今回色々と試しながら実装してみた。
animationに関しては便利なパッケージもいくつかあるが、今回は根本的な挙動確認も行ないため、パッケージは使用しないものとする。
SNSのいいね機能でありそうなアニメーションを例に実装してみる。
statefulパターン
void main() => runApp(const MyApp());
class MyApp extends StatelessWidget {
// ...statefulのおまじない部分は記載省略
State createState() => _MyWidgetState();
}
class _MyWidgetState extends State<MyWidget>
with SingleTickerProviderStateMixin {
// with SingleTickerProviderStateMixin を忘れずに
late AnimationController controller;
late Animation<double> scaleAnimation;
late Animation<double> fadeAnimation;
Color color = Colors.grey;
void initState() {
super.initState();
controller = AnimationController(
vsync: this,
duration: const Duration(milliseconds: 500),
)..addStatusListener((status) {
if (status == AnimationStatus.completed) {
// animationの再生が終了すると、色を変更してanimationの状態をリセットする
setState(() {
color = Colors.grey;
});
controller.reset();
}
});
scaleAnimation = Tween<double>(
begin: 1.0, // アニメーション開始時のスケール
end: 2.0, // アニメーション終了時のスケール
).animate(controller);
fadeAnimation = Tween<double>(
begin: 1.0, // アニメーション開始時のスケール
end: 0.0, // アニメーション終了時のスケール
).animate(controller);
}
void dispose() {
controller.dispose();
super.dispose();
}
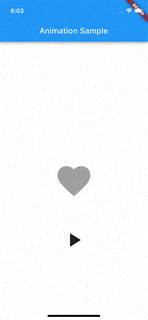
Widget build(BuildContext context) {
return Scaffold(
appBar: AppBar(
title: const Text('Animation Sample'),
),
body: Center(
child: Stack(
children: [
Center(
child: FadeTransition(
opacity: fadeAnimation,
child: ScaleTransition(
scale: scaleAnimation,
child: const Icon(
Icons.favorite,
size: 100.0,
color: Colors.red,
),
),
),
),
Center(
child: Icon(
Icons.favorite,
size: 100.0,
color: color,
),
),
Center(
child: Padding(
padding: const EdgeInsets.only(top: 300.0),
child: IconButton(
onPressed: () {
setState(() {
color = Colors.red;
});
// アニメーション再生
controller.forward();
},
icon: const Icon(Icons.play_arrow),
iconSize: 60,
),
),
)
],
),
),
);
}
}
ポイント1:SingleTickerProviderStateMixin
AnimationControllerを使用する際には、必須でvsyncを指定する必要がある。
おまじない的にvsync:thisとすることが一般的だが、thisを指定するためには、
with SingleTickerProviderStateMixinを付与してあげる必要がある。
※vsync:thisやSingleTickerProviderStateMixinについての詳細はここでは割愛。
class _MyWidgetState extends State<MyWidget>
    with SingleTickerProviderStateMixin {
    // ...省略

    controller = AnimationController(
      vsync: this,
      // ...省略
ポイント2:アニメーションの制御・検知
アニメーションの再生や停止、リセットなどを検知するには、AnimationControllerに対してaddStatusListenerを使用すると簡単に制御できる。
アニメーションの状態がstatusに入ってくるので、それを元に処理を行う。
controller = AnimationController(
  vsync: this,
  duration: const Duration(milliseconds: 500),
)..addStatusListener((status) {
    if (status == AnimationStatus.completed) {
      // animationの再生が終了すると、色を変更してanimationの状態をリセットする
      setState(() {
        color = Colors.grey;
      });
      controller.reset();
    }
  });
以下のようにも書ける。
    void statusListener(AnimationStatus status) {
      if (status == AnimationStatus.completed) {
        // animationの再生が終了すると、色を変更してanimationの状態をリセットする
        setState(() {
          color = Colors.grey;
        });
        controller.reset();
      }
    }

    controller = AnimationController(
      vsync: this,
      duration: const Duration(milliseconds: 500),
    );

    controller.addStatusListener(statusListener);
ポイント3:コントローラーの破棄
AnimationControllerは、disposeを呼ばないとメモリリークするので、disposeをオーバーライドして破棄する。
また、コントローラーに紐づいたリスナーについては、コントローラーの破棄と一緒にリスナーも破棄されるため、別途リスナーを破棄する処理の記述は不要。
void dispose() {
controller.dispose();
super.dispose();
}
hooksパターン
void main() => runApp(const MyApp());
class MyApp extends StatelessWidget {
const MyApp({super.key});
Widget build(BuildContext context) {
return const MaterialApp(
home: MyWidget(),
);
}
}
class MyWidget extends HookWidget {
const MyWidget({super.key});
Widget build(BuildContext context) {
final controller = useAnimationController(
duration: const Duration(milliseconds: 500),
);
final scaleAnimation = Tween<double>(
begin: 1.0,
end: 2.0,
).animate(controller);
final fadeAnimation = Tween<double>(
begin: 1.0,
end: 0.0,
).animate(controller);
final color = useState(Colors.grey);
// 画面読み込み時に一度だけ実行される
useEffect(() {
void statusListener(AnimationStatus status) {
if (status == AnimationStatus.completed) {
color.value = Colors.grey;
controller.reset();
}
}
// アニメーションの状態を監視する
controller.addStatusListener(statusListener);
// 画面破棄時に実行される
return () {
// 状態監視をしていたリスナーを削除する
// MEMO: controllerの破棄は、useAnimationControllerが自動で行ってくれる
controller.removeStatusListener(statusListener);
};
}, []);
return Scaffold(
appBar: AppBar(
title: const Text('Animation Sample'),
),
body: Center(
child: Stack(
children: [
Center(
child: FadeTransition(
opacity: fadeAnimation,
child: ScaleTransition(
scale: scaleAnimation,
child: const Icon(
Icons.favorite,
size: 100.0,
color: Colors.red,
),
),
),
),
Center(
child: Icon(
Icons.favorite,
size: 100.0,
color: color.value,
),
),
Center(
child: Padding(
padding: const EdgeInsets.only(top: 300.0),
child: IconButton(
onPressed: () {
color.value = Colors.red;
controller.forward();
},
icon: const Icon(Icons.play_arrow),
iconSize: 60,
),
),
)
],
),
),
);
}
}
ポイント1:useEffect
useEffectを使用すると、statefulでいうinitStateやdisposeのような処理をまとめて管理できる。
※詳細なuseEffectについての書き方や挙動については、この記事では割愛。
// 画面読み込み時に一度だけ実行される
useEffect(() {
  void statusListener(AnimationStatus status) {
    if (status == AnimationStatus.completed) {
      color.value = Colors.grey;
      controller.reset();
    }
  }
  // アニメーションの状態を監視する
  controller.addStatusListener(statusListener);

  // return 以下は、画面破棄時に実行される
  return () {
    // 状態監視をしていたリスナーを削除する
    controller.removeStatusListener(statusListener);

    // MEMO: controllerの破棄は、useAnimationControllerが自動で行ってくれる
  };
}, []);
ポイント2:useAnimationController
flutter_hooksにはuseAnimationControllerというhooksが用意されている。
このhooksを使用すると、vsyncを指定しなくてもAnimationControllerのインスタンスを生成できる。
また、hooksを使用すると、ライフサイクルも自動で管理してくれるため、statefulでいう@override void dispose()の記述も不要となる。
    final controller = useAnimationController(
      duration: const Duration(milliseconds: 500));
ただ、hooksで作成したコントローラーにリスナーを追加した場合は、リスナー破棄の処理が必要となる。(hooksが自動でリスナーまでは破棄してくれない。。)
上記ポイント1のコード部分参照。
おわり
すごくシンプルなアニメーションの実装を、statefulWidgetとflutter_hooksのそれぞれのパターンで実装してみた。
まだまだ理解が浅い部分があるので、もっとよい実装があれば随時更新していきたい。
flutter_hooksの方に関しては、useEffectの使い方や挙動の理解が重要になってくるので、別途挙動調査して理解を深める。
Discussion