指定したURLから Metatag を取得する [Next.js App Router]
Metatag とは
Metatag とは、HTML の head タグ内に記述されるメタデータのことです。主に検索エンジンや SNS などで利用され、ページのタイトルや説明、画像などを指定することができます。
Devtools の Elements タブで確認することができます。
この記事では、Next.js の Route Handler を利用して、指定した URL から title,description,image を含む Metatag を取得する方法を紹介します。
Route Handler の作成
まずは Route Handler を使用して、指定した URL から Metatag を取得する API を作成します。
以下全体のコードです。
全体コード
import { NextRequest } from 'next/server';

import { parse } from 'node-html-parser';

import { setImagePath } from '@/lib/utils';
import { Metatag } from '@/types/data';
import { formSchema } from '@/app/validations/form-schema';

export const runtime = 'edge';

export async function GET(request: NextRequest) {
  const urlParam = request.nextUrl.searchParams.get('url');
  const validationResult = formSchema.safeParse({ url: urlParam });

  if (!validationResult.success) {
    return new Response(`The URL ${urlParam} is missing.`, { status: 400 });
  }

  const url = validationResult.data.url;
  try {
    const response = await fetch(url, {
      headers: { 'User-Agent': 'Googlebot' },
    });
    const html = await response.text();
    console.log(html);

    if (!html) {
      return new Response(
        JSON.stringify({ title: url, description: '', image: '' })
      );
    }
    const metaTags: { [key: string]: string | boolean } = extractMetaTags(
      html,
      url
    );
    return new Response(JSON.stringify(metaTags));
  } catch (error) {
    return new Response(JSON.stringify(error), { status: 500 });
  }
}

const allowedTags = [
  'title',
  'og:title',
  'twitter:title',
  'description',
  'og:description',
  'twitter:description',
  'og:image',
  'twitter:image',
  'icon',
  'apple-touch-icon',
  'shortcut icon',
];

function extractMetaTags(html: string, url: string) {
  const root = parse(html);
  const objectMap: { [key: string]: string } = {};

  root
    .querySelectorAll('meta')
    .forEach(({ attributes }: { attributes: { [key: string]: string } }) => {
      const property =
        attributes.property || attributes.name || attributes.href;
      if (!objectMap[property] && allowedTags.includes(property)) {
        objectMap[property] = attributes.content;
      }
    });

  root
    .querySelectorAll('link')
    .forEach(({ attributes }: { attributes: { [key: string]: string } }) => {
      const { rel, href } = attributes;
      if (rel && href && allowedTags.includes(rel)) {
        objectMap[rel] = href;
      }
    });

  const title =
    objectMap['og:title'] ||
    objectMap['twitter:title'] ||
    root.querySelector('title')?.innerText ||
    url;

  const description =
    objectMap['og:description'] || objectMap['description'] || '';

  const imageSrc =
    objectMap['og:image'] ||
    objectMap['twitter:image'] ||
    objectMap['apple-touch-icon'] ||
    objectMap['icon'] ||
    objectMap['shortcut icon'];

  const favIconImage =
    objectMap['apple-touch-icon'] ||
    objectMap['icon'] ||
    objectMap['shortcut icon'];

  const image = setImagePath(url, imageSrc);

  return {
    title,
    description,
    image,
    ...(image && { is_fallback: imageSrc === favIconImage }),
  } as Metatag;
}
searchParams から URL を取得
API にリクエストを送る際に、URL を指定するために、URL を取得する処理を searchParams から行います。
// http://3000/api/open-graph?url=https://zenn.dev/ の場合
// urlParamは https://zenn.dev/
const urlParam = request.nextUrl.searchParams.get('url');
URL のバリデーション
URL が指定されていない場合は、エラーレスポンスを返します。ここでは、zod の safeParse を使用してバリデーションを行います。
formSchema について
app/validations/form-schema.ts に URL のスキーマ定義を記述します。
import { z } from 'zod';

export const formSchema = z.object({
  url: z.string().url(),
});
const validationResult = formSchema.safeParse({ url: urlParam });

if (!validationResult.success) {
  return new Response(`The URL ${urlParam} is missing.`, { status: 400 });
}
fetch で指定した URL から HTML を取得
指定した URL から HTML を取得するために、fetch を使用します。
const url = validationResult.data.url;

const response = await fetch(url, {
  headers: { 'User-Agent': 'Googlebot' },
});
const html = await response.text();
User-Agent について
'User-Agent': 'Googlebot' は、Googlebot としてリクエストを送信するためのヘッダーです。Googlebot は、Google がクロールする際に使用するクローラーです。
Metatag を取得する
指定した URL を元に取得した HTML から、Metatag を取得するために、node-html-parser を使用します。
パッケージをインストールするには、以下のコマンドを実行します。
pnpm i -D node-html-parser
extractMetatag 関数は、指定した URL から取得した HTML から Metatag を抽出します。
Metatag は、<meta> タグと <link> タグに記述されているため、それぞれのタグを取得して、Metatag を抽出します。
function extractMetatag(html: string, url: string) {
  const root = parse(html);
  const objectMap: { [key: string]: string } = {};

  // `<meta>` タグを取得して、Metatag を抽出
  root
    .querySelectorAll('meta')
    .forEach(({ attributes }: { attributes: { [key: string]: string } }) => {
      const property =
        attributes.property || attributes.name || attributes.href;
      if (!objectMap[property] && allowedTags.includes(property)) {
        objectMap[property] = attributes.content;
      }
    });

  // `<link>` タグを取得して、Metatag を抽出
  root
    .querySelectorAll('link')
    .forEach(({ attributes }: { attributes: { [key: string]: string } }) => {
      const { rel, href } = attributes;
      if (rel && href && allowedTags.includes(rel)) {
        objectMap[rel] = href;
      }
    });

  // title, description, imageSrc, favIconImage を取得
  const title =
    objectMap['og:title'] ||
    objectMap['twitter:title'] ||
    root.querySelector('title')?.innerText ||
    url;

  const description =
    objectMap['og:description'] || objectMap['description'] || '';

  const imageSrc =
    objectMap['og:image'] ||
    objectMap['twitter:image'] ||
    objectMap['apple-touch-icon'] ||
    objectMap['icon'] ||
    objectMap['shortcut icon'];

  const favIconImage =
    objectMap['apple-touch-icon'] ||
    objectMap['icon'] ||
    objectMap['shortcut icon'];

  // 画像のパスを設定
  const image = setImagePath(url, imageSrc);

  // Metatag を返す
  return {
    title,
    description,
    image,
    ...(image && { is_fallback: imageSrc === favIconImage }),
  } as Metatag;
}
setImagePath 関数について
utils ディレクトリにある setImagePath 関数は、URL から画像のパスを取得する関数です。
export const setImagePath = (url: string, imageUrl: string) => {
  if (!imageUrl) return imageUrl;

  const { protocol, host } = new URL(url);
  return new URL(imageUrl, `${protocol}//${host}`).toString();
};
Metatag を返す
最後に、extractMetatag 関数で取得した Metatag を返してレスポンスを返します。
const metatag: { [key: string]: string | boolean } = extractMetatag(html, url);

return new Response(JSON.stringify(metatag));
API を呼び出すためのコンポーネントを作成
API を呼び出すための Form コンポーネントを shadcn/ui を使用して作成します。
shadcn/ui について
shadcn/ui は、ユーザーインターフェース(UI)とユーザーエクスペリエンス(UX)に優れた特徴を持つ UI ライブラリです。Radix UI を基盤として構築されており、そのデザインは直感的で使いやすいインターフェースを提供します。このライブラリは、npm パッケージとしてのコンポーネント提供ではなく、CLI を通じてプロジェクトに直接組み込む形式で提供されています。このアプローチにより、shadcn/ui は単なる UI ライブラリを超え、柔軟性とカスタマイズ性に富んだデザインシステムとして機能します。ユーザーは、このシステムを利用して、独自のニーズに合わせた UI を簡単に作成し、最適化することができます。
shadcn/ui のインストール
以下のコマンドを実行して、shadcn/ui をインストールします。
pnpm dlx shadcn-ui@latest init
コンポーネントのインポート
コマンドを通して導入することも可能ですが、コンポーネントをインポートするために便利な VSCode の拡張機能があります。以下のリンクから確認してください。
インストール後、Ctrl + Shift + Pでコマンドパレットを開き、shadcnと検索するとAdd Multiple Componentsというコマンドが表示されるので、これを選択します。
'use client';
import React from 'react';
import { useForm } from 'react-hook-form';
import { z } from 'zod';
import { zodResolver } from '@hookform/resolvers/zod';
import { Button } from '@/components/ui/button';
import {
Form,
FormControl,
FormDescription,
FormField,
FormItem,
FormLabel,
FormMessage,
} from '@/components/ui/form';
import { Input } from '@/components/ui/input';
import { formSchema } from '@/app/validations/form-schema';
function OpenGraphForm() {
const form = useForm<z.infer<typeof formSchema>>({
resolver: zodResolver(formSchema),
defaultValues: {
url: '',
},
});
async function onSubmit(values: z.infer<typeof formSchema>) {
console.log(values);
}
return (
<Form {...form}>
<form onSubmit={form.handleSubmit(onSubmit)} className='space-y-8'>
<FormField
control={form.control}
name='url'
render={({ field }) => (
<FormItem>
<FormLabel>url</FormLabel>
<FormControl>
<Input placeholder='https://example.com' {...field} />
</FormControl>
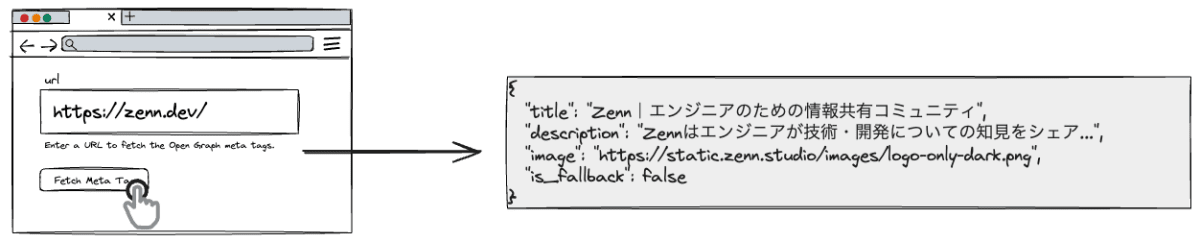
<FormDescription>
Enter a URL to fetch the Open Graph meta tags.
</FormDescription>
<FormMessage />
</FormItem>
)}
/>
<Button type='submit'>Fetch Metatag</Button>
</form>
</Form>
);
}
export default OpenGraphForm;

onSubmit 関数で API を呼び出す
Route Handler で作成した API を呼び出すために、onSubmit内で fetch を使用します。
function onSubmit(values: z.infer<typeof formSchema>) {
return startTransition(async () => {
const data = await fetch(
`/api/open-graph?url=${encodeURIComponent(values.url)}`
);
if (!data.ok) {
throw new Error('Failed to fetch data');
}
const { title, description, image, is_fallback } = await data.json();
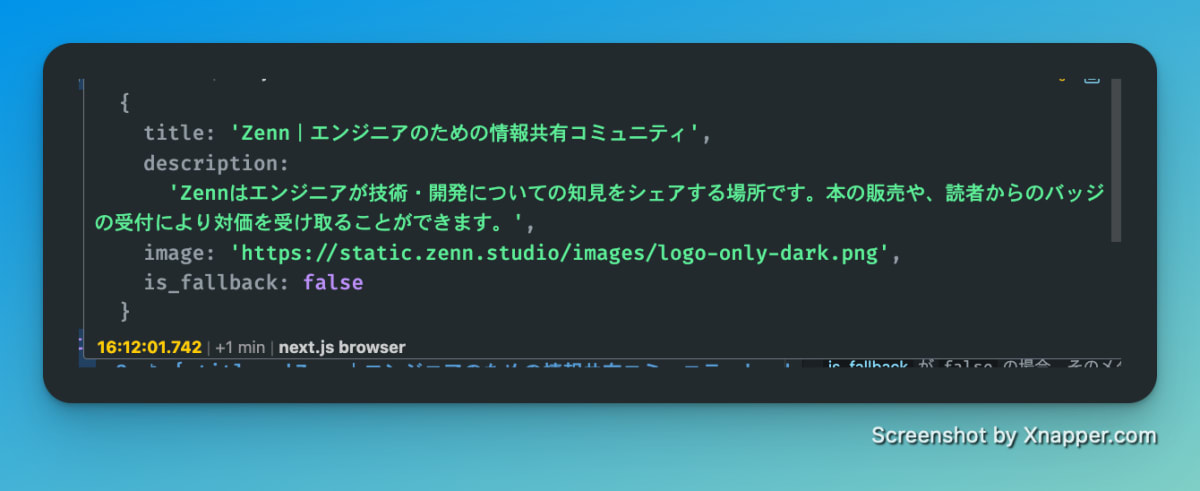
console.log({ title, description, image, is_fallback });
});
}
以上で、Input コンポーネントに URL を入力して、ボタンを押下すると、指定した URL から Metatag を取得することができます。console には、取得した Metatag が表示されます。
encodeURIComponent について
TypeScript で URL をエンコードする際には、encodeURIComponentを使用します。encodeURIComponentは、URI の特殊文字をエンコードするためのグローバル関数です。URI の特殊文字とは、URI において特別な意味を持つ文字のことです。URI の特殊文字は、URI の構文を解釈する際に特別な意味を持つため、URI に含まれる文字列としては使用できません。
そのため、URI の特殊文字をエンコードする必要があります。encodeURIComponentは、URI の特殊文字をエンコードするためのグローバル関数です。URI の特殊文字をエンコードすることで、URI の特殊文字を含む文字列を URI として安全に使用することができます。
OpenGraphForm コンポーネントの全体コード
'use client';

import React, { useTransition } from 'react';
import { useForm } from 'react-hook-form';
import { z } from 'zod';
import { zodResolver } from '@hookform/resolvers/zod';

import { Button } from '@/components/ui/button';
import {
  Form,
  FormControl,
  FormDescription,
  FormField,
  FormItem,
  FormLabel,
  FormMessage,
} from '@/components/ui/form';
import { Input } from '@/components/ui/input';
import { formSchema } from '@/app/validations/form-schema';

function OpenGraphForm() {
  const [isPending, startTransition] = useTransition();

  const form = useForm<z.infer<typeof formSchema>>({
    resolver: zodResolver(formSchema),
    defaultValues: {
      url: '',
    },
  });

  function onSubmit(values: z.infer<typeof formSchema>) {
    return startTransition(async () => {
      const data = await fetch(
        `/api/open-graph?url=${encodeURIComponent(values.url)}`,
        {
          cache: 'force-cache',
        }
      );
      if (!data.ok) {
        throw new Error('Failed to fetch data');
      }

      const { title, description, image, is_fallback } = await data.json();
      console.log({ title, description, image, is_fallback });
    });
  }

  return (
    <Form {...form}>
      <form onSubmit={form.handleSubmit(onSubmit)} className='space-y-8'>
        <FormField
          control={form.control}
          name='url'
          render={({ field }) => (
            <FormItem>
              <FormLabel>url</FormLabel>
              <FormControl>
                <Input placeholder='https://example.com' {...field} />
              </FormControl>
              <FormDescription>
                Enter a URL to fetch the Open Graph meta tags.
              </FormDescription>
              <FormMessage />
            </FormItem>
          )}
        />
        <Button type='submit' disabled={isPending}>
          Fetch Metatag
        </Button>
      </form>
    </Form>
  );
}

export default OpenGraphForm;
おまけ: URL をペーストして自動的に Metatag を取得する
最後に URL を Input コンポーネントにペーストして、onSubmit 関数が発火するよう関数を作成します。
ここでは、onPaste関数を作成し、onPaste関数内でペーストされたテキストを取得し、onSubmit関数を呼び出します。
  const onPaste = async (event: ClipboardEvent<HTMLInputElement>) => {
    const pastedText = event.clipboardData?.getData('text');
    onSubmit({ url: pastedText });
  };
Input コンポーネントにonPaste関数を渡します
  return (
    <Form {...form}>
      <form onSubmit={form.handleSubmit(onSubmit)} className='space-y-8'>
        <FormField
          control={form.control}
          name='url'
          render={({ field }) => (
            <FormItem>
              <FormLabel>url</FormLabel>
              <FormControl>
                <Input
                  placeholder='https://example.com'
                  type='url'
                  pattern='https://.*|http://.*'
+                 onPaste={onPaste}
                  {...field}
                />
完成した OpenGraphForm コンポーネントの全体コード
'use client';

import React, { useTransition } from 'react';
import { useForm } from 'react-hook-form';
import { z } from 'zod';
import { zodResolver } from '@hookform/resolvers/zod';
import { ClipboardEvent, SyntheticEvent } from 'react';

import { Button } from '@/components/ui/button';
import {
  Form,
  FormControl,
  FormDescription,
  FormField,
  FormItem,
  FormLabel,
  FormMessage,
} from '@/components/ui/form';
import { Input } from '@/components/ui/input';
import { formSchema } from '@/app/validations/form-schema';

function OpenGraphForm() {
  const [isPending, startTransition] = useTransition();

  const form = useForm<z.infer<typeof formSchema>>({
    resolver: zodResolver(formSchema),
    defaultValues: {
      url: '',
    },
  });

  const onPaste = async (event: ClipboardEvent<HTMLInputElement>) => {
    const pastedText = event.clipboardData?.getData('text');
    onSubmit({ url: pastedText });
  };

  function onSubmit(values: z.infer<typeof formSchema>) {
    return startTransition(async () => {
      const data = await fetch(
        `/api/open-graph?url=${encodeURIComponent(values.url)}`,
        {
          cache: 'force-cache',
        }
      );
      if (!data.ok) {
        throw new Error('Failed to fetch data');
      }

      const { title, description, image, is_fallback } = await data.json();
      console.log({ title, description, image, is_fallback });
    });
  }

  return (
    <Form {...form}>
      <form onSubmit={form.handleSubmit(onSubmit)} className='space-y-8'>
        <FormField
          control={form.control}
          name='url'
          render={({ field }) => (
            <FormItem>
              <FormLabel>url</FormLabel>
              <FormControl>
                <Input
                  placeholder='https://example.com'
                  type='url'
                  pattern='https://.*|http://.*'
                  onPaste={onPaste}
                  {...field}
                />
              </FormControl>
              <FormDescription>
                Enter a URL to fetch the Open Graph meta tags.
              </FormDescription>
              <FormMessage />
            </FormItem>
          )}
        />
        <Button type='submit' disabled={isPending}>
          Fetch Metatag
        </Button>
      </form>
    </Form>
  );
}

export default OpenGraphForm;
まとめ 📌
この記事では、Next.js の Route Handler を使用して、指定した URL から Metatag を取得する方法を紹介しました。
筆者としてはこの方法を提案しましたが、より良い方法や改善点、指摘、別のアプローチがあれば、ぜひフィードバックお願いします 🙇♂️
以上です!
Discussion