AstroというWebフレームワークは知っていますか?
Astroは、SSR/SSGができて、NodeはCloudFlare Workers、Denoなどの好きなランタイムで動かせて、ReactやVueなど好きなUIフレームワークを使えるWebフレームワークです。
その「好きなランタイムで動かせる」を実現しているのが、AstroのAdapterです。
この記事では、AstroのAdapterの仕組みを調べて、Adapterを作っていきます。
Adapterについて詳しく
Adapterは、前述した通り、Astroのサーバーをいろいろなランタイムで動かすためのものです。
言い換えれば、Astroとランタイムの間に入る「クッション」のような存在です。
Adapterの必要性
ランタイムによってある行動をしたい場合のコードやAPIが異なります。
例えば、サーバーを起動する処理の場合、DenoはDeno.serve、Nodeはhttpモジュールなど、Cloudflare WorkersはaddEventListener('fetch')というふうに、ランタイムごとに違います。
そのため、単純に同じプログラムだと異なるランタイムで動かせないことがあるのです。
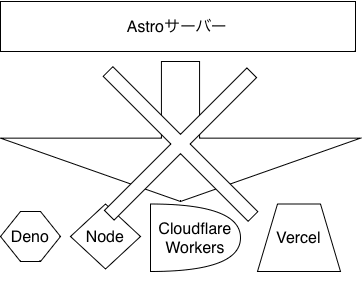
そこで、Adapterの登場です。
Adapterは、下の図のようにランタイムの差を吸収してくれるのです。

これがAstroのAdapterの役割です。
Adapter
Adapterの構造を解説します。
Astroは、ランタイムごとのAPIに依存しないコードをビルド時に生成します。Deno.xxxなどを使わない、ECMAScriptなコードです。
このコードの役割の一つとして、manifestよ呼ばれるオブジェクトを生成するというものがあります。
型情報は以下のSSRManifestのようです。
manifestには、画像などの外部アセットデータ以外の情報が詰まっています。
manifestを利用して、各ランタイム用にAdapterを書けるわけです。
実際のmanifestは以下のようになっています。
かなり複雑な構造をしていますね。


Adapterを作ってみる
早速、Adapterを作ってみましょう!
Bun用Adapterの作成
Astro公式は多くのAdapterを作っていて、そのおかげでDenoなどで動かせますが、Bun用のアダプターはありません!
Bunは、高速なJavaScriptランタイムです。
ないなら作ってしまいましょう!
BunのランタイムAPIの理解
AdapterはAstroとランタイムAPIを繋げるクッションなので、まずBunのランタイムAPIを簡単に理解しましょう!
まず、Bunのサーバー起動は次のようになっています。
Bun.serve({
  fetch: async (req: Request): Promise<Response> => {
    return new Response(`Hello, ${new URL(req.url).pathname}`)
  }
})
これは、アクセスすると、Hello, <pathname>と返ってくるコードです。
Bun.serveにRequestを受け取りResponse(PromiseでもOK)を返すfetch関数を渡す簡単なAPIです。
また、Bunでのファイル読み込みは
const foo = Bun.file('foo.txt')

foo.size // サイズ
foo.type // MIME Type

await foo.arrayBuffer() // ArrayBuffer取得
のような簡単なAPIになっています。
プロジェクトを作る
まず、create-astroを使用してAstroプロジェクトを作成します。
bun create astro
次に、astro.config.mjsをサーバーモードに対応させましょう。
  import { defineConfig } from 'astro/config';

  // https://astro.build/config
  export default defineConfig({
+   output: 'server'
  });
Adapterをつくる
次に、Adapterを作りましょう!
Integration
src/integrations/bun-adapter/index.tsとでもするファイルを作ってください。
import type { AstroIntegration } from 'astro'

export const bunAdapter = (): AstroIntegration => {
  return {
    name: 'bun-adapter',
    hooks: {
      'astro:config:done': ({ setAdapter }) => {
         setAdapter({
           name: 'bun-adapter',
           serverEntrypoint: './src/integrations/bun-adapter/index.ts',
           supportedAstroFeatures: { staticOutput: 'stable' }
         })
      }
    }
  }
}
解説します。このコードは、Astro Integrationを作成する関数です。Integrationは、Astroのプラグインシステムのようなものです。
nameは、Integrationの名前、hooksは、Astroが呼ぶイベントを代入します。
astro:config:doneは、configがdoneしたときに呼ばれると思います(そのまま)
このイベントのハンドラーは、setAdapterという関数をAstroから受け取り、それを呼び出しAdapterを登録しています。
nameにはAdapterの名前、serverEntrypointはAdapter本体のパス、supportedAstroFeaturesはAdapterが対応している機能が代入されます。
Integrationの登録
次に、このIntegrationをAstroに認識させます。
また、今回制作するAdapterは画像最適化は行わないため、無効にしておきます。
- import { defineConfig } from 'astro/config';
+ import { defineConfig, passthroughImageService } from 'astro/config';
+ import { bunAdapter } from './src/integrations/bun-adapter`

  // https://astro.build/config
  export default defineConfig({
    output: 'server',
+   adapter: bunAdapter(),
+   image: {
      service: passthroughImageService()
+   }
  });
完璧です。Adapterの方は、importして受け渡してるだけです。
Adapter本体
では、serverEntrypointであるAdapter本体のsrc/integrations/bun-adapter/index.tsを書きましょう。
import type { SSRManifest } from 'astro'

export function start (manifest: SSRManifest) {
  // サーバ起動時のコードを書いていく...
}
出ました前述のmanifestです。manifestを受け取るstart関数をエクスポートしています。
この状態で
import type { SSRManifest } from 'astro'

export function start (manifest: SSRManifest) {
  console.log('Hello world!!')
}
とやってastro build(bun run build)でビルドします。
すると、distディレクトリが作成されます。
dist/server/entry.mjsはサーバー起動のエントリーポイントのコードなので、これを実行してみてください。
bun ./dist/server/entry.mjs
こんな感じになるはずです。そしたら成功です。

「あれ?サーバー起動しないの?」って思う方がいらっしゃると思いますが、Adapterにはサーバー起動のコードが含まれていないのでそうなります。
では、実際にサーバーを起動するコードを書きましょう。
manifestからBun.serveに繋げるのです。
しかし、manifestは前述の通り非常に複雑です。なので、astro/appというモジュールが存在します。
import { App } from 'astro/app'

const app = new App(manifest)
のようにして初期化させます。
このAppというのが便利なのです。
Appは、manifestをRequest/Responseのインターフェースにしてくれるのです。
import type { SSRManifest } from 'astro'
import { App } from 'astro/app'

export function start (manifest: SSRManifest) {
  const app = new App(manifest)

  app.render(new Request('https://example.com/')).then(console.log)
}
のようにapp.renderを使うと、Responseが出力されるはずです。
では、これをBun.serveで使います。
import type { SSRManifest } from 'astro'
import { App } from 'astro/app'

export function start (manifest: SSRManifest) {
  const app = new App(manifest)

  Bun.serve({
    fetch: req => app.render(req)
  })
  console.log('Started server: http://localhost:3000')
}
サーバーも動いてるしこれで完成!
と思いきや、これだとしっかり動きません。
その証拠の一つとして、faviconが表示されないはずです。(されているとしたらキャッシュの影響)
静的Assetsをサポートしていないためです。
manifestの説明に書いた通り、manifestには外部Assetsが含まれていません。
そのため、静的ファイルにはアクセスできないのです。これを解決するために、静的ファイルについてのコードを書きます。
manifest.assetsには静的ファイルのパスのSetが含まれます。
これを用いて静的ファイルを配信します。
import type { SSRManifest } from 'astro'
import { App } from 'astro/app'
import path from 'node:path'

export function start(manifest: SSRManifest) {
  const app = new App(manifest)

  const getAssetFuncs: Record<string, (() => Promise<Response>) | undefined> = {} // pathnameからファイルデータを出す関数たち

  for (const asset of manifest.assets) {
    const filePath = path.join(
      import.meta.dir,
      '../client',
      asset.replace(/^\//, '') // `/favicon.svg`を`favicon.svg`に
    ) // ファイルパスを求める

    getAssetFuncs[asset] = async () => {
      const file = Bun.file(filePath)

      return new Response(file, {
        headers: {
          "Content-Type": file.type // Mime Typeを指定
        }
      })
    }
  }
  Bun.serve({
    fetch: async req => {
      const pathname = new URL(req.url).pathname // pathnameを取得
      const getAsset = getAssetFuncs[pathname]
      if (getAsset) {
        // ファイルがある
        return getAsset()
      }
      return await app.render(req)
    },
    port: 3001
  })
  console.log('Started server: http://localhost:3000')
}
こんな感じにしたら大体完成です!!!
しっかりfaviconもあるはずです。
Hono用Adapterを作る
次に、Hono用Adapterを作ってみましょう。
Honoは、いろんなランタイムで動く高速なWebフレームワークです。
BunのAdapterをベースにしたいので、cp -r src/integrations/bun-adapter src/integrations/hono-adapterとでもしましょう。
astro.config.mjsも同じようにimport先パスを変えます。
そして、
-
bunAdapter→honoAdapter -
bun-adapter→hono-adapter
のようにintegrationsのコード内の名前を変更するといいでしょう。
目標はこんな感じです。
import { Hono } from 'hono'
import { astroAppMiddleware } from '../dist/server/entry.mjs'

const app = new Hono()

app.use('/*', astroApp()) // m

Bun.serve(app)
実現するためには、astroAppMiddlewareというミドルウェアのexportが必要なのですが、これは実現できるのでしょうか?
できます。Bunのアダプタではstartをつかっていましたが、今回はcreateExportsを使います。
- export function start (manifest: SSRManifest) {
+ export function createExports (manifest: SSRManifest) {
とstartをcreateExportsに置き換えて、
import type { SSRManifest } from 'astro'
import { App } from 'astro/app'
import path from 'node:path'

export function createExports(manifest: SSRManifest) {
  const app = new App(manifest)

  const getAssetFuncs: Record<string, (() => Promise<Response>) | undefined> = {} // pathnameからファイルデータを出す関数たち

  for (const asset of manifest.assets) {
    const filePath = path.join(
      import.meta.dir,
      '../client',
      asset.replace(/^\//, '') // `/favicon.svg`を`favicon.svg`に
    ) // ファイルパスを求める

    getAssetFuncs[asset] = async () => {
      const file = Bun.file(filePath)

      return new Response(file, {
        headers: {
          "Content-Type": file.type // Mime Typeを指定
        }
      })
    }
  }
  const astroAppMiddleware = () => async (c, next) => {
    const pathname = c.req.path // pathnameを取得
    const getAsset = getAssetFuncs[pathname]
    if (getAsset) {
      // ファイルがある
      return getAsset()
    }
    const res = await app.render(c.req)
    if (res.status === 404) {
      await next() // 404の場合middlewareをスキップ
    }
    return res
  }
  return { astroAppMiddleware }
}
のように、HonoのミドルウェアをExportするのです。
そして、src/integrations/hono-adapter/index.tsに「この関数をExportするよー」ということを伝えます。
  import type { AstroIntegration } from 'astro'

  export const bunAdapter = (): AstroIntegration => {
    return {
      name: 'bun-adapter',
      hooks: {
        'astro:config:done': ({ setAdapter }) => {
           setAdapter({
             name: 'bun-adapter',
             serverEntrypoint: './src/integrations/bun-adapter/index.ts',
             supportedAstroFeatures: { staticOutput: 'stable' },
+            exports: ['astroAppMiddleware']
           })
        }
      }
    }
  }
これで、ビルドして、
scripts/hono.tsを
import { Hono } from 'hono'
import { astroAppMiddleware } from '../dist/server/entry.mjs'

const app = new Hono()

app.use('/*', astroAppMiddleware())


Bun.serve(app)
のようにして実行すると、完成です!!
まとめ
- Astroは、Adapterを使用することでいろいろなランタイムで動かせる
- AstroのAdapterは、自作できる
-
createExportsを利用することで、外部のコードで使えるようなものを作れる
今回作ったサンプルはGitHubのあげてあります...

TRANs(生徒会情報機構)は、デジタル化に取り組む生徒会間の情報共有・知見交流・技術共有・システム統合に向けて設立された機関です。地域間の情報格差の是正や技術的問題の早期解決なども目標として掲げています。 現在、Discordにおいて40名以上とともに活動しています!
Discussion