MagicOnion + MessagePack + YetAnotherHttpHandler でリアルタイム通信を行う
概要
2024年最新版の MagicOnion 6.0.1 + MessagePack 2.5.140 + YetAnotherHttpHandler 1.0.0 でリアルタイム通信を行う環境構築手順を書きました。また、Unityクライアントは IL2CPP ビルドまで行い、リアルタイムサーバーはローカルサーバーとして起動するところまで行います。
記事を書くきっかけとなったのは、Cysharp さんから grpc-dotnet が利用できる YetAnotherHttpHandler の公開です。最近まで、Unityで gRPC クライアントを使う際には、メンテナンスモードの C-Core gRPC ライブラリを使うしかない状況でしたが、 YetAnotherHttpHandler はその問題を解決します。Unity の gRPC クライアント事情についてはこちらが参考になります。メンテナンス期間が少なくとも2024年10月まで再延期 | gRPC, neue cc - Unity用のHTTP/2(gRPC) Client、YetAnotherHttpHandlerを公開しました, Unityでもgrpc-dotnetを使ったgRPCがしたい - Activ8 Tech Blog
この記事の目標は以下のような成果物を作成することです。
また、この記事では Server の TLS 化やクラウドサービスへのデプロイまではやりません。(需要がありそうなら続編書くぞ!という気持ちです)
追記: 本記事は、もともと MagicOnion 5.1.8 と YetAnotherHttpHandler 0.1.0 での環境構築の際の躓きポイントを紹介する記事でした。MagicOnion 6.0.1 と YetAnotherHttpHandler 1.0.0 のリリースにより、README が更新され環境構築がしやすくなりました。そのため本記事がなくとも MagicOnion README や 公式サンプルコード、YetAnotherHttpHandler READMEを読むだけでも十分かもしれません。
環境
-
.NET 8
- .NET 7 以降で Linux 上のパフォーマンスや gRPC のパフォーマンスが上がったらしく、LTS 版の .NET8 を使います
- Unity2022.3.14f1
- これより新しいバージョンであれば大丈夫なはず
-
MagicOnion 6.0.1 | GitHub
- リアルタイムサーバー用途として利用できるフレームワーク
-
MessagePack-CSharp 2.5.140 | GitHub
- C#用の高速なシリアライザ
-
YetAnotherHttpHandler 1.0.0 | GitHub
- Unity で使える gRPC, HTTP/2 クライアント
- grpc-dotnet との互換性がある
- 内部実装が Rust
サンプル用 GitHub リポジトリ
以下に本記事で紹介するサンプルリポジトリを置いておきます。記事の説明が不十分だったりする場合はこちらを参考にしてください。
MagicOnion Server 編
大まかに、MagicOnion Server 編、Unityクライアント編と分けて手順を記述しています。まずは MagicOnion Server 編です。
事前準備
- .NET SDK8.0 のインストール
- IDE の更新
- .NET8 対応のために Visual Studio や Rider の最新版への更新が必要になる場合があります。
最初のフォルダー構成
magiconion-sample-server
├── .git
├── .gitignore
└── README.md
ソリューションの作成
.NET ソリューションと2つのプロジェクトを作成し、ソリューションに2つのプロジェクトを追加します。
2つのプルジェクトのうち、1つは Server プロジェクトで MagicOnion Server の実装を置くプロジェクトです。2つめは Server と Unityクライアントで共有する Shared プロジェクトで、Interface群が定義されています。Server プロジェクト側でこの Interface を実装し、Unity クライアント側ではこの Interface を利用する関係になります。
> cd magiconion-sample-server
> dotnet new sln -n magiconion-sample-server
> dotnet new console -n Server -o magiconion-sample-server --framework net8.0
> dotnet sln magiconion-sample-server.sln add Server/Server.csproj
> dotnet new classlib -n Shared -o magiconion-sample-server --framework netstandard2.1
> dotnet sln magiconion-sample-server.sln add Shared/Shared.csproj
また、Server プロジェクトは最新の .NET 8 を指定します。.NET 7 以降で Linux 上のパフォーマンスや gRPC のパフォーマンスが上がったらしく、LTS 版の .NET8 を使います。
Shared プロジェクトは Server と Unity クライアントで共有されるので、フレームワークとしてnetstandard2.1を指定しています。
magiconion-sample-server.slnをエクスプローラーからダブルクリックするなりして開きます
以下のようなディレクトリ構成になっているはずです。
magiconion-sample-server
├── .git
├── .gitignore
├── README.md
├── Server
│   ├── Program.cs
│   └── Server.csproj
├── Shared
│   ├── Class1.cs
│   └── Shared.csproj
└── magiconion-sample-server.sln
また、Shared プロジェクトはサーバー側では .NET8 環境、Unity クライアント側では Unity2022.3.14f1 のコンパイラ環境(C#9.0 まで対応)で実行されるので、C#9.0 の構文で書く必要があります。
Shared プロジェクトの用意
Shared プロジェクトでは Interface を定義します。Shared プロジェクトで定義した Interface は Server プロジェクトで実装され、Unityクライアント側から利用される関係になります。
まずは Shared.csprojを以下のようにします。PropertyGroup は<TargetFramework>netstandard2.1</TargetFramework>と<LangVersion>9.0</LangVersion>のみ指定(<ImplicitUsings>enable</ImplicitUsings> と<Nullable>enable</Nullable>を消す必要があります。残したままだと Server プロジェクトがビルドできないので注意) し、必要な package を追加します。
<Project Sdk="Microsoft.NET.Sdk">

  <PropertyGroup>
    <TargetFramework>netstandard2.1</TargetFramework>
    <LangVersion>9.0</LangVersion>
  </PropertyGroup>

  <ItemGroup>
    <PackageReference Include="MagicOnion.Abstractions" Version="6.0.0" />
    <PackageReference Include="MessagePack.Annotations" Version="2.5.140" />
    <PackageReference Include="MessagePack.UnityShims" Version="2.5.140" />
  </ItemGroup>

</Project>
Shared プロジェクトで Interface の定義
MagicOnion の README を参考にInterfaceを定義します。Shared ディレクトリ配下にInterfacesディレクトリを作成し、その配下に以下の IMyFirstService.csとIGamingHub.csを追加します。
using MagicOnion;
namespace Shared.Interfaces
{
    public interface IMyFirstService : IService<IMyFirstService>
    {
        UnaryResult<int> SumAsync(int x, int y);
    }
}
using System.Threading.Tasks;
using MagicOnion;
using MessagePack;
using UnityEngine;

namespace Shared.Interfaces
{
    public interface IGamingHubReceiver
    {
        void OnJoin(Player player);
        void OnLeave(Player player);
        void OnMove(Player player);
    }

    public interface IGamingHub : IStreamingHub<IGamingHub, IGamingHubReceiver>
    {
        ValueTask<Player[]> JoinAsync(string roomName, string userName, Vector3 position, Quaternion rotation);
        ValueTask LeaveAsync();
        ValueTask MoveAsync(Vector3 position, Quaternion rotation);
    }

    [MessagePackObject]
    public class Player
    {
        [Key(0)]
        public string Name { get; set; }
        [Key(1)]
        public Vector3 Position { get; set; }
        [Key(2)]
        public Quaternion Rotation { get; set; }
    }
}
Package化
次に、Unity において Shared プロジェクトを package として認識できるように、Shared プロジェクトルートに package.json を追加します。
{
  "name": "com.magiconion-sample-server.shared",
  "version": "0.0.1",
  "displayName": "magiconion-sample-server shared"
}
さらに不要なClass1.csは削除すると、Shared 以下のディレクトリ構造は以下のようになるはずです。
Shared
├── Interfaces
│   ├── IGamingHub.cs
│   └── IMyFirstService.cs
├── Shared.csproj
└── package.json
Server プロジェクトの用意
続いて Server プロジェクトの用意をしてきます。
まず MagicOnion.Server 6.0.0 と Shared プロジェクトを追加します。
<Project Sdk="Microsoft.NET.Sdk">

  <PropertyGroup>
    <OutputType>Exe</OutputType>
    <TargetFramework>net8.0</TargetFramework>
    <ImplicitUsings>enable</ImplicitUsings>
    <Nullable>enable</Nullable>
  </PropertyGroup>

  <ItemGroup>
    <PackageReference Include="MagicOnion.Server" Version="6.0.0"/>
    <ProjectReference Include="../Shared/Shared.csproj"/>
  </ItemGroup>

</Project>
Server プロジェクトで Interface の実装
MagicOnion の README の通りMyFistService.csとGamingHub.csとして実装します。
ディレクトリ構造は以下のようにします。
Server
├── Program.cs
├── Server.csproj
├── Services
│   └── MyFirstService.cs
└─── StreamingHub
   └── GamingHub.cs
using MagicOnion;
using MagicOnion.Server;
using Shared.Interfaces;

namespace Server.Services;

// copied from https://github.com/Cysharp/MagicOnion#service-implementation-server-side
// Implements RPC service in the server project.
// The implementation class must inherit `ServiceBase<IMyFirstService>` and `IMyFirstService`
public class MyFirstService : ServiceBase<IMyFirstService>, IMyFirstService
{
    // `UnaryResult<T>` allows the method to be treated as `async` method.
    public async UnaryResult<int> SumAsync(int x, int y)
    {
        Console.WriteLine($"Received:{x}, {y}");
        return x + y;
    }
}
using MagicOnion.Server.Hubs;
using Shared.Interfaces;
using UnityEngine;

namespace Server.StreamingHub;

// copied from https://github.com/Cysharp/MagicOnion#streaminghub
// Server implementation
// implements : StreamingHubBase<THub, TReceiver>, THub
public class GamingHub : StreamingHubBase<IGamingHub, IGamingHubReceiver>, IGamingHub
{
    // this class is instantiated per connected so fields are cache area of connection.
    IGroup room;
    Player self;
    IInMemoryStorage<Player> storage;

    public async ValueTask<Player[]> JoinAsync(string roomName, string userName, Vector3 position, Quaternion rotation)
    {
        self = new Player() { Name = userName, Position = position, Rotation = rotation };

        // Group can bundle many connections and it has inmemory-storage so add any type per group.
        (room, storage) = await Group.AddAsync(roomName, self);

        // Typed Server->Client broadcast.
        Broadcast(room).OnJoin(self);

        return storage.AllValues.ToArray();
    }

    public async ValueTask LeaveAsync()
    {
        await room.RemoveAsync(this.Context);
        Broadcast(room).OnLeave(self);
    }

    public async ValueTask MoveAsync(Vector3 position, Quaternion rotation)
    {
        self.Position = position;
        self.Rotation = rotation;
        Console.WriteLine($"MoveAsync: {self.Name} pos:{position.x} {position.y} {position.z} rot:{rotation.x} {rotation.y} {rotation.z} {rotation.w}");
        Broadcast(room).OnMove(self);
    }

    // You can hook OnConnecting/OnDisconnected by override.
    protected override ValueTask OnDisconnected()
    {
        // on disconnecting, if automatically removed this connection from group.
        return ValueTask.CompletedTask;
    }
}
サーバープログラムのエントリポイントの実装
サーバープログラムのエントリーポイントととしてProgram.csの中身を書いていきます。
using System.Net;
using System.Security.Cryptography.X509Certificates;
using Microsoft.AspNetCore.Builder;
using Microsoft.AspNetCore.Hosting;
using Microsoft.AspNetCore.Server.Kestrel.Core;
using Microsoft.Extensions.DependencyInjection;

namespace Server;

internal static class Program
{
    public static void Main(string[] args)
    {
        var builder = WebApplication.CreateBuilder(args);

        builder.WebHost.UseKestrel(options =>
        {
            options.ConfigureEndpointDefaults(endpointOptions =>
            {
                endpointOptions.Protocols = HttpProtocols.Http2;
            });

            // HTTP/1.1エンドポイントの設定
            options.Listen(IPAddress.Parse("0.0.0.0"), 5000, listenOptions =>
            {
                listenOptions.Protocols = HttpProtocols.Http1;
            });

            // HTTP/2 ,HTTPS エンドポイントの設定
            options.Listen(IPAddress.Parse("0.0.0.0"), 5001, listenOptions =>
            {
                // --load-cert=true が指定されていたら証明書を読み込む
                if (args.Any(arg => arg == "--load-cert=true"))
                {
                    Console.WriteLine("load certificate");
                    listenOptions.UseHttps(new X509Certificate2("certificate/certificate.pfx","test"));
                }
            });
        });

        builder.Services.AddGrpc();
        builder.Services.AddMagicOnion();

        var app = builder.Build();

        // テスト用のエンドポイント
        app.MapGet("/", () => "Hello World!");

        // MagicOnionのエンドポイント
        app.MapMagicOnionService();

        app.Run();
    }
}
以下の点を考慮しています。
- 問題の切り分け用に HTTP/1.1 のエンドポイントを用意しておく
- エンドポイントのIPは
0.0.0.0にしているのは、docker コンテナ上で Server を起動したときにホストマシンからのアクセスを楽にするため- なのでホストマシンでサーバーを起動する場合は
127.0.0.1でも大丈夫
- なのでホストマシンでサーバーを起動する場合は
- 証明書を読み込むオプションがあるが、現時点では証明書を生成していないので機能しないです。
最後に適当な GitHub リポジトリに push しておきます。
git push origin main
Unity クライアント編
事前準備
- (必要な人は)C++ コンパイラと Windows SDK のインストール
- 例えば、Visual Studio Installer を起動して 変更 -> C++ によるデスクトップ開発 を選択しインストールすることができます。
- IL2CPP ビルドで必要になります。
- UnityHub から適当な Unity プロジェクトを作成
- 私は Unity2022.3.14f1 & URP 3Dテンプレートにしました。
- .gitignore, .gitattributeを追加
-
git initでローカル git リポジトリを作成 - magiconion-sample-serverをsubmoduleとして追加
git submodule add git@github.com:tou-tou/magiconion-sample-server.gitgit submodule initgit submodule update
必要な Unity Package を openupm 経由で追加
Packages フォルダ配下に存在しているmanifest.json内のscopedRegistriesとして以下を追加します。
"scopedRegistries": [
    {
      "name": "package.openupm.com",
      "url": "https://package.openupm.com",
      "scopes": [
        "com.cysharp.magiconion",
        "com.neuecc.messagepack",
        "com.cysharp.yetanotherhttphandler",
        "com.veriorpies.parrelsync"
      ]
    }
  ],
dependenciesとして以下を追加します。
...
 "dependencies": {
    "com.cysharp.magiconion": "6.0.1",
    "com.neuecc.messagepack": "2.5.140",
    "com.cysharp.yetanotherhttphandler": "1.0.0",
    "com.github-glitchenzo.nugetforunity": "4.0.2",
    "com.veriorpies.parrelsync": "1.5.2",
    "com.magiconion-sample-server.shared": "file:../../magiconion-sample-client/magiconion-sample-server/Shared/",
...
 }
追加すると以下のようになります。
追加したパッケージについて
- ParrelSyncは Unity Editor を複数立ち上げてマルチプレイのデバッグができるツールです。
- Shared プロジェクトを読み込むために
"com.magiconion-sample-server.shared": "file:../../magiconion-sample-client/magiconion-sample-server/Shared/",と指定しています。-
"file:../../magiconion-sample-client/magiconion-sample-server/Shared/"に於いて、../../で2つ上の親ディレクトリを指定しているのは ParrelSync を正常に動かすためです。
-
-
NuGetForUnity: A NuGet Package Manager for Unity
- これを使うと
.unitypacakgeファイルを import して dll を読み込む、をしなくて済みます。 - パッケージのバージョン管理もしてくれるので更新が楽になります。
- これを使うと
必要な NuGet Pacakge を追加
まずは、 YetAnotherHttpHandler の依存関係を NuGetForUnity 経由で追加します。
上記の必要なライブラリを NuGetForUnity の GUI でポチポチと追加するか Assets/package.config に以下を記述するかをして追加します。
さらに MessagePack 2.5.140 はMicrosoft.NET.StringTools >=17.6.3に依存しているので追加しておきます。
NuGet Gallery | MessagePack 2.5.140
Shared プロジェクトに AssemblyDefinition ファイルを追加
サーバー側では csproj ファイルでパッケージ依存関係を解決していましたが、Unity 側ではパッケージ依存関係の解決のために Assembly Definition ファイルを利用します。
Unity Editor の ProjetタブからPackages/magiconion-sampler-server sharedフォルダを開き、その配下に AssemblyDefinitions ファイルを追加します。 Assembly Deffinition References に MessagePack.AnnotationsとMagicOnion.Abstractionsを追加します。これによって、Shared プロジェクトで必要な MagicOnion や MessagePack を読み込むことができます。

その後、Submoduleのmagiconion-sample-serverプロジェクト(実体は git ローカルリポジトリ)内で変更をリモートリポジトリに push しておきましょう。
# path-to/magiconion-sample-client
> cd magiconion-sample-server
> git status
Untracked files:
  (use "git add <file>..." to include in what will be committed)
        Shared/Shared.asmdef
> git add Shared/Shared.asmdef
> git commit -m "add asmdef"
> git push origin main
クライアントの実装
続いて、MagicOnionのREADMEを参考に Streming Hub の実装をします。
using System.Collections.Generic;
using System.Threading.Tasks;
using Grpc.Core;
using MagicOnion.Client;
using Shared.Interfaces;
using UnityEngine;

namespace SampleClient
{
   public class GamingHubClient : IGamingHubReceiver
   {
       private Dictionary<string, GameObject> _players = new();

       private IGamingHub _client;

       private readonly GameObject _ownPlayer;

       public GamingHubClient(GameObject player)
       {
           _ownPlayer = player;
       }

       public async ValueTask<GameObject> ConnectAsync(ChannelBase grpcChannel, string roomName, string playerName)
       {
           _client = await StreamingHubClient.ConnectAsync<IGamingHub, IGamingHubReceiver>(grpcChannel, this);

           var roomPlayers = await _client.JoinAsync(roomName, playerName, Vector3.zero, Quaternion.identity);
           foreach (var player in roomPlayers) (this as IGamingHubReceiver).OnJoin(player);

           return _players[playerName];
       }

       // methods send to server.

       public ValueTask LeaveAsync(string playerName)
       {
           foreach (var cube in _players)
               if (cube.Value.name != playerName)
                   Object.Destroy(cube.Value);

           return _client.LeaveAsync();
       }

       public ValueTask MoveAsync(Vector3 position, Quaternion rotation)
       {
           // たまにnullになることがあるので、nullチェックを入れる
           if (_client == null) return new ValueTask();
           return _client.MoveAsync(position, rotation);
       }

       // dispose client-connection before channel.ShutDownAsync is important!
       public Task DisposeAsync()
       {
           return _client.DisposeAsync();
       }

       // You can watch connection state, use this for retry etc.
       public Task WaitForDisconnect()
       {
           return _client.WaitForDisconnect();
       }

       // Receivers of message from server.

       void IGamingHubReceiver.OnJoin(Player player)
       {
           Debug.Log("Join Player:" + player.Name);

           // 自分の場合は自分のオブジェクトを生成しない
           if (_ownPlayer.name == player.Name)
           {
               _players[player.Name] = _ownPlayer;
           }
           else
           {
               var playerObject = GameObject.CreatePrimitive(PrimitiveType.Cube);
               var LitMat = Resources.Load<Material>("LitMat");
               playerObject.GetComponent<Renderer>().material = LitMat;
               playerObject.name = player.Name;
               playerObject.transform.SetPositionAndRotation(player.Position, player.Rotation);
               _players[player.Name] = playerObject;
           }
       }

       void IGamingHubReceiver.OnLeave(Player player)
       {
           Debug.Log("Leave Player:" + player.Name);

           if (_players.TryGetValue(player.Name, out var cube)) Object.Destroy(cube);
       }

       void IGamingHubReceiver.OnMove(Player player)
       {
           Debug.Log("Move Player:" + player.Name);

           if (_players.TryGetValue(player.Name, out var cube))
           {
               if (player.Name == _ownPlayer.name) return;
               cube.transform.SetPositionAndRotation(player.Position, player.Rotation);
           }
       }
   }
}
Cube コントローラーの追加
キーボード入力で Cube を操作できるようにします。
using UnityEngine;

namespace SampleClient
{
    public class Controller : MonoBehaviour
    {
        public float moveSpeed = 5.0f;

        void Update()
        {
            if (Input.GetKey(KeyCode.W))
            {
                transform.Translate(Vector3.forward * (moveSpeed * Time.deltaTime));
            }
            if (Input.GetKey(KeyCode.S))
            {
                transform.Translate(Vector3.back * (moveSpeed * Time.deltaTime));
            }

            if (Input.GetKey(KeyCode.A))
            {
                transform.Translate(Vector3.left * (moveSpeed * Time.deltaTime));
            }
            if (Input.GetKey(KeyCode.D))
            {
                transform.Translate(Vector3.right * (moveSpeed * Time.deltaTime));
            }

            if (Input.GetKey(KeyCode.Q))
            {
                transform.Translate(Vector3.up * (moveSpeed * Time.deltaTime));
            }
            if (Input.GetKey(KeyCode.Z))
            {
                transform.Translate(Vector3.down * (moveSpeed * Time.deltaTime));
            }
        }
    }
}
下図のようにシーン上に Cube (例えば名前は user1 )を生成し、user1 に上記のController.csをアタッチします。

UI Tool Kitで UI の追加
UI ToolKit を導入して効率よく UI を構築する をベースに簡単な UI を作ります。
例えば下図のような UI を作成します。

上記の UI の各ボタンと機能を連携させ、とりあえず動くコードを書きます。
( UI と機能が分離してないとか、Dispose 処理怪しくないかとかありますが、とりあえず動きます...)
using System;
using Cysharp.Net.Http;
using Grpc.Core;
using Shared.Interfaces;
using Grpc.Net.Client;
using MagicOnion;
using MagicOnion.Client;
using UnityEngine;
using UnityEngine.UIElements;

namespace SampleClient
{
    public class SampleUIClient : MonoBehaviour
    {
        [SerializeField] private GameObject playerObject;
        private GamingHubClient _hubClient;
        private ChannelBase _channel;

        private TextField nameField;
        private TextField roomField;
        private bool _isConnected = false;

        private async void Start()
        {
            _channel = GrpcChannelx.ForAddress("http://127.0.0.1:5001/");

            var serviceClient = MagicOnionClient.Create<IMyFirstService>(_channel);
            var result = await serviceClient.SumAsync(100, 200);
            Debug.Log(result);

            // UIボタンと機能の連携
            var root = GetComponent<UIDocument>().rootVisualElement;
            var button = root.Q<Button>("Connect");
            button.clicked += async () =>
            {
                Debug.Log("room Button clicked!");
                if (_isConnected) return;
                _hubClient = new GamingHubClient(playerObject);
                _ = await _hubClient.ConnectAsync(_channel, roomField.value, nameField.value);
                _isConnected = true;
                nameField.isReadOnly = true;
                nameField.isReadOnly = true;
            };

            var button2 = root.Q<Button>("Disconnect");
            button2.clicked += async () =>
            {
                Debug.Log("name Button clicked!");
                _isConnected = false;
                nameField.isReadOnly = false;
                nameField.isReadOnly = false;
                await _hubClient.LeaveAsync(playerObject.name);
                await _hubClient.DisposeAsync();
            };

            nameField = root.Q<TextField>("name");
            playerObject.name = nameField.value;
            nameField.RegisterValueChangedCallback(evt =>
            {
                Debug.Log("Entered Name: " + evt.newValue);
                if (!_isConnected) playerObject.name = evt.newValue;
            });

            roomField = root.Q<TextField>("room");
            roomField.RegisterValueChangedCallback(evt =>
            {
                Debug.Log("Entered Name: " + evt.newValue);
                if (_isConnected) roomField.isReadOnly = true;
            });
        }

        private async void Update()
        {
            if (_hubClient == null) return;
            if (_isConnected)
            {
                var position = playerObject.transform.position;
                var rotation = playerObject.transform.rotation;
                await _hubClient.MoveAsync(position, rotation);
            }
        }

        private async void OnApplicationQuit()
        {
            if (_hubClient == null) return;
            await _hubClient.LeaveAsync(playerObject.name);
            await _hubClient.DisposeAsync();
        }
    }
}
シーン上に存在するUI Document がアタッチされた GameObject(下図の場合だと UIClient)に上記スクリプトをアタッチし、先ほど作成した user1 を Player Object に割り当てます。

IL2CPP 向けのコード生成
IL2CPP は、ビルド時に Unity のスクリプト内の C# コードから生成された中間言語コードを C++ コードに変換し、その後ネイティブコードにコンパイルして実行可能なファイルを生成する仕組みです。
また、通信部分(MagicOnion)やシリアライズ部分(MessagePack)ではリフレクション機能の一部(ここではオブジェクトの型情報を利用して効率の良いコードを動的生成するような仕組み)が使われていることが多いのですが、IL2CPP では実行時の動的コード生成は禁止されており、動的コード生成に依存するリフレクション機能は制限されます。
そのため、IL2CPP では動的コード生成に依存するリフレクション機能のために必要な全てのコードを事前に生成しておく必要があります。
上記を解決するために、MessagePack ではコード生成ツール、MagicOnion では SourceGnerator が提供されているのでそれを利用します。
MessagePack for C# 用コード生成
mpc (MessagePack Codegen)を使ってコード生成をします。こちらは Editor拡張として提供されているのでそちらを使います。
MessagePackのREADMEを参考に進めます。

上記の例だとAssets/Scripts/Generated/Serializer.generated.csが生成されます。
MagicOnion 用コード生成 と Resolver の登録
MagicOnionのREADMEの通り Source Generator で生成できます。
上記で生成したコード(MessagePackSampleResolver.InstanceとMagicOnionClientInitializer.Resolver)が実行時に Static なインスタンスに登録されるようにします。
以下のInitializer.csをAssets/Scripts/ディレクトリ配下に作成します。
using Grpc.Net.Client;
using MagicOnion.Client;
using MagicOnion.Unity;
using MessagePack;
using MessagePack.Resolvers;
using UnityEngine;

namespace SampleClient
{
    // Shared プロジェクト のアセンブリに含まれていれば、`IMyFirstService` か `IGamingHub` のどちらの指定でもOK
    [MagicOnionClientGeneration(typeof(Shared.Interfaces.IMyFirstService))]
    internal partial class MagicOnionClientInitializer
    {
    }

    public static class Initializer
    {
        [RuntimeInitializeOnLoadMethod(RuntimeInitializeLoadType.BeforeSceneLoad)]
        private static void RegisterResolvers()
        {
            // NOTE: Currently, CompositeResolver doesn't work on Unity IL2CPP build. Use StaticCompositeResolver instead of it.
            StaticCompositeResolver.Instance.Register(
                // This resolver is generated by MagicOnion's Source Generator.
                // See below for details. https://github.com/Cysharp/MagicOnion?tab=readme-ov-file#ahead-of-time-compilation-support-with-source-generator
                MagicOnionClientInitializer.Resolver,
                // This resolver is generated by MessagePack's code generator.
                MessagePackSampleResolver.Instance,
                BuiltinResolver.Instance,
                PrimitiveObjectResolver.Instance,
                MessagePack.Unity.UnityResolver.Instance,
                StandardResolver.Instance
            );

            MessagePackSerializer.DefaultOptions = MessagePackSerializer.DefaultOptions
                .WithResolver(StaticCompositeResolver.Instance);
        }

        [RuntimeInitializeOnLoadMethod(RuntimeInitializeLoadType.BeforeSceneLoad)]
        public static void OnRuntimeInitialize()
        {
            GrpcChannelProviderHost.Initialize(
                new GrpcNetClientGrpcChannelProvider(() => new GrpcChannelOptions()
                {
                    HttpHandler = new Cysharp.Net.Http.YetAnotherHttpHandler()
                    {
                        Http2Only = true
                    }
                }));
        }
    }
}
マテリアルの設定
下図のように Assets/RsourcesディレクトリにLitMatという名でマテリアルを生成します。Shader は Universal Render Pipeline/Litとしています。user1 にドラッグ&ドロップするなどして user1 のマテリアルを LitMat に変更します。
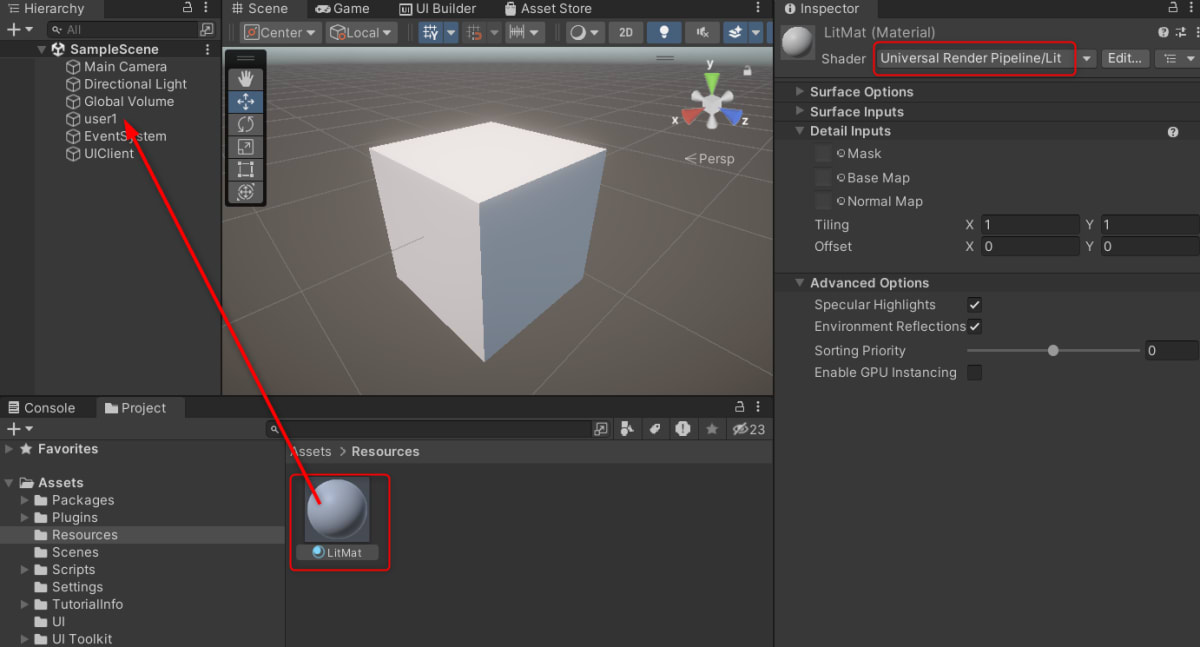
このマテリアルは、以下のようにGameObject.CreatePrimitive(PrimitiveType.Cube) で生成される Cube にアタッチするようにしています。このメソッドを使った場合、URP プロジェクトのビルドではなぜか期待通りのマテリアルがアタッチされないためです。
IL2CPP ビルドの設定
最後に IL2CPP ビルドのための設定を行います。
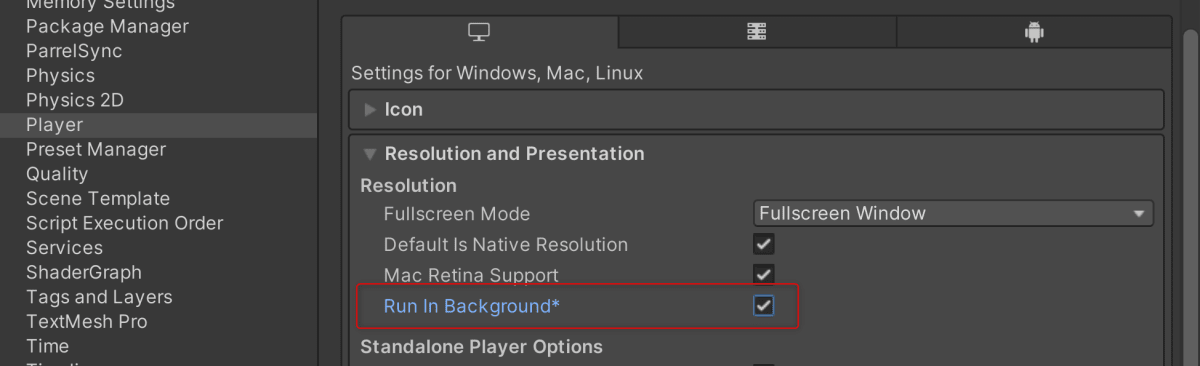
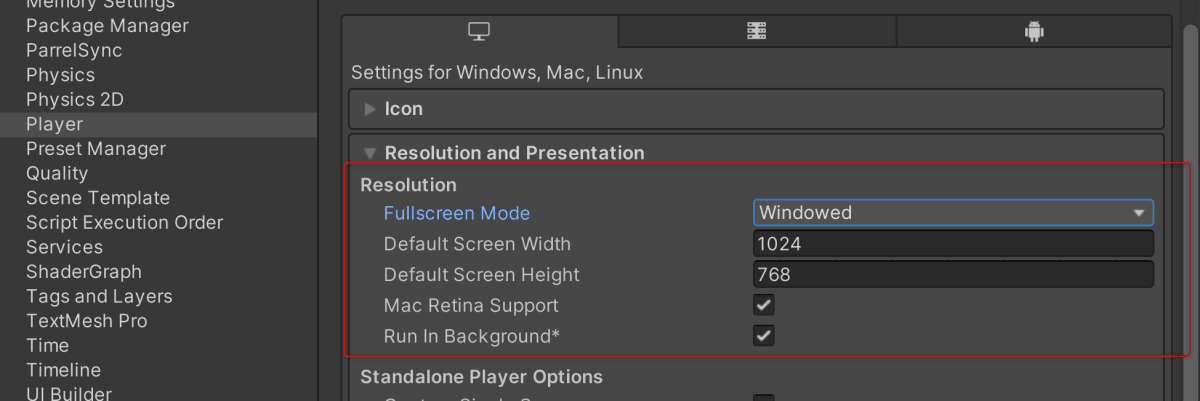
Unity Editor の File -> Build Settings -> Player Settings -> Player から
Scripting Backend を IL2CPP に

バックグラウンドでも動くように
アプリのWindowサイズを適当な大きさに
File -> Build Settings -> Build からアプリケーションをビルドします。
動かす
magiconion-sample-server の Server プロジェクトを IDE から直接実行するなり、ビルドしてから実行ファイルを実行するなりでサーバーを起動します。
先ほど生成した Unity クライアントの実行ファイルを何回かクリックし複数のクライアントを起動します。
こんな感じになります。
ケース別エラー対応
ケース別エラー対応
Microsoft.NET.StringTools がない
Library\PackageCache\com.neuecc.messagepack@2.5.140\Formatters\StringInterningFormatter.cs(5,17): error CS0234: The type or namespace name 'NET' does not exist in the namespace 'Microsoft' (are you missing an assembly reference?)
Microsoft.NET.StringTools 17.6.3 をNuGetForUnityから追加
C++ Compiler と Windows 10 SDK がない
Internal build system error. BuildProgram exited with code 1.
error: Could not set up a toolchain for Architecture x64. Make sure you have the right build tools installed for il2cpp builds. Details:
IL2CPP C++ code builder is unable to build C++ code. In order to build C++ code for Windows Desktop, you must have one of these installed:
 * Visual Studio 2022 or newer with C++ compilers and Windows 10 (or newer) SDK (recommended)
 * Visual Studio 2019 with C++ compilers and Windows 10 (or newer) SDK
 * Visual Studio 2017 with C++ compilers and Windows 10 (or newer) SDK
 * Visual Studio 2015 with C++ compilers and Windows 10 (or newer) SDK

Visual Studio 2017 (or newer) is detected using `vswhere.exe` as well as VSCOMNTOOLS environment variables.
Visual Studio 2015 is detected by looking at "SOFTWARE\Microsoft\VisualStudio\14.0_Config\InstallDir" in the registry as well as VSCOMNTOOLS environment variables.
Windows 10 (or newer) SDK is detected by looking at "SOFTWARE\Wow6432Node\Microsoft\Microsoft SDKs\Windows\v10.0\InstallationFolder" in the registry.

Unable to detect any compatible Visual Studio installation!
 * Found Visual Studio 2022 installation without C++ tool components
 * Found Visual Studio 2019 installation without C++ tool components

Windows 10 (or newer) SDK is not installed. You can install from here: https://developer.microsoft.com/en-us/windows/downloads/windows-10-sdk/


Unity.IL2CPP.Bee.BuildLogic.ToolchainNotFoundException: IL2CPP C++ code builder is unable to build C++ code. In order to build C++ code for Windows Desktop, you must have one of these installed:
 * Visual Studio 2022 or newer with C++ compilers and Windows 10 (or newer) SDK (recommended)
 * Visual Studio 2019 with C++ compilers and Windows 10 (or newer) SDK
 * Visual Studio 2017 with C++ compilers and Windows 10 (or newer) SDK
 * Visual Studio 2015 with C++ compilers and Windows 10 (or newer) SDK

Visual Studio 2017 (or newer) is detected using `vswhere.exe` as well as VSCOMNTOOLS environment variables.
Visual Studio 2015 is detected by looking at "SOFTWARE\Microsoft\VisualStudio\14.0_Config\InstallDir" in the registry as well as VSCOMNTOOLS environment variables.
Windows 10 (or newer) SDK is detected by looking at "SOFTWARE\Wow6432Node\Microsoft\Microsoft SDKs\Windows\v10.0\InstallationFolder" in the registry.

Unable to detect any compatible Visual Studio installation!
 * Found Visual Studio 2022 installation without C++ tool components
 * Found Visual Studio 2019 installation without C++ tool components

Windows 10 (or newer) SDK is not installed. You can install from here: https://developer.microsoft.com/en-us/windows/downloads/windows-10-sdk/


   at Unity.IL2CPP.Bee.BuildLogic.WindowsDesktop.WindowsDesktopBuildLogic.UserAvailableToolchainFor(Architecture architecture, NPath toolChainPath, NPath sysRootPath, Boolean targetIsSimulator)
   at PlayerBuildProgramLibrary.PlayerBuildProgramBase.GetIl2CppToolChain(PlatformBuildLogic platform, Architecture architecture, NPath toolChainPath, NPath sysrootPath)
   at PlayerBuildProgramLibrary.PlayerBuildProgramBase.SetupIl2CppBuild()
   at PlayerBuildProgramLibrary.PlayerBuildProgramBase.<SetupPlayerBuild>b__94_0()
   at Bee.Core.TinyProfiler2Base.Section[T](String label, Func`1 func, Dictionary`2 metadata)
   at PlayerBuildProgramLibrary.PlayerBuildProgramBase.SetupPlayerBuild()
   at WinPlayerBuildProgram.WinPlayerBuildProgram.SetupPlayerBuild()
   at PlayerBuildProgramLibrary.PlayerBuildProgramBase.RunBuildProgram()
   at PlayerBuildProgramTypeWrapper.Run(String[] args)
   at Program.Main(String[] args)
UnityEngine.GUIUtility:ProcessEvent (int,intptr,bool&)
Visual Studio Installerを起動して 変更 -> C++ によるデスクトップ開発 を選択しインストールします。
ビルドを実行中、生成したCubeがMaterialエラーになる
ビルドでは CreatePrimitive 追加される Cube に期待通りの Material がアタッチされないっぽいので、Cube 生成直後の Material を割り当てるようにします。
さいごに
意外とハマりポイントが多くて環境構築が大変でしたが、クライアントとサーバーどちらも C# で実装できるのは嬉しいですね!
今後、MagicOnion ネタとして以下の内容で記事を今後書けたらいいなぁと思っています。
- MagicOnion + MessgePack + YetAnotherHttpHandler でリアルタイムサーバーを作る(本記事)
- Unity(YetAnotherHttpHandler)とMagicOnionで自己署名証明書を使ったHTTPS&HTTP/2通信
- MagicOnion Server コンテナを GCP にデプロイする
- DFrame で MagicOnion Server の負荷試験
- TLS 終端用リバースプロキシ追加によるサーバーパフォーマンス差
Discussion
MagicOnion周りの記事、ネット上にあまり落ちておらず非常に助かります、ありがとうございます…!
こちらの記事通り取り組んでみましたが、IDE上でServer プロジェクトを実行しようとしたところ、Unity側で以下エラーが出てしまい、正常に動作しませんでした。
Assembly 'Library/ScriptAssemblies/Assembly-CSharp.dll' will not be loaded due to errors:
Reference has errors 'Shared'.
Assembly 'Packages/com.magiconion-sample-server.shared/bin/Debug/netstandard2.1/Shared.dll' will not be loaded due to errors:
Unable to resolve reference 'MessagePack.UnityShims'. Is the assembly missing or incompatible with the current platform?
Reference validation can be disabled in the Plugin Inspector.
正直なところ、エラー内容が良く理解できず自力で対処できなかったのですが、こちらがどのようなエラーかお教えいただけないでしょうか?また、何か思い当たる解決法はございますか…?
記事を参考にしていただいてありがとうございます!
ServerプロジェクトをUnityランタイムで実行している可能性はありませんか?
ServerプロジェクトはUnityのランタイムではなく、.NET8ランタイムで実行する必要があります。
IDEとUnityが紐づいていて、Serverプロジェクト実行時にUnity側でエラーが出てしまっているように見えます。
Serverプロジェクト自体はUnityなしで実行できる想定です。
返信ありがとうございます…!またこちらの返信が遅くなり申し訳ありません。
Unityランタイムで実行するとは、VisualStudioのUnityにアタッチのボタンを押して実行するということで間違いないでしょうか?(的外れでしたら申し訳ありません。)
もしそれで間違いないのであれば、VisualStudioのServerプロジェクトの再生ボタンにはUnityにアタッチとは出ていない状態で実行しております。
(追記)こちら の返信
はい、そのはずです…
上記についての認識を確認したいのですが、VisualStudioの実行ボタンを押すと、VisualStudioのコンソールではなくUnityEditorのコンソールで上記のエラーが出力されたという状況で間違いないでしょうか。
VisualStudioで実行しているのにも関わらず、UnityEditorのコンソールでエラーが出力されてしまうのは、VisualStudioがUnityに紐づいている事で発生する現象に見えます。
以下を試すとどのような挙動になるか教えていただけますか
はい、その通りです。
UnityEditorを完全に終了させ、再度起動したところ、起動時に上記のエラーが引き続き表示されました。
特にビルドエラーなどは出ず、正常にプログラムが開始されました。
ただ、初回サーバープロジェクト実行時にbinフォルダとobjフォルダ、その他metaファイルがSharedフォルダ内に生成されておりました。エラー内容を読むにこの辺りのファイルが関係してそうには見えますが、どうでしょうか…?
ありがとうございます。
もしかして、Unityプロジェクト内( magiconion-sample-client)に含まれているサーバープロジェクト (magiconion-sample-server ) を実行していますかね?
もしそうであれば、Unityプロジェクトとは関係ないところにサーバープロジェクトを用意し、そちらでサーバープロジェクトを実行してください。
例えば、以下のようなフォルダ構造になっているかを確認してください。
その後、Sharedフォルダ内の以前に生成されたファイル群を消してから、UnityEditorを起動してみてください。
Unityプロジェクト内のサーバープロジェクトをビルドすることで生成されたファイル群をUnityEditorが読み込んでエラーが出力されているように見えます
こちら、フォルダ構造に誤りがございました…!
magiconion-sample-clientディレクトリの中のmagiconion-sample-serverプロジェクトが入っておりませんでした。
上記フォルダ構成にして生成ファイルを消してから再起動したところエラーが改善され、アプリも正常に動作しました。
ご回答いただき大変助かりました、本当にありがとうございます…!
解決して何よりです!
はじめまして。
記事の方参考にさせてもらってます。大変助かります。
現在、MagicOnion環境構築を進めて動作をしているのですが、
Androidでapkビルドして動かした際に、対象のRPC関数を呼び出すタイミングで、以下のエラーが出て困っています。
Androidでは任意の型の変換には対応していないのでしょうか?
情報が少なく、もし助言頂けますと幸いです・・・。
以下抜粋して記載しますが、Resolverの登録は以下のように行っており、UnityのWindowsビルドexeでは正常に動作している状況です。
(追記) AndroidでもMonoなら動きました。IL2CPPだけ動かないようで…
自己解決しました・・・(意を決して質問するとなぜか解決するあるある
Sharedプロジェクト配下で、
で生成されたファイルをUnityに持っていってResolver登録で、無事に動きました。
あ、IL2CPP向けのコード生成のとこに書いてましたね💦
Unityエディタから実行出来たのか。見逃してました。