AstroからデータベースプラットフォームとしてAstro DBがリリースされました。
色々と触ってみたのでチュートリアルとしてTODOリストを作成する方法を解説します。
Astroのインストール
まずは通常のAstroのインストールを行います。
npm create astro@latestでproject名を「astro-todo」、Emptyプロジェクトを選択して作成します。
% npm create astro@latest

 astro   Launch sequence initiated.

   dir   Where should we create your new project?
         ./astro-todo

  tmpl   How would you like to start your new project?
         Empty

    ts   Do you plan to write TypeScript?
         Yes

   use   How strict should TypeScript be?
         Strict

  deps   Install dependencies?
         Yes

   git   Initialize a new git repository?
         Yes

      ✔  Project initialized!
         ■ Template copied
         ■ TypeScript customized
         ■ Dependencies installed
         ■ Git initialized

  next   Liftoff confirmed. Explore your project!

         Enter your project directory using cd ./astro-todo
         Run npm run dev to start the dev server. CTRL+C to stop.
         Add frameworks like react or tailwind using astro add.

         Stuck? Join us at https://astro.build/chat

╭─────╮  Houston:
│ ◠ ◡ ◠  Good luck out there, astronaut! 🚀
╰─────╯
以下のコマンドでプロジェクトを立ち上げることができるでしょう
cd ./astro-todo
npm run dev
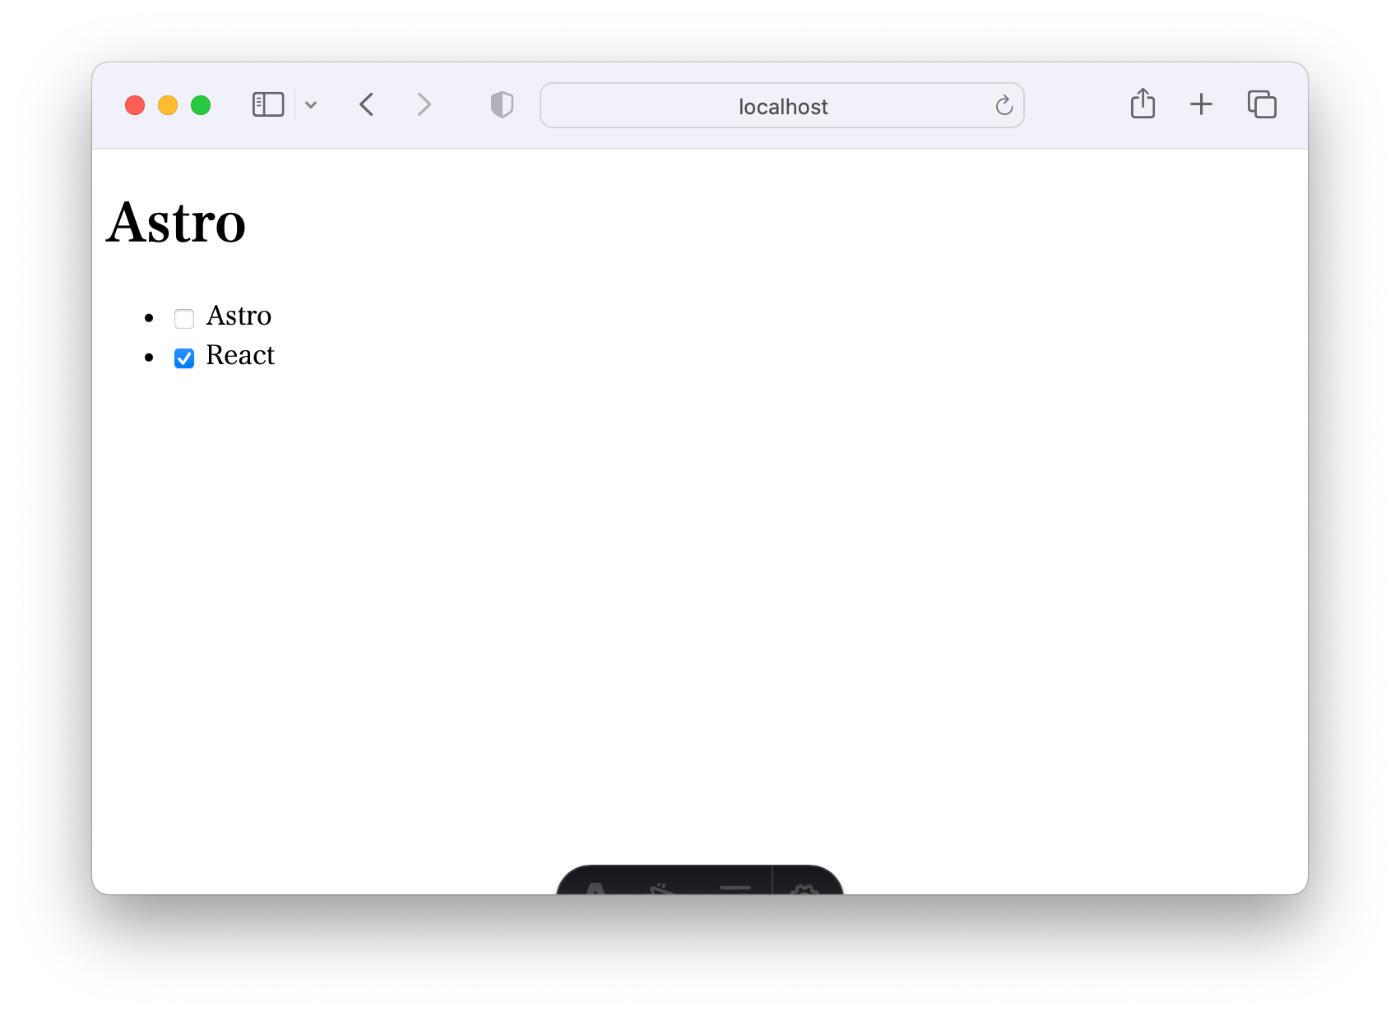
ブラウザで確認すると以下のようなページが表示されているはずです。

Astro DBのインストール
ターミナルなどで npx astro add db とコマンドを入力するとAstro DBのインストールや設定が行われます。
@astrojs/dbパッケージのインストールからdb/config.tsとdb/seed.tsの作成、astro.config.mjsの変更まで一通りの初期設定を行ってくれます。
% npx astro add db
✔ Resolving packages...

  Astro will run the following command:
  If you skip this step, you can always run it yourself later

 ╭─────────────────────────────────╮
 │ npm install @astrojs/db@^0.8.6  │
 ╰─────────────────────────────────╯

✔ Continue? … yes
✔ Installing dependencies...

  Astro will scaffold ./db/config.ts and ./db/seed.ts files.

✔ Continue? … yes

  Astro will make the following changes to your config file:

 ╭ astro.config.mjs ─────────────────────────────╮
 │ import { defineConfig } from 'astro/config';  │
 │                                               │
 │ import db from "@astrojs/db";                 │
 │                                               │
 │ // https://astro.build/config                 │
 │ export default defineConfig({                 │
 │   integrations: [db()]                        │
 │ });                                           │
 ╰───────────────────────────────────────────────╯

✔ Continue? … yes

   success  Added the following integration to your project:
  - @astrojs/db
Astro DBのテーブル定義
テーブル定義はdb/config.tsで行っていきます。
初期状態では以下のようになっているでしょう。
import { defineDb } from 'astro:db';

// https://astro.build/db/config
export default defineDb({
  tables: {}
});
今回はシンプルに idというプライマリキーと、titleとテキストフィールド、finishという真偽値のカラムをもつテーブルを作成します。
import { column, defineDb, defineTable } from 'astro:db';

const Todo = defineTable({
  columns: {
    id: column.number({ primaryKey: true }),
    title: column.text(),
    finish: column.boolean()
  }
})

// https://astro.build/db/config
export default defineDb({
  tables: {
    Todo
  }
});
Astro DBのシードデータの作成
テーブルデータのシードデータをdb/seed.tsで作成します。
db/seed.tsは初期値は以下のようなコードですが
import { db } from 'astro:db';

// https://astro.build/db/seed
export default async function seed() {
	// TODO
}
これ以下のようなデータの追加を行います。
import { db, Todo } from 'astro:db';

// https://astro.build/db/seed
export default async function seed() {
	await db.insert(Todo).values([
		{ id: 1, title: 'Astro', finish: false },
		{ id: 2, title: 'React', finish: true },
	])
}
DBの設定は以上です。
レンダリングをSSRに変更
後ほど追加や削除などサーバーサイドの機能を利用しますのでレンダリングをSSRに変更しておきます。
SSRであればNode.jsでサーバーサイド処理の記述ができるようになります。
SSRにするのにはastro.config.mjsにoutput: "server",を追記するだけです。
import db from '@astrojs/db';
import { defineConfig } from 'astro/config';

// https://astro.build/config
export default defineConfig({
	integrations: [db()],
+	output: "server",
});
設定はこれまでです。実際にページを作成していきましょう。
Astro DBのデータをページに表示
src/pages/index.astro に変更を加えて先ほど作成したシードデータの内容をページに表示しましょう。
以下のように記述をするとTODOデータを表示することができます。
---
import { db, Todo } from 'astro:db';
const todos = await db.select().from(Todo);
---

<html lang="ja">
	<head>
		<meta charset="utf-8" />
		<link rel="icon" type="image/svg+xml" href="/favicon.svg" />
		<meta name="viewport" content="width=device-width" />
		<meta name="generator" content={Astro.generator} />
		<title>Astro</title>
	</head>
	<body>
		<h1>Astro</h1>
		<ul>
			{
				todos.map(({ title, finish }) => (
					<li>
						<input type="checkbox" checked={finish} />
						{title}
					</li>
				))
			}
		</ul>
	</body>
</html>
Astro DBにデータを追加
次にデータ追加処理をおこないましょう。
今回は説明を簡易化するためにPOSTのform-dataを受け取れるエンドポイントを用意して処理を行っていきます。
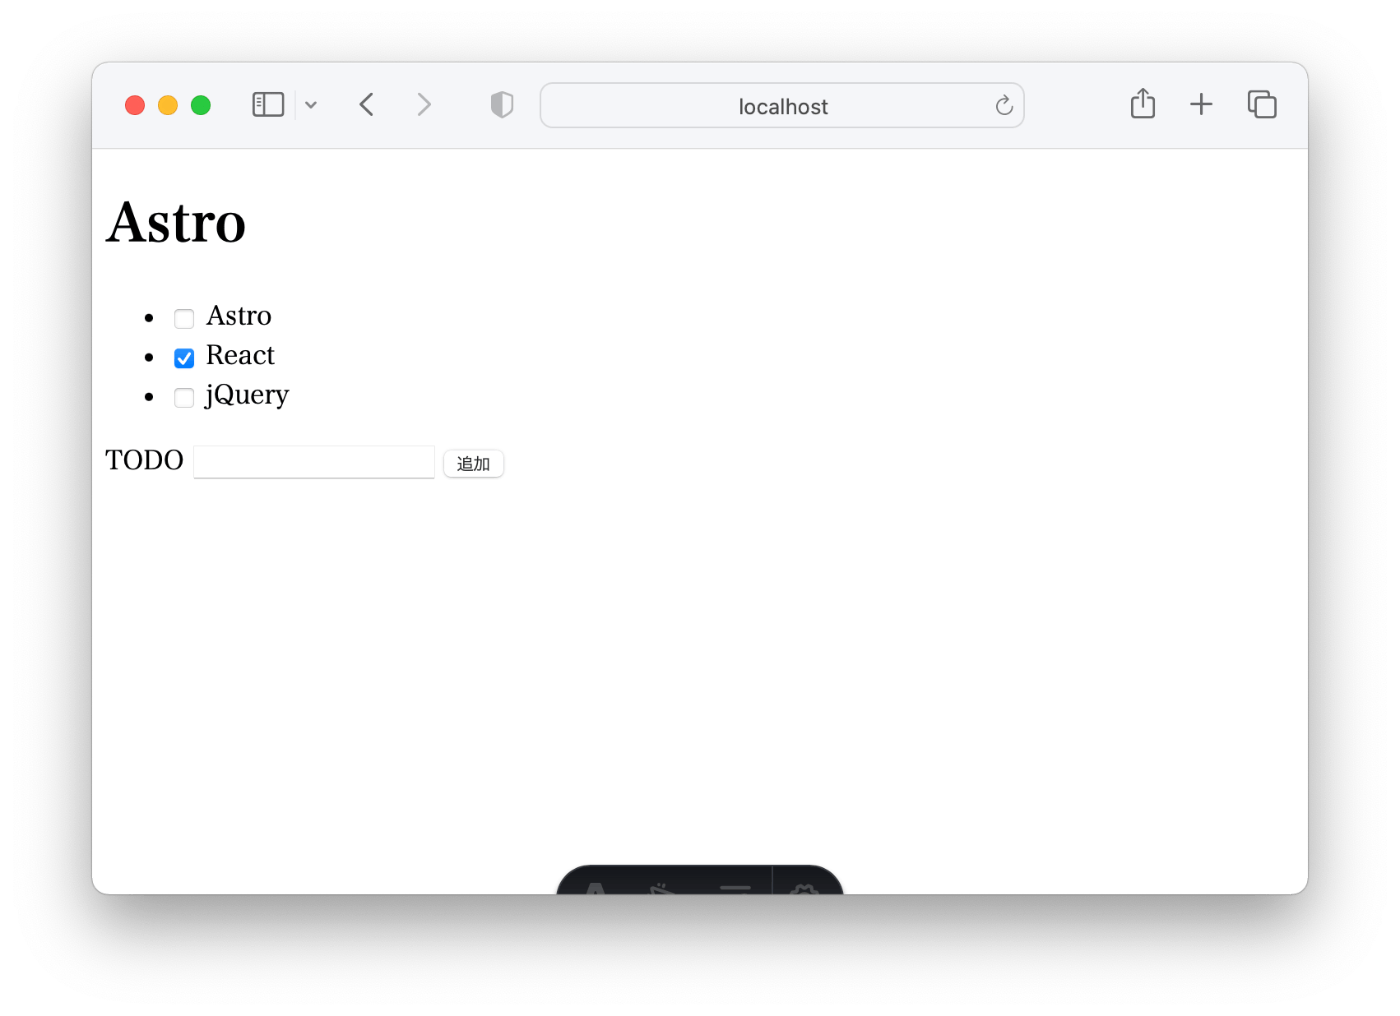
src/pages/index.astroの下部に入力フォームを作成します。
---
import { db, Todo } from 'astro:db';
const todos = await db.select().from(Todo);
---

 <html lang="ja">
...
	<body>
...
+		<form method="POST" action="/api/todo">
+			<label>TODO <input name="title" /></label>
+			<button>追加</button>
+		</form>
	</body>
 </html>
次にエンドポイントを作成します。
src/api/todo/index.tsを作成して以下の記述を行います。
import type { APIRoute } from "astro";
import { db, Todo } from 'astro:db';

export const POST: APIRoute = async ({ request, redirect }) => {
  const formData = await request.formData();
  const title = formData.get('title');
  if(typeof title === 'string') {
    await db.insert(Todo).values({ title , finish: false });
  }
  return redirect('/');
}
これはレコードのインサートを行ってからTOPに遷移する処理になっています。
これでTODOに入力を行って追加ボタンを押下するとTODOが追加されるようになります。
Astro DBにデータを編集
現状ではチェックボックスの値を変更してもリロードをすると元に戻ってしまいます。TODOテーブルのfinsihフィールドを更新して変更内容が保存されるようにしましょう。
送信用の処理
src/pages/index.astroを以下のように変更してチェックボックの値が切り替わったら/api/todo/${id}にsubmitが発生するように修正します。
---
import { db, Todo } from 'astro:db';
const todos = await db.select().from(Todo);
---

<html lang="ja">
(中略)
    <ul>
      {
        todos.map(({ id, title, finish }) => (
          <li>
            <form method="POST" action={`/api/todo/${id}`}>
              <input type="checkbox" checked={finish} name="finish"/>
              {title}
            </form>
          </li>
        ))
      }
    </ul>
(中略)
    <script>
    const updateTriggers = document.querySelectorAll("input[type='checkbox']")
    updateTriggers.forEach(trigger => {
      trigger.addEventListener('change',(e) => {
        const currentTarget = e.currentTarget as HTMLInputElement
        const targetForm = currentTarget.parentElement as HTMLFormElement
        targetForm.submit()
      })
    })
    </script>
  </body>
</html>
DB更新用の処理
次にエンドポイントを作成します。
今回は説明を簡易化するためにPOSTのform-dataを受け取れるエンドポイントを用意して処理を行っていきます。
src/api/todo/[id].tsを作成して以下の記述を行います。
import type { APIRoute } from "astro";
import { db, Todo, eq } from 'astro:db';

export const POST: APIRoute = async ({ params, request, redirect }) => {
  const formData = await request.formData();
  const finish = formData.get('finish');

  await db.update(Todo)
        .set({ finish: finish === 'on' })
        .where(eq(Todo.id, Number(params.id)))

  return redirect('/');
}
これでチェックボックスの値が更新された際に値が更新されるようになります。
Astro DBのデータを削除
では最後にTODOを削除できるようにしましょう。
src/pages/index.astroに削除用のリンクを作成します。
説明を簡易化するためにsrc/api/todo/[id].tsにGETでリクエストが来た場合に削除されるとしています
          <li>
            <form method="POST" action={`/api/todo/${id}`}>
              <input type="checkbox" checked={finish} name="finish"/>
              {title}
+              <a href={`/api/todo/${id}`}>削除</a>
            </form>
          </li>
src/api/todo/[id].tsに以下の記述を追記します。
export const GET: APIRoute = async ({params, redirect}) => {
    await db.delete(Todo).where(eq(Todo.id, Number(params.id)))
    return redirect('/');
}
これで削除リンクをクリックすると削除が可能になりました。
これで完成です。
今回はローカルでAstro DBを利用する方法を解説しましたが次はデータストレージサービスであるAstro Studioと連携してデータの共有を可能にする方法を解説します。

Discussion