【Nuxt x Rails】サンプルTODOアプリ - Rails編
今回検証目的でフロントに Nuxt、バックエンドに Rails、インフラに AWS を使って以下のような TODO アプリを作りました。
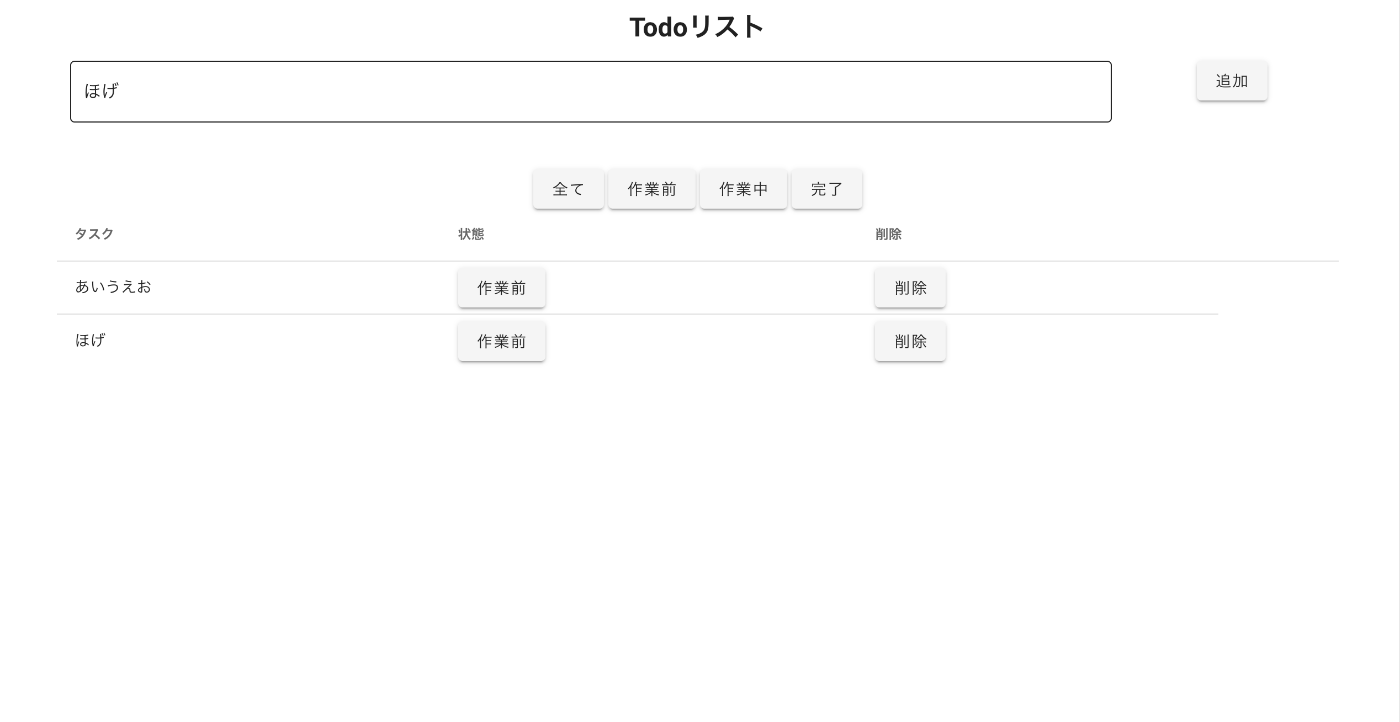
この記事では Rails に関する解説を行います 🙋♂️
- 以下の記事で全体の解説を行っています。
- 全ソースコードはこちら
環境
- ローカル(docker)
# ruby -v
ruby 2.6.6p146 (2020-03-31 revision 67876) [x86_64-linux]
# rails -v
Rails 6.1.5
# bundle -v
Bundler version 1.17.2
# gem -v
3.0.3
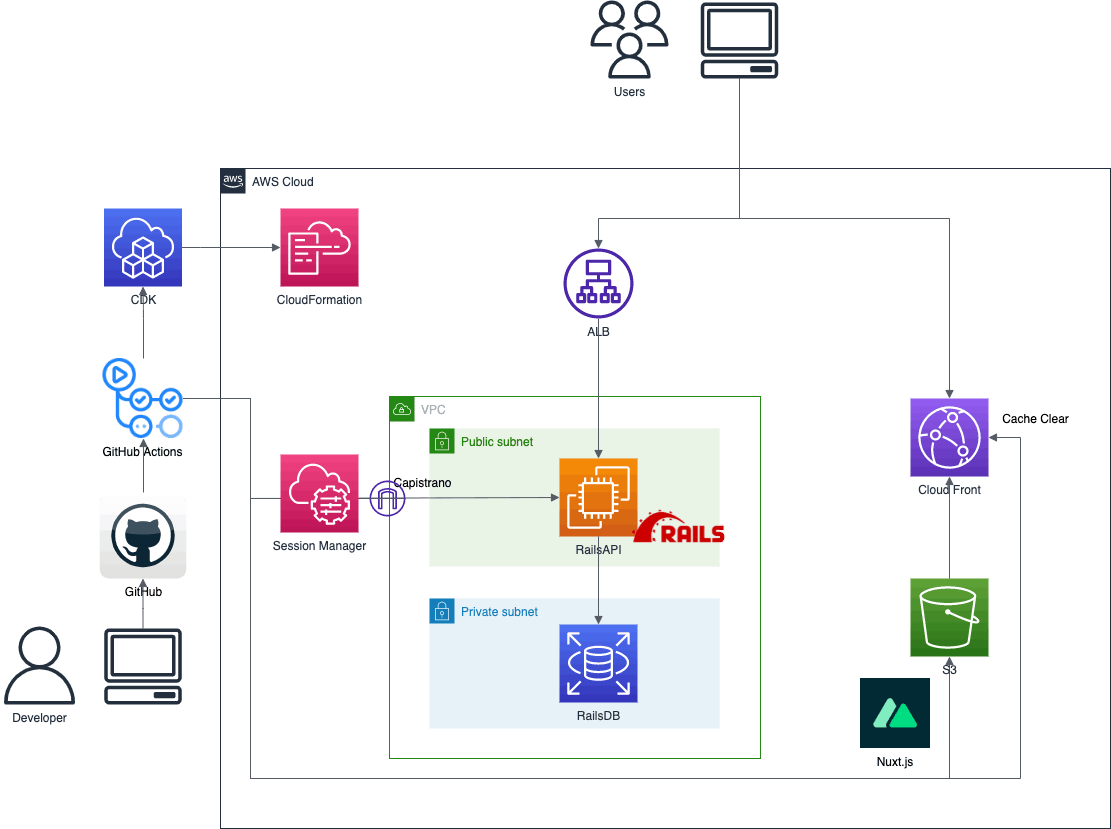
- インフラ構成図
Rails アプリの作成
今回は Rails アプリの作成から docker 上で行いましたが、ローカルに直接インストールした ruby を使っても構築は可能です。
Rails がインストールされた状態で以下のコマンドを使って Rails のアプリを API モードで作成します。
rails new api --database=mysql --skip-bundle --api
- その後 db の環境も構築が終わっていれば以下のコマンドで環境構築は完了です。(docker の場合はそのままコマンド実行で OK)
bundle install
bundle exec rails db:create
- 以下のコマンドでモデルの追加を行います。todo というテーブルを作成します。
$ rails g model todo
Running via Spring preloader in process 633
      invoke  active_record
      create    db/migrate/20220321130738_create_todos.rb
      create    app/models/todo.rb
      invoke    test_unit
      create      test/models/todo_test.rb
      create      test/fixtures/todo.yml
- 作成された
api/db/migrate/20220321130738_create_todos.rbファイルを編集してスキーマを定義します。
class CreateTodos < ActiveRecord::Migration[6.1]
  def change
    create_table :todos do |t|
      t.string  :content # 追加
      t.string  :state # 追加
      t.timestamps
    end
  end
end
- 上記のマイグレーションファイルを実行します
$ rake db:migrate
== 20220405004625 CreateTests: migrating ======================================
-- create_table(:tests)
   -> 0.0933s
== 20220405004625 CreateTests: migrated (0.0937s) =============================
- すると
schema.rbが以下のように変更されます。
ActiveRecord::Schema.define(version: 2022_03_21_130738) do

  create_table "todos", charset: "utf8mb4", force: :cascade do |t|
    t.string "content"
    t.string "state"
    t.datetime "created_at", precision: 6, null: false
    t.datetime "updated_at", precision: 6, null: false
  end

end
- また、環境を動かす際に予め値が入っておいたほうが都合が良い場合は
seeds.rbに記載しておきます。
todos = Todo.create([{content: 'テスト', state: '作業中'}])
- これを db に流すために以下のコマンドを実施します。
rails db:seed
- 次にコントローラーを追加します。
$ rails g controller v1/todos
Running via Spring preloader in process 690
      create  app/controllers/v1/todos_controller.rb
      invoke  test_unit
      create    test/controllers/v1/todos_controller_test.rb
- 作成されたコントローラーを修正します。今回は単純な CRUD のみを記載しています。
class V1::TodosController < ApplicationController
    before_action :set_post, only: %i[show destroy update]

    def index
        todos = Todo.all.order(:id)
        render json: todos
    end

    def show
        render json: @todo
    end

    def create
        todo = Todo.new(todo_params)
        if todo.save
            render json: todo
        else
            render json: todo.errors
        end
    end

    def update
      if @todo.update(todo_params)
        render json: @todo
      else
        render json: @todo.errors
      end
    end

    def destroy
      if @todo.destroy
        render json: @todo
      else
        render json: @todo.errors
      end
    end

    private

    def set_post
      @todo = Todo.find(params[:id])
    end

    def todo_params
      params.require(:todo).permit(:content, :state)
    end
end
- さらにルーティングを以下のように追加します。各メソッドに対して許可しています。
Rails.application.routes.draw do
  # For details on the DSL available within this file, see https://guides.rubyonrails.org/routing.html
  namespace :v1 do
    resources :todos, only: %i[index show create update destroy]
  end
end
実行
- 完成したら
rails sコマンドで起動して実行してみましょう。
$ rails s -p 8000 -b '0.0.0.0'
=> Booting Puma
=> Rails 6.1.5 application starting in development
=> Run `bin/rails server --help` for more startup options
Puma starting in single mode...
* Puma version: 5.6.4 (ruby 2.6.6-p146) ("Birdie's Version")
*  Min threads: 5
*  Max threads: 5
*  Environment: development
*          PID: 626
* Listening on http://0.0.0.0:8000
Use Ctrl-C to stop
上記の様に表示されたら別のターミナルからリクエストを送ってみます。
今回のスキーマに合わせてテスト用の json を以下のように用意しています。
{
    "todo": {
        "content": "テスト from json",
        "state": "作業中"
    }
}
それぞれ期待した値が返却されることをここで確認しておきましょう。
- get
curl -X GET http://localhost:8000/v1/todos
- show
curl -X GET http://localhost:8000/v1/todos/1
- create
curl -H "Accept: application/json" \
     -H "Content-Type: application/json" \
     -d @message_body/body.json \
     -X POST http://localhost:8000/v1/todos
- update
curl -H "Accept: application/json" \
     -H "Content-Type: application/json" \
     -d @message_body/body.json \
     -X PUT http://localhost:8000/v1/todos/1
- delete
curl -H "Accept: application/json" \
     -H "Content-Type: application/json" \
     -d @message_body/body.json \
     -X DELETE http://localhost:8000/v1/todos/1
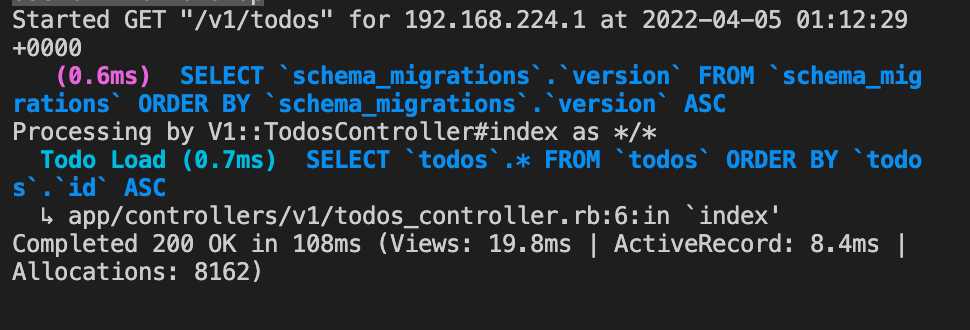
-
rails sしたターミナルではログが表示されます。
Capistrano の定義
- Gemfile の
group :development doの中に以下を追加します。
group :development do
  gem 'listen', '~> 3.3'
  # Spring speeds up development by keeping your application running in the background. Read more: https://github.com/rails/spring
  gem 'spring'
  gem "capistrano", "~> 3.10", require: false
  gem "capistrano-rails", "~> 1.6", require: false
  gem 'capistrano-rbenv', '~> 2.2'
  gem 'capistrano-rbenv-vars', '~> 0.1'
  gem 'capistrano3-puma'
end
- bundle install します
bundle install
bundle exec cap install STAGES=production
- 作成された
Capfileに以下を追加します。
require 'capistrano/rbenv'
require 'capistrano/bundler'
require 'capistrano/rails/migrations'
require 'capistrano/puma'
install_plugin Capistrano::Puma
install_plugin Capistrano::Puma::Systemd
install_plugin Capistrano::Puma::Nginx
- deploy の設定ファイルを修正します。
-
application、repo_url、branch、deploy_toはご自身の物に読み替えてください。
-
set :application, "api"
set :repo_url, "git@github.com:tokku5552/nuxt-rails-sample.git"
set :rbenv_ruby, File.read('.ruby-version').strip
set :branch, ENV['BRANCH'] || "main"
set :nginx_config_name, "#{fetch(:application)}.conf"
set :nginx_sites_enabled_path, "/etc/nginx/conf.d"
set :deploy_to, '/var/www/api'
- 接続情報を記載します。今回ターゲットは cdk で EC2 を作り直すたびに変わるので、環境変数で受け取っています。
server ENV['TARGET_INSTANCE_ID'], user: "ec2-user", roles: %w{app db web}

require 'net/ssh/proxy/command'
set :ssh_options, {
  proxy: Net::SSH::Proxy::Command::new("aws ssm start-session --target %h --document-name AWS-StartSSHSession --parameters 'portNumber=%p'"),
  keys: %w(~/.ssh/MyKeypair.pem),
  forward_agent: true,
  auth_methods: %w(publickey),
}
今回 SSM 経由での SSH 接続を行うので、require 'net/ssh/proxy/command'を追加した上で、ssh_optionsにproxyのコマンドを渡しています。
参考:ステップ 8: (オプション) Session Manager を通して SSH 接続のアクセス許可を有効にして制御する - AWS Systems Manager
また、環境変数はapi/.env.sampleをコピーしてapi/.envを作成し、実際のターゲットを記載します。
TARGET_INSTANCE_ID=i-xxxxxxxxxxxxxxxxx
- DB への接続情報を記載します。以下のコマンドで
api/config/credentials.yml.encに暗号化された状態で接続情報を記載できます。- このファイルは
master.keyがないと復号できない様になっており、credentials.yml.enc自体は git 管理下にしておいて deploy の設定ファイルで指定したブランチにプッシュしておきます。
- このファイルは
EDITOR=vi rails credentials:edit
# viが開くので以下のように編集して :wq で上書き保存
db:
  password: RDSのパスワード
  hostname: RDSのエンドポイント
RDS のパスワードは今回の私の構成と同じ CDK を使いたい場合は SSM に保存してあるはずなので、以下で取得します。
aws ssm get-parameter --name "RailsApiRDS" --with-decryption
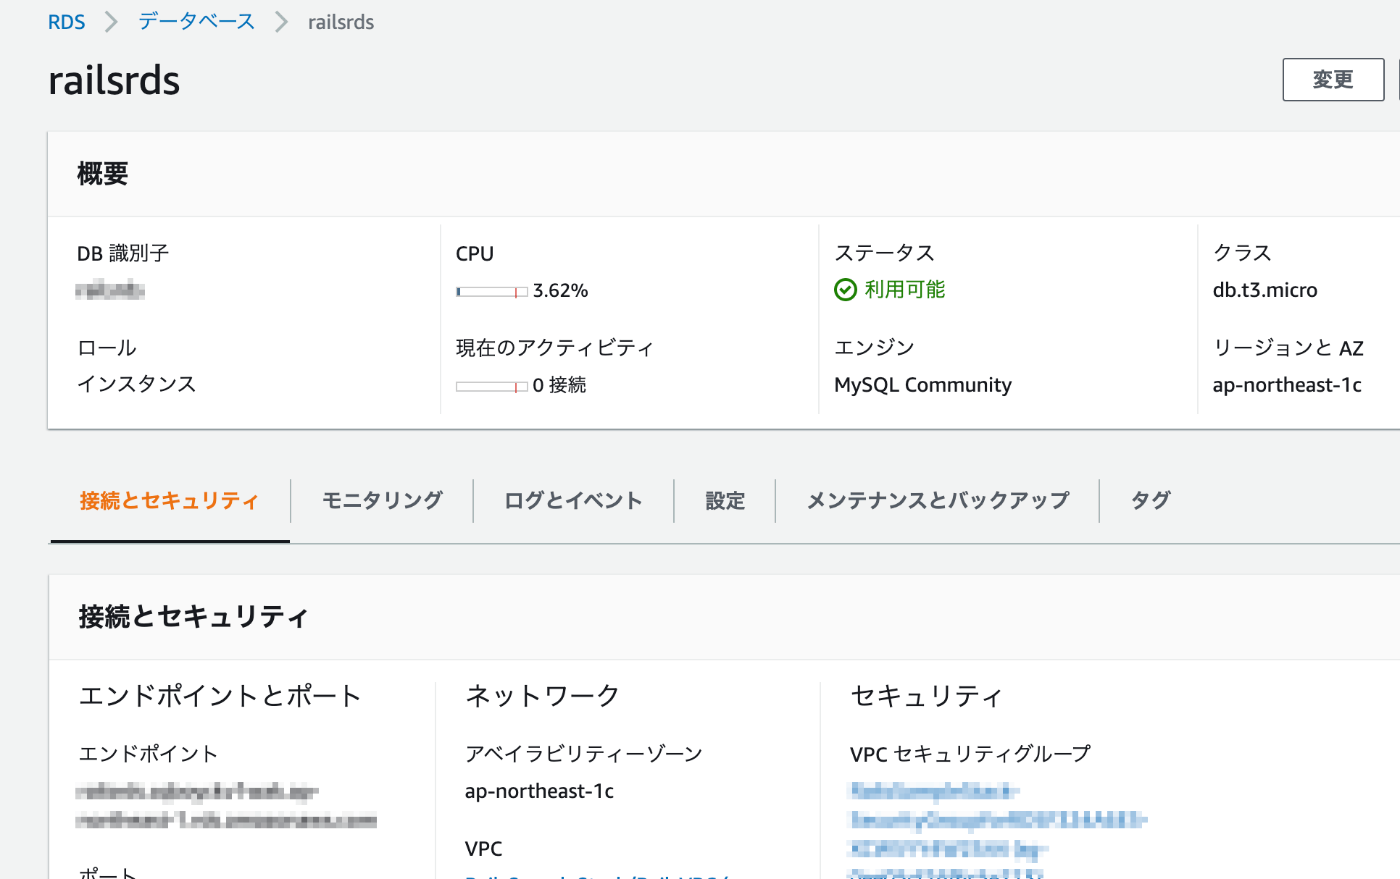
エンドポイントはRDS -> データベース -> DB識別子のページの接続とセキュリティタブから確認できます。
- 初回に一度デプロイを実行して必要なファイルを作成しておきます。
source .env
TARGET_INSTANCE_ID=$TARGET_INSTANCE_ID bundle exec cap production deploy
- 上記だとおそらく
master.keyが存在しないエラーが出るので配置してから再度デプロイを実行します。- 鍵を指定しながらの scp だとうまく行かなかったので、
~/.ssh/configに接続情報を記載しておいて、定義したホスト名のみでアクセスできるようにしておきます。
- 鍵を指定しながらの scp だとうまく行かなかったので、
Host railstest
  Hostname i-xxxxxxxxxxxxxxx
  User ec2-user
  IdentityFile キーペア名
  ProxyCommand sh -c "aws ssm start-session --target %h --document-name AWS-StartSSHSession --parameters 'portNumber=%p'"
上記の設定は ssh や scp でサーバー名にrailstestと指定した場合、実際にはec2-user@i-xxxxxxxxxxxxxxx -i キーペア名で ProxyCommand で指定したコマンドをプロキシとして実行しながら接続しに行きます。
- 改めて
master.keyを配置してpumaのコンフィグを実行します。
scp config/master.key your_server_name:/var/www/api/shared/config
TARGET_INSTANCE_ID=$TARGET_INSTANCE_ID bundle exec cap production puma:config
TARGET_INSTANCE_ID=$TARGET_INSTANCE_ID bundle exec cap production puma:systemd:config puma:systemd:enable
上記コマンドのyour_server_nameは~/.ssh/configで指定したサーバー名に変更して実行ください。
- 再度デプロイすれば成功するはずです。
TARGET_INSTANCE_ID=$TARGET_INSTANCE_ID bundle exec cap production deploy
- デプロイは今後上記のコマンドを実行するだけで良いですが、実際に動作させるには更に nginx の設定を行います。
cd /etc/nginx
sudo mkdir sites-available
bundle exec cap production puma:nginx_config
sudo systemctl restart nginx
curl -X GET http://localhost/v1/todos -v
上記のcurlコマンドで 200 が返ってくれば OK
まとめ
今回始めて API モードでの Rails に触れたのですが、かなり簡単に実装できました。
CRUD しか実装しませんでしたが、Rails 自体はフルスタックな Web フレームワークなので実際にはもっと自由度が高いです。
どうしてもコード量が多くなってしまいますが、Laravel ともフォルダ構造が似ているので、慣れればわかりやすいのかなと思いました。
Discussion