【Unity雑記】
※未経験のため間違ったことが書いてある可能性が大いにあります。
画面遷移について
画面の単位は「Scene」
- 画面を作る際は、Sceneの単位で作成する
- Build Settingsにはアプリで使用するSceneは全て追加する
- 画面を管理するSceneManagerControllerというファイルを用意する
- 空のGameObjectを作成し、SceneManagerControllerをアタッチする
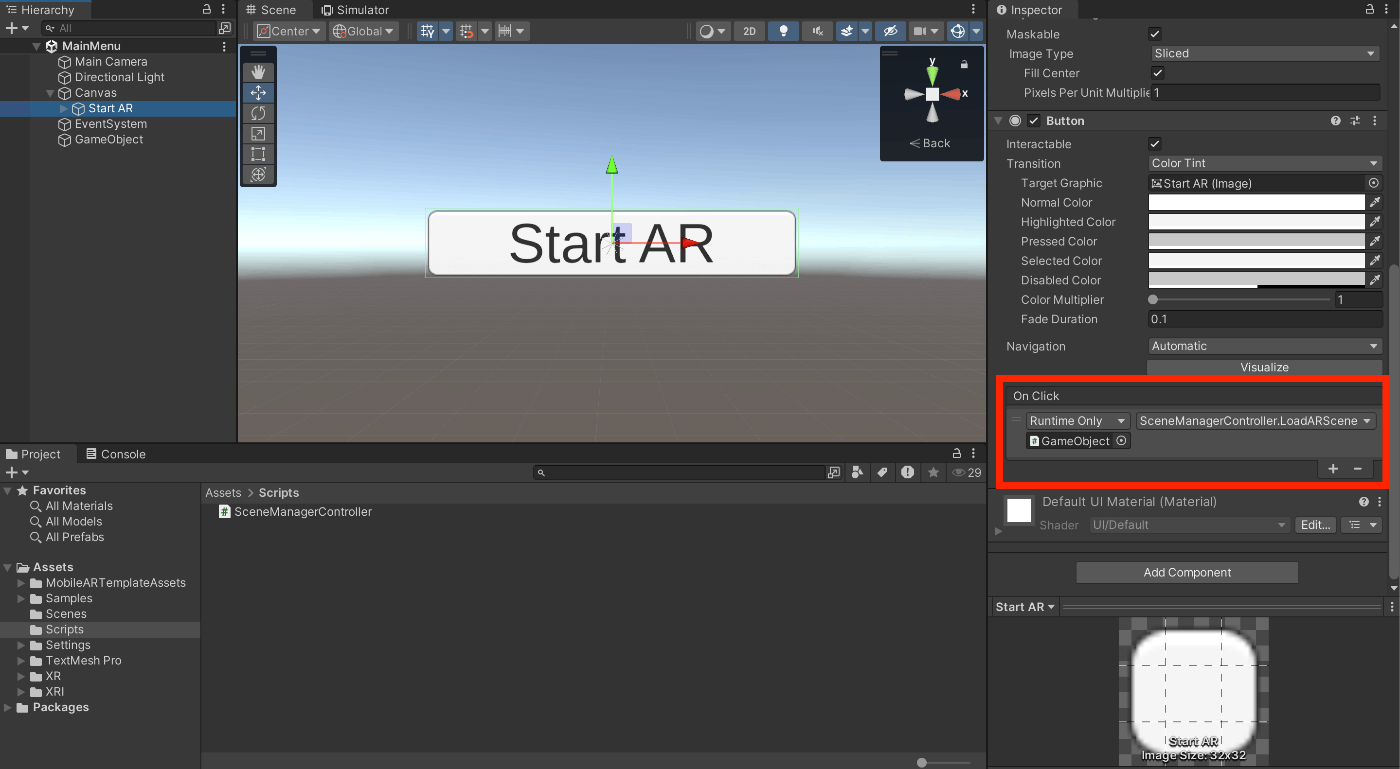
- 画面遷移するためのボタンを用意して、onClickにSceneManagerControllerがアタッチされたGameObjectをアサインする

onClickにメソッドをアサインした例
using UnityEngine;
using UnityEngine.SceneManagement;

public class SceneManagerController : MonoBehaviour
{
    public void LoadARScene()
    {
        // ARSceneをロードする
        SceneManager.LoadScene("ARScene");
    }

    public void LoadMainMenu()
    {
        // MainMenuをロードする
        SceneManager.LoadScene("MainMenu");
    }
}
Assets/
├─ Scenes/
│  ├─ MainMenu.unity
│  └─ ARScene.unity
├─ Scripts/
│  └─ SceneManagerController.cs
└─ ...
カメラ機能
- ARアプリなので、ARCameraManagerを使用する
- 写真を撮る作業は非同期になるので、コルーチン関数使用する
- プレビュー表示は、Texture2Dに書き込んで、RawImage.textureに代入
using UnityEngine;
using UnityEngine.UI;
using UnityEngine.XR.ARFoundation;
using System.Collections;
using UnityEngine.SceneManagement;

public class CameraCapture : MonoBehaviour
{
    public Button captureButton;
    private ARCameraManager arCameraManager;
    private Texture2D capturedImage;

    void Start()
    {
        // XR Origin (Mobile AR)のMain CameraからARCameraManagerを取得
        arCameraManager = FindObjectOfType<ARSessionOrigin>().GetComponentInChildren<ARCameraManager>();
        if (arCameraManager == null)
        {
            Debug.LogError("ARCameraManager not found!");
        }
        captureButton.onClick.AddListener(CapturePhoto);
    }

    public void CapturePhoto()
    {
        StartCoroutine(TakePhoto());
    }

    IEnumerator TakePhoto()
    {
        // 現在のフレームの描画が終わるまで待機し、その後でスクリーンショットを撮影しています。これにより、画面の描画が完全に終わった状態で写真を撮ることができます。
        yield return new WaitForEndOfFrame();

        int width = Screen.width;
        int height = Screen.height;
        capturedImage = new Texture2D(width, height, TextureFormat.RGB24, false);
        capturedImage.ReadPixels(new Rect(0, 0, width, height), 0, 0);
        capturedImage.Apply();

        // Save the captured image to PlayerPrefs
        byte[] bytes = capturedImage.EncodeToPNG();
        string encodedImage = System.Convert.ToBase64String(bytes);
        PlayerPrefs.SetString("CapturedImage", encodedImage);

        // Load the preview scene
        SceneManager.LoadScene("PreviewScene");
    }
}
using UnityEngine;
using UnityEngine.UI;

public class ImagePreview : MonoBehaviour
{
    public RawImage previewImage;

    void Start()
    {
        string encodedImage = PlayerPrefs.GetString("CapturedImage");
        if (!string.IsNullOrEmpty(encodedImage))
        {
            byte[] bytes = System.Convert.FromBase64String(encodedImage);
            Texture2D texture = new Texture2D(1, 1);
            texture.LoadImage(bytes);
            previewImage.texture = texture;
        }
    }
}
Unity x Google Geospatial API(iOS)
ゴール
ボタンをクリックすると地理情報を取得して画面に表示させる
試した環境と追加パッケージ
- Unity: 2022.3.41f1
- ARFoundation: 5.1.5
- プロジェクト: 「AR Mobile」で作成
- 追加パッケージ: ARCore Extensions
- 検証デバイス: iOS
実装方法・手順
1. プロジェクトに諸々追加
- Assets/ARCoreExtensionsCameraConfigFilter.asset
- 設定は任意
- Assets/ARCoreExtensionsConfig.asset
- Geospatial ModeをEnabledにする
- Assets/Scenes/GeospatialScene.unity
- 今回使用する画面のこと
- Assets/Scripts/GeospatialManager.cs
- 後述したコードをコピペ
2. hierarchyに諸々追加
-
AR Session
-
XR Origin(Mobile AR)
- AR Earth Managerを追加する

-
Canvas
-
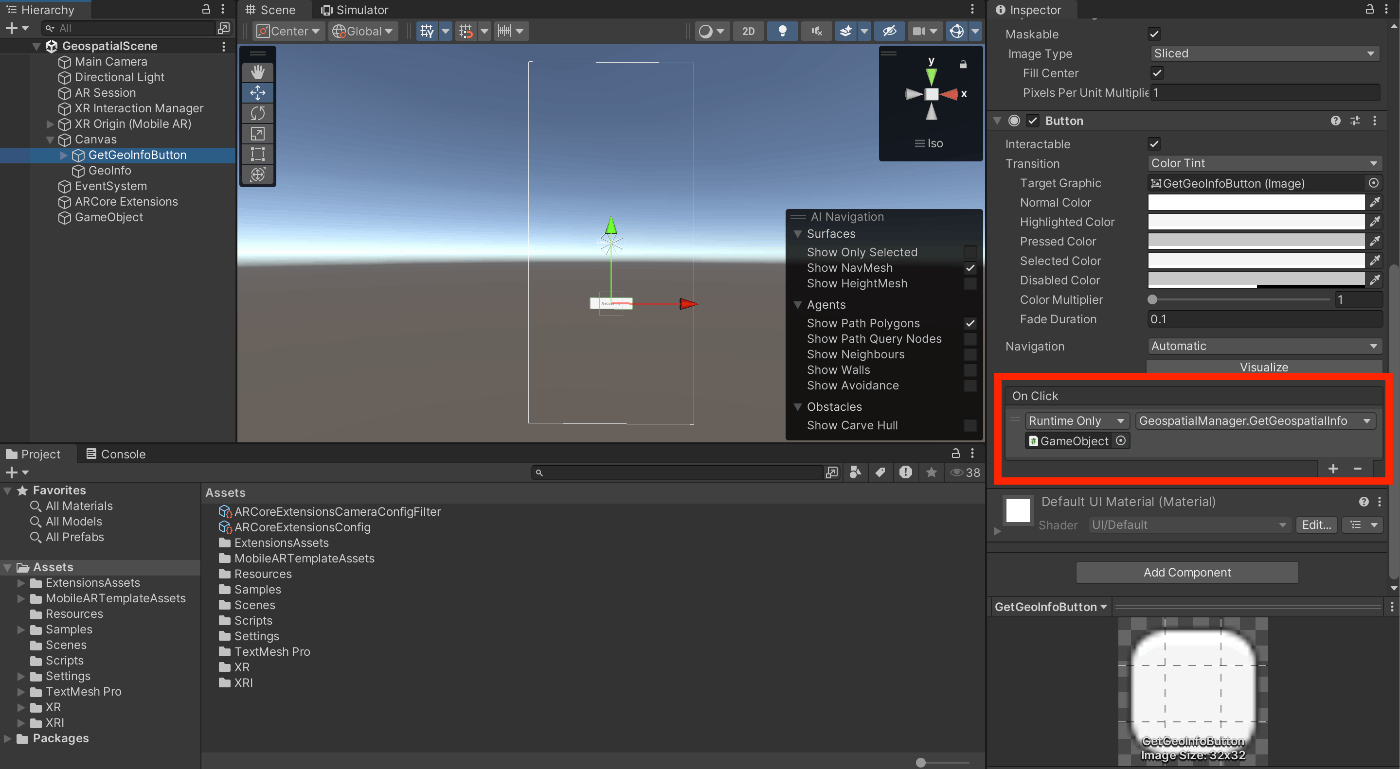
Button
- On Clickを以下のように設定

-
Text(TMP)
-
-
ARCore Extensions
- Inspectorに諸々割り当て
- Session: AR Session
- Camera Manager: Main Camera
- AR Core Extensions Config:
Assets/ARCoreExtensionsConfig.asset - Camera Config Filter:
Assets/ARCoreExtensionsCameraConfigFilter.asset 
- Inspectorに諸々割り当て
-
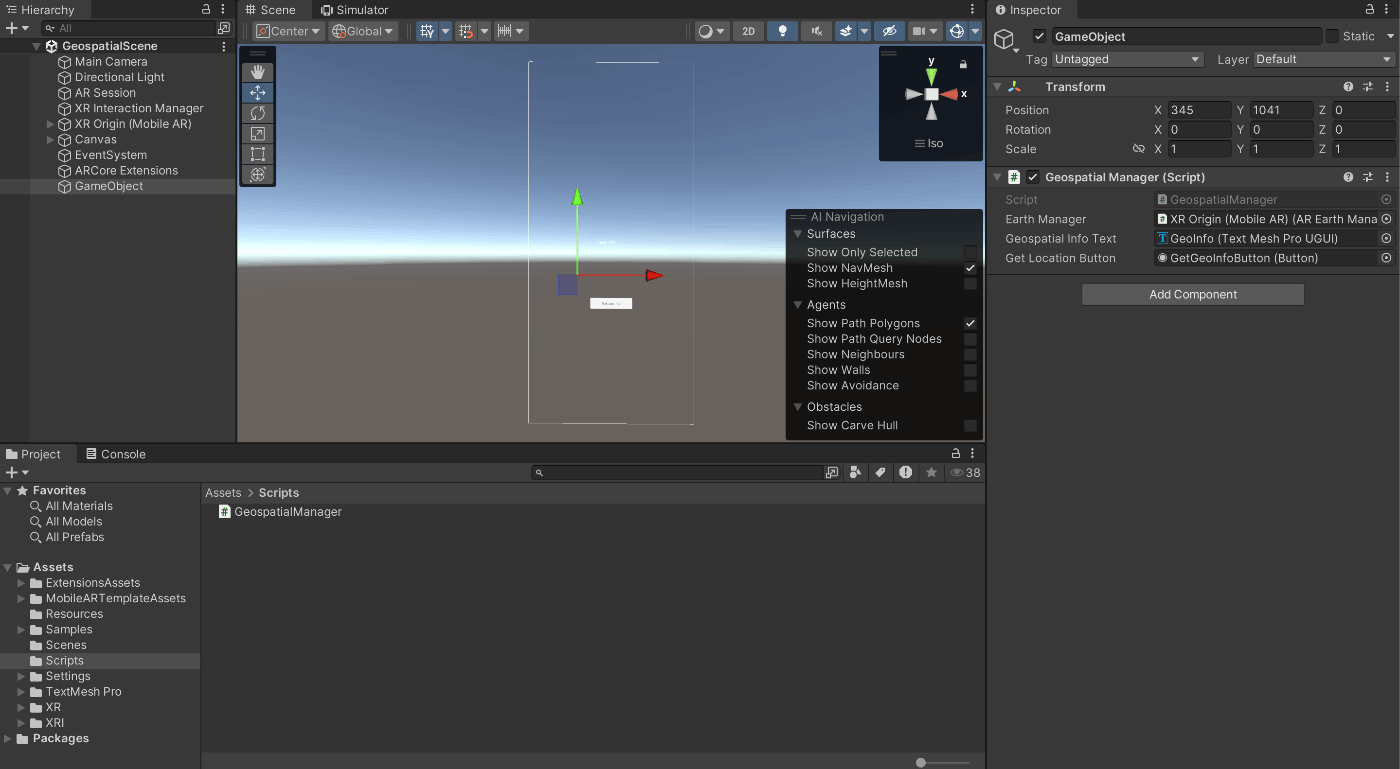
GameObject(空のオブジェクト)
- Inspectorに
Assets/Scripts/GeospatialManager.csをドラッグ&ドロップする 
- Inspectorに
3. GameObjectに諸々割り当て
using UnityEngine;
using UnityEngine.UI;
using UnityEngine.XR.ARSubsystems;
using Google.XR.ARCoreExtensions;
using TMPro;


public class GeospatialManager : MonoBehaviour
{
    [SerializeField] private AREarthManager earthManager;
    [SerializeField] private TextMeshProUGUI geospatialInfoText;
    [SerializeField] private Button getLocationButton;

    private void Start()
    {
        getLocationButton.onClick.AddListener(GetGeospatialInfo);
    }

    public void GetGeospatialInfo()
    {
        if (earthManager.EarthTrackingState == TrackingState.Tracking)
        {
            GeospatialPose pose = earthManager.CameraGeospatialPose;
            string info = $"Lat: {pose.Latitude:F6}\n" +
                          $"Lon: {pose.Longitude:F6}\n" +
                          $"Alt: {pose.Altitude:F2}m\n" +
                          $"Heading: {pose.Heading:F1}°";
            geospatialInfoText.text = info;
        }
        else
        {
            geospatialInfoText.text = "Geospatial tracking not available";
        }
    }
}
Unity x Firebase
ここでは、unityにてFirebaseサービスのauthでログイン機能の実装についてまとめます。
※検証のため非常に簡易的なものです。
開発準備
まずは、開発に使用するFirebaseプロジェクトを作成して下さい。
手順は更新ドキュメント通りにすれば問題ありません。
ステップ4までで構いません。
1. Scene作成
- Scenes
    |---AuthScene.unity
2. UI作成
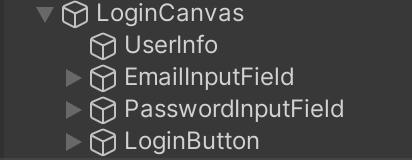
UIは、4つ用意します。
- UserInfo: ログイン情報
- EmailInputField: Email入力
- PasswordInputField: Password入力
- LoginButton: ログインボタン

3. ロジック作成
2つのスクリプトを作成します。
- AuthSceneUIManager: UIと密に連携するもの(基本的にここを触る)
- FirebaseAuthManager: SDKと密に連携するもの(SDKとUIManagerとの仲介)
using UnityEngine;
using UnityEngine.UI;
using System.Threading.Tasks;
using TMPro;

public class AuthSceneUIManager : MonoBehaviour
{
    public TMP_InputField emailInput;
    public TMP_InputField passwordInput;
    public Button loginButton;
    public TMP_Text statusText;

    private FirebaseAuthManager authManager;

    private void Start()
    {
        authManager = GetComponent<FirebaseAuthManager>();
        if (authManager == null)
        {
            authManager = gameObject.AddComponent<FirebaseAuthManager>();
        }

        loginButton.onClick.AddListener(OnLoginButtonClicked);

        // 初期状態の確認
        UpdateLoginStatus();
    }

    private async void OnLoginButtonClicked()
    {
        string email = emailInput.text;
        string password = passwordInput.text;

        if (string.IsNullOrEmpty(email) || string.IsNullOrEmpty(password))
        {
            statusText.text = "Please enter both email and password.";
            return;
        }

        statusText.text = "Logging in...";
        loginButton.interactable = false;

        bool success = await authManager.LoginWithEmailPassword(email, password);

        if (success)
        {
            statusText.text = "Login successful!";
        }
        else
        {
            statusText.text = "Login failed. Please try again.";
        }

        loginButton.interactable = true;
        UpdateLoginStatus();
    }

    private void UpdateLoginStatus()
    {
        if (authManager.IsUserLoggedIn())
        {
            statusText.text = $"Logged in as: {authManager.GetCurrentUserEmail()}";
            loginButton.gameObject.SetActive(false);
        }
        else
        {
            loginButton.gameObject.SetActive(true);
        }
    }
}
using UnityEngine;
using Firebase;
using Firebase.Auth;
using System;
using System.Threading.Tasks;

public class FirebaseAuthManager : MonoBehaviour
{
    private FirebaseAuth auth;

    private void Awake()
    {
        InitializeFirebaseAuth();
    }

    private void InitializeFirebaseAuth()
    {
        auth = FirebaseAuth.DefaultInstance;
    }

    public async Task<bool> LoginWithEmailPassword(string email, string password)
    {
        try
        {
            await auth.SignInWithEmailAndPasswordAsync(email, password);
            Debug.Log($"User logged in successfully: {auth.CurrentUser.Email}");
            return true;
        }
        catch (FirebaseException e)
        {
            Debug.LogError($"Failed to login: {e.Message}");
            return false;
        }
    }

    public bool IsUserLoggedIn()
    {
        return auth.CurrentUser != null;
    }

    public void LogOut()
    {
        if (IsUserLoggedIn())
        {
            auth.SignOut();
            Debug.Log("User logged out successfully.");
        }
    }

    // 現在のユーザーの情報を取得するメソッド
    public string GetCurrentUserEmail()
    {
        return IsUserLoggedIn() ? auth.CurrentUser.Email : null;
    }
}
4. UIに諸々アサイン
空のGameObjectを作成し、AuthSceneUIManagerとFirebaseAuthManagerをアタッチします。

Unity x Githubについて
恐らく、手っ取り早い方法は、現在のプロジェクトのvscodeを開いてGit initかな。
用語集
NuGet
Unity?C#のnpm
NuGet経由でsupabaseをinstallする場合は、「Supabase」をinstallしてください。
これまではsupabase-sharpだったが、Supabaseに変更になった。中身はほとんど変わらない。
コルーチン
コルーチンとは:
- 処理を一時停止し、後で再開できる特殊な関数です。
- Unityで非同期処理を実現するための重要な機能です。
主な特徴:
- IEnumerator を返す関数として定義されます。
- yield キーワードを使用して処理を一時停止します。
- StartCoroutine() メソッドで開始します。
コルーチンの利点:
フレームをまたぐ処理が可能です。
メインスレッドをブロックせずに時間のかかる処理を実行できます。
ゲームの動作を妨げずに非同期タスクを実行できます。
PlayerPrefs
Unityが提供する簡単なデータ保存システム
遭遇したエラーたち
InvalidOperationException: You are trying to read Input using the UnityEngine.Input class, but you have switched active Input handling to Input System package in Player Settings.
原因
このエラーメッセージは、Unity プロジェクトの入力システムの設定に関する問題を示しています。プロジェクトが新しい Input System パッケージを使用するように設定されているにもかかわらず、コード内で古い Input クラスを使用しようとしているために発生しています。
解決策
- Input System の設定変更:
- Unity Editor で「Edit」→「Project Settings」→「Player」を開きます。
- 「Other Settings」セクションを探し、「Active Input Handling」の設定を確認します。
- 現在の設定に応じて、以下のいずれかを選択します:
- a) 「Input System Package (New)」を選択している場合は「Both」に変更
- b) もしくは「Input Manager (Old)」に戻す
The name 'TrackingState' does not exist in the current context
原因
TrackingState は UnityEngine.XR.ARSubsystems 名前空間に定義されているが、
名前空間がインポートされていなかった。
解決策
ファイルの先頭に using UnityEngine.XR.ARSubsystems; を追加しました。
Assets/Scripts/LoginManager.cs(48,47): error CS0029: Cannot implicitly convert type 'Firebase.Auth.AuthResult' to 'Firebase.Auth.FirebaseUser'
原因
最新バージョンだと型が変わっている
解決策
Task<FirebaseUser> から Task<AuthResult>に変更する
Discussion