Open8
WebAssembly で画像処理をやってみる
実践 Rust プログラミング入門を一通りパラパラ読んだ。
練習としてなんらかの画像処理をするアプリを作ってみる。
最終的な目標はあんまり決めずに気が向いたように作る。
このページを参考にした。
プロジェクトを作成
$ cargo generate --git https://github.com/rustwasm/wasm-pack-template
🤷   Project Name: image_process_app
⚠️   Renaming project called `image_process_app` to `image-process-app`...
🔧   Destination: /root/code/rust/image-process-app ...
🔧   project-name: image-process-app ...
🔧   Generating template ...
[ 1/12]   Done: .appveyor.yml
[ 2/12]   Done: .gitignore
[ 3/12]   Done: .travis.yml
[ 4/12]   Done: Cargo.toml
[ 5/12]   Done: LICENSE_APACHE                                                   [ 6/12]   Done: LICENSE_MIT                                                      [ 7/12]   Done: README.md                                                        [ 8/12]   Done: src/lib.rs                                                       [ 9/12]   Done: src/utils.rs                                                     [10/12]   Done: src                                                              [11/12]   Done: tests/web.rs                                                     [12/12]   Done: tests                                                            🔧   Moving generated files into: `/root/code/rust/image-process-app`...
💡   Initializing a fresh Git repository
✨   Done! New project created /path/to/image-process-app
パッケージを最新にしておく
$ cargo upgrade
ビルドできることを確認
$ cd image-process-app
$ weasm-pack build
[INFO]: Checking for the Wasm target...
[INFO]: Compiling to Wasm...
(略)
warning: `image-process-app` (lib) generated 1 warning
    Finished release [optimized] target(s) in 15.72s
[INFO]: Installing wasm-bindgen...
[INFO]: Optimizing wasm binaries with `wasm-opt`...
[INFO]: Optional fields missing from Cargo.toml: 'description', 'repository', and 'license'. These are not necessary, but recommended
[INFO]: :-) Done in 16.06s
[INFO]: :-) Your wasm pkg is ready to publish at /path/to/image-process-app/pkg.
image というライブラリを使う。
$ cargo add image
    Updating crates.io index
      Adding image v0.24.5 to dependencies.
ページにあるようなコードを書いてみる。いずれも cargo run で実行できる。
これで画像をコピー
main.rs
use image::io::Reader as ImageReader;

fn main() {
    let img = ImageReader::open("sample.png").unwrap().decode().unwrap();
    img.save("copy.png").unwrap();
}
画像のサイズ変更
main.rs
use image::{io::Reader as ImageReader, imageops::FilterType::Gaussian};

fn main() {
    let img = ImageReader::open("sample.png").unwrap().decode().unwrap();
    // 横 200、縦 1000になる
    img.resize_exact(200, 1000, Gaussian).save("copy.png").unwrap();
}
画像の色とか変えたい
こんな感じで実装したら result1.save("copy1.jpg").unwrap() のところでエラーになる。
main.rs
use image::{io::Reader as ImageReader, ImageBuffer, Rgba};

fn swap_color_channels(img: &ImageBuffer<Rgba<u8>, Vec<u8>>) -> ImageBuffer<Rgba<u8>, Vec<u8>> {
    let height = img.height();
    let width = img.width();

    let mut result_img = img.clone();

    for h in 0..height {
        for w in 0..width {
            let p = img.get_pixel(w, h).0;
            result_img.put_pixel(w, h,  Rgba([p[1], p[2], p[0], p[3]]));
        }
    }
    result_img
}

fn main() {
    let img = ImageReader::open("sample.jpg").unwrap().decode().unwrap().into_rgba8();
    let result1 = swap_color_channels(&img);
    let result2 = swap_color_channels(&result1);
    result1.save("copy1.jpg").unwrap();
    result2.save("copy2.jpg").unwrap();
}
エラー内容
main.rs(21, 39): value moved here
main.rs(20, 9): move occurs because `result1` has type `ImageBuffer<Rgba<u8>, Vec<u8>>`, which does not implement the `Copy` trait
「rusult1 の所有権を let result2 = swap_color_channels(result1); で渡しているからもう使えないよ」というエラー。
参考書通りに進めるとこういうエラーが出ないのでちょっと感動した。
所有権を渡すのではなく借用することで解決。
main.rs
use image::{io::Reader as ImageReader, ImageBuffer, Rgba};

+ fn swap_color_channels(img: &ImageBuffer<Rgba<u8>, Vec<u8>>) -> ImageBuffer<Rgba<u8>, Vec<u8>> {
- fn swap_color_channels(img: ImageBuffer<Rgba<u8>, Vec<u8>>) -> ImageBuffer<Rgba<u8>, Vec<u8>> {

fn main() {
    let img = ImageReader::open("sample.jpg").unwrap().decode().unwrap().into_rgba8();
-     let result1 = swap_color_channels(img);
-     let result2 = swap_color_channels(result1);
+     let result1 = swap_color_channels(&img);
+     let result2 = swap_color_channels(&result1);
    result1.save("copy1.jpg").unwrap();
    result2.save("copy2.jpg").unwrap();
}
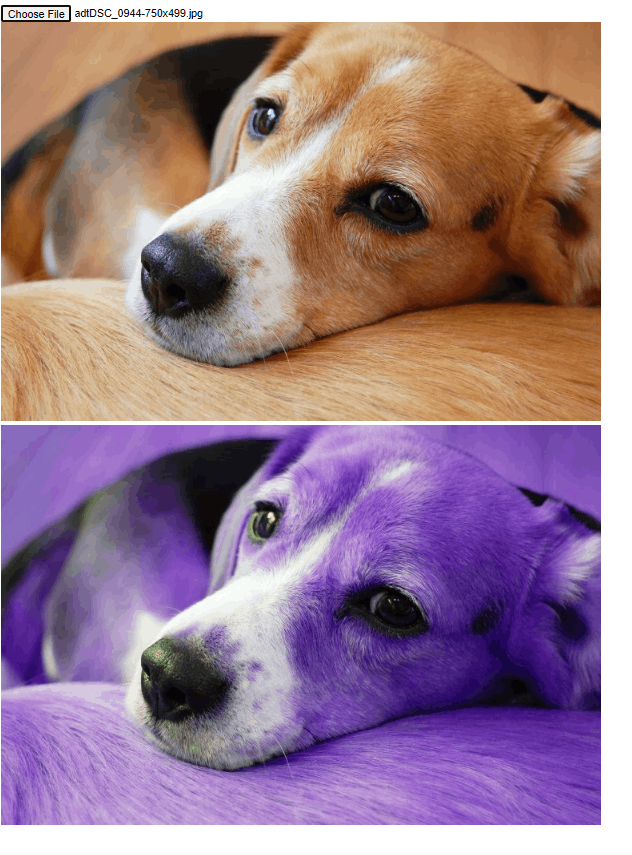
処理した結果がこんな感じ
ちゃんとチャンネルが1つずつずれているのがわかる。3回処理すると元画像と一緒になることも確認した。

元画像

処理1回

処理2回
ウェブページで投稿した画像を変換できるようにする。
画像処理の部分はモジュール化する。
JS 側で使えるように、型は Vec<u8> を使う。
swap_color_channels.rs
use image::{ImageBuffer, Rgba};

fn swap_color_channels(img: ImageBuffer<Rgba<u8>, Vec<u8>>, width: u32, height: u32) -> ImageBuffer<Rgba<u8>, Vec<u8>> {

    let mut result_img = img.clone();

    for h in 0..height {
        for w in 0..width {
            let p = img.get_pixel(w, h).0;
            result_img.put_pixel(w, h,  Rgba([p[1], p[2], p[0], p[3]]));
        }
    }
    result_img
}

pub fn exec(buf: Vec<u8>, width: u32, height: u32) -> Vec<u8> {
    let img = ImageBuffer::<Rgba<u8>, Vec<u8>>::from_raw(width, height, buf).unwrap();
    swap_color_channels(img, width, height).into_raw()
}
JS から呼び出せるように #[wasm_bindgen] をつける。
lib.rs
mod swap_color_channels;

use wasm_bindgen::{prelude::*, Clamped};

#[wasm_bindgen]
pub fn swap_color_channels(buf: Clamped<Vec<u8>>, width: u32, height: u32) -> Vec<u8> {
    swap_color_channels::exec(buf.0, width, height)
}
JS 側の実装。
一度画像を canvas に張り付け、 getImageData で画像の vector でのデータを取得する。
取得した画像を swap_color_channels で変換し、別の canvas に張り付ける
index.js
import { swap_color_channels } from '../pkg/image_process_app';

window.onload = () => {
  const imageInput = document.getElementById('input-image');
  console.log(imageInput);

  imageInput.addEventListener('change', (event) => {
    const image = new Image();
    image.onload = () => {
      const { width, height } = image;

      const canvas = document.getElementById('original-canvas');
      canvas.width = width;
      canvas.height = height;
      canvas.getContext('2d').drawImage(image, 0, 0, width, height);
      const { data } = canvas
        .getContext('2d')
        .getImageData(0, 0, width, height);

      const converted = swap_color_channels(data, width, height);
      const convertedImage = new ImageData(
        new Uint8ClampedArray(converted),
        width
      );
      const convertedCanvas = document.getElementById('converted-canvas');
      convertedCanvas.width = width;
      convertedCanvas.height = height;
      convertedCanvas
        .getContext('2d')
        .putImageData(convertedImage, 0, 0, 0, 0, width, height);
    };

    const reader = new FileReader();
    reader.onload = () => {
      image.src = reader.result;
    };

    reader.readAsDataURL(event.target.files[0]);
  });
};
実行するとこんな感じで表示できた。