🔑
Actions機能を使ってHasuraとAuth0を連携させる


Hasuraの認証に使えるサービスとしてAuth0を使った方法が紹介されている。
その中で、Rules機能を利用した方法が説明されているが、Auth0側ではRules機能の廃止がアナウンスされている。
そこで、より拡張性の高い機能であるActions機能を使った方法を紹介する。
カスタムJWTクレームの発行
まず、Actions機能のLibraryにアクセスし、 [Build Custom] をクリックする。

名前はここでは hasura-jwt-claim としておく。 (好きな名前で良い)

作成すると、編集画面が出てくので、 exports.onExecutePostLogin の関数を書き換える。
 exports.onExecutePostLogin = async (event, api) => {
+  const namespace = "https://hasura.io/jwt/claims";
+
+  api.accessToken.setCustomClaim(namespace, {
+    'x-hasura-default-role': 'user',
+    'x-hasura-allowed-roles': ['user'],
+    'x-hasura-user-id': event.user.user_id
+  });
 };
終わったら [Deploy] をクリックする。
ログイン時にHasuraにユーザーを作成するようにする
同じ要領で、ログイン時にHasuraにユーザーを作成する処理も実装する。
Libraryのページに戻り、 [Build Custom] から sign-in という名前で2つ目のActionを作成する。
作成したら、以下の通り exports.onExecutePostLogin の関数を書き換える。
exports.onExecutePostLogin = async (event, api) => {
+  const axios = require('axios');
+
+  const userId = event.user.user_id;
+  const nickname = event.user.nickname;
+
+  const admin_secret = "xxxx";
+  const url = "https://ready-panda-91.hasura.app/v1/graphql";
+  const query = `mutation($userId: String!, $nickname: String) {
+    insert_users(objects: [{
+      id: $userId, name: $nickname, last_seen: "now()"
+    }], on_conflict: {constraint: users_pkey, update_columns: [last_seen, name]}
+    ) {
+      affected_rows
+    }
+  }`;
+
+  const variables = { "userId": userId, "nickname": nickname };
+
+  await axios.post(
+    url,
+    { query, variables },
+    { headers: { 'content-type' : 'application/json', 'x-hasura-admin-secret': admin_secret } }
+  );
};
HTTPクライアントを利用しているため、dependenciesにaxiosを追加する。


そして、 [Deploy] をクリックしてデプロイする。
Actionsの有効化
最後に、ログイン後の処理として先ほど作成した2つのActionをルーティングする。
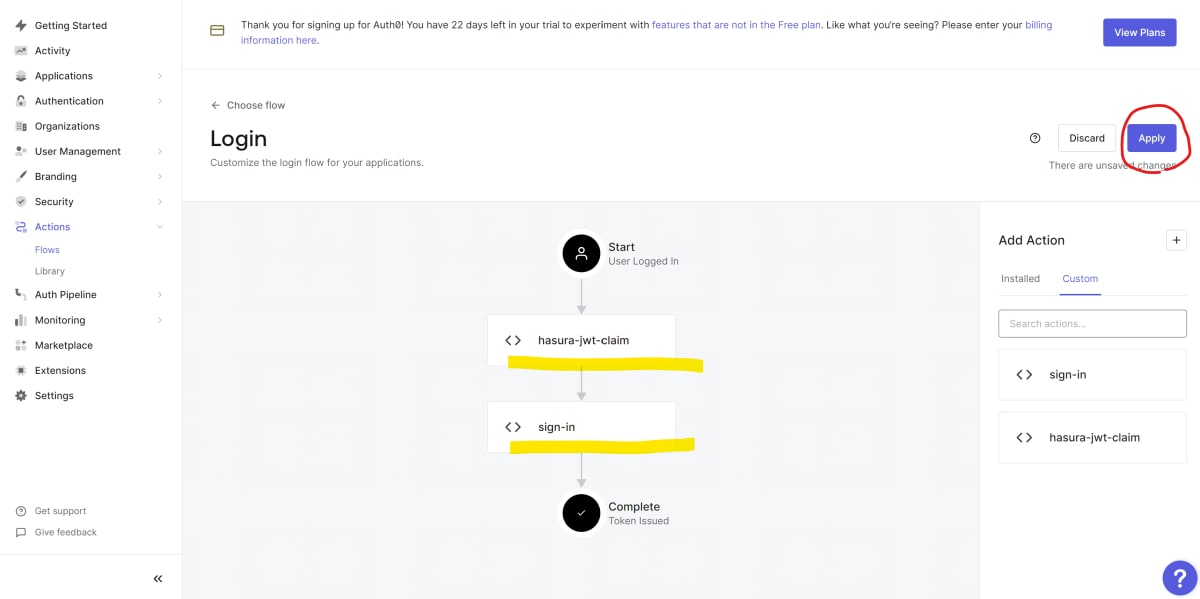
ActionsのFlowsを開き、Loginをクリックする。

Customタブを選択し、表示されている2つのActionを以下の順になるようにドラッグアンドドロップする。
- hasura-jwt-claim
- sign-in

このような表示になったら [Apply] をクリックする。
以上で、Actions機能を使ってHasuraとAuth0を連携させることができる。
Discussion