複数台のArduinoを遠隔で一斉にアップデートする
OTAを使います
前回の記事
この記事内でいうと
- 更新ファイルを受付ておく
デバイス自身でサーバを立ち上げ、PCなどから更新ファイルをデバイスに対して送信する
ここのことを実際に動作させてみたいと思います。
今回の環境
この「PCなどから更新ファイルを...」っていう部分を今回は Node.js を使って送信してみます。
M5Stackを使って、更新できたっていうのをわかりやすくディスプレイの色を変えたりしてみたいと思います。
複数台といっても、M5Stackのbasicが2台しか持っていないので、2台に対してやります。
この記事では順を追って1台のみのと、複数台に対してと、複数台あるときに便利なIPアドレス(ホスト名)の割り振りをしてみます。
まずは1台のみでテスト
Arduino側コード
ArduinoのIDEから「スケッチの例」->「ArduinoOTA」->「OTAWebUpdater」のプログラムをベースにちょっと省略しつつ、M5Stackのディスプレイの色を変えるコード追加します。
#include <WiFi.h>
#include <WiFiClient.h>
#include <WebServer.h>
#include <ESPmDNS.h>
#include <Update.h>

#include <M5Stack.h>

const char* host = "m5stack-01";
const char* ssid = "xxxxxxx";
const char* password = "xxxxxxx";

WebServer server(80);

void setup(void) {
  M5.begin();
  Serial.begin(115200);

  WiFi.begin(ssid, password);
  Serial.println("");
  while (WiFi.status() != WL_CONNECTED) {
    delay(500);
    Serial.print(".");
  }
  Serial.println("");
  Serial.print("Connected to ");
  Serial.println(ssid);
  Serial.print("IP address: ");
  Serial.println(WiFi.localIP());
  if (!MDNS.begin(host)) {
    Serial.println("Error setting up MDNS responder!");
    while (1) {
      delay(1000);
    }
  }
  Serial.print("mDNS responder started host: ");
  Serial.println(host);

  server.on("/", HTTP_GET, []() {
    server.sendHeader("Connection", "close");
    server.send(200, "text/html", "<h1>OTAWebM5Stack</h1>");
  });
  server.on("/update", HTTP_POST, []() {
    server.sendHeader("Connection", "close");
    server.send(200, "text/plain", (Update.hasError()) ? "FAIL" : "OK");
    ESP.restart();
  }, []() {
    HTTPUpload& upload = server.upload();
    if (upload.status == UPLOAD_FILE_START) {
      Serial.printf("Update: %s\n", upload.filename.c_str());
      if (!Update.begin(UPDATE_SIZE_UNKNOWN)) {
        Update.printError(Serial);
      }
    } else if (upload.status == UPLOAD_FILE_WRITE) {
      if (Update.write(upload.buf, upload.currentSize) != upload.currentSize) {
        Update.printError(Serial);
      }
    } else if (upload.status == UPLOAD_FILE_END) {
      if (Update.end(true)) {
        Serial.printf("Update Success: %u\nRebooting...\n", upload.totalSize);
      } else {
        Update.printError(Serial);
      }
    }
  });
  server.begin();

  // ディスプレイの初期設定
  M5.Lcd.fillScreen(RED); // BLUE, GREENとかに変えてみる
  M5.Lcd.setTextFont(2);
  M5.Lcd.setTextColor(WHITE);
  M5.Lcd.setCursor(10, 10);
  M5.Lcd.print("host: ");
  M5.Lcd.println(host);
}

void loop(void) {
  server.handleClient();
  M5.update();
  delay(100);
}
以下のコードの部分を自分の環境に合わせます
const char* ssid = "xxxxxxx";
const char* password = "xxxxxxx";
以下のコードのREDの部分をBLUEとかGREENとかに変えてちゃんと変更できているか確認していければと
M5.Lcd.fillScreen(RED); // BLUE, GREENとかに変えてみる
Arduino側の書き込み
まずは普通に書き込み
PC側から更新したファイルを受け取る準備段階です
PC側(Node.js)
- もちろんArduinoと同じネットワークに繋げる
// 1つのbinファイルを1つのESP32にOTAアップロードするためのNode.jsスクリプト
const axios = require("axios");
const fs = require("fs");
const FormData = require("form-data");
const path = require("path");

const ESP32_HOST_NAME = "m5stack-01";
const ESP32_OTA_PATH = "/update";

const FIRMWARE_FILE_NAME = "firmware.bin";

const FIRMWARE_FILE_PATH = path.join(__dirname, FIRMWARE_FILE_NAME);

async function uploadFirmwareToESP32() {
  if (!fs.existsSync(FIRMWARE_FILE_PATH)) {
    console.error(`Error: Firmware file not found at "${FIRMWARE_FILE_PATH}".`);
    console.error(
      "Please ensure your compiled .bin file is in the same directory as this script and named correctly."
    );
    return;
  }

  const form = new FormData();
  form.append("update", fs.createReadStream(FIRMWARE_FILE_PATH), {
    filename: FIRMWARE_FILE_NAME,
  });

  const uploadUrl = `http://${ESP32_HOST_NAME}${ESP32_OTA_PATH}`;

  console.log(`Attempting to upload "${FIRMWARE_FILE_NAME}" to ${uploadUrl}`);
  console.log(
    "Ensure your ESP32 is powered on, connected to WiFi, and running the OTA sketch."
  );

  try {
    const response = await axios.post(uploadUrl, form, {
      headers: {
        ...form.getHeaders(),
      },
      onUploadProgress: (progressEvent) => {
        const percentCompleted = Math.round(
          (progressEvent.loaded * 100) / progressEvent.total
        );
        process.stdout.write(`Upload progress: ${percentCompleted}%\r`);
      },
      timeout: 600000,
    });

    console.log("\n--- Upload Response ---");
    console.log("Status:", response.status);
    console.log("Response data:", response.data);

    if (response.status === 200 && response.data.includes("OK")) {
      console.log("Firmware upload successful! ESP32 should now reboot.");
    } else {
      console.warn(
        "Firmware upload might have failed or received unexpected response."
      );
    }
  } catch (error) {
    console.error("\n--- Error during upload ---");
  }
}

uploadFirmwareToESP32();
Arduinoのバイナリファイル
ArduinoIDEでは、メニュー内の「スケッチ」->「コンパイルしたバイナリを出力」から作成される
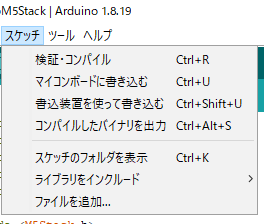
PlatformIOではビルド後、プロジェクトフォルダ内の「.pio\build\m5stack-core-esp32\firmware.bin」に作成される
「m5stack-core-esp32」の部分は各ボードの種類によって変わる
別の話になりますが…PlatformIO使ってみましたが、すっごくいい!
ビルド全然早いし、使い慣れたVSCodeが使えて、プラグインも使えてすばらしい
ファームウェア更新
ArduinoのバイナリファイルをNode.js側のプロジェクト内にコピーしたりして、実行
複数台に更新
ホスト名の割り振り
例えば、こんな感じでスプレッドシートに管理するのもありかなと
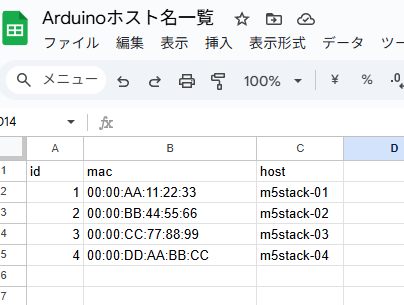
Arduino側で自分のMacアドレスからホスト名を設定させてみました
スプレッドシート側でdevice_mapの宣言あたりをうまく作れれば楽かなと思います
struct MacHostnamePair {
  uint8_t mac[6];
  const char* hostname;
};
const MacHostnamePair device_map[] = {
  {{0x00, 0x00, 0xAA, 0x11, 0x22, 0x33}, "m5stack-01"},
  {{0x00, 0x00, 0xBB, 0x44, 0x55, 0x66}, "m5stack-02"},
  {{0x00, 0x00, 0xCC, 0x77, 0x88, 0x99}, "m5stack-03"},
  {{0x00, 0x00, 0xDD, 0xAA, 0xBB, 0xCC}, "m5stack-04"}
};
const int DEVICE_COUNT = sizeof(device_map) / sizeof(device_map[0]);
const char* getHostName(uint8_t current_mac[6]) {
  for (int i = 0; i < DEVICE_COUNT; i++) {
    if (memcmp(current_mac, device_map[i].mac, 6) == 0) {
      return device_map[i].hostname;
    }
  }
  return NULL;
}
利用するには
uint8_t current_mac[6];
  WiFi.macAddress(current_mac);
  const char* hostname = getHostName(current_mac);
  if (!MDNS.begin(hostname)) {
    Serial.println("Error setting up MDNS responder!");
    while (1) {
      delay(1000);
    }
  }
こんな感じで利用します
先ほどの一部を編集なイメージです
PC側(Node.js)
// 1つのbinファイルを複数のESP32にOTAアップロードするためのNode.jsスクリプト
const axios = require("axios");
const fs = require("fs");
const FormData = require("form-data");
const path = require("path");

const ESP32_IP_ADDRESSES = ["m5stack-01.local", "m5stack-02.local"];
const ESP32_OTA_PATH = "/update";

const FIRMWARE_FILE_NAME = "firmware.bin";

const FIRMWARE_FILE_PATH = path.join(__dirname, FIRMWARE_FILE_NAME);

async function uploadFirmwareToESP32(ipAddress) {
  const form = new FormData();
  form.append("file", fs.createReadStream(FIRMWARE_FILE_PATH));

  try {
    const response = await axios.post(
      `http://${ipAddress}${ESP32_OTA_PATH}`,
      form,
      {
        headers: {
          ...form.getHeaders(),
        },
      }
    );
    console.log(
      `Firmware uploaded successfully to ${ipAddress}:`,
      response.data
    );
  } catch (error) {
    console.error(`Error uploading firmware to ${ipAddress}:`, error.message);
  }
}

async function uploadFirmwareToAllESP32s() {
  for (const ipAddress of ESP32_IP_ADDRESSES) {
    await uploadFirmwareToESP32(ipAddress);
  }
}

uploadFirmwareToAllESP32s();
1つだけ更新するコードからちょっと省略しつつです
Discussion