FastAPIを支えるデータ検証ライブラリ「Pydantic」のV2がベータリリースされたので使ってみた
はじめに
こんにちは。Acompanyの田中(@tkrk_p)です。本記事はAcompany5周年アドベントカレンダー19日目の記事となります。
1日前の記事はこちら↓
本記事では、先日ベータリリースされたデータ検証ライブラリ「Pydantic」のV2を紹介します。
Pydanticとは
Samuel Colvin氏によって2017年に開発されたPythonのデータパース・変換ライブラリです。Pythonの型アノテーションを使用してデータモデルを定義し、入力データの検証や型変換、データのシリアライズ(シリアル化)およびデシリアライズ(逆シリアル化)などの便利な機能を提供しています。
2023年6月現在で月間 7,000 万件以上ダウンロードされていることから、ここ数年で非常に注目されていることがわかります。(ちなみにDjangoのダウンロード数は月間約950万件)
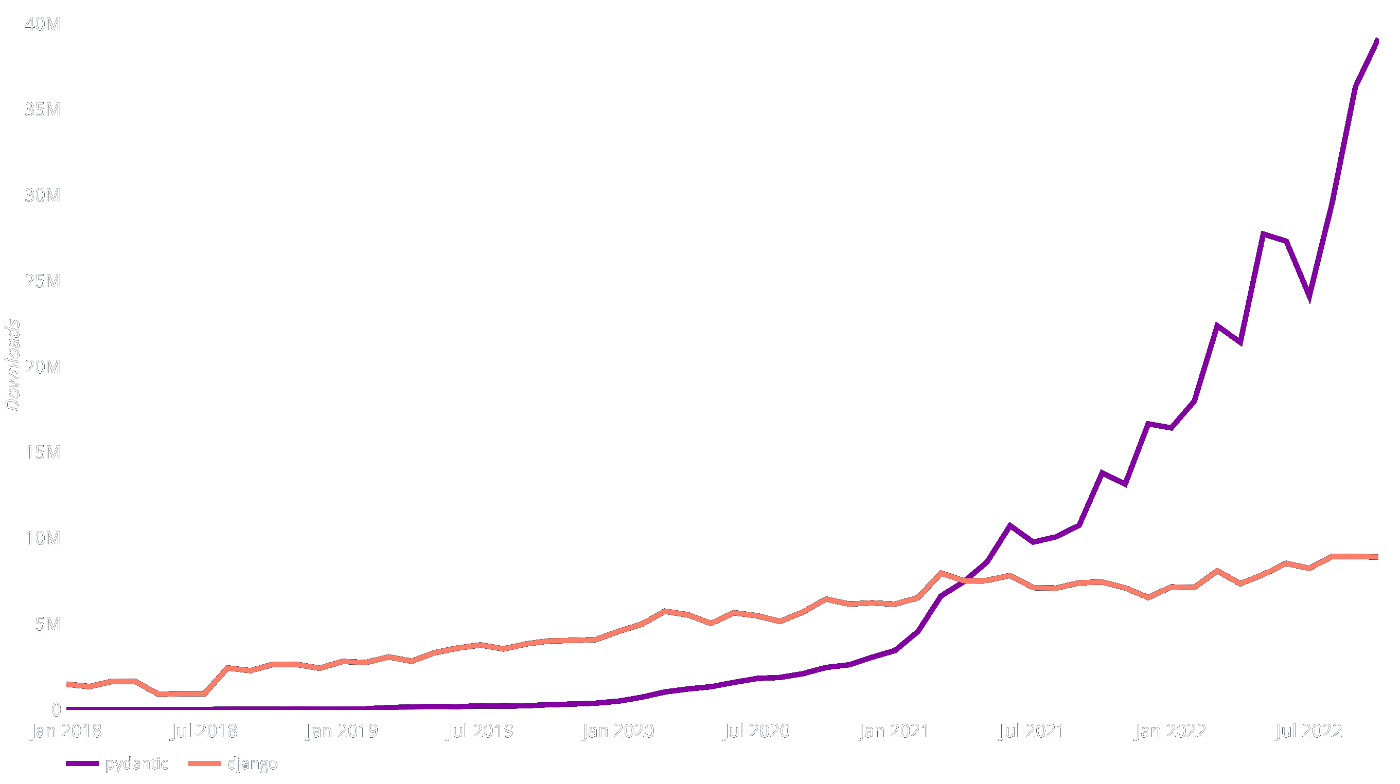
PyPIでのDjangoとPydanticのダウンロード数
FastAPIにおける使用例
PydanticはPythonのWebアプリケーションフレームワーク界の大型ルーキーFastAPIにも統合されており、Pydanticによるリクエスト/レスポンスのスキーマ定義を行うことによって、Swagger UIのドキュメント自動生成機能 や型安全な開発を実現しています。
SQLAlchemyとの統合によってレスポンススキーマを定義することで、ORM Model ↔ API Response Modelの変換を自動的に行ってくれます。
以下の様に、FastAPI + Pydantic + SQLAlchemyを用いてSQLiteを使った簡単なユーザの登録と取得を行えるAPIを爆速で実装することができます。
from typing import Dict, List, Optional

import uvicorn
from fastapi import Depends, FastAPI, HTTPException
from pydantic import (BaseModel, EmailStr, PositiveInt, SecretStr,
                      ValidationError, validator)
from sqlalchemy import (Boolean, Column, Integer, String,
                        create_engine)
from sqlalchemy.ext.declarative import declarative_base
from sqlalchemy.orm import Session, sessionmaker

# ------ setup ------ #
# SQLiteの設定
SQLALCHEMY_DATABASE_URL = "sqlite:///./sql_app.db"
engine = create_engine(
    SQLALCHEMY_DATABASE_URL, connect_args={"check_same_thread": False}
)
SessionLocal = sessionmaker(autocommit=False, autoflush=False, bind=engine)

Base = declarative_base()

# FastAPIの設定
app = FastAPI()

# ------ models ------ #
class UserModel(Base):
    __tablename__ = "users"

    id = Column(Integer, primary_key=True, index=True)
    email = Column(String, unique=True, index=True)
    firstname = Column(String)
    lastname = Column(String)
    hashed_password = Column(String)
    is_active = Column(Boolean, default=True)

# ------ cruds ------ #
def crud_get_user(db: Session, user_id: int):
    return db.query(UserModel).filter(UserModel.id == user_id).first()

def crud_get_user_by_email(db: Session, email: str):
    return db.query(UserModel).filter(UserModel.email == email).first()

def crud_get_users(db: Session, skip: int = 0, limit: int = 100):
    return db.query(UserModel).offset(skip).limit(limit).all()

def crud_create_user(db: Session, user: UserCreate):
    fake_hashed_password = user.password.get_secret_value() + "notreallyhashed"
    db_user = UserModel(email=user.email, firstname=user.firstname, lastname=user.lastname, hashed_password=fake_hashed_password)
    db.add(db_user)
    db.commit()
    db.refresh(db_user)
    return db_user

# ------ Pydantic schemas ------ #
class UserBase(BaseModel):
    email: EmailStr # Email形式の文字列
    firstname: str
    lastname: str

class UserCreate(UserBase):
    password: SecretStr # 機密情報

class User(UserBase):
    id: PositiveInt # 正整数
    is_active: bool

    # ORMモデルの様な属性を持つ任意のObjectからのパースが可能になるオプション
    class Config:
        orm_mode = True

class UserResponse(BaseModel):
    """
    Property:
        id: ユーザーのID
        email: ユーザーのメールアドレス
        firstname: ユーザーのファーストネーム
        lastname: ユーザーのラストネーム
        fullname: ユーザーのフルネーム

    Example:
        {
            "id": 1,
            "email": "user1@example.com",
            "firstname": "taro",
            "lastname": "yamada",
            "fullname": "taro yamada"
        }
    """
    id: PositiveInt # 正整数
    email: EmailStr # Email形式の文字列
    firstname: str
    lastname: str
    fullname: str = None

    # dbにないがresponseに含みたい返り値の生成
    @validator('fullname', always=True)
    def set_default(cls, v: Optional[str], values: Dict[str, str]) -> str:
        if 'firstname' in values and 'lastname' in values and v is None:
            return values['firstname'] + ' ' + values['lastname']
        return v

    # ORMモデルの様な属性を持つ任意のObjectからのパースが可能になるオプション
    class Config:
        orm_mode = True

# ------ app ------ #
# Dependency
def get_db():
    db = SessionLocal()
    try:
        yield db
    finally:
        db.close()

@app.post("/users/", response_model=UserResponse)
def create_user(user: UserCreate, db: Session = Depends(get_db)):
    """
    ユーザーを作成します。

    Args:
        user: ユーザー作成リクエストのボディ
        db: データベースセッション

    Returns:
        作成されたユーザー

    Raises:
        HTTPException(400): メールアドレスがすでに登録されている場合
    """
    db_user = crud_get_user_by_email(db, email=user.email)
    if db_user:
        raise HTTPException(status_code=400, detail="Email already registered")
    return crud_create_user(db=db, user=user)

@app.get("/users/", response_model=List[UserResponse])
def read_users(skip: int = 0, limit: int = 100, db: Session = Depends(get_db)):
    """
    ユーザーの一覧を取得します。

    Args:
        skip: 取得開始位置のオフセット
        limit: 取得するユーザー数の上限
        db: データベースセッション

    Returns:
        ユーザーの一覧
    """
    db_users = crud_get_users(db, skip=skip, limit=limit)
    users = [UserResponse.from_orm(u) for u in db_users]
    return users

@app.get("/users/{user_id}", response_model=UserResponse)
def read_user(user_id: int, db: Session = Depends(get_db)):
    """
    ユーザーの詳細情報を取得します。

    Args:
        user_id: 取得するユーザーのID
        db: データベースセッション

    Returns:
        ユーザーの詳細情報

    Raises:
        HTTPException(404): 指定されたユーザーが見つからない場合
    """
    db_user = crud_get_user(db, user_id=user_id)
    if db_user is None:
        raise HTTPException(status_code=404, detail="User not found")
    return db_user

if __name__ == "__main__":
    # table新規作成
    Base.metadata.create_all(bind=engine)
    uvicorn.run(app, host="0.0.0.0", port=8000)
上記のコードを実行して/docsを叩くと、以下の様にPydanticで定義したスキーマから自動生成されたDocsが表示されます。

Pydantic V2ベータ版リリース
非常に素晴らしい機能を提供しているPydanticですが、先日V1からメジャーアップデートが行われ、V2のベータ版v2.0b1がリリースされました。
V2はpydantic V1を「10 倍高速で、より安定し、より強力」なものとするためのアップデートであり、コアロジックを丸々書き換えています。
そのため、かなり大規模な仕様変更がなされており、V1からV2への追従にはやや改修作業が必要になります。
V1 → V2への移行
先ほどのFastAPI用にPydantic V1で定義したスキーマのコードを例に差分を見ていきましょう。
見やすくPydanticの使用例のみを抽出したコードを以下に用意しました。
from typing import Union, Optional, Dict
from pydantic import (
    BaseModel,
    validator,
    EmailStr,
    SecretStr,
    PositiveInt,
    ValidationError,
)

class UserBase(BaseModel):
    email: EmailStr  # Email形式の文字列
    age: PositiveInt
    firstname: str
    lastname: str

class UserCreate(UserBase):
    password: SecretStr  # 機密情報

class User(UserBase):
    id: PositiveInt  # 正整数
    is_active: bool

    # ORMモデルの様な属性を持つ任意のObjectからのパースが可能になるオプション
    class Config:
        orm_mode = True

class UserResponse(BaseModel):
    id: PositiveInt  # 正整数
    email: EmailStr  # Email形式の文字列
    age: PositiveInt
    firstname: str
    lastname: str
    fullname: str = None

    # dbにないがresponseに含みたい返り値の生成
    @validator("fullname", always=True)
    def set_default(cls, v: Optional[str], values: Dict[str, str]) -> str:
        if "firstname" in values and "lastname" in values and v is None:
            return values["firstname"] + " " + values["lastname"]
        return v

    # ORMモデルの様な属性を持つ任意のObjectからのパースが可能になるオプション
    class Config:
        orm_mode = True

if __name__ == "__main__":
    user = UserCreate(
        email="hoge@fuga.com", age=24, firstname="Hoge", lastname="Fuga", password="pass"
    )
    print(user)
    # => email='hoge@fuga.com' age=24 firstname='Hoge' lastname='Fuga' password=SecretStr('**********')
    print(user.password.get_secret_value())
    # => pass

    user = User(id=1, is_active=True, **user.dict())
    print(user)
    # => email='hoge@fuga.com' age=24 firstname='Hoge' lastname='Fuga' id=1 # idの値を追加

    user = UserResponse.from_orm(user)
    print(user.dict())
    # => {'id': 1, 'email': 'hoge@fuga.com', 'age': 24, 'firstname': 'Hoge', 'lastname': 'Fuga', 'fullname': 'Hoge Fuga'} # 自動的にpropertyを選択抽出

    try:
        user = UserCreate(email="hoge@fuga.com", age="24", firstname=123, lastname=["hoge"])
    except ValidationError as e:
        print(e.json())
    # =>
    # [
    #   {
    #     "loc": [
    #       "lastname"
    #     ],
    #     "msg": "str type expected",
    #     "type": "type_error.str"
    #   },
    #   {
    #     "loc": [
    #       "password"
    #     ],
    #     "msg": "field required",
    #     "type": "value_error.missing"
    #   }
    # ]
このコードを元に、V2にアップデートする際の差分を見ていきましょう。
@validatorの廃止
@@ -1,11 +1,13 @@
 from typing import Optional, Dict
 from pydantic import (
     BaseModel,
-    validator,
+    field_validator,
     EmailStr,
     SecretStr,
     PositiveInt,
     ValidationError,
...
+    Field,
 )
@@ -24,27 +26,28 @@ class User(UserBase):
     is_active: bool

...

 class UserResponse(BaseModel):
     id: PositiveInt  # 正整数
     email: EmailStr  # Email形式の文字列
     firstname: str
     lastname: str
-    fullname: str = None
+    fullname: str = Field(None, validate_default=True)

     # dbにないがresponseに含みたい返り値の生成
-    @validator("fullname", always=True)
+    @field_validator("fullname", mode='before')
     def set_default(cls, v: Optional[str], values: Dict[str, str]) -> str:
-        if "firstname" in values and "lastname" in values and v is None:
-            return values["firstname"] + " " + values["lastname"]
+        if "firstname" in values.data and "lastname" in values.data and v is None:
+            return values.data["firstname"] + " " + values.data["lastname"]
         return v
V2では@validatorと@root_validator が廃止され、新たに@field_validator が追加されました。これにより、@field_validator は引数から always が削除され、デフォルトで always=False の様な挙動となりました。
従来通り動的にデフォルト値を設定したい場合、 mode='before' を設定しFieldクラスを用いて validate_default=True に設定することで再現できそうです。(2023/6/19時点でまだ公式ドキュメントが更新されていなかったため正攻法かは不明です。)
BaseModelのメソッド変更
@@ -1,11 +1,13 @@
 from typing import Optional, Dict
 from pydantic import (
...
+    ConfigDict,
...


@@ -24,27 +26,28 @@ class User(UserBase):
     is_active: bool

     # ORMモデルの様な属性を持つ任意のObjectからのパースが可能になるオプション
-    class Config:
-        orm_mode = True
-
+    model_config = ConfigDict(
+        from_attributes=True
+    )

if __name__ == "__main__":
     print(user.password.get_secret_value())
     # => pass

-    user = User(id=1, is_active=True, **user.dict())
+    user = User(id=1, is_active=True, **user.model_dump())
     print(user)
     # => email='hoge@fuga.com' firstname='Hoge' lastname='Fuga' id=1 # idの値を追加

-    user = UserResponse.from_orm(user)
-    print(user.dict())
+    user = UserResponse.model_validate(user)
+    print(user.model_dump())
     # => {'id': 1, 'email': 'hoge@fuga.com', 'firstname': 'Hoge', 'lastname': 'Fuga', 'fullname': 'Hoge Fuga'} # 自動的にpropertyを選択抽出
Pydantic V2では、pydantic.BaseModelのメソッド名にいくつかの変更が加えられました。 旧バージョンのメソッド名は非推奨となっており、新しいバージョンには代替のメソッド名が追加されています。以下は、重要な変更点の一部です。
| Pydantic V1 | Pydantic V2 |
|---|---|
| __fields__ | model_fields |
| __private_attributes__ | __pydantic_private__ |
| __validators__ | __pydantic_validator__ |
| construct() | model_construct() |
| copy() | model_copy() |
| dict() | model_dump() |
| json_schema() | model_json_schema() |
| json() | model_dump_json() |
| parse_obj() | model_validate() |
また、from_ormメソッドも廃止されました。 代わりに model_config でfrom_attributes=Trueを設定した場合、model_validate(Pydantic V1のparse_objに相当する)を使用することができるようになりました。
Pydanticは厳密には「入力時に検証する」用途ではなく、「出力モデルの型と制約を保証する」ためのライブラリという思想で作られています。(故にV1では x: int と定義していても x = "123" はエラーを吐かずに自動で x = 123 として解釈される仕様になっていました。)
pydanticは主に解析ライブラリであり、検証ライブラリではありません。検証は目的を達成するための手段であり、提供されたタイプと制約に準拠するモデルを構築します。
言い換えれば、pydantic は入力データではなく、出力モデルの型と制約を保証します。
これは難解な区別のように聞こえるかもしれませんが、そうではありません。これが何を意味するか、または使用方法にどのような影響を与えるかがわからない場合は、以下のデータ変換に関するセクションをお読みください。
検証はpydanticの主な目的ではありませんが、このライブラリをカスタム検証に使用できます。
https://docs.pydantic.dev/latest/usage/models/#data-conversion
作者曰くこの思想による命名時の「parse」vs「validate」論争により、用語が混在しておりカオスになってしまったため、Jsonのパースについて語る時以外は全て「validate」に寄せることにしたっぽいです。
バリデーションの厳密化とエラーメッセージのリッチ化
@@ -1,16 +1,19 @@
...

-class UserBase(BaseModel):
+class UserBase(BaseMode, strict=True):

...

if __name__ == "__main__":
...

     try:
         user = UserCreate(email="hoge@fuga.com", age="24", firstname=123, lastname=["hoge"])
     except ValidationError as e:
-        print(e.json())
+        print(e.json(indent=2))
     # =>
     # [
     #   {
+    #     "type": "int_type",
+    #     "loc": [
+    #       "age"
+    #     ],
+    #     "msg": "Input should be a valid integer",
+    #     "input": "24",
+    #     "url": "https://errors.pydantic.dev/0.39.0/v/int_type"
+    #   },
+    #   {
+    #     "type": "string_type",
+    #     "loc": [
+    #       "firstname"
+    #     ],
+    #     "msg": "Input should be a valid string",
+    #     "input": 123,
+    #     "url": "https://errors.pydantic.dev/0.39.0/v/string_type"
+    #   },
+    #   {
+    #     "type": "string_type",
     #     "loc": [
     #       "lastname"
     #     ],
-    #     "msg": "str type expected",
-    #     "type": "type_error.str"
+    #     "msg": "Input should be a valid string",
+    #     "input": [
+    #       "hoge"
+    #     ],
+    #     "url": "https://errors.pydantic.dev/0.39.0/v/string_type"
     #   },
     #   {
+    #     "type": "missing",
     #     "loc": [
     #       "password"
     #     ],
-    #     "msg": "field required",
-    #     "type": "value_error.missing"
+    #     "msg": "Field required",
+    #     "input": {
+    #       "email": "hoge@fuga.com",
+    #       "age": "24",
+    #       "firstname": 123,
+    #       "lastname": [
+    #         "hoge"
+    #       ]
+    #     },
+    #     "url": "https://errors.pydantic.dev/0.39.0/v/missing"
     #   }
     # ]"
上記の思想に基づいて、V1ではデフォルトでstrとintは相互に自動変換される仕様だったため、age: int = "24" と firstname: str = 123 が検証を正常にパスしていました。
この仕様はstr型のIDフィールドに数値形式の文字列を入力したいときなど、使い方によっては非常に便利な一方で、この例の様な直感的にはエラーが出て欲しいケースでは混乱を生む原因となっていました。
V2ではStrict Modeが追加され、Model定義時に strict=True を指定すると、strとintの自動変換がされずにValidationErrorを吐くようになり、より検証用途に適した挙動にスイッチできるようになりました。
さらに、ValidationErrorのエラーメッセージがより洗練されわかりやすくなりました。
エラーメッセージに詳細ドキュメントのURLが紐づけられるようになっておりユーザーフレンドリーに進化しています。
今回紹介しきれなかった他の変更点は以下まとめられているので気になる方は参照してください。
V2に移植した完全版コード
from typing import Union, Optional, Dict
from pydantic import (
BaseModel,
field_validator,
EmailStr,
SecretStr,
PositiveInt,
ValidationError,
ConfigDict,
Field,
)

class UserBase(BaseMode, strict=True):
email: EmailStr  # Email形式の文字列
age: PositiveInt
firstname: str
lastname: str

class UserCreate(UserBase):
password: SecretStr  # 機密情報

class User(UserBase):
id: PositiveInt  # 正整数
is_active: bool

# ORMモデルの様な属性を持つ任意のObjectからのパースが可能になるオプション
model_config = ConfigDict(
    from_attributes=True
)

class UserResponse(BaseModel):
id: PositiveInt  # 正整数
email: EmailStr  # Email形式の文字列
age: PositiveInt
firstname: str
lastname: str
fullname: str = Field(None, validate_default=True)

# dbにないがresponseに含みたい返り値の生成
@field_validator("fullname", mode='before')
def set_default(cls, v: Optional[str], values: Dict[str, str]) -> str:
    if "firstname" in values.data and "lastname" in values.data and v is None:
	return values.data["firstname"] + " " + values.data["lastname"]
    return v

# ORMモデルの様な属性を持つ任意のObjectからのパースが可能になるオプション
model_config = ConfigDict(
    from_attributes=True
)

if __name__ == "__main__":
user = UserCreate(
    email="hoge@fuga.com", age=24, firstname="Hoge", lastname="Fuga", password="pass"
)
print(user)
# => email='hoge@fuga.com' age=24 firstname='Hoge' lastname='Fuga' password=SecretStr('**********')
print(user.password.get_secret_value())
# => pass

user = User(id=1, is_active=True, **user.model_dump())
print(user)
# => email='hoge@fuga.com' age=24 firstname='Hoge' lastname='Fuga' id=1 # idの値を追加

user = UserResponse.model_validate(user)
print(user.model_dump())
# => {'id': 1, 'email': 'hoge@fuga.com', 'age': 24, 'firstname': 'Hoge', 'lastname': 'Fuga', 'fullname': 'Hoge Fuga'} # 自動的にpropertyを選択抽出

try:
    user = UserCreate(email="hoge@fuga.com", age="24", firstname=123, lastname=["hoge"])
except ValidationError as e:
    print(e.json(indent=2))
# =>
# [
#   {
#     "type": "int_type",
#     "loc": [
#       "age"
#     ],
#     "msg": "Input should be a valid integer",
#     "input": "24",
#     "url": "https://errors.pydantic.dev/0.39.0/v/int_type"
#   },
#   {
#     "type": "string_type",
#     "loc": [
#       "firstname"
#     ],
#     "msg": "Input should be a valid string",
#     "input": 123,
#     "url": "https://errors.pydantic.dev/0.39.0/v/string_type"
#   },
#   {
#     "type": "string_type",
#     "loc": [
#       "lastname"
#     ],
#     "msg": "Input should be a valid string",
#     "input": [
#       "hoge"
#     ],
#     "url": "https://errors.pydantic.dev/0.39.0/v/string_type"
#   },
#   {
#     "type": "missing",
#     "loc": [
#       "password"
#     ],
#     "msg": "Field required",
#     "input": {
#       "email": "hoge@fuga.com",
#       "age": "24",
#       "firstname": 123,
#       "lastname": [
#         "hoge"
#       ]
#     },
#     "url": "https://errors.pydantic.dev/0.39.0/v/missing"
#   }
# ]
パフォーマンスが17倍改善
V2では高速化と開発生産性向上のために検証ロジックであるpydantic-coreがRustでリライトされました。リライトにはPython用のRust bindingを提供するpyo3ライブラリを使用しており、公式ドキュメントによると、V1と比較して全体で4x〜50xほど高速化され、一般的な検証ユースケースの場合、約17倍速くなったとのことです。
Looking at the pydantic-core benchmarks
today, pydantic V2 is between 4x and 50x faster than pydantic V1.9.1.In general, pydantic V2 is about 17x faster than V1 when validating a model containing a range of common fields.
FastAPIでもPydantic V2への追従を進めていおり、FastAPI作者のtiangolo氏によると、すでに作業が大部分終了していると報告されています。リリースが非常に楽しみですね。
まとめ
本記事ではPydanticがV2にアップデートされたことで一般的なユースケースにおいてどの様な差分があるのかを紹介していきました。
つい先日Pydanticの今後のロードマップについて公開され、非常にエキサイティングなプロジェクトが始まりそうでワクワクしています。
(追記)ロードマップの詳細についてはこちら↓
皆さんも是非一緒にPydanticの今後の発展に期待して引き続きウォッチしていきましょう。
おまけ
Pydanticにコントリビュートしたい方向け
ついでにFastAPIも
Discussion