AzureStaticWebAppをReact+AzureFunctions(Python)で作って、ローカルで動かしてみる
この記事は、下記の構成をローカル環境で実行するためのメモです。
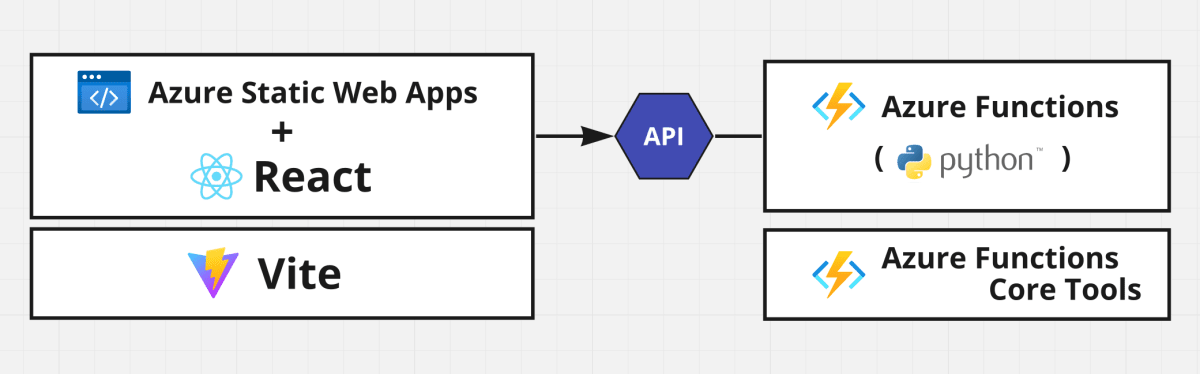
AzureでちょっとしたWebアプリケーションを作るときに、コスト面や運用面でAzure Static Web Appsは候補に上がりやすいサービスです。
しかし大体の手順がGithubやAzureDevOpsといったCI連携が前提となっていて、ちょっと作って試すにはハードルが高いイメージがありました。
そのため本記事ではサクッとローカルで動かすところまで行ってみようと思います。
主な利用サービスは下記の通りです。
| Azureサービス | フレームワーク | 言語 | |
|---|---|---|---|
| フロントエンド | Azure Static Web Apps | React | TypeScript |
| バックエンド | Azure Functions | - | Python |
※ 今回はローカルで動かすだけなので、特にAzureアカウント等は不要です
※ 記事作成時の環境はApple M1 + Sonoma (macOS 14)です
今回は2つのアプリを立ち上げる形になるので、フォルダ構成は下記のようになります。
~/devel/
   |- sandbox_azure_functions    <-- Azure Functions App用
   |- sandbox_vite               <-- Azure Static Web Apps (Vite + React)用
1. Azure FunctionsでHTTPトリガーの関数アプリを実装する
まずバックエンドのAPIから作っていきます。
バックエンドはAzure FunctionsのPython版を使用します。
1.1. 環境構築
まずAzure Functionsの実行環境を整えます。
これによりAzure Functionsのプロジェクトテンプレートの作成や、ローカルでの実行が可能になります。
- Homebrewでインストールできるように、azure/functionsをtapします
brew tap azure/functions==> Tapping azure/functions Cloning into '/opt/homebrew/Library/Taps/azure/homebrew-functions'... remote: Enumerating objects: 716, done. remote: Counting objects: 100% (74/74), done. remote: Compressing objects: 100% (49/49), done. remote: Total 716 (delta 44), reused 26 (delta 25), pack-reused 642 Receiving objects: 100% (716/716), 112.44 KiB | 10.22 MiB/s, done. Resolving deltas: 100% (470/470), done. Tapped 5 formulae (23 files, 157.2KB). - Homebrewでインストールできるバージョンを調べます
brew search azure-functions-core-tools==> Formulae azure/functions/azure-functions-core-tools azure/functions/azure-functions-core-tools-v3-preview azure/functions/azure-functions-core-tools@2 azure/functions/azure-functions-core-tools@3 azure/functions/azure-functions-core-tools@4 - 前工程の結果から最新のものを選んでインストールします
brew install azure-functions-core-tools@4==> Downloading https://formulae.brew.sh/api/formula.jws.json ######################################################################### 100.0% ==> Downloading https://formulae.brew.sh/api/cask.jws.json ######################################################################### 100.0% ==> Fetching azure/functions/azure-functions-core-tools@4 ==> Downloading https://functionscdn.azureedge.net/public/4.0.5455/Azure.Functio ######################################################################### 100.0% ==> Installing azure-functions-core-tools@4 from azure/functions Telemetry --------- The Azure Functions Core tools collect usage data in order to help us improve your experience. The data is anonymous and doesn't include any user specific or personal information. The data is collected by Microsoft. You can opt-out of telemetry by setting the FUNCTIONS_CORE_TOOLS_TELEMETRY_OPTOUT environment variable to '1' or 'true' using your favorite shell. 🍺 /opt/homebrew/Cellar/azure-functions-core-tools@4/4.0.5455: 5,736 files, 610MB, built in 35 seconds ==> Running `brew cleanup azure-functions-core-tools@4`... Disable this behaviour by setting HOMEBREW_NO_INSTALL_CLEANUP. Hide these hints with HOMEBREW_NO_ENV_HINTS (see `man brew`). - funcコマンドのバージョンを確認します
func --version4.0.5455
ここまででAzure Functionsの実行環境は整いました。
1.2. プロジェクトの作成
次にAzure Functionsのプロジェクトを作成します。
- ワークディレクトリに移動します
mkdir ~/devel cd ~/devel/ -
func initコマンドでAzure Functionsのプロジェクトを作成しますfunc init sandbox_azure_functions --worker-runtime python --model V2Found Python version 3.11.6 (python3). The new Python programming model is generally available. Learn more at https://aka.ms/pythonprogrammingmodel Writing requirements.txt Writing function_app.py Writing .gitignore Writing host.json Writing local.settings.json Writing ~/devel/sandbox_azure_functions/.vscode/extensions.json - 作成したプロジェクトフォルダに移動します
cd sandbox_azure_functions - Gitリポジトリも作成します
git init .Initialized empty Git repository in ~/devel/sandbox_azure_functions/.git/ - 作成した直後の状態を記録しておきます
git add .
git commit -m 'first commit'
[main (root-commit) 37b1b16] first commit 6 files changed, 82 insertions(+) create mode 100644 .gitignore create mode 100644 .vscode/extensions.json create mode 100644 .vscode/settings.json create mode 100644 function_app.py create mode 100644 host.json create mode 100644 requirements.txt - Visual Studio Codeでプロジェクトを開いて、プロジェクトを最適化します
code . - 最適化した状態を記録しておきます
git add .
git commit -m "VS CodeのAzure functions拡張で再初期化"
[main 9b1b543] VS CodeのAzure functions拡張で再初期化 5 files changed, 52 insertions(+), 4 deletions(-) create mode 100644 .funcignore create mode 100644 .vscode/launch.json create mode 100644 .vscode/tasks.json
ここまででプロジェクトの作成が完了しました。
1.3. APIの作成
次にAPIを作っていきます。
ここではシンプルに『誰でも実行できるAPI』を作っていきます。
- HTTPトリガーのAzure Functionsを作成する
func new --template "Http Trigger" --name MyHttpTriggerSelect a number for Auth Level: 1. FUNCTION 2. ANONYMOUS 3. ADMIN Choose option: 2 Appending to ~/devel/sandbox_azure_functions/function_app.py The function "nMyHttpTrigger" was created successfully from the "Http Trigger" template.
これで極々シンプルなサンプルAPIが、function_app.py として作成されました。
このAPIはAPIコールすると下記の文字列を返してくるAPIです。
This HTTP triggered function executed successfully. Pass a name in the query string or in the request body for a personalized response.
また、本文中にある通りリクエストでnameを渡してあげると下記のようにレスポンスが変化します。
Hello, {name}. This HTTP triggered function executed successfully.
1.4. APIの実行
次にAPIを実際に立ち上げて、レスポンスを確認してみましょう。
- 作成したAPIを立ち上げます
func startFound Python version 3.11.6 (python3). Azure Functions Core Tools Core Tools Version: 4.0.5455 Commit hash: N/A (64-bit) Function Runtime Version: 4.27.5.21554 [2023-12-08T15:04:52.442Z] Customer packages not in sys path. This should never happen! [2023-12-08T15:04:53.167Z] Worker process started and initialized. Functions: MyHttpTrigger: http://localhost:7071/api/MyHttpTrigger For detailed output, run func with --verbose flag. [2023-12-08T15:04:58.123Z] Host lock lease acquired by instance ID '0000000000000000000000007DB202B9'.
これでAPIは http://localhost:7071/api/MyHttpTrigger でアクセスできるようになりました。
Curlを使って立ち上げたAPIを実行してみます。
- 別のターミナルを立ち上げ、立ち上がったAPIを試してみます
curl "http://localhost:7071/api/MyHttpTrigger"This HTTP triggered function executed successfully. Pass a name in the query string or in the request body for a personalized response.%
想定通り返ってきました。
また、 func start したターミナルでは下記のように実行ログが表示されます。
[2023-12-08T15:05:25.372Z] Executing 'Functions.MyHttpTrigger' (Reason='This function was programmatically called via the host APIs.', Id=6e9b30b9-4d78-4f32-918a-0f7fc9c172bf)
[2023-12-08T15:05:25.401Z] Python HTTP trigger function processed a request.
[2023-12-08T15:05:25.436Z] Executed 'Functions.MyHttpTrigger' (Succeeded, Id=6e9b30b9-4d78-4f32-918a-0f7fc9c172bf, Duration=75ms)
まずはAPIが1つ完成しました。
1.5. APIレスポンスの調整
ここまでで文字列を返すAPIはできたのですが、Reactが受け取って扱いやすいようにJSON形式でレスポンスを返すように調整します。
- Visual Studio Codeで
function_app.pyを開いて下記のように修正しますfunction_app.pyimport azure.functions as func import datetime import json import logging bp = func.Blueprint() @bp.route(route="MyHttpTrigger", auth_level=func.AuthLevel.ANONYMOUS) def MyHttpTrigger(req: func.HttpRequest) -> func.HttpResponse: logging.info('Python HTTP trigger function processed a request.') name = req.params.get('name') if not name: try: req_body = req.get_json() except ValueError: pass else: name = req_body.get('name') if name: - return func.HttpResponse(f"Hello, {name}. This HTTP triggered function executed successfully.") + return func.HttpResponse( + json.dumps({'message': f"Hello, {name}. This HTTP triggered function executed successfully."}), + mimetype="application/json", + status_code=200 + ) else: return func.HttpResponse( - "This HTTP triggered function executed successfully. Pass a name in the query string or in the request body for a personalized response.", + json.dumps({'message': "This HTTP triggered function executed successfully. Pass a name in the query string or in the request body for a personalized response."}), + mimetype="application/json", status_code=200 )
変更が完了したら、保存して閉じます。
- ここまでの作業を記録しておきます
git add .
git commit -m "Azure FunctionsでHTTPトリガーの関数アプリを実装完了"
[main 2196b39] Azure FunctionsでHTTPトリガーの関数アプリを実装完了 1 file changed, 34 insertions(+), 6 deletions(-)
先ほどと同様に作成したAPIを実行してみます。
curl -i http://localhost:7071/api/MyHttpTrigger
HTTP/1.1 200 OK
connection: close
content-type: application/json
date: Sat, 9 Dec 2023 15:03:33 GMT
server: Kestrel
transfer-encoding: chunked

{"message": "This HTTP triggered function executed successfully. Pass a name in the query string or in the request body for a personalized response."}
今度はJSON形式でレスポンスを受け取ることができました。
ここまで出来たら、次の作業へ進むために Ctrl+c でAzure Functionsを一旦終了させます。
2. Vite + React で Frontend を実装する
次にフロントエンドを作っていきます。
今回はローカルの開発用サーバーとしてViteを使っていきます。
2.1. 環境構築
Azure Static Web Appsはnodejsのバージョンに厳しいので、バージョンを合わせつつ環境を構築します。
記事作成時点ではnodejsのv20で作る必要があったので、nodenvを使って環境を作っていきます。
- ワークディレクトリに移動します
mkdir ~/devel cd ~/devel/ - nodenvをインストールします
brew install nodenv==> Downloading https://formulae.brew.sh/api/formula.jws.json ######################################################################### 100.0% ==> Downloading https://formulae.brew.sh/api/cask.jws.json ######################################################################### 100.0% ==> Downloading https://ghcr.io/v2/homebrew/core/nodenv/manifests/1.4.1 ######################################################################### 100.0% ==> Fetching dependencies for nodenv: node-build ==> Downloading https://ghcr.io/v2/homebrew/core/node-build/manifests/4.9.133 ######################################################################### 100.0% ==> Fetching node-build ==> Downloading https://ghcr.io/v2/homebrew/core/node-build/blobs/sha256:e9e144a ######################################################################### 100.0% ==> Fetching nodenv ==> Downloading https://ghcr.io/v2/homebrew/core/nodenv/blobs/sha256:e68daad6e3f ######################################################################### 100.0% ==> Installing dependencies for nodenv: node-build ==> Installing nodenv dependency: node-build ==> Downloading https://ghcr.io/v2/homebrew/core/node-build/manifests/4.9.133 Already downloaded: ~/Library/Caches/Homebrew/downloads/f0292426219966e9e689afc2331d6fadf326558baea95cdaec1f13133838d3c2--node-build-4.9.133.bottle_manifest.json ==> Pouring node-build--4.9.133.all.bottle.tar.gz 🍺 /opt/homebrew/Cellar/node-build/4.9.133: 842 files, 1MB ==> Installing nodenv ==> Pouring nodenv--1.4.1.arm64_sonoma.bottle.tar.gz 🍺 /opt/homebrew/Cellar/nodenv/1.4.1: 34 files, 125.0KB ==> Running `brew cleanup nodenv`... Disable this behaviour by setting HOMEBREW_NO_INSTALL_CLEANUP. Hide these hints with HOMEBREW_NO_ENV_HINTS (see `man brew`). -
.zshrcの末尾に下記を追記します.zshrc+ export PATH="$HOME/.nodenv/bin:$PATH" + eval "$(nodenv init -)" - ターミナルを開き直す
- nodenvでインストールできるv20を確認します
nodenv install -l | grep -i '^20'20.0.0 20.1.0 20.2.0 20.3.0 20.3.1 20.4.0 20.5.0 20.5.1 20.6.0 20.6.1 20.7.0 20.8.0 20.8.1 20.9.0 20.10.0 - 表示されたもののうち一番新しいものをインストールします
nodenv install 20.10.0Downloading node-v20.10.0-darwin-arm64.tar.gz... -> https://nodejs.org/dist/v20.10.0/node-v20.10.0-darwin-arm64.tar.gz Installing node-v20.10.0-darwin-arm64... Installed node-v20.10.0-darwin-arm64 to ~/.nodenv/versions/20.10.0 - 前工程でインストールしたものを使用するよう設定変更します
nodenv local 20.10.0
2.2. Viteプロジェクトを作る
次にVite+ReactのTypeScript版プロジェクトを作っていきます。
- yarn create viteでプロジェクトを作成します
yarn create vite sandbox_vite --template react-swc-tsyarn create v1.22.21 [1/4] 🔍 Resolving packages... ⠁ (node:53323) [DEP0040] DeprecationWarning: The `punycode` module is deprecated. Please use a userland alternative instead. (Use `node --trace-deprecation ...` to show where the warning was created) [2/4] 🚚 Fetching packages... [3/4] 🔗 Linking dependencies... warning " > vite-plugin-singlefile@0.13.5" has unmet peer dependency "rollup@>=2.79.0". warning " > vite-plugin-singlefile@0.13.5" has unmet peer dependency "vite@>=3.2.0". [4/4] 🔨 Building fresh packages... success Installed "create-vite@5.0.0" with binaries: - create-vite - cva [#######################################################################] 82/82 Scaffolding project in ~/devel/sandbox_vite... Done. Now run: cd sandbox_vite yarn yarn dev ✨ Done in 0.61s. - 作成したプロジェクトの中に移動します
cd sandbox_vite - 続けてGitリポジトリも作成します
git init .Initialized empty Git repository in ~/devel/sandbox_vite/.git/ - 作成した直後の状態を記録しておきます
git add .
git commit -m 'first commit'
[main (root-commit) 80275e6] first commit 15 files changed, 313 insertions(+) create mode 100644 .eslintrc.cjs create mode 100644 .gitignore create mode 100644 README.md create mode 100644 index.html create mode 100644 package.json create mode 100644 public/vite.svg create mode 100644 src/App.css create mode 100644 src/App.tsx create mode 100644 src/assets/react.svg create mode 100644 src/index.css create mode 100644 src/main.tsx create mode 100644 src/vite-env.d.ts create mode 100644 tsconfig.json create mode 100644 tsconfig.node.json create mode 100644 vite.config.ts - 依存ライブラリをインストールします
yarnyarn install v1.22.21 info No lockfile found. [1/4] 🔍 Resolving packages... ⠁ (node:53351) [DEP0040] DeprecationWarning: The `punycode` module is deprecated. Please use a userland alternative instead. (Use `node --trace-deprecation ...` to show where the warning was created) [2/4] 🚚 Fetching packages... [3/4] 🔗 Linking dependencies... [4/4] 🔨 Building fresh packages... success Saved lockfile. ✨ Done in 18.38s. - 最初期のパッケージバージョンを記録しておきます
git add yarn.lock git commit -m "最初期のパッケージバージョンを記録"[main 3a0bce4] 最初期のパッケージバージョンを記録 1 file changed, 1303 insertions(+) create mode 100644 yarn.lock
ここまででVite+Reactの初期環境は整いました。
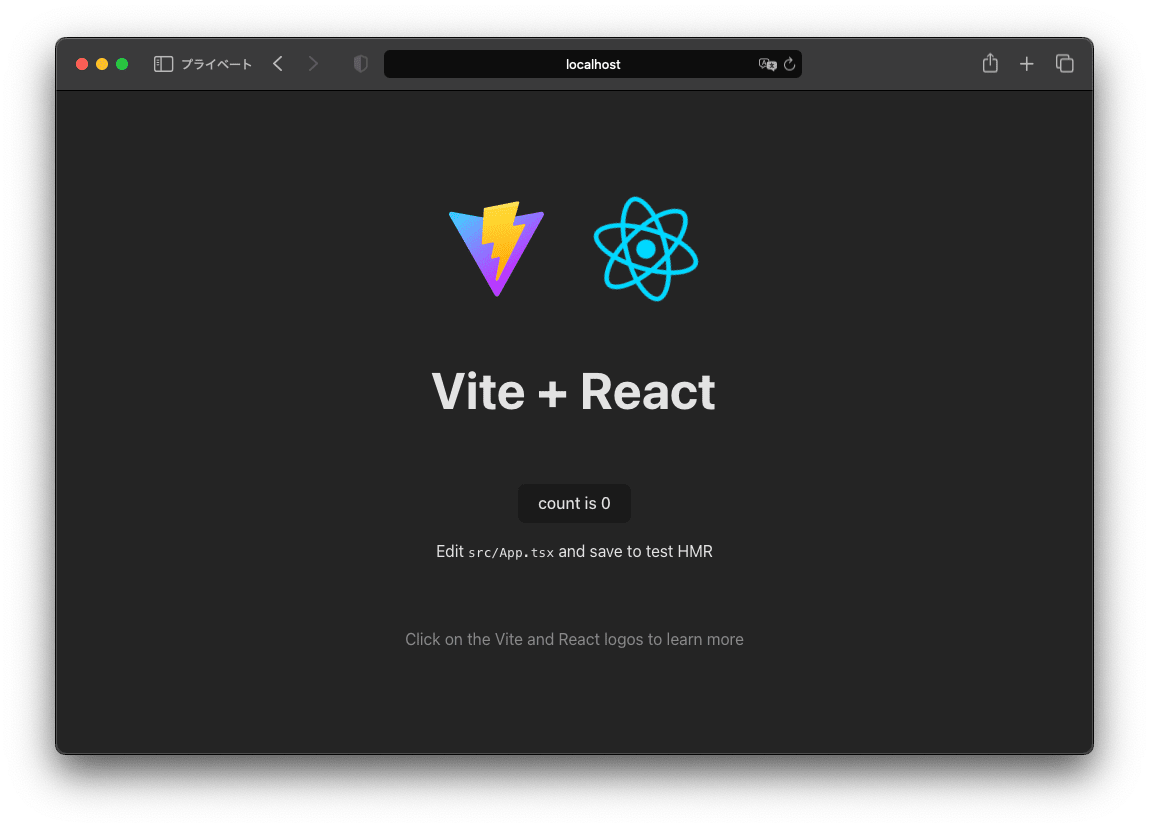
2.3. Vite + React で作ったプロジェクトを立ち上げてみる
次に先ほど作成したVite + Reactのアプリを立ち上げます。
-
yarn devで作成したアプリを立ち上げます
yarn devyarn run v1.22.21 $ vite VITE v5.0.7 ready in 415 ms ➜ Local: http://localhost:5173/ ➜ Network: use --host to expose ➜ press h + enter to show help -
ブラウザで http://localhost:5173/ にアクセスし、下記のように表示されていることを確認します
-
次の作業に進むため、
Ctrl+cで一旦Viteを終了します
3. Static Web Apps として統合する
これまで作ってきたフロントエンドとバックエンドをAzure Static Web Apps CLIを使って統合していきます。
3.1. 環境構築
まずローカルでAzure Static Web Appsを実行するためのCLIをインストールします。
- yarnコマンドを使ってCLIをインストールします
yarn add --dev @azure/static-web-apps-cliyarn add v1.22.21 [1/4] 🔍 Resolving packages... [2/4] 🚚 Fetching packages... [3/4] 🔗 Linking dependencies... [4/4] 🔨 Building fresh packages... 〜〜〜〜〜(中略)〜〜〜〜〜 ├─ yaml@2.3.4 ├─ yargs-parser@21.1.1 └─ yargs@17.7.2 ✨ Done in 23.26s. - Azure Static Web Apps用の設定ファイルを作成します
yarn exec swa init sandbox_vite -- --yesyarn exec v1.22.21 Welcome to Azure Static Web Apps CLI (1.1.6) Detected configuration for your app: - Framework(s): Vite - App location: . - Output location: dist - API location: - API language: - API version: - Data API location: - App build command: npm run build - API build command: - App dev server command: npm run dev - App dev server URL: http://localhost:5173 - API dev server URL: Configuration successfully saved to swa-cli.config.json. Get started with the following commands: - Use swa start to run your app locally. - Use swa build to build your app. - Use swa deploy to deploy your app to Azure. ✨ Done in 0.49s. - Azure Static Web Apps用の設定ファイル(
swa-cli.config.json)を編集するswa-cli.config.json{ "$schema": "https://aka.ms/azure/static-web-apps-cli/schema", "configurations": { "sandbox_vite": { "appLocation": ".", "outputLocation": "dist", - "appBuildCommand": "npm run build", + "appBuildCommand": "yarn build", - "run": "npm run dev", + "run": "yarn dev", + "apiDevserverUrl": "http://localhost:7071", "appDevserverUrl": "http://localhost:5173" } } } - ここまでの作業を記録する
git add .
git commit -m "Azure Static Web Apps CLIの環境構築"
[main aee3b07] Azure Static Web Apps CLIの環境構築 3 files changed, 1947 insertions(+), 13 deletions(-) create mode 100644 swa-cli.config.json
これでアプリケーションとしての統合は完了です。
3.2. Azure Static Web Apps CLIで環境を立ち上げる
順番に作成したものを立ち上げていきます。
-
新しいターミナルを開いて作成したバックエンドAPIを立ち上げます
cd ~/devel/sandbox_azure_functions
func start
Found Python version 3.11.6 (python3). Azure Functions Core Tools Core Tools Version: 4.0.5455 Commit hash: N/A (64-bit) Function Runtime Version: 4.27.5.21554 [2023-12-08T15:04:52.442Z] Customer packages not in sys path. This should never happen! [2023-12-08T15:04:53.167Z] Worker process started and initialized. Functions: MyHttpTrigger: http://localhost:7071/api/MyHttpTrigger For detailed output, run func with --verbose flag. [2023-12-08T15:04:58.123Z] Host lock lease acquired by instance ID '0000000000000000000000007DB202B9'. -
フロントエンドを立ち上げます
yarn exec swa startyarn exec v1.22.21 Welcome to Azure Static Web Apps CLI (1.1.6) Using configuration "sandbox_vite" from file: ~/devel/sandbox_vite/swa-cli.config.json *********************************************************************** * WARNING: This emulator may not match the cloud environment exactly. * * Always deploy and test your app in Azure. * *********************************************************************** yarn run v1.22.21 $ vite [swa] - Waiting for http://localhost:5173 to be ready [run] [run] VITE v5.0.10 ready in 123 ms [run] [run] ➜ Local: http://localhost:5173/ [run] ➜ Network: use --host to expose [swa] ✔ http://localhost:5173 validated successfully [swa] [swa] Using dev server for static content: [swa] http://localhost:5173 [swa] [swa] Using dev server for API: [swa] http://localhost:7071 [swa] [swa] Azure Static Web Apps emulator started at http://localhost:4280. Press CTRL+C to exit. [swa] [swa]
これによりローカル環境でAzure Static Web Apps + Azure Functionsの環境を立ち上げることができました。
統合された環境はログメッセージにある通り、ポート4280で上がっています。
- 統合されたAPIを実行する
curl -i http://localhost:4280/api/MyHttpTriggerHTTP/1.1 200 OK connection: close content-type: text/plain; charset=utf-8 date: Sat, 9 Dec 2023 15:03:21 GMT server: Kestrel transfer-encoding: chunked {"message": "This HTTP triggered function executed successfully. Pass a name in the query string or in the request body for a personalized response."}
APIは、前項の http://localhost:7071 と同様のレスポンスを返していることがわかります。
また、ブラウザで http://localhost:4280 を表示してみると、前項と同様にVite + Reactのページが表示されていることがわかります。
これらはAzure Static Web Apps CLIがローカル環境でプロキシとして機能しているため、同一ポートでフロントエンドとバックエンドの両方にアクセスができるという状態になっています。
4. フロントエンド から API に接続する
今は独立したフロントエンドとバックエンドが同じポートで立っている状態なので、フロントエンドからバックエンドのAPIを呼び出して、API連携をしてみます。
4.1. 依存ライブラリのインストール
フロントエンドをカスタマイズしていくので、下記のフォルダで作業します。
~/devel/sandbox_vite
今回はSWRを使って、シンプルにAPI連携を実装します。
- 先ほど
yarn exec swa startを実行したターミナルで、Ctrl+cを入力し、ローカルで動かしていたAzure Static Web App CLIを停止します - API連携用の依存ライブラリを追加します
yarn add swr axiosyarn add v1.22.21 [1/4] 🔍 Resolving packages... [2/4] 🚚 Fetching packages... [3/4] 🔗 Linking dependencies... 〜〜〜〜〜(中略)〜〜〜〜〜 ├─ proxy-from-env@1.1.0 ├─ swr@2.2.4 └─ use-sync-external-store@1.2.0 ✨ Done in 1.43s.
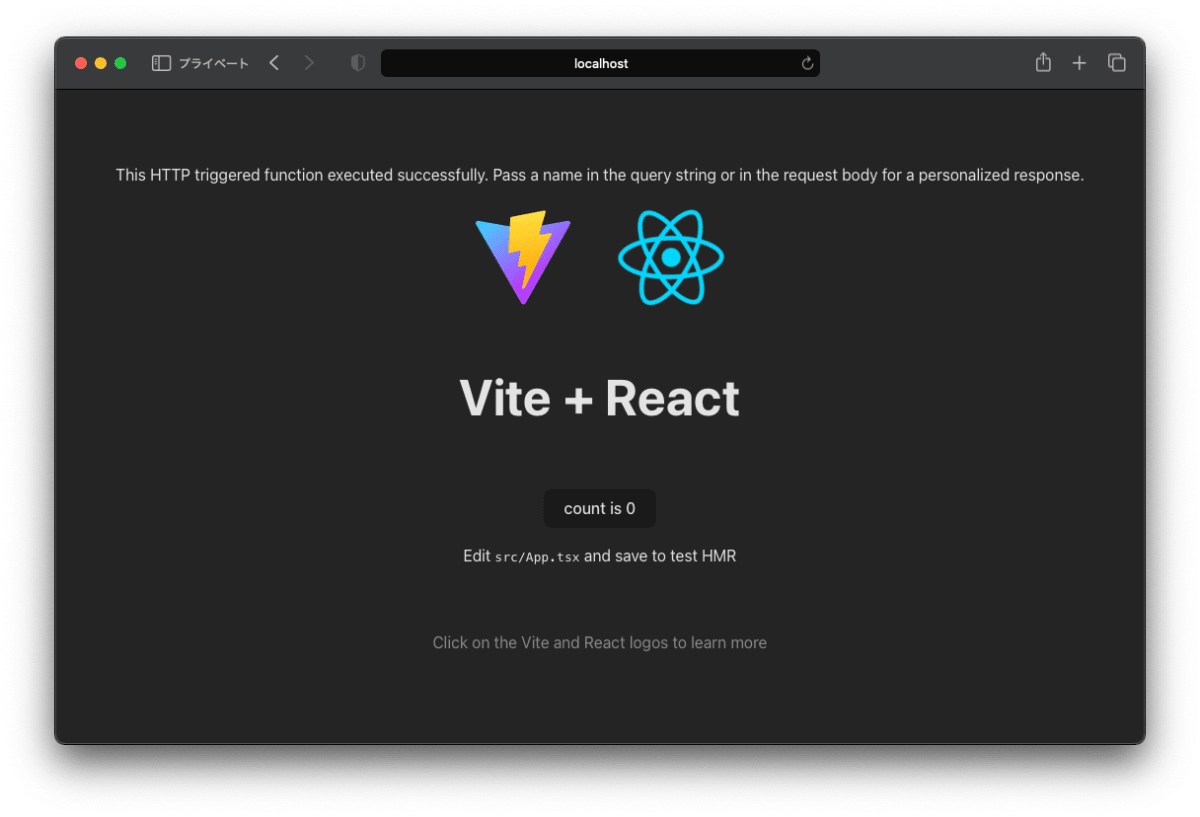
4.2. フロントエンドの更新
今の状態ではブラウザで http://localhost:4280 にアクセスした時、 src/App.tsx の内容が表示されています。
今回は src/App.tsx でバックエンドAPIを呼び出し、一番上にレスポンスを表示させるように実装します。
- エディタで
src/App.tsxを開いて下記のように編集しますsrc/App.tsximport { useState } from 'react' + import useSWR from 'swr' + import axios from 'axios' import reactLogo from './assets/react.svg' import viteLogo from '/vite.svg' import './App.css' + const fetcher = (url: string) => axios.get(url).then(res => res.data) + function App() { const [count, setCount] = useState(0) + const { data, isLoading } = useSWR('/api/MyHttpTrigger', fetcher) + + if (isLoading) return <div>loading...</div> return ( <> + {data.message} <div> <a href="https://vitejs.dev" target="_blank"> <img src={viteLogo} className="logo" alt="Vite logo" /> </a> 〜〜〜〜〜(後略)〜〜〜〜〜 - ここまでの作業を記録します
git add .
git commit -m "/api/MyHttpTriggerとのAPI連携を実装"
[main 9b70009] /api/MyHttpTriggerとのAPI連携を実装 1 file changed, 6 insertions(+)
4.3. API連携の確認
実装したAPI連携をブラウザで表示して確認します。
もしバックエンドを停止してしまっていたなら、改めて func start で立ち上げておきます。
-
まず先ほど停止したターミナルで、再度
yarn exec swa startを実行しますyarn exec swa startyarn exec v1.22.21 Welcome to Azure Static Web Apps CLI (1.1.6) Using configuration "sandbox_vite" from file: ~/devel/sandbox_vite/swa-cli.config.json *********************************************************************** * WARNING: This emulator may not match the cloud environment exactly. * * Always deploy and test your app in Azure. * *********************************************************************** yarn run v1.22.21 $ vite [swa] - Waiting for http://localhost:5173 to be ready [run] [run] VITE v5.0.10 ready in 123 ms [run] [run] ➜ Local: http://localhost:5173/ [run] ➜ Network: use --host to expose [swa] ✔ http://localhost:5173 validated successfully [swa] [swa] Using dev server for static content: [swa] http://localhost:5173 [swa] [swa] Using dev server for API: [swa] http://localhost:7071 [swa] [swa] Azure Static Web Apps emulator started at http://localhost:4280. Press CTRL+C to exit. [swa] [swa] -
ブラウザで http://localhost:4280 を開いて、下記のようになっていることを確認する
まとめ
ここまででAzure Static Web Apps + Azure Functionsをローカルで実行してAPI連携させるところまで完了しました。
Azure Functions Core ToolsやAzure Static Web Apps CLIは思ったよりしっかり動いてくれて、手順さえ理解してしまえばローカル環境もスムーズに構築できそう。
次回は、 今回のAzure Functionsをhatchでプロジェクト管理しつつ、テストを作成して実行する環境を整えていきます。
次回の記事はこちら:
Discussion