【AHC】Rustだけでビジュアライザを作ろう!(egui)
コンテスト中に、提供されているビジュアライザとは異なる可視化をしたい、コードのデバッグを可視化しながら行いたい、など自分専用のビジュアライザがほしいな、と思うことがあります。
以前、チーム戦用に言語が異なるチームメンバーとビジュアライザを共有する方法について投稿しました。
これを利用するのもありなのですが、個人戦の場合、以下のような問題があるので、なんとかRustだけでビジュアライザを作りたい、という気持ちになります。
- 提出コードで書いた構造体や関数を使い回したいので、提出コードと分けたくない
- ブラウザ上のビジュアライザに入出力をわざわざコピペしたくない
そこで、色々調べると、eguiというcrateであれば、Rustだけでビジュアライザを作ることができそう!、ということで作ってみました。
設定
Cargo.toml
AtCoderではrustcのバージョンが1.70.0なので、このバージョンに対応していて、かつproconioと干渉しないバージョンの0.19.0を使用します。
また、ローカル環境でのみ、ビジュアライズを行い、提出時はCEにならないようにするために、featuresを設定しておきます。
[dependencies]
eframe = "0.19.0"

[features]
vis = []
コードの設定
コード内でビジュアライザに関するコード(提出するとCEになってしまうコード)に関しては、以下の通り、コードの直前に#[cfg(feature = "vis")]を書いておく必要があります。
fn main() {
    #[cfg(feature = "vis")]
    {
        // Something
    }
}

#[cfg(feature = "vis")]
mod visualizer {
    // Something
}
実行時のコマンド設定
以下のようにfeaturesフラグ付きで実行すると、ローカル環境でのみ、ビジュアライザを実行することができます。
cargo run -r --features vis
テンプレート
テンプレート
fn main() {

    // ここに提出コードを書く

    // ビジュアライザは最後に実j
    let input = Input {};
    let output = Output {};
    let max_turn = 1000;
    #[cfg(feature = "vis")]
    {
        visualizer::vis(input, output, max_turn);
    }
}

pub struct Input {}
pub struct Output {}

#[cfg(feature = "vis")]
mod visualizer {
    use crate::{Input, Output};  // 提出コードで使用する入出力構造体
    use eframe::egui::{
        show_tooltip_at_pointer, widgets, Align2, CentralPanel, Color32, Context, FontFamily,
        FontId, Id, Key, Pos2, Rect, RichText, Slider, Stroke, TextEdit, Ui,
    };
    use eframe::{run_native, App, CreationContext, Frame, NativeOptions, Storage, Theme};
    use std::time::{Duration, Instant};

    // 画面サイズ設定
    const WIDTH: f32 = 800.0;
    const HEIGHT: f32 = 800.0;
    // ビジュアライズサイズ設定
    const VIS_WIDTH: f32 = 600.0;
    const VIS_HEIGHT: f32 = 600.0;
    // ビジュアライズ始点のオフセット
    // 画面上側にはスコア表示や操作用のスライダー、チェックボックスを
    // レイアウトするので、その分を空けておく)
    const OFFSET_WIDTH: f32 = (WIDTH - VIS_WIDTH) / 2.0;
    const OFFSET_HEIGHT: f32 = (HEIGHT - VIS_HEIGHT) / 2.0;
    // 自動再生時のスピードの上限・下限
    const SPEED_MIN: usize = 1;
    const SPEED_MAX: usize = 10;

    pub struct Egui {
        input: Input,
        output: Output,
        turn: usize,
        max_turn: usize,
        checked: bool,
        play: bool,
        speed: usize,
        instant: Instant,
        cnt: usize,
    }

    impl Egui {
        fn new(input: Input, output: Output, max_turn: usize) -> Self {
            Egui {
                input,
                output,
                turn: max_turn,
                max_turn,
                checked: true,
                play: false,
                speed: 5,
                instant: Instant::now(),
                cnt: 0,
            }
        }
    }

    impl App for Egui {
        fn save(&mut self, _storage: &mut dyn Storage) {}
        fn update(&mut self, ctx: &Context, _frame: &mut Frame) {
            // 自動再生用の設定
            // 5ms毎にupdateを強制的に呼び出して、10ms以上経過したらカウントアップ
            // スピード設定に応じて、turnをカウントアップ
            ctx.request_repaint_after(Duration::from_millis(5));
            if self.instant.elapsed() >= Duration::from_millis(10) {
                self.cnt += 1;
                if self.cnt % (SPEED_MIN + SPEED_MAX - self.speed) == 0
                    && self.play
                    && self.turn < self.max_turn
                {
                    self.turn += 1;
                }
                self.instant = Instant::now();
            }

            CentralPanel::default().show(ctx, |ui| {
                // ここにビジュアライザのコードを書く
            });
        }
    }

    pub fn vis(input: Input, output: Output, max_turn: usize) {
        let options = NativeOptions {
            initial_window_size: Some((WIDTH, HEIGHT).into()),  // 画面サイズ設定
            initial_window_pos: Some(Pos2 { x: 100.0, y: 100.0 }),  // 初期位置設定
            resizable: false,
            default_theme: Theme::Light,  // ライトモード or ダークモードのデフォルト設定
            ..NativeOptions::default()
        };
        let gui = Egui::new(input, output, max_turn);
        run_native("visualizer", options, Box::new(|_cc| Box::new(gui)));
    }
}
ビジュアライズ
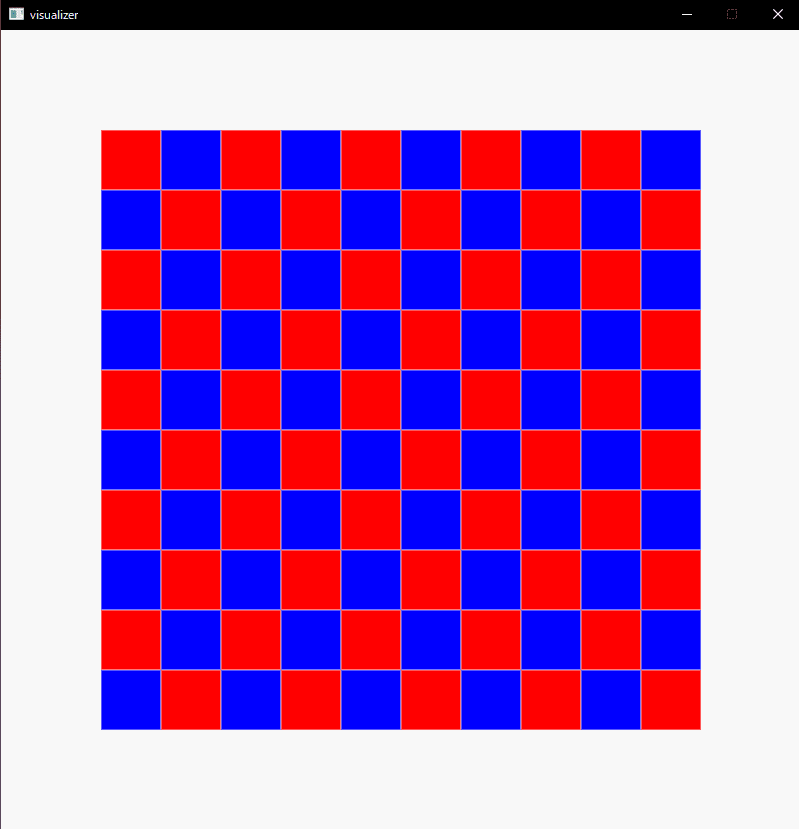
Rectangle
四角形を描画する場合は、以下の関数を用います。
pub fn rect(
    ui: &mut Ui,
    mut pos1: Pos2,  // 左上の座標
    mut pos2: Pos2,  // 右下の座標
    fill_color: Color32,  // 塗りつぶしの色
    stroke_color: Color32,  // 枠線の色
) -> Rect {
    // オフセット分ずらす
    pos1.x += OFFSET_WIDTH;
    pos2.x += OFFSET_WIDTH;
    pos1.y += OFFSET_HEIGHT;
    pos2.y += OFFSET_HEIGHT;

    let rect = Rect {
        min: pos1,
        max: pos2,
    };
    let rounding = 0.0;
    let stroke = Stroke {
        width: 0.2,
        color: stroke_color,
    };
    ui.painter().rect(rect, rounding, fill_color, stroke);
    rect
}
使用例は以下の通り。
四角形描画例
let N = 10;
let d = VIS_WIDTH / N as f32;

CentralPanel::default().show(ctx, |ui| {
    for i in 0..N {
        for j in 0..N {
            let pos1 = Pos2 {
                y: i as f32 * d,
                x: j as f32 * d,
            };
            let pos2 = Pos2 {
                y: pos1.y + d,
                x: pos1.x + d,
            };
            if (i + j) % 2 == 0 {
                rect(ui, pos1, pos2, Color32::RED, Color32::WHITE);
            } else {
                rect(ui, pos1, pos2, Color32::BLUE, Color32::WHITE);
            }
        }
    }
});
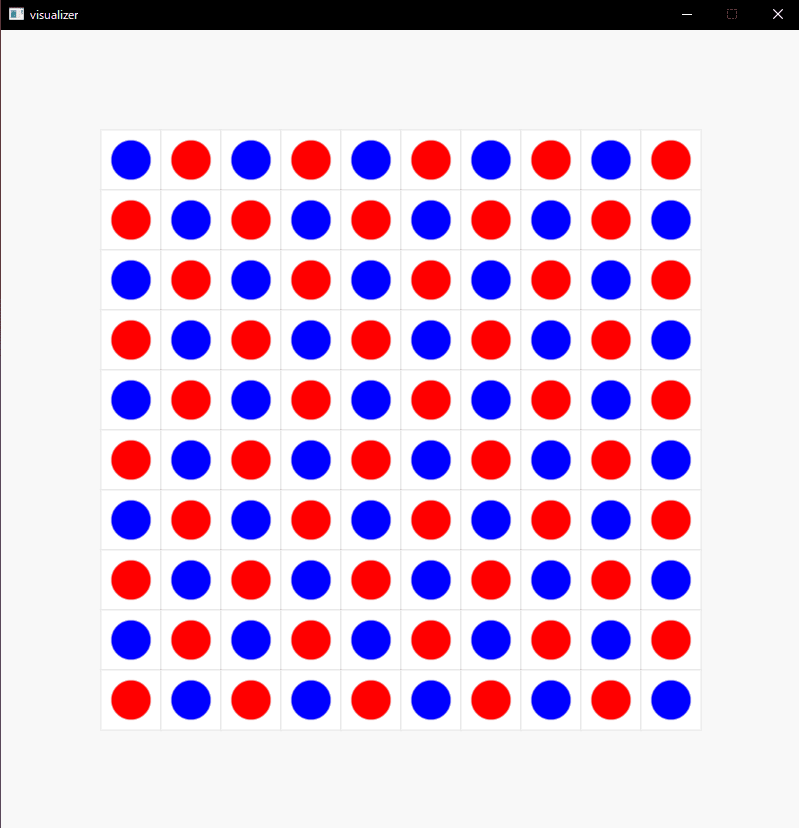
Circle
円を描画する場合は、以下の関数を用います。
pub fn circle(
    ui: &mut Ui,
    mut center: Pos2,  // 中心座標
    radius: f32,  // 半径
    fill_color: Color32,  // 塗りつぶしの色
    stroke_color: Color32,  // 枠線の色
) {
    // オフセット分ずらす
    center.x += OFFSET_WIDTH;
    center.y += OFFSET_HEIGHT;
    let stroke = Stroke {
        width: 0.2,
        color: stroke_color,
    };
    ui.painter().circle(center, radius, fill_color, stroke);
}
使用例は以下の通り。
円描画例
let N = 10;
let d = VIS_WIDTH / N as f32;

CentralPanel::default().show(ctx, |ui| {
    for i in 0..N {
        for j in 0..N {
            let pos1 = Pos2 {
                y: i as f32 * d,
                x: j as f32 * d,
            };
            let pos2 = Pos2 {
                y: pos1.y + d,
                x: pos1.x + d,
            };
            let center = Pos2 {
                y: i as f32 * d + d / 2.0,
                x: j as f32 * d + d / 2.0,
            };
            if (i + j) % 2 == 0 {
                rect(ui, pos1, pos2, Color32::WHITE, Color32::BLACK);
                circle(ui, center, d / 3.0, Color32::BLUE, Color32::WHITE);
            } else {
                rect(ui, pos1, pos2, Color32::WHITE, Color32::BLACK);
                circle(ui, center, d / 3.0, Color32::RED, Color32::WHITE);
            }
        }
    }
});
Line
線を描画する場合は、以下の関数を用います。
pub fn line(ui: &mut Ui, mut pos1: Pos2, mut pos2: Pos2, color: Color32) {
    pos1.x += OFFSET_WIDTH;
    pos2.x += OFFSET_WIDTH;
    pos1.y += OFFSET_HEIGHT;
    pos2.y += OFFSET_HEIGHT;
    let points = [pos1, pos2];
    let stroke = Stroke { width: 3.0, color };
    ui.painter().line_segment(points, stroke);
}
使用例は以下の通り。
線描画例
let N = 10;
let d = VIS_WIDTH / N as f32;

CentralPanel::default().show(ctx, |ui| {
    for i in 0..N {
        for j in 0..N {
            let pos1 = Pos2 {
                y: i as f32 * d,
                x: j as f32 * d,
            };
            let pos2 = Pos2 {
                y: pos1.y + d,
                x: pos1.x + d,
            };
            if (i + j) % 2 == 0 {
                rect(ui, pos1, pos2, Color32::RED, Color32::WHITE);
            } else {
                rect(ui, pos1, pos2, Color32::BLUE, Color32::WHITE);
            }
        }
    }

    let roots = vec![(0, 0), (0, 2), (2, 4), (5, 4)];
    for nodes in roots.windows(2) {
        let (x1, y1) = nodes[0];
        let (x2, y2) = nodes[1];
        let pos1 = Pos2 {
            y: y1 as f32 * d + d / 2.0,
            x: x1 as f32 * d + d / 2.0,
        };
        let pos2 = Pos2 {
            y: y2 as f32 * d + d / 2.0,
            x: x2 as f32 * d + d / 2.0,
        };
        line(ui, pos1, pos2, Color32::WHITE);
    }
});

破線は0.27.2のバージョンに存在するようですが、0.19.0には存在しないようなので、自作しました。
破線
pub fn dash_line(
    ui: &mut Ui,
    mut pos1: Pos2,
    mut pos2: Pos2,
    dash_length: f32,
    gap_length: f32,
    color: Color32,
) {
    pos1.x += OFFSET_WIDTH;
    pos2.x += OFFSET_WIDTH;
    pos1.y += OFFSET_HEIGHT;
    pos2.y += OFFSET_HEIGHT;

    let mut x1 = pos1.x;
    let mut y1 = pos1.y;
    let mut x2 = pos2.x;
    let mut y2 = pos2.y;
    let mut is_swap = false;
    if x1 == x2 {
        std::mem::swap(&mut x1, &mut y1);
        std::mem::swap(&mut x2, &mut y2);
        is_swap = true;
    }

    let a = (y2 - y1) / (x2 - x1);
    let b = y1 - a * x1;

    let f = |x: f32, target_length: f32| -> bool {
        let y = a * x + b;
        let len = ((x - x1).powf(2.0) + (y - y1).powf(2.0)).sqrt();
        len <= target_length
    };

    let mut positions = vec![];
    positions.push((x1, y1));
    let max_length = ((x1 - x2).powf(2.0) + (y1 - y2).powf(2.0)).sqrt();
    let mut cnt = 0;
    let mut target_length = 0.0f32;

    loop {
        if cnt % 2 == 0 {
            target_length += dash_length;
        } else {
            target_length += gap_length;
        }
        if target_length >= max_length {
            break;
        }

        let mut ok = x1;
        let mut ng = x2;
        while (ng - ok).abs() > 1e-3 {
            let m = (ok + ng) / 2.0;
            if f(m, target_length) {
                ok = m;
            } else {
                ng = m;
            }
        }

        positions.push((ok, a * ok + b));

        cnt += 1;
    }
    positions.push((x2, y2));
    if positions.len() % 2 == 1 {
        positions.pop();
    }
    if is_swap {
        for (a, b) in &mut positions {
            std::mem::swap(a, b);
        }
    }
    let mut i = 0;
    while i < positions.len() {
        let p1 = Pos2 {
            x: positions[i].0,
            y: positions[i].1,
        };
        let p2 = Pos2 {
            x: positions[i + 1].0,
            y: positions[i + 1].1,
        };
        line(ui, p1, p2, color);
        i += 2;
    }
}
Text
テキストを描画する場合は、以下の関数を用います。
pub fn txt(ui: &mut Ui, txt: &str, mut pos: Pos2, size: f32, color: Color32) {
    pos.x += OFFSET_WIDTH;
    pos.y += OFFSET_HEIGHT;
    let anchor = Align2::CENTER_CENTER;
    let font_id = FontId::new(size, FontFamily::Monospace);
    ui.painter().text(pos, anchor, txt, font_id, color);
}
使用例は以下の通り。
テキスト描画例
let N = 10;
let d = VIS_WIDTH / N as f32;

CentralPanel::default().show(ctx, |ui| {
    for i in 0..N {
        for j in 0..N {
            let pos1 = Pos2 {
                y: i as f32 * d,
                x: j as f32 * d,
            };
            let pos2 = Pos2 {
                y: pos1.y + d,
                x: pos1.x + d,
            };
            if (i + j) % 2 == 0 {
                rect(ui, pos1, pos2, Color32::RED, Color32::WHITE);
            } else {
                rect(ui, pos1, pos2, Color32::BLUE, Color32::WHITE);
            }
            let pos = Pos2 {
                y: i as f32 * d + d / 2.0,
                x: j as f32 * d + d / 2.0,
            };
            txt(ui, &(i * N + j).to_string(), pos, d / 3.0, Color32::BLACK);
        }
    }
});

Color
RGB
寒色~暖色を表現する関数は以下の通りです。引数は0.0~1.0の値。
// 0 <= val <= 1
pub fn color32(mut val: f32) -> Color32 {
    val = val.min(1.0);
    val = val.max(0.0);
    let (r, g, b) = if val < 0.5 {
        let x = val * 2.0;
        (
            30. * (1.0 - x) + 144. * x,
            144. * (1.0 - x) + 255. * x,
            255. * (1.0 - x) + 30. * x,
        )
    } else {
        let x = val * 2.0 - 1.0;
        (
            144. * (1.0 - x) + 255. * x,
            255. * (1.0 - x) + 30. * x,
            30. * (1.0 - x) + 70. * x,
        )
    };
    Color32::from_rgb(r.round() as u8, g.round() as u8, b.round() as u8)
}
RGB描画例
let MAX = 50;
let d = 10.0;

CentralPanel::default().show(ctx, |ui| {
    for i in 0..=MAX {
        let pos1 = Pos2 {
            x: i as f32 * d,
            y: 0.0,
        };
        let pos2 = Pos2 {
            x: i as f32 * d + d,
            y: 4.0 * d,
        };
        rect(
            ui,
            pos1,
            pos2,
            color32(i as f32 / MAX as f32),
            Color32::TRANSPARENT,
        );
    }
});

Opacity
透明度を表現する関数は以下の通りです。引数は0.0~1.0の値。
// 0 <= opacity <= 1
pub fn opacity(color: Color32, opacity: f32) -> Color32 {
    let opacity = (opacity * 255.0) as u8;
    Color32::from_rgba_premultiplied(color.r(), color.g(), color.b(), opacity)
}
Opacity描画例
let MAX = 50;
let d = 10.0;
let GREEN = Color32::from_rgb(0, 128, 0);

CentralPanel::default().show(ctx, |ui| {
    for i in 0..=MAX {
        let pos1 = Pos2 {
            x: i as f32 * d,
            y: 0.0,
        };
        let pos2 = Pos2 {
            x: i as f32 * d + d,
            y: 4.0 * d,
        };
        rect(
            ui,
            pos1,
            pos2,
            opacity(GREEN, i as f32 / MAX as f32),
            Color32::BLACK,
        );
    }
});

表示・操作
スコア表示
labelを用いてスコア表示を行います。文字サイズを変更する場合は、RichTextを使用します。
let score = 1000;
CentralPanel::default().show(ctx, |ui| {
    ui.label(RichText::new(format!("Score: {}", score)).size(20.0));
});

チェックボックス
checkboxは以下のように使用します。self.checkedはboolなので、この状態によって、描画の方法を変えることができます。
CentralPanel::default().show(ctx, |ui| {
    ui.checkbox(&mut self.checked, "Show Number");

    if self.checked {
        // Something
    }
});

スライダー
ターンの制御や再生スピードの制御に用いるスライダーは以下のようにして表示することができます。
CentralPanel::default().show(ctx, |ui| {
    ui.horizontal(|ui| {
        ui.label(RichText::new("Turn: ").size(20.0));
        ui.add(Slider::new(&mut self.turn, 0..=self.max_turn));
    });
    ui.horizontal(|ui| {
        ui.label(RichText::new("Speed: ").size(20.0));
        ui.add(Slider::new(&mut self.speed, SPEED_MIN..=SPEED_MAX));
    });
});

キーボード操作
再生スタート・ストップ、ターンを進める・戻るなどの操作は以下のように設定できます。
// スペースキーで再生スタート・ストップ
if ctx.input().key_released(Key::Space) {
    self.play = !self.play;
};
// 右矢印でターンを進める
if ctx.input().key_pressed(Key::ArrowRight) && self.turn < self.max_turn {
    self.turn += 1;
};
// 左矢印でターンを戻る
if ctx.input().key_pressed(Key::ArrowLeft) && self.turn > 0 {
    self.turn -= 1;
};
Tooltip
オブジェクトにホバーしたときに、詳細情報を表示する機能は以下のように実装します。
まず、ui.input().pointer.hover_pos()でポインタの位置を取得し、オブジェクトの範囲内であれば、show_tooltip_at_pointerを用いて表示します。
以下の例はオブジェクトが四角形の例ですが、円の場合などはホバーが反応する範囲を四角形に近似するのが楽な実装かなと思います。
let N = 10;
let d = VIS_WIDTH / N as f32;

CentralPanel::default().show(ctx, |ui| {
    let hover_pos = ui.input().pointer.hover_pos();
    for i in 0..N {
        for j in 0..N {
            let pos1 = Pos2 {
                y: i as f32 * d,
                x: j as f32 * d,
            };
            let pos2 = Pos2 {
                y: pos1.y + d,
                x: pos1.x + d,
            };
            let rect = rect(ui, pos1, pos2, Color32::GRAY, Color32::WHITE);
            let pos = Pos2 {
                y: i as f32 * d + d / 2.0,
                x: j as f32 * d + d / 2.0,
            };
            txt(ui, &(i * N + j).to_string(), pos, d / 3.0, Color32::BLACK);
            if let Some(hover_pos) = hover_pos {
                if rect.contains(hover_pos) {
                    show_tooltip_at_pointer(ui.ctx(), Id::new("hover tooltip"), |ui| {
                        ui.label(format!("a[{}, {}] = {}", i, j, i * N + j));
                    });
                }
            }
        }
    }
});

ライトモード・ダークモード変更
CentralPanel::default().show(ctx, |ui| {
    widgets::global_dark_light_mode_buttons(ui);
});

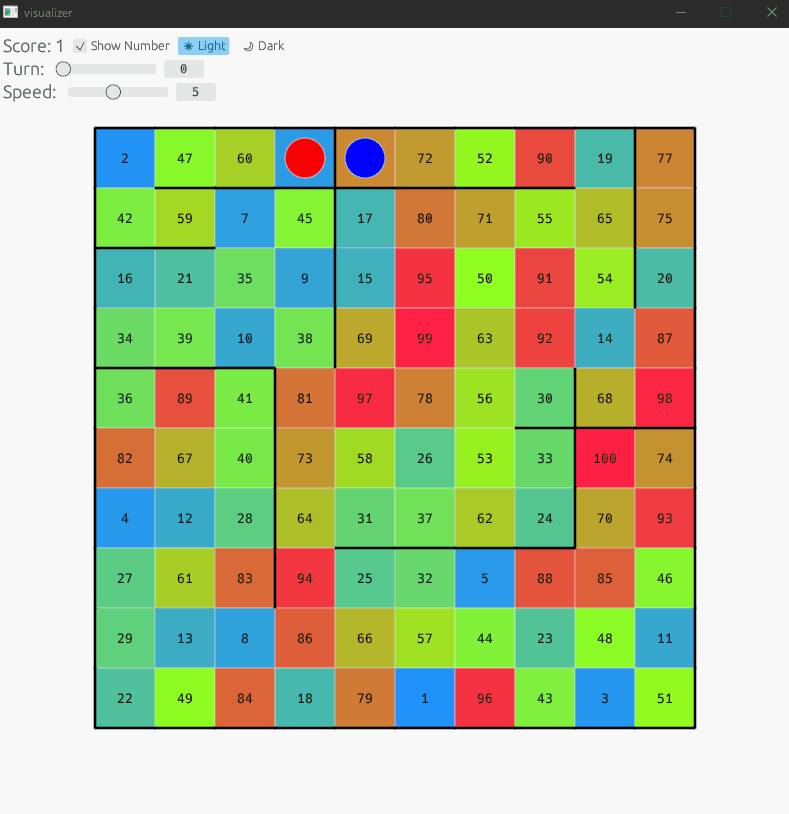
実装例
第一回マスターズ選手権-予選-のビジュアライザを作成したので、以下の提出コードを参考にしてください。
Discussion