Open6
Spring WebFluxでWebAPIを作成する
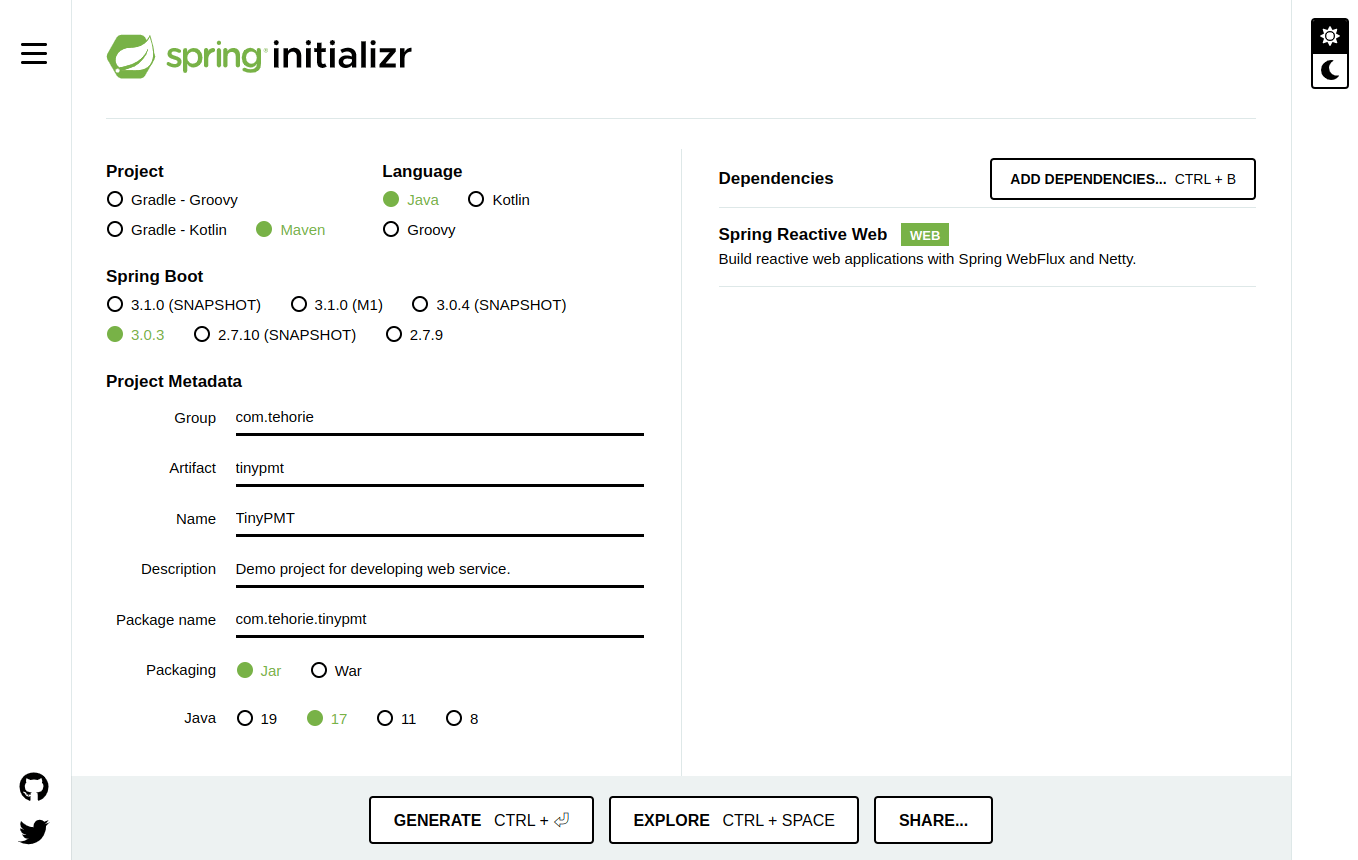
Spring Initializrでプロジェクトを作成します。
前準備
SDKMAN!のインストール
curl -s "https://get.sdkman.io" | bash
新しいターミナルを開いてJavaとMavenをインストール
sdk install java
sdk install maven
Zipをbackendディレクトリに以下のように展開
$ tree -L 2 backend/
backend/
├── HELP.md
├── mvnw
├── mvnw.cmd
├── pom.xml
├── src
│   ├── main
│   └── test
└── target
    ├── classes
    ├── generated-sources
    ├── generated-test-sources
    ├── maven-status
    └── test-classes

9 directories, 4 files
バックエンドのプロジェクトに以下のファイルを追加
backend/src/main/java/com/tehorie/tinypmt/presentation/TicketController.java
package com.tehorie.tinypmt.presentation;

import org.springframework.web.bind.annotation.GetMapping;
import org.springframework.web.bind.annotation.RestController;
import reactor.core.publisher.Mono;

@RestController
public class TicketController {

    @GetMapping("/")
    Mono<String> hello() {
        return Mono.just("Hello, world");
    }
}
backendのディレクトリでSpring Bootを起動
$ mvn spring-boot:run
[INFO] Scanning for projects...
[INFO]
[INFO] ------------------------< com.tehorie:tinypmt >-------------------------
[INFO] Building TinyPMT 0.0.1-SNAPSHOT
[INFO]   from pom.xml
[INFO] --------------------------------[ jar ]---------------------------------
(中略)
[INFO] --- spring-boot:3.0.3:run (default-cli) @ tinypmt ---
[INFO] Attaching agents: []

  .   ____          _            __ _ _
 /\\ / ___'_ __ _ _(_)_ __  __ _ \ \ \ \
( ( )\___ | '_ | '_| | '_ \/ _` | \ \ \ \
 \\/  ___)| |_)| | | | | || (_| |  ) ) ) )
  '  |____| .__|_| |_|_| |_\__, | / / / /
 =========|_|==============|___/=/_/_/_/
 :: Spring Boot ::                (v3.0.3)

2023-02-25T18:46:43.208+09:00  INFO 42397 --- [           main] com.tehorie.tinypmt.TinyPmtApplication   : Starting TinyPmtApplication using Java 17.0.6 with PID 42397 (/home/tetsuya/repo/tiny-pmt/backend/target/classes started by tetsuya in /home/tetsuya/repo/tiny-pmt/backend)
2023-02-25T18:46:43.210+09:00  INFO 42397 --- [           main] com.tehorie.tinypmt.TinyPmtApplication   : No active profile set, falling back to 1 default profile: "default"
2023-02-25T18:46:43.900+09:00  INFO 42397 --- [           main] o.s.b.web.embedded.netty.NettyWebServer  : Netty started on port 8080
2023-02-25T18:46:43.905+09:00  INFO 42397 --- [           main] com.tehorie.tinypmt.TinyPmtApplication   : Started TinyPmtApplication in 0.9 seconds (process running for 1.062)
Netty started on port 8080とNettyが8080ポートで開始しているので、curlでアクセス
$ curl -v http://localhost:8080/
*   Trying 127.0.0.1:8080...
* TCP_NODELAY set
* Connected to localhost (127.0.0.1) port 8080 (#0)
> GET / HTTP/1.1
> Host: localhost:8080
> User-Agent: curl/7.68.0
> Accept: */*
>
* Mark bundle as not supporting multiuse
< HTTP/1.1 200 OK
< Content-Type: text/plain;charset=UTF-8
< Content-Length: 12
<
* Connection #0 to host localhost left intact
Hello, world
Ticketオブジェクトを返せるようにする。
クライアントに返すためのDTO(Data Transfer Object)を作成。
src/main/java/com/tehorie/tinypmt/presentation/model/TicketDTO.java
package com.tehorie.tinypmt.presentation.model;

public class TicketDTO {
    private String title;

    public TicketDTO(String title) {
        this.title = title;
    }

    public String getTitle() {
        return this.title;
    }

    public void setTitle(String title) {
        this.title = title;
    }
}
Controllerを変更。
src/main/java/com/tehorie/tinypmt/presentation/TicketController.java
@RestController
public class TicketController {

    @GetMapping("/tickets")
    Flux<TicketDTO> hello() {
        return Flux.fromArray(new TicketDTO[]{new TicketDTO("最初のチケット"), new TicketDTO("2番目のチケット")});
    }
}
以下のように、Ticketオブジェクトのリストが返ってくる。
$ curl -v http://localhost:8080/tickets
*   Trying 127.0.0.1:8080...
* TCP_NODELAY set
* Connected to localhost (127.0.0.1) port 8080 (#0)
> GET /tickets HTTP/1.1
> Host: localhost:8080
> User-Agent: curl/7.68.0
> Accept: */*
>
* Mark bundle as not supporting multiuse
< HTTP/1.1 200 OK
< transfer-encoding: chunked
< Content-Type: application/json
<
* Connection #0 to host localhost left intact
[{"title":"最初のチケット"},{"title":"2番目のチケット"}]
修正の度に再起動するのは面倒なので、LiveReloadの機能を有効にする。
pom.xmlに以下を追加
backend/pom.xml
		<dependency>
			<groupId>org.springframework.boot</groupId>
			<artifactId>spring-boot-devtools</artifactId>
			<scope>runtime</scope>
			<optional>true</optional>
		</dependency>
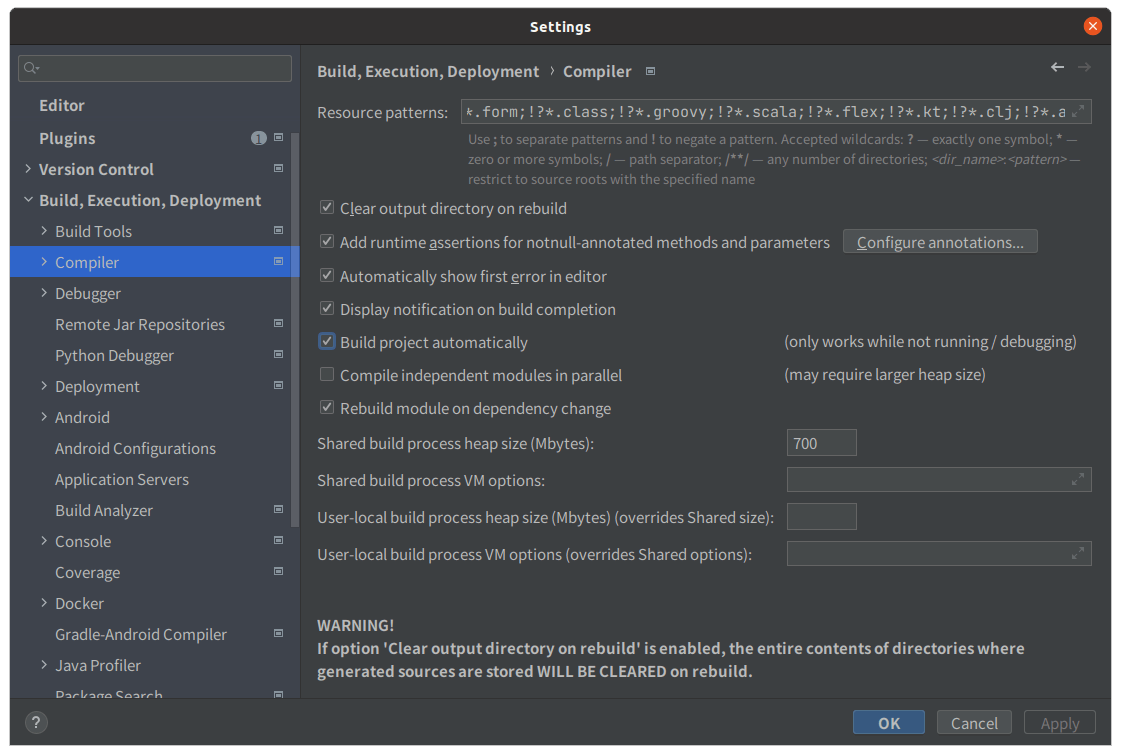
File - Settings... で Build, Execution, Deployment - Compiler を選択し、Build project automaticallyにチェック
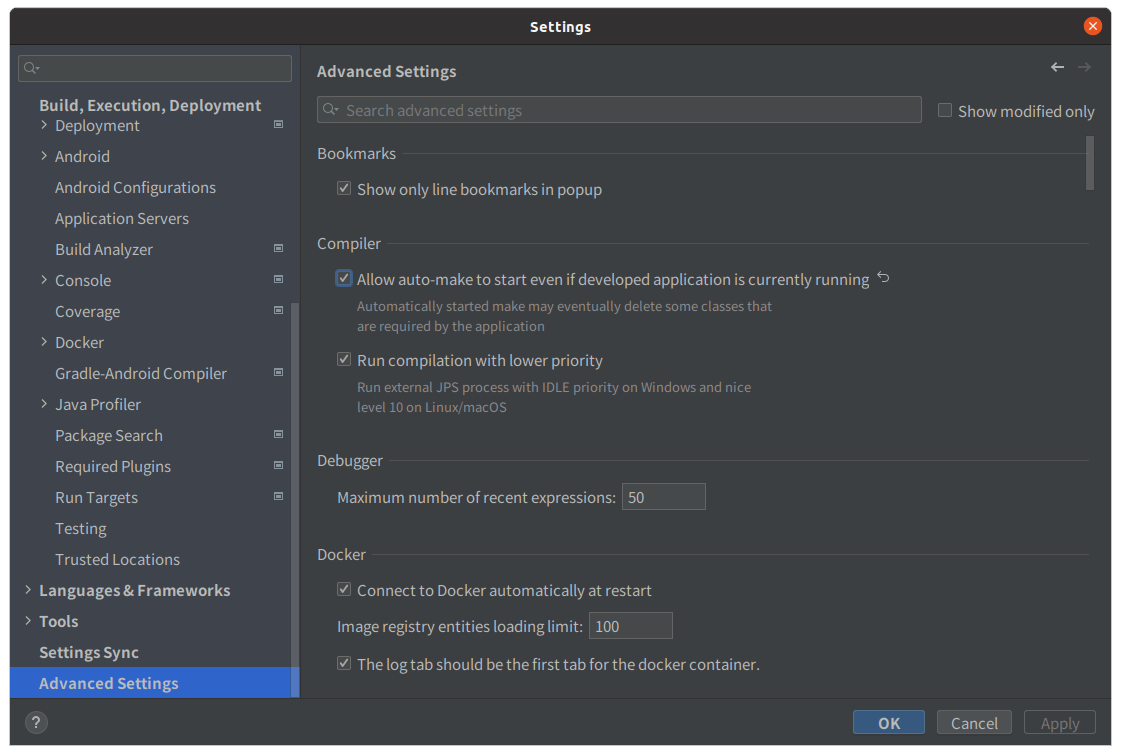
さらに、 Advanced Setting で Allow auto-make to start even if developed application is currently runnig にチェク
デバッグモードでアプリケーションを起動する。